Windows Hello ログイン サービスの作成
これは、パッケージ化された Windows アプリで従来のユーザー名とパスワード認証システムの代わりに Windows Hello を使用する方法に関する完全なチュートリアルの第 2 部です。 この記事では、パート 1 Windows Hello ログイン アプリを取り上げ、Windows Hello を既存のアプリケーションに統合する方法を示すために機能を拡張します。
このプロジェクトをビルドするには、C# と XAML のエクスペリエンスが必要です。 また、Windows 10 または Windows 11 コンピューターで Visual Studio 2022 を使用する必要があります。 開発環境のセットアップの詳細な手順については、「 Get started with WinUI 」を参照してください。
演習 1: サーバー側ロジック
この演習では、最初のラボでビルドされた Windows Hello アプリケーションから始めて、ローカル モック サーバーとデータベースを作成します。 このハンズ オン ラボは、Windows Hello を既存のシステムに統合する方法を教えるために設計されています。 モック サーバーとモック データベースを使用すると、関連のないセットアップの多くが排除されます。 独自のアプリケーションでは、モック オブジェクトを実際のサービスとデータベースに置き換える必要があります。
まず、最初の Windows Hello Hands On Lab から WindowsHelloLogin ソリューションを開きます。
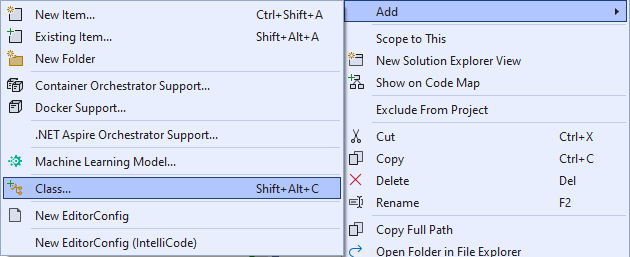
まず、モック サーバーとモック データベースを実装します。 "AuthService" という名前の新しいフォルダーを作成します。 ソリューション エクスプローラーで、WindowsHelloLogin プロジェクトを右クリックし、[ 追加>新しいフォルダーを選択します。
モック データベース 保存するデータのモデルとして機能するUserAccount クラスと WindowsHelloDevices クラスを作成します。 UserAccountは、従来の認証サーバーに実装されているユーザー モデルに似ています。 AuthService フォルダーを右クリックし、"UserAccount" という名前の新しいクラスを追加します。
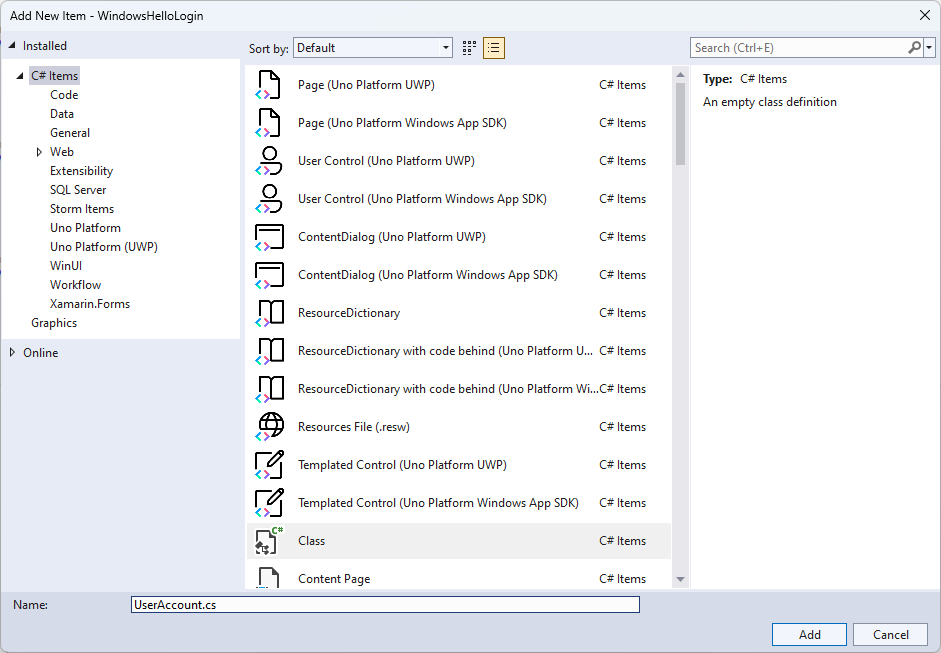
クラス スコープをパブリックに変更し、 UserAccount クラスの次のパブリック プロパティを追加します。
System.ComponentModel.DataAnnotations名前空間に using ステートメントを追加する必要があります。using System; using System.ComponentModel.DataAnnotations; namespace WindowsHelloLogin.AuthService { public class UserAccount { [Key, Required] public Guid UserId { get; set; } [Required] public string Username { get; set; } public string Password { get; set; } // public List<WindowsHelloDevice> WindowsHelloDevices = new(); } }コメントアウトされた WindowsHelloDevicesの一覧に気付いたかもしれません。 これは、現在の実装の既存のユーザー モデルに対して行う必要がある変更です。 WindowsHelloDevices の一覧には、deviceID、Windows Hello から作成された公開キー、および KeyCredentialAttestationResult が含まれます。 この演習では、 keyAttestationResult TPM (トラステッド プラットフォーム モジュール) チップを持つデバイス上でのみ Windows Hello によって提供されるため、実装する必要があります。 KeyCredentialAttestationResult は複数のプロパティの組み合わせであり、データベースに保存して読み込むには分割する必要があります。
AuthService フォルダーに "WindowsHelloDevice.cs" という名前の新しいクラスを作成します。 これは、上で説明した Windows Hello デバイスのモデルです。 クラス スコープをパブリックに変更し、次のプロパティを追加します。
using System;

namespace WindowsHelloLogin.AuthService
{
    public class WindowsHelloDevice
    {
        // These are the new variables that will need to be added to the existing UserAccount in the Database
        // The DeviceName is used to support multiple devices for the one user.
        // This way the correct public key is easier to find as a new public key is made for each device.
        // The KeyAttestationResult is only used if the User device has a TPM (Trusted Platform Module) chip,
        // in most cases it will not. So will be left out for this hands on lab.
        public Guid DeviceId { get; set; }
        public byte[] PublicKey { get; set; }
        // public KeyCredentialAttestationResult KeyAttestationResult { get; set; }
    }
}
UserAccount.csに戻り、Windows Hello デバイスの一覧のコメントを解除します。
using System.Collections.Generic; namespace WindowsHelloLogin.AuthService { public class UserAccount { [Key, Required] public Guid UserId { get; set; } [Required] public string Username { get; set; } public string Password { get; set; } public List<WindowsHelloDevice> WindowsHelloDevices = new(); } }UserAccountとWindowsHelloDeviceのモデルを作成したら、モック データベースとして機能する AuthService フォルダーに別の新しいクラスを作成する必要があります。これは、ユーザー アカウントの一覧をローカルに保存して読み込むモック データベースであるためです。 実際には、これがデータベースの実装になります。 "MockStore.cs" という名前の AuthService フォルダーに新しいクラスを作成します。 クラススコープをパブリックに変更します。
モック ストアはユーザー アカウントの一覧をローカルに保存して読み込むので、 XmlSerializer を使用してそのリストを保存して読み込むロジックを実装できます。 また、ファイル名を覚えて保存する必要があります。 MockStore.csでは、次のコードを実装します。
using System.Collections.Generic;
using System;
using System.IO;
using System.Linq;
using System.Text;
using System.Threading.Tasks;
using System.Xml.Serialization;
using Windows.Storage;

namespace WindowsHelloLogin.AuthService
{
    public class MockStore
    {
        private const string USER_ACCOUNT_LIST_FILE_NAME = "userAccountsList.txt";
        // This cannot be a const because the LocalFolder is accessed at runtime
        private string _userAccountListPath = Path.Combine(
            ApplicationData.Current.LocalFolder.Path, USER_ACCOUNT_LIST_FILE_NAME);
        private List<UserAccount> _mockDatabaseUserAccountsList;

#region Save and Load Helpers
        /// <summary>
        /// Create and save a useraccount list file. (Replacing the old one)
        /// </summary>
        private async Task SaveAccountListAsync()
        {
            string accountsXml = SerializeAccountListToXml();

            if (File.Exists(_userAccountListPath))
            {
                StorageFile accountsFile = await StorageFile.GetFileFromPathAsync(_userAccountListPath);
                await FileIO.WriteTextAsync(accountsFile, accountsXml);
            }
            else
            {
                StorageFile accountsFile = await ApplicationData.Current.LocalFolder.CreateFileAsync(USER_ACCOUNT_LIST_FILE_NAME);
                await FileIO.WriteTextAsync(accountsFile, accountsXml);
            }
        }

        /// <summary>
        /// Gets the useraccount list file and deserializes it from XML to a list of useraccount objects.
        /// </summary>
        /// <returns>List of useraccount objects</returns>
        private async Task LoadAccountListAsync()
        {
            if (File.Exists(_userAccountListPath))
            {
                StorageFile accountsFile = await StorageFile.GetFileFromPathAsync(_userAccountListPath);

                string accountsXml = await FileIO.ReadTextAsync(accountsFile);
                DeserializeXmlToAccountList(accountsXml);
            }

            // If the UserAccountList does not contain the sampleUser Initialize the sample users
            // This is only needed as it in a Hand on Lab to demonstrate a user being migrated.
            // In the real world, user accounts would just be in a database.
            if (!_mockDatabaseUserAccountsList.Any(f => f.Username.Equals("sampleUsername")))
            {
                //If the list is empty, call InitializeSampleAccounts and return the list
                //await InitializeSampleUserAccountsAsync();
            }
        }

        /// <summary>
        /// Uses the local list of accounts and returns an XML formatted string representing the list
        /// </summary>
        /// <returns>XML formatted list of accounts</returns>
        private string SerializeAccountListToXml()
        {
            var xmlizer = new XmlSerializer(typeof(List<UserAccount>));
            var writer = new StringWriter();
            xmlizer.Serialize(writer, _mockDatabaseUserAccountsList);
            return writer.ToString();
        }

        /// <summary>
        /// Takes an XML formatted string representing a list of accounts and returns a list object of accounts
        /// </summary>
        /// <param name="listAsXml">XML formatted list of accounts</param>
        /// <returns>List object of accounts</returns>
        private List<UserAccount> DeserializeXmlToAccountList(string listAsXml)
        {
            var xmlizer = new XmlSerializer(typeof(List<UserAccount>));
            TextReader textreader = new StreamReader(new MemoryStream(Encoding.UTF8.GetBytes(listAsXml)));
            return _mockDatabaseUserAccountsList = (xmlizer.Deserialize(textreader)) as List<UserAccount>;
        }
#endregion
    }
}
LoadAccountListAsync メソッドでは、InitializeSampleUserAccountsAsync メソッドがコメント アウトされていることがわかります。MockStore.csでこのメソッドを作成する必要があります。 このメソッドは、ログインを実行できるように、ユーザー アカウントの一覧を設定します。 実際には、ユーザー データベースは既に設定されています。 この手順では、ユーザー リストを初期化し、 LoadAccountListAsync を呼び出すコンストラクターも作成します。
namespace WindowsHelloLogin.AuthService
{
    public class MockStore
    {
        private const string USER_ACCOUNT_LIST_FILE_NAME = "userAccountsList.txt";
        // This cannot be a const because the LocalFolder is accessed at runtime
        private string _userAccountListPath = Path.Combine(
            ApplicationData.Current.LocalFolder.Path, USER_ACCOUNT_LIST_FILE_NAME);
        private List<UserAccount> _mockDatabaseUserAccountsList;

        public MockStore()
        {
            _mockDatabaseUserAccountsList = new List<UserAccount>();
            _ = LoadAccountListAsync();
        }

        private async Task InitializeSampleUserAccountsAsync()
        {
            // Create a sample Traditional User Account that only has a Username and Password
            // This will be used initially to demonstrate how to migrate to use Windows Hello

            var sampleUserAccount = new UserAccount()
            {
                UserId = Guid.NewGuid(),
                Username = "sampleUsername",
                Password = "samplePassword",
            };

            // Add the sampleUserAccount to the _mockDatabase
            _mockDatabaseUserAccountsList.Add(sampleUserAccount);
            await SaveAccountListAsync();
        }
    }
}
これで、 InitializeSampleUserAccountsAsync メソッドは、 LoadAccountListAsync メソッドのメソッド呼び出しのコメントを解除します。
private async Task LoadAccountListAsync()
{
    if (File.Exists(_userAccountListPath))
    {
        StorageFile accountsFile = await StorageFile.GetFileFromPathAsync(_userAccountListPath);

        string accountsXml = await FileIO.ReadTextAsync(accountsFile);
        DeserializeXmlToAccountList(accountsXml);
    }

    // If the UserAccountList does not contain the sampleUser Initialize the sample users
    // This is only needed as it in a Hand on Lab to demonstrate a user migrating
    // In the real world user accounts would just be in a database
    if (!_mockDatabaseUserAccountsList.Any(f = > f.Username.Equals("sampleUsername")))
            {
        //If the list is empty InitializeSampleUserAccountsAsync and return the list
        await InitializeSampleUserAccountsAsync();
    }
}
モック ストアのユーザー アカウントの一覧を保存して読み込めるようになりました。 アプリケーションの他の部分は、このリストにアクセスできる必要があるため、このデータを取得するにはいくつかのメソッドが必要です。 InitializeSampleUserAccountsAsync メソッドの下に、次のメソッドを追加してデータを取得します。 ユーザー ID、1 人のユーザー、特定の Windows Hello デバイスのユーザーの一覧を取得したり、特定のデバイス上のユーザーの公開キーを取得したりできます。
public Guid GetUserId(string username)
{
    if (_mockDatabaseUserAccountsList.Any())
    {
        UserAccount account = _mockDatabaseUserAccountsList.FirstOrDefault(f => f.Username.Equals(username));
        if (account != null)
        {
            return account.UserId;
        }
    }
    return Guid.Empty;
}

public UserAccount GetUserAccount(Guid userId)
{
    return _mockDatabaseUserAccountsList.FirstOrDefault(f => f.UserId.Equals(userId));
}

public List<UserAccount> GetUserAccountsForDevice(Guid deviceId)
{
    var usersForDevice = new List<UserAccount>();

    foreach (UserAccount account in _mockDatabaseUserAccountsList)
    {
        if (account.WindowsHelloDevices.Any(f => f.DeviceId.Equals(deviceId)))
        {
            usersForDevice.Add(account);
        }
    }

    return usersForDevice;
}

public byte[] GetPublicKey(Guid userId, Guid deviceId)
{
    UserAccount account = _mockDatabaseUserAccountsList.FirstOrDefault(f => f.UserId.Equals(userId));
    if (account != null)
    {
        if (account.WindowsHelloDevices.Any())
        {
            return account.WindowsHelloDevices.FirstOrDefault(p => p.DeviceId.Equals(deviceId)).PublicKey;
        }
    }
    return null;
}
実装する次のメソッドは、アカウントの追加、アカウントの削除、デバイスの削除を行う簡単な操作を処理します。 Windows Hello はデバイス固有であるため、デバイスの削除が必要です。 ログインするデバイスごとに、Windows Hello によって新しい公開キーと秘密キーのペアが作成されます。 これは、サインインするデバイスごとに異なるパスワードを持っているようなものです。唯一のことは、すべてのパスワードを覚える必要がないことです。サーバーが実行します。 MockStore.csに次のメソッドを追加します。
public async Task<UserAccount> AddAccountAsync(string username)
{
    UserAccount newAccount = null;
    try
    {
        newAccount = new UserAccount()
        {
            UserId = Guid.NewGuid(),
            Username = username,
        };

        _mockDatabaseUserAccountsList.Add(newAccount);
        await SaveAccountListAsync();
    }
    catch (Exception)
    {
        throw;
    }
    return newAccount;
}

public async Task<bool> RemoveAccountAsync(Guid userId)
{
    UserAccount userAccount = GetUserAccount(userId);
    if (userAccount != null)
    {
        _mockDatabaseUserAccountsList.Remove(userAccount);
        await SaveAccountListAsync();
        return true;
    }
    return false;
}

public async Task<bool> RemoveDeviceAsync(Guid userId, Guid deviceId)
{
    UserAccount userAccount = GetUserAccount(userId);
    WindowsHelloDevice deviceToRemove = null;
    if (userAccount != null)
    {
        foreach (WindowsHelloDevice device in userAccount.WindowsHelloDevices)
        {
            if (device.DeviceId.Equals(deviceId))
            {
                deviceToRemove = device;
                break;
            }
        }
    }

    if (deviceToRemove != null)
    {
        //Remove the WindowsHelloDevice
        userAccount.WindowsHelloDevices.Remove(deviceToRemove);
        await SaveAccountListAsync();
    }

    return true;
}
MockStore クラスで、Windows Hello 関連情報を既存の UserAccount に追加するメソッドを追加します。 このメソッドは "WindowsHelloUpdateDetailsAsync" と呼ばれ、ユーザーを識別するためのパラメーターと Windows Hello の詳細を受け取ります。 KeyAttestationResultは、WindowsHelloDevice を作成するときにコメント アウトされています。実際のアプリケーションでは、これを必要とします。
using System.Threading.Tasks;
using Windows.Security.Credentials;

public async Task WindowsHelloUpdateDetailsAsync(Guid userId, Guid deviceId, byte[] publicKey,
    KeyCredentialAttestationResult keyAttestationResult)
{
    UserAccount existingUserAccount = GetUserAccount(userId);
    if (existingUserAccount != null)
    {
        if (!existingUserAccount.WindowsHelloDevices.Any(f => f.DeviceId.Equals(deviceId)))
        {
            existingUserAccount.WindowsHelloDevices.Add(new WindowsHelloDevice()
            {
                DeviceId = deviceId,
                PublicKey = publicKey,
                // KeyAttestationResult = keyAttestationResult
            });
        }
    }
    await SaveAccountListAsync();
}
MockStore クラスはデータベースを表しているため、プライベートと見なす必要があります。 MockStore にアクセスするには、データベース データを操作するために AuthService クラスが必要です。 AuthServiceフォルダーに、"AuthService.cs" という名前の新しいクラスを作成します。 クラス スコープをパブリックに変更し、シングルトン インスタンス パターンを追加して、1 つのインスタンスのみが作成されるようにします。
namespace WindowsHelloLogin.AuthService
{
    public class AuthService
    {
        // Singleton instance of the AuthService
        // The AuthService is a mock of what a real world server and service implementation would be
        private static AuthService _instance;
        public static AuthService Instance
        {
            get
            {
                if (null == _instance)
                {
                    _instance = new AuthService();
                }
                return _instance;
            }
        }

        private AuthService()
        { }
    }
}
AuthService クラスは、MockStore クラスのインスタンスを作成し、MockStore オブジェクトのプロパティにアクセスできるようにする必要があります。
namespace WindowsHelloLogin.AuthService
{
    public class AuthService
    {
        //Singleton instance of the AuthService
        //The AuthService is a mock of what a real world server and database implementation would be
        private static AuthService _instance;
        public static AuthService Instance
        {
            get
            {
                if (null == _instance)
                {
                    _instance = new AuthService();
                }
                return _instance;
            }
        }

        private AuthService()
        { }

        private MockStore _mockStore = new();

        public Guid GetUserId(string username)
        {
            return _mockStore.GetUserId(username);
        }

        public UserAccount GetUserAccount(Guid userId)
        {
            return _mockStore.GetUserAccount(userId);
        }

        public List<UserAccount> GetUserAccountsForDevice(Guid deviceId)
        {
            return _mockStore.GetUserAccountsForDevice(deviceId);
        }
    }
}
AuthService クラスのメソッドは、MockStore オブジェクトの Windows Hello 詳細メソッドの追加、削除、更新にアクセスするために必要です。 AuthService クラス定義の最後に、次のメソッドを追加します。
using System.Threading.Tasks;
using Windows.Security.Credentials;

public async Task RegisterAsync(string username)
{
    await _mockStore.AddAccountAsync(username);
}

public async Task<bool> WindowsHelloRemoveUserAsync(Guid userId)
{
    return await _mockStore.RemoveAccountAsync(userId);
}

public async Task<bool> WindowsHelloRemoveDeviceAsync(Guid userId, Guid deviceId)
{
    return await _mockStore.RemoveDeviceAsync(userId, deviceId);
}

public async Task WindowsHelloUpdateDetailsAsync(Guid userId, Guid deviceId, byte[] publicKey,
    KeyCredentialAttestationResult keyAttestationResult)
{
    await _mockStore.WindowsHelloUpdateDetailsAsync(userId, deviceId, publicKey, keyAttestationResult);
}
AuthService クラスは、資格情報を検証するメソッドを提供する必要があります。 このメソッドは、ユーザー名とパスワードを取得し、アカウントが存在し、パスワードが有効であることを確認します。 既存のシステムには、ユーザーが承認されていることを確認する同等のメソッドがあります。 次の ValidateCredentials メソッドをAuthService.cs ファイルに追加します。
public bool ValidateCredentials(string username, string password)
{
    if (!string.IsNullOrEmpty(username) && !string.IsNullOrEmpty(password))
    {
        // This would be used for existing accounts migrating to use Windows Hello
        Guid userId = GetUserId(username);
        if (userId != Guid.Empty)
        {
            UserAccount account = GetUserAccount(userId);
            if (account != null)
            {
                if (string.Equals(password, account.Password))
                {
                    return true;
                }
            }
        }
    }
    return false;
}
AuthService クラスには、クライアントにチャレンジを返す要求チャレンジ メソッドが必要です。このメソッドは、ユーザーが要求したユーザーであるかどうかを検証します。 その後、クライアントから署名されたチャレンジを受け取るために、 AuthService クラスに別のメソッドが必要です。 このハンズオン ラボでは、署名されたチャレンジが完了したかどうかを判断する方法は不完全なままです。 既存の認証システムへの Windows Hello の実装はそれぞれ若干異なります。 サーバーに格納されている公開キーは、クライアントがサーバーに返した結果と一致する必要があります。 これら 2 つのメソッドをAuthService.csに追加します。
using Windows.Security.Cryptography;
using Windows.Storage.Streams;

public IBuffer WindowsHelloRequestChallenge()
{
    return CryptographicBuffer.ConvertStringToBinary("ServerChallenge", BinaryStringEncoding.Utf8);
}

public bool SendServerSignedChallenge(Guid userId, Guid deviceId, byte[] signedChallenge)
{
    // Depending on your company polices and procedures this step will be different
    // It is at this point you will need to validate the signedChallenge that is sent back from the client.
    // Validation is used to ensure the correct user is trying to access this account.
    // The validation process will use the signedChallenge and the stored PublicKey
    // for the username and the specific device signin is called from.
    // Based on the validation result you will return a bool value to allow access to continue or to block the account.

    // For this sample validation will not happen as a best practice solution does not apply and will need to
       // be configured for each company.
    // Simply just return true.

    // You could get the User's Public Key with something similar to the following:
    byte[] userPublicKey = _mockStore.GetPublicKey(userId, deviceId);
    return true;
}
演習 2: クライアント側のロジック
この演習では、 AuthService クラスを使用するように、クライアント側のビューとヘルパー クラスを最初のラボから変更します。 実際には、 AuthService は認証サーバーであり、Web API を使用してサーバーからデータを送受信する必要があります。 このハンズオン ラボでは、クライアントとサーバーの両方がローカルであり、シンプルな状態を維持します。 目的は、Windows Hello API の使用方法を学習することです。
MainPage.xaml.csでは、読み込まれたメソッドの AccountHelper.LoadAccountListAsync メソッド呼び出しを AuthService クラスとして削除すると、 MockStore のインスタンスが作成され、アカウント 一覧が読み込まれます。
Loadedメソッドは、次のスニペットのようになります。 何も待機していないので、非同期メソッド定義は削除されることに注意してください。private void MainPage_Loaded(object sender, RoutedEventArgs e) { Frame.Navigate(typeof(UserSelection)); }Login ページ インターフェイスを更新して、パスワードの入力を要求します。 このハンズオン ラボでは、Windows Hello を使用するように既存のシステムを移行する方法を示します。既存のアカウントにはユーザー名とパスワードが含まれます。 また、XAML の下部にある説明を更新して、既定のパスワードを含めます。 Login.xaml で次の XAML を更新します。
<Grid>
  <StackPanel>
    <TextBlock Text="Login" FontSize="36" Margin="4" TextAlignment="Center"/>

    <TextBlock x:Name="ErrorMessage" Text="" FontSize="20" Margin="4" Foreground="Red" TextAlignment="Center"/>

    <TextBlock Text="Enter your credentials below" Margin="0,0,0,20"
               TextWrapping="Wrap" Width="300"
               TextAlignment="Center" VerticalAlignment="Center" FontSize="16"/>

    <StackPanel Orientation="Horizontal" HorizontalAlignment="Center">
      <!-- Username Input -->
      <TextBlock x:Name="UserNameTextBlock" Text="Username: "
                 FontSize="20" Margin="4" Width="100"/>
      <TextBox x:Name="UsernameTextBox" PlaceholderText="sampleUsername" Width="200" Margin="4"/>
    </StackPanel>

    <StackPanel Orientation="Horizontal" HorizontalAlignment="Center">
      <!-- Password Input -->
      <TextBlock x:Name="PasswordTextBlock" Text="Password: "
                 FontSize="20" Margin="4" Width="100"/>
      <PasswordBox x:Name="PasswordBox" PlaceholderText="samplePassword" Width="200" Margin="4"/>
    </StackPanel>

    <Button x:Name="LoginButton" Content="Login" Background="DodgerBlue" Foreground="White"
            Click="LoginButton_Click" Width="80" HorizontalAlignment="Center" Margin="0,20"/>

    <TextBlock Text="Don't have an account?"
               TextAlignment="Center" VerticalAlignment="Center" FontSize="16"/>
    <TextBlock x:Name="RegisterButtonTextBlock" Text="Register now"
               PointerPressed="RegisterButtonTextBlock_OnPointerPressed"
               Foreground="DodgerBlue"
               TextAlignment="Center" VerticalAlignment="Center" FontSize="16"/>

    <Border x:Name="WindowsHelloStatus" Background="#22B14C"
            Margin="0,20" Height="100">
      <TextBlock x:Name="WindowsHelloStatusText" Text="Windows Hello is ready to use!"
                 Margin="4" TextAlignment="Center" VerticalAlignment="Center" FontSize="20"/>
    </Border>

    <TextBlock x:Name="LoginExplanation" FontSize="24" TextAlignment="Center" TextWrapping="Wrap"
               Text="Please Note: To demonstrate a login, validation will only occur using the default username 'sampleUsername' and default password 'samplePassword'"/>
  </StackPanel>
</Grid>
Login クラスの分離コード ファイルでは、クラスの先頭にある
Accountプライベート変数をUserAccountに変更する必要があります。OnNavigateToイベントを変更して、型をUserAccountにキャストします。 次の using ステートメントも必要です。using WindowsHelloLogin.AuthService; namespace WindowsHelloLogin.Views { public sealed partial class Login : Page { private UserAccount _account; private bool _isExistingAccount; public Login() { this.InitializeComponent(); } protected override async void OnNavigatedTo(NavigationEventArgs e) { //Check Windows Hello is setup and available on this machine if (await WindowsHelloHelper.WindowsHelloAvailableCheckAsync()) { if (e.Parameter != null) { _isExistingAccount = true; //Set the account to the existing account being passed in _account = (UserAccount)e.Parameter; UsernameTextBox.Text = _account.Username; await SignInWindowsHelloAsync(); } } } private async void LoginButton_Click(object sender, RoutedEventArgs e) { ErrorMessage.Text = ""; await SignInWindowsHelloAsync(); } } }Login ページでは、前の
AccountオブジェクトではなくUserAccountオブジェクトが使用されているため、一部のメソッドのパラメーター型としてUserAccountを使用するには、WindowsHelloHelper.csを更新する必要があります。 CreateWindowsHelloKeyAsync、RemoveWindowsHelloAccountAsync、およびgetWindowsHelloAuthenticationMessageAsync メソッドの 次のパラメーターを変更する必要があります。UserAccountクラスには UserId のGuidが含まれるため、より正確にするために、より多くの場所で ID の使用を開始します。public static async Task<bool> CreateWindowsHelloKeyAsync(Guid userId, string username) { KeyCredentialRetrievalResult keyCreationResult = await KeyCredentialManager.RequestCreateAsync(username, KeyCredentialCreationOption.ReplaceExisting); return true; } public static async void RemoveWindowsHelloAccountAsync(UserAccount account) { } public static async Task<bool> GetWindowsHelloAuthenticationMessageAsync(UserAccount account) { KeyCredentialRetrievalResult openKeyResult = await KeyCredentialManager.OpenAsync(account.Username); //Calling OpenAsync will allow the user access to what is available in the app and will not require user credentials again. //If you wanted to force the user to sign in again you can use the following: //var consentResult = await Windows.Security.Credentials.UI.UserConsentVerifier.RequestVerificationAsync(account.Username); //This will ask for the either the password of the currently signed in Microsoft Account or the PIN used for Windows Hello. if (openKeyResult.Status == KeyCredentialStatus.Success) { //If OpenAsync has succeeded, the next thing to think about is whether the client application requires access to backend services. //If it does here you would Request a challenge from the Server. The client would sign this challenge and the server //would check the signed challenge. If it is correct it would allow the user access to the backend. //You would likely make a new method called RequestSignAsync to handle all this //for example, RequestSignAsync(openKeyResult); //Refer to the second Windows Hello sample for information on how to do this. //For this sample there is not concept of a server implemented so just return true. return true; } else if (openKeyResult.Status == KeyCredentialStatus.NotFound) { //If the _account is not found at this stage. It could be one of two errors. //1. Windows Hello has been disabled //2. Windows Hello has been disabled and re-enabled cause the Windows Hello Key to change. //Calling CreateWindowsHelloKeyAsync and passing through the account will attempt to replace the existing Windows Hello Key for that account. //If the error really is that Windows Hello is disabled then the CreateWindowsHelloKeyAsync method will output that error. if (await CreateWindowsHelloKeyAsync(account.UserId, account.Username)) { //If the Windows Hello Key was again successfully created, Windows Hello has just been reset. //Now that the Windows Hello Key has been reset for the account retry sign in. return await GetWindowsHelloAuthenticationMessageAsync(account); } } // Can't use Windows Hello right now, try again later return false; }Login.xaml.cs ファイルの SignInWindowsHelloAsync メソッドは、AccountHelper の代わりに AuthService を使用するように更新する必要があります。 資格情報の検証は、 AuthService を使用して行われます。 このハンズオン ラボでは、構成されたアカウントは "sampleUsername" のみです。 このアカウントは、MockStore.csの InitializeSampleUserAccountsAsync メソッドで作成されます。 次のコード スニペットを反映するように、Login.xaml.csで SignInWindowsHelloAsync メソッドを更新します。
private async Task SignInWindowsHelloAsync()
{
    if (_isExistingAccount)
    {
        if (await WindowsHelloHelper.GetWindowsHelloAuthenticationMessageAsync(_account))
        {
            Frame.Navigate(typeof(Welcome), _account);
        }
    }
    else if (AuthService.AuthService.Instance.ValidateCredentials(UsernameTextBox.Text, PasswordBox.Password))
    {
        Guid userId = AuthService.AuthService.Instance.GetUserId(UsernameTextBox.Text);

        if (userId != Guid.Empty)
        {
            //Now that the account exists on server try and create the necessary details and add them to the account
            if (await WindowsHelloHelper.CreateWindowsHelloKeyAsync(userId, UsernameTextBox.Text))
            {
                Debug.WriteLine("Successfully signed in with Windows Hello!");
                //Navigate to the Welcome Screen.
                _account = AuthService.AuthService.Instance.GetUserAccount(userId);
                Frame.Navigate(typeof(Welcome), _account);
            }
            else
            {
                //The Windows Hello account creation failed.
                //Remove the account from the server as the details were not configured
                await AuthService.AuthService.Instance.WindowsHelloRemoveUserAsync(userId);

                ErrorMessage.Text = "Account Creation Failed";
            }
        }
    }
    else
    {
        ErrorMessage.Text = "Invalid Credentials";
    }
}
Windows Hello は、各デバイスのアカウントごとに異なる公開キーと秘密キーのペアを作成するため、 Welcome ページでは、ログインしているアカウントの登録済みデバイスの一覧を表示し、各デバイスを忘れるようにする必要があります。 Welcome.xaml で、
ForgetButtonの下に次の XAML を追加します。 これにより、デバイスの忘れるボタン、エラー テキスト領域、およびすべてのデバイスを表示するリストが実装されます。<Grid> <StackPanel> <TextBlock x:Name="Title" Text="Welcome" FontSize="40" TextAlignment="Center"/> <TextBlock x:Name="UserNameText" FontSize="28" TextAlignment="Center"/> <Button x:Name="BackToUserListButton" Content="Back to User List" Click="Button_Restart_Click" HorizontalAlignment="Center" Margin="0,20" Foreground="White" Background="DodgerBlue"/> <Button x:Name="ForgetButton" Content="Forget Me" Click="Button_Forget_User_Click" Foreground="White" Background="Gray" HorizontalAlignment="Center"/> <Button x:Name="ForgetDeviceButton" Content="Forget Device" Click="Button_Forget_Device_Click" Foreground="White" Background="Gray" Margin="0,40,0,20" HorizontalAlignment="Center"/> <TextBlock x:Name="ForgetDeviceErrorTextBlock" Text="Select a device first" TextWrapping="Wrap" Width="300" Foreground="Red" TextAlignment="Center" VerticalAlignment="Center" FontSize="16" Visibility="Collapsed"/> <ListView x:Name="UserListView" MaxHeight="500" MinWidth="350" Width="350" HorizontalAlignment="Center"> <ListView.ItemTemplate> <DataTemplate> <Grid Background="Gray" Height="50" Width="350" HorizontalAlignment="Center" VerticalAlignment="Stretch" > <TextBlock Text="{Binding DeviceId}" HorizontalAlignment="Center" TextAlignment="Center" VerticalAlignment="Center" Foreground="White"/> </Grid> </DataTemplate> </ListView.ItemTemplate> </ListView> </StackPanel> </Grid>Welcome.xaml.cs ファイルでは、クラスの先頭にあるプライベート
Account変数をプライベートUserAccount変数に変更する必要があります。 次に、AuthService を使用するようにOnNavigatedToメソッドを更新し現在のアカウントの情報を取得します。 アカウント情報がある場合は、一覧のItemsSourceを設定してデバイスを表示できます。 AuthService 名前空間への参照を追加する必要があります。using WindowsHelloLogin.AuthService; namespace WindowsHelloLogin.Views { public sealed partial class Welcome : Page { private UserAccount _activeAccount; public Welcome() { InitializeComponent(); } protected override void OnNavigatedTo(NavigationEventArgs e) { _activeAccount = (UserAccount)e.Parameter; if (_activeAccount != null) { UserAccount account = AuthService.AuthService.Instance.GetUserAccount(_activeAccount.UserId); if (account != null) { UserListView.ItemsSource = account.WindowsHelloDevices; UserNameText.Text = account.Username; } } } } }アカウントを削除するときに AuthService を使用するため、
Button_Forget_User_Clickメソッドの AccountHelper への参照を削除できます。 メソッドは次のようになります。private async void Button_Forget_User_Click(object sender, RoutedEventArgs e) { //Remove it from Windows Hello await WindowsHelloHelper.RemoveWindowsHelloAccountAsync(_activeAccount); Debug.WriteLine($"User {_activeAccount.Username} deleted."); //Navigate back to UserSelection page. Frame.Navigate(typeof(UserSelection)); }WindowsHelloHelper メソッドは、AuthService を使用してアカウントを削除していません。 AuthService を呼び出し、userIdを渡す必要があります。
public static async void RemoveWindowsHelloAccountAsync(UserAccount account)
{
    //Open the account with Windows Hello
    KeyCredentialRetrievalResult keyOpenResult = await KeyCredentialManager.OpenAsync(account.Username);

    if (keyOpenResult.Status == KeyCredentialStatus.Success)
    {
        // In the real world you would send key information to server to unregister
        await AuthService.AuthService.Instance.WindowsHelloRemoveUserAsync(account.UserId);
    }

    //Then delete the account from the machines list of Windows Hello Accounts
    await KeyCredentialManager.DeleteAsync(account.Username);
}
Welcome ページの実装を完了する前に、WindowsHelloHelper.csでデバイスを削除できるようにするメソッドを作成する必要があります。 AuthService で WindowsHelloRemoveDeviceAsync を呼び出す新しいメソッドを作成します。
public static async Task RemoveWindowsHelloDeviceAsync(UserAccount account, Guid deviceId)
{
    await AuthService.AuthService.Instance.WindowsHelloRemoveDeviceAsync(account.UserId, deviceId);
}
Welcome.xaml.csで、 Button_Forget_Device_Click イベント ハンドラーを実装します。 これにより、デバイスの一覧から選択したデバイスが使用され、Windows Hello ヘルパーを使用してデバイスの削除が呼び出されます。 イベント ハンドラーを非同期にすることを忘れないでください。
private async void Button_Forget_Device_Click(object sender, RoutedEventArgs e)
{
    WindowsHelloDevice selectedDevice = UserListView.SelectedItem as WindowsHelloDevice;
    if (selectedDevice != null)
    {
        //Remove it from Windows Hello
        await WindowsHelloHelper.RemoveWindowsHelloDeviceAsync(_activeAccount, selectedDevice.DeviceId);

        Debug.WriteLine($"User {_activeAccount.Username} deleted.");

        if (!UserListView.Items.Any())
        {
            //Navigate back to UserSelection page.
            Frame.Navigate(typeof(UserSelection));
        }
    }
    else
    {
        ForgetDeviceErrorTextBlock.Visibility = Visibility.Visible;
    }
}
次に更新するページは、 UserSelection ページです。 UserSelection ページでは、現在のデバイスのすべてのユーザー アカウントを取得するために、AuthService を使用する必要があります。 現時点では、 AuthService に渡すデバイス ID を取得して、そのデバイスのユーザー アカウントを返す方法はありません。 Utils フォルダーに、"Helpers.cs" という名前の新しいクラスを作成します。 クラス スコープをパブリック静的に変更し、次のメソッドを追加して、現在のデバイス ID を取得できるようにします。
using System;
using Windows.Security.ExchangeActiveSyncProvisioning;

namespace WindowsHelloLogin.Utils
{
    public static class Helpers
    {
        public static Guid GetDeviceId()
        {
            //Get the Device ID to pass to the server
            var deviceInformation = new EasClientDeviceInformation();
            return deviceInformation.Id;
        }
    }
}
UserSelection ページ クラスでは、ユーザー インターフェイスではなく、分離コードのみを変更する必要があります。 UserSelection.xaml.csで、
Accountクラスの代わりにUserAccountクラスを使用するように、UserSelection_Loaded メソッドと UserSelectionChanged メソッドを更新します。 また、 AuthService を使用して、このデバイスのすべてのユーザーを取得する必要があります。using System.Linq; using WindowsHelloLogin.AuthService; namespace WindowsHelloLogin.Views { public sealed partial class UserSelection : Page { public UserSelection() { InitializeComponent(); Loaded += UserSelection_Loaded; } private void UserSelection_Loaded(object sender, RoutedEventArgs e) { List<UserAccount> accounts = AuthService.AuthService.Instance.GetUserAccountsForDevice(Helpers.GetDeviceId()); if (accounts.Any()) { UserListView.ItemsSource = accounts; UserListView.SelectionChanged += UserSelectionChanged; } else { //If there are no accounts navigate to the Login page Frame.Navigate(typeof(Login)); } } /// <summary> /// Function called when an account is selected in the list of accounts /// Navigates to the Login page and passes the chosen account /// </summary> private void UserSelectionChanged(object sender, RoutedEventArgs e) { if (((ListView)sender).SelectedValue != null) { UserAccount account = (UserAccount)((ListView)sender).SelectedValue; if (account != null) { Debug.WriteLine($"Account {account.Username} selected!"); } Frame.Navigate(typeof(Login), account); } } } }WindowsHelloRegister ページで分離コード ファイルを更新する必要があります。 ユーザー インターフェイスに変更は必要ありません。 WindowsHelloRegister.xaml.csでは、不要になったプライベート
Account変数をクラスの先頭から削除します。 AuthService を使用するように、RegisterButton_Click_Async イベント ハンドラーを更新します。 このメソッドは、新しい UserAccount を作成し、そのアカウントの詳細を試して更新します。 Windows Hello でキーの作成に失敗した場合、登録プロセスが失敗するとアカウントが削除されます。private async void RegisterButton_Click_Async(object sender, RoutedEventArgs e) { ErrorMessage.Text = ""; //Validate entered credentials are acceptable if (!string.IsNullOrEmpty(UsernameTextBox.Text)) { //Register an Account on the AuthService so that we can get back a userId await AuthService.AuthService.Instance.RegisterAsync(UsernameTextBox.Text); Guid userId = AuthService.AuthService.Instance.GetUserId(UsernameTextBox.Text); if (userId != Guid.Empty) { //Now that the account exists on server try and create the necessary details and add them to the account if (await WindowsHelloHelper.CreateWindowsHelloKeyAsync(userId, UsernameTextBox.Text)) { //Navigate to the Welcome Screen. Frame.Navigate(typeof(Welcome), AuthService.AuthService.Instance.GetUserAccount(userId)); } else { //The Windows Hello account creation failed. //Remove the account from the server as the details were not configured await AuthService.AuthService.Instance.WindowsHelloRemoveUserAsync(userId); ErrorMessage.Text = "Account Creation Failed"; } } } else { ErrorMessage.Text = "Please enter a username"; } }アプリケーションをビルドして実行します。 資格情報 "sampleUsername" と "samplePassword" を使用して、サンプル ユーザー アカウントにサインインします。 ようこそ画面で、[デバイスを忘れる] ボタンが表示されているのに、デバイスがないことがわかります。 Windows Hello を操作するユーザーを作成または移行する場合、アカウント情報は AuthService にプッシュされません。
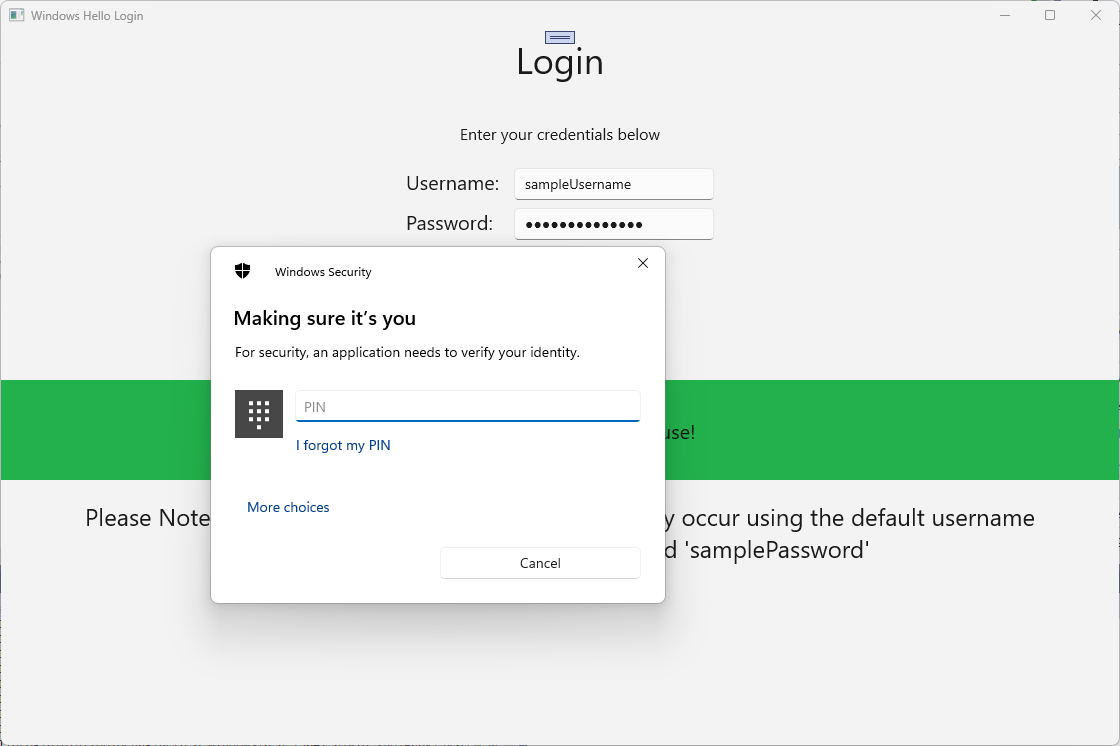
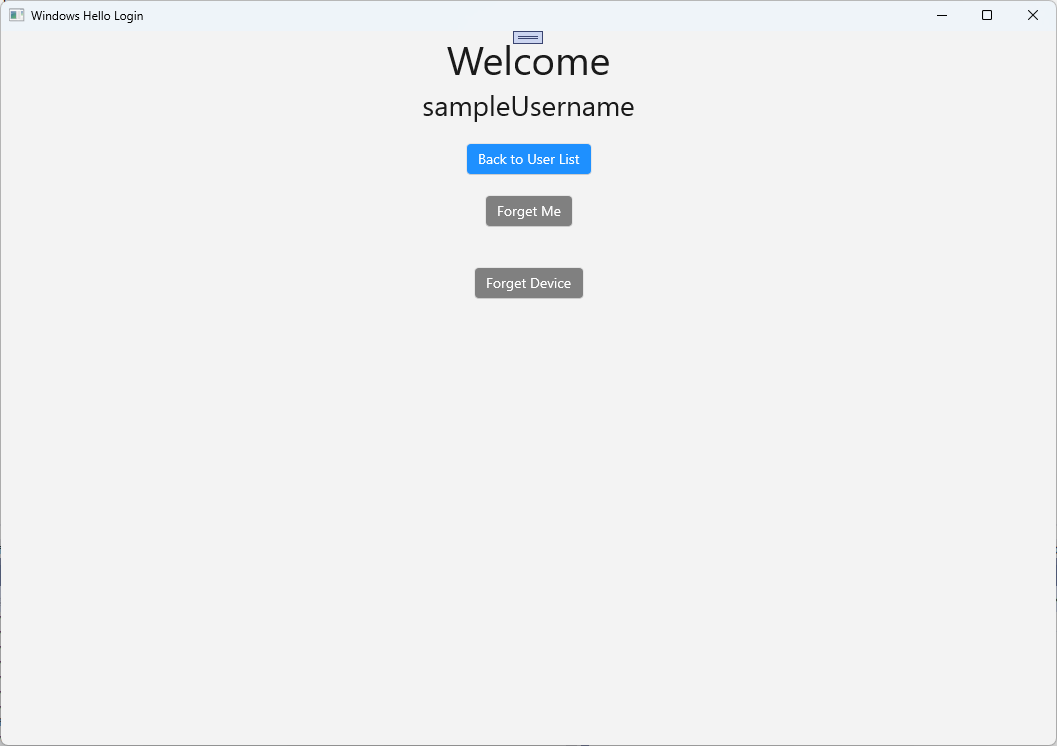
windows Hello アカウント情報を AuthService に取得するには、WindowsHelloHelper.csを更新する必要があります。 CreateWindowsHelloKeyAsyncメソッドでは、成功した場合にのみ
trueを返すのではなく、KeyAttestationを取得しようとする新しいメソッドを呼び出す必要があります。 このハンズ オン ラボでは、この情報は AuthService に記録されませんが、クライアント側でこの情報を取得する方法について説明します。 CreateWindowsHelloKeyAsync メソッドを次のように更新します。public static async Task<bool> CreateWindowsHelloKeyAsync(Guid userId, string username) { KeyCredentialRetrievalResult keyCreationResult = await KeyCredentialManager.RequestCreateAsync(username, KeyCredentialCreationOption.ReplaceExisting); switch (keyCreationResult.Status) { case KeyCredentialStatus.Success: Debug.WriteLine("Successfully made key"); await GetKeyAttestationAsync(userId, keyCreationResult); return true; case KeyCredentialStatus.UserCanceled: Debug.WriteLine("User cancelled sign-in process."); break; case KeyCredentialStatus.NotFound: // User needs to setup Windows Hello Debug.WriteLine($"Windows Hello is not set up!{Environment.NewLine}Please go to Windows Settings and set up a PIN to use it."); break; default: break; } return false; }WindowsHelloHelper.csで GetKeyAttestationAsync メソッドを作成します。 このメソッドは、特定のデバイス上の各アカウントに対して Windows Hello から提供できる必要なすべての情報を取得する方法を示します。
using Windows.Storage.Streams;

private static async Task GetKeyAttestationAsync(Guid userId, KeyCredentialRetrievalResult keyCreationResult)
{
    KeyCredential userKey = keyCreationResult.Credential;
    IBuffer publicKey = userKey.RetrievePublicKey();
    KeyCredentialAttestationResult keyAttestationResult = await userKey.GetAttestationAsync();
    IBuffer keyAttestation = null;
    IBuffer certificateChain = null;
    bool keyAttestationIncluded = false;
    bool keyAttestationCanBeRetrievedLater = false;
    KeyCredentialAttestationStatus keyAttestationRetryType = 0;

    if (keyAttestationResult.Status == KeyCredentialAttestationStatus.Success)
    {
        keyAttestationIncluded = true;
        keyAttestation = keyAttestationResult.AttestationBuffer;
        certificateChain = keyAttestationResult.CertificateChainBuffer;
        Debug.WriteLine("Successfully made key and attestation");
    }
    else if (keyAttestationResult.Status == KeyCredentialAttestationStatus.TemporaryFailure)
    {
        keyAttestationRetryType = KeyCredentialAttestationStatus.TemporaryFailure;
        keyAttestationCanBeRetrievedLater = true;
        Debug.WriteLine("Successfully made key but not attestation");
    }
    else if (keyAttestationResult.Status == KeyCredentialAttestationStatus.NotSupported)
    {
        keyAttestationRetryType = KeyCredentialAttestationStatus.NotSupported;
        keyAttestationCanBeRetrievedLater = false;
        Debug.WriteLine("Key created, but key attestation not supported");
    }

    Guid deviceId = Helpers.GetDeviceId();

    //Update the Windows Hello details with the information we have just fetched above.
    //await UpdateWindowsHelloDetailsAsync(userId, deviceId, publicKey.ToArray(), keyAttestationResult);
}
最後の行を追加した GetKeyAttestationAsync メソッドがコメント アウトされたことに気付いた可能性があります。この最後の行は、すべての Windows Hello 情報を AuthService に送信する新しいメソッドです。 実際の環境では、Web API を介してこれを実際のサーバーに送信する必要があります。
using System.Runtime.InteropServices.WindowsRuntime;
using System.Threading.Tasks;

public static async Task<bool> UpdateWindowsHelloDetailsAsync(Guid userId, Guid deviceId, byte[] publicKey, KeyCredentialAttestationResult keyAttestationResult)
{
    //In the real world, you would use an API to add Windows Hello signing info to server for the signed in account.
    //For this tutorial, we do not implement a Web API for our server and simply mock the server locally.
    //The CreateWindowsHelloKey method handles adding the Windows Hello account locally to the device using the KeyCredential Manager

    //Using the userId the existing account should be found and updated.
    await AuthService.AuthService.Instance.WindowsHelloUpdateDetailsAsync(userId, deviceId, publicKey, keyAttestationResult);
    return true;
}
Windows Hello 情報が AuthService に送信されるように、GetKeyAttestationAsync メソッドの最後の行のコメントを解除します。
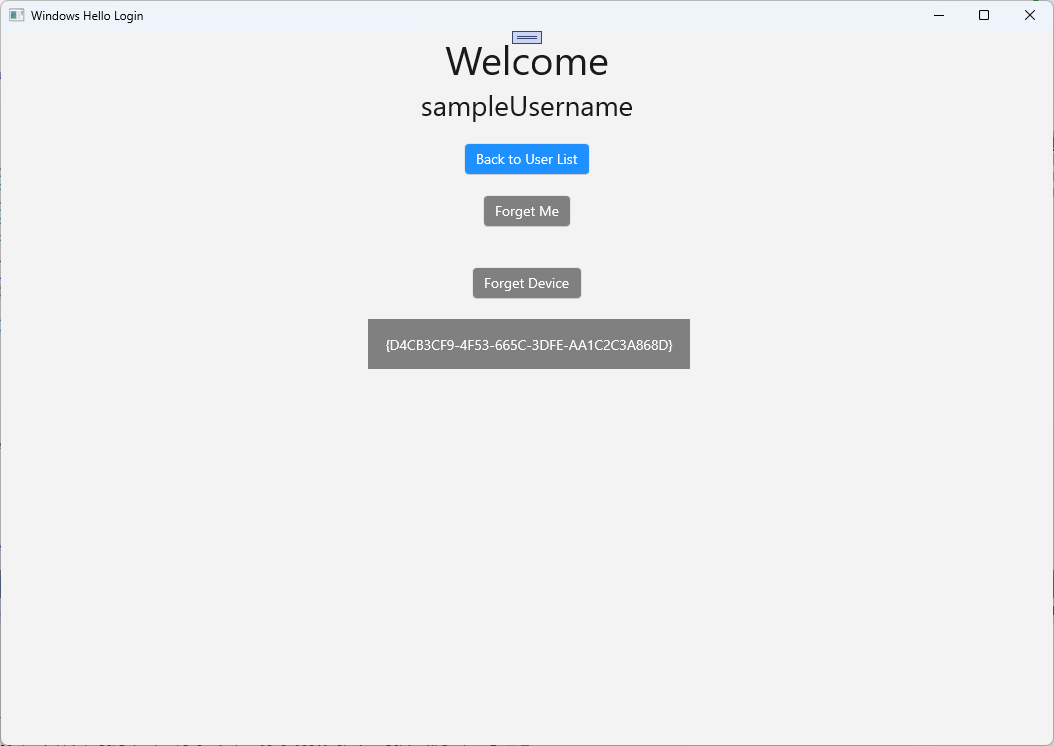
アプリケーションをビルドして実行し、以前と同様に既定の資格情報でサインインします。 Welcome ページに、デバイス ID が表示されます。 ここにも表示される別のデバイスでサインインした場合 (クラウドでホストされている認証サービスがある場合)。 このハンズオン ラボでは、実際のデバイス ID が表示されています。 実際の実装では、ユーザーが理解し、各デバイスを識別するために使用できるフレンドリ名を表示する必要があります。
このハンズオン ラボを完了するには、ユーザーがユーザー選択ページから選択し、もう一度サインインするときに、ユーザーに対する要求とチャレンジが必要です。 AuthServiceには、チャレンジを要求するために作成した 2 つのメソッドがあります。1 つは署名されたチャレンジを使用します。 WindowsHelloHelper.csで、 RequestSignAsync という名前の新しいメソッドを作成します。 これにより、 AuthServiceにチャレンジが要求され、Windows Hello API を使用してそのチャレンジにローカルで署名され、署名されたチャレンジが AuthService に送信されます。 このハンズ オン ラボでは、 AuthService は署名されたチャレンジを受け取り、
trueを返します。 実際の実装では、チャレンジが正しいデバイス上の正しいユーザーによって署名されたかどうかを判断するための検証メカニズムを実装する必要があります。 次のメソッドをWindowsHelloHelper.csに追加しますprivate static async Task<bool> RequestSignAsync(Guid userId, KeyCredentialRetrievalResult openKeyResult) { // Calling userKey.RequestSignAsync() prompts the uses to enter the PIN or use Biometrics (Windows Hello). // The app would use the private key from the user account to sign the sign-in request (challenge) // The client would then send it back to the server and await the servers response. IBuffer challengeMessage = AuthService.AuthService.Instance.WindowsHelloRequestChallenge(); KeyCredential userKey = openKeyResult.Credential; KeyCredentialOperationResult signResult = await userKey.RequestSignAsync(challengeMessage); if (signResult.Status == KeyCredentialStatus.Success) { // If the challenge from the server is signed successfully // send the signed challenge back to the server and await the servers response return AuthService.AuthService.Instance.SendServerSignedChallenge( userId, Helpers.GetDeviceId(), signResult.Result.ToArray()); } else if (signResult.Status == KeyCredentialStatus.UserCanceled) { // User cancelled the Windows Hello PIN entry. } else if (signResult.Status == KeyCredentialStatus.NotFound) { // Must recreate Windows Hello key } else if (signResult.Status == KeyCredentialStatus.SecurityDeviceLocked) { // Can't use Windows Hello right now, remember that hardware failed and suggest restart } else if (signResult.Status == KeyCredentialStatus.UnknownError) { // Can't use Windows Hello right now, try again later } return false; }WindowsHelloHelper クラスで、GetWindowsHelloAuthenticationMessageAsync メソッドから RequestSignAsync メソッドを呼び出します。
public static async Task<bool> GetWindowsHelloAuthenticationMessageAsync(UserAccount account)
{
    KeyCredentialRetrievalResult openKeyResult = await KeyCredentialManager.OpenAsync(account.Username);
    // Calling OpenAsync will allow the user access to what is available in the app and will not require user credentials again.
    // If you wanted to force the user to sign in again you can use the following:
    // var consentResult = await Windows.Security.Credentials.UI.UserConsentVerifier.RequestVerificationAsync(account.Username);
    // This will ask for the either the password of the currently signed in Microsoft Account or the PIN used for Windows Hello.

    if (openKeyResult.Status == KeyCredentialStatus.Success)
    {
        //If OpenAsync has succeeded, the next thing to think about is whether the client application requires access to backend services.
        //If it does here you would Request a challenge from the Server. The client would sign this challenge and the server
        //would check the signed challenge. If it is correct it would allow the user access to the backend.
        //You would likely make a new method called RequestSignAsync to handle all this
        //for example, RequestSignAsync(openKeyResult);
        //Refer to the second Windows Hello sample for information on how to do this.

        return await RequestSignAsync(account.UserId, openKeyResult);
    }
    else if (openKeyResult.Status == KeyCredentialStatus.NotFound)
    {
        //If the _account is not found at this stage. It could be one of two errors.
        //1. Windows Hello has been disabled
        //2. Windows Hello has been disabled and re-enabled cause the Windows Hello Key to change.
        //Calling CreateWindowsHelloKeyAsync and passing through the account will attempt to replace the existing Windows Hello Key for that account.
        //If the error really is that Windows Hello is disabled then the CreateWindowsHelloKeyAsync method will output that error.
        if (await CreateWindowsHelloKeyAsync(account.UserId, account.Username))
        {
            //If the Windows Hello Key was again successfully created, Windows Hello has just been reset.
            //Now that the Windows Hello Key has been reset for the _account retry sign in.
            return await GetWindowsHelloAuthenticationMessageAsync(account);
        }
    }

    // Can't use Windows Hello right now, try again later
    return false;
}
この演習では、 AuthService を使用するようにクライアント側アプリケーションを更新しました。 これにより、 Account クラスと AccountHelper クラスが不要になります。 Utils フォルダー内の Account クラス、Models フォルダー、および AccountHelper クラスを削除します。 ソリューションが正常にビルドされる前に、アプリケーション全体で
WindowsHelloLogin.Models名前空間への参照をすべて削除する必要があります。アプリケーションをビルドして実行し、モック サービスとデータベースで Windows Hello を使用して楽しんでください。
このハンズ オン ラボでは、Windows Hello API を使用して、Windows マシンからの認証を使用する場合のパスワードの必要性を置き換える方法について学習しました。 ユーザーがパスワードを維持し、既存のシステムで紛失したパスワードをサポートすることでどれだけのエネルギーが消費されているかを検討すると、この新しい Windows Hello 認証システムに移行するメリットが得られます。
サービス側とサーバー側で認証を実装する方法の詳細については、演習として残しました。 ほとんどの開発者には、Windows Hello の使用を開始するために移行する必要がある既存のシステムが存在することが予想されます。 これらの各システムの詳細は異なります。
関連トピック
Windows developer
