포트 미러링 유효성 검사
적용 대상: Advanced Threat Analytics 버전 1.9
참고 항목
이 문서는 ATA 경량 게이트웨이 대신 ATA 게이트웨이를 배포하는 경우에만 관련이 있습니다. ATA 게이트웨이를 사용해야 하는지 확인하려면 배포에 적합한 게이트웨이 선택을 참조하세요.
다음 단계에서는 포트 미러 올바르게 구성되었는지 확인하는 프로세스를 안내합니다. ATA가 제대로 작동하려면 ATA 게이트웨이가 할 일기본 컨트롤러에서 트래픽을 볼 수 있어야 합니다. ATA에서 사용하는 기본 데이터 원본은 할 일기본 컨트롤러의 네트워크 트래픽에 대한 심층 패킷 검사입니다. ATA에서 네트워크 트래픽을 보려면 포트 미러 구성해야 합니다. 포트 미러 한 포트(원본 포트)에서 다른 포트(대상 포트)로 트래픽을 복사합니다.
Windows PowerShell 스크립트를 사용하여 포트 미러 유효성 검사
- 이 스크립트의 텍스트를 ATAdiag.ps1이라는 파일에 저장합니다.
- 유효성을 검사하려는 ATA 게이트웨이에서 이 스크립트를 실행합니다. 스크립트는 ATA 게이트웨이에서 do기본 컨트롤러로 ICMP 트래픽을 생성하고 do기본 컨트롤러의 캡처 NIC에서 해당 트래픽을 찾습니다. ATA 게이트웨이에서 대상 IP 주소가 있는 ICMP 트래픽이 ATA 콘솔에 입력한 DC IP 주소와 동일한 경우 포트 미러 구성된 것으로 간주됩니다.
스크립트를 실행하는 방법에 대한 샘플:
# ATAdiag.ps1 -CaptureIP n.n.n.n -DCIP n.n.n.n -TestCount n
param([parameter(Mandatory=$true)][string]$CaptureIP, [parameter(Mandatory=$true)][string]$DCIP, [int]$PingCount = 10)

# Set variables
$ErrorActionPreference = "stop"
$starttime = get-date
$byteIn = new-object byte[] 4
$byteOut = new-object byte[] 4
$byteData = new-object byte[] 4096  # size of data

$byteIn[0] = 1  # for promiscuous mode
$byteIn[1-3] = 0
$byteOut[0-3] = 0

# Convert network data to host format
function NetworkToHostUInt16 ($value)
{
    [Array]::Reverse($value)
    [BitConverter]::ToUInt16($value,0)
}
function NetworkToHostUInt32 ($value)
{
    [Array]::Reverse($value)
    [BitConverter]::ToUInt32($value,0)
}
function ByteToString ($value)
{
    $AsciiEncoding = new-object system.text.asciiencoding
    $AsciiEncoding.GetString($value)
}

Write-Host "Testing Port Mirroring..." -ForegroundColor Yellow
Write-Host ""
Write-Host "Here is a summary of the connection we will test." -ForegroundColor Yellow

# Initialize a first ping connection
Test-Connection -Count 1 -ComputerName $DCIP -ea SilentlyContinue
Write-Host ""
Write-Host "Press any key to continue..." -ForegroundColor Red
[void][System.Console]::ReadKey($true)
Write-Host ""
Write-Host "Sending ICMP and Capturing data..." -ForegroundColor Yellow

# Open a socket
$socket = new-object system.net.sockets.socket([Net.Sockets.AddressFamily]::InterNetwork,[Net.Sockets.SocketType]::Raw,[Net.Sockets.ProtocolType]::IP)

# Include the IP header
$socket.setsocketoption("IP","HeaderIncluded",$true)
$socket.ReceiveBufferSize = 10000
$ipendpoint = new-object system.net.ipendpoint([net.ipaddress]"$CaptureIP",0)
$socket.bind($ipendpoint)

# Enable promiscuous mode
[void]$socket.iocontrol([net.sockets.iocontrolcode]::ReceiveAll,$byteIn,$byteOut)

# Initialize test variables
$tests = 0
$TestResult = "Noise"
$OneSuccess = 0

while ($tests -le $PingCount)
{
    if (!$socket.Available)  # see if any packets are in the queue
    {
        start-sleep -milliseconds 500
        continue
    }

    # Capture traffic
    $rcv = $socket.receive($byteData,0,$byteData.length,[net.sockets.socketflags]::None)

    # Decode the header so we can read ICMP
    $MemoryStream = new-object System.IO.MemoryStream($byteData,0,$rcv)
    $BinaryReader = new-object System.IO.BinaryReader($MemoryStream)

    # Set IP version & header length
    $VersionAndHeaderLength = $BinaryReader.ReadByte()

    # TOS
    $TypeOfService= $BinaryReader.ReadByte()

    # More values, and the Protocol Number for ICMP traffic
    # Convert network format of big-endian to host format of little-endian
    $TotalLength = NetworkToHostUInt16 $BinaryReader.ReadBytes(2)
    $Identification = NetworkToHostUInt16 $BinaryReader.ReadBytes(2)
    $FlagsAndOffset = NetworkToHostUInt16 $BinaryReader.ReadBytes(2)
    $TTL = $BinaryReader.ReadByte()
    $ProtocolNumber = $BinaryReader.ReadByte()
    $Checksum = [Net.IPAddress]::NetworkToHostOrder($BinaryReader.ReadInt16())

    # The source and destination IP addresses
    $SourceIPAddress = $BinaryReader.ReadUInt32()
    $DestinationIPAddress = $BinaryReader.ReadUInt32()

    # The source and destimation ports
    $sourcePort = [uint16]0
    $destPort = [uint16]0

    # Close the stream reader
    $BinaryReader.Close()
    $memorystream.Close()

    # Cast DCIP into an IPaddress type
    $DCIPP = [ipaddress] $DCIP
    $DestinationIPAddressP = [ipaddress] $DestinationIPAddress

    #Ping the DC at the end after starting the capture
    Test-Connection -Count 1 -ComputerName $DCIP -ea SilentlyContinue | Out-Null

    # This is the match logic - check to see if Destination IP from the Ping sent matches the DCIP entered by in the ATA Console
    # The only way the ATA Gateway should see a destination of the DC is if Port Spanning is configured

    if ($DestinationIPAddressP -eq $DCIPP)  # is the destination IP eq to the DC IP?
    {
        $TestResult = "Port Spanning success!"
        $OneSuccess = 1
    } else {
        $TestResult = "Noise"
    }

    # Put source, destination, test result in Powershell object
    new-object psobject | add-member -pass noteproperty CaptureSource $([system.net.ipaddress]$SourceIPAddress) | add-member -pass noteproperty CaptureDestination $([system.net.ipaddress]$DestinationIPAddress) | Add-Member -pass NoteProperty Result $TestResult | Format-List | Out-Host
    #Count tests
    $tests ++
}

if ($OneSuccess -eq 1)
{
    Write-Host "Port Spanning Success!" -ForegroundColor Green
    Write-Host ""
    Write-Host "At least one packet which was addressed to the DC, was picked up by the Gateway." -ForegroundColor Yellow
    Write-Host "A little noise is OK, but if you don't see a majority of successes, you might want to re-run." -ForegroundColor Yellow
} else {
    Write-Host "No joy, all noise.  You may want to re-run, increase the number of Ping Counts, or check your config." -ForegroundColor Red
}

Write-Host ""
Write-Host "Press any key to continue..." -ForegroundColor Red
[void][System.Console]::ReadKey($true)
Net Mon을 사용하여 포트 미러 유효성 검사
유효성을 검사하려는 ATA 게이트웨이에 Microsoft 네트워크 모니터 3.4를 설치합니다.
Important
MICROSOFT Message Analyzer 또는 다른 트래픽 캡처 소프트웨어를 ATA 게이트웨이에 설치하지 마세요.
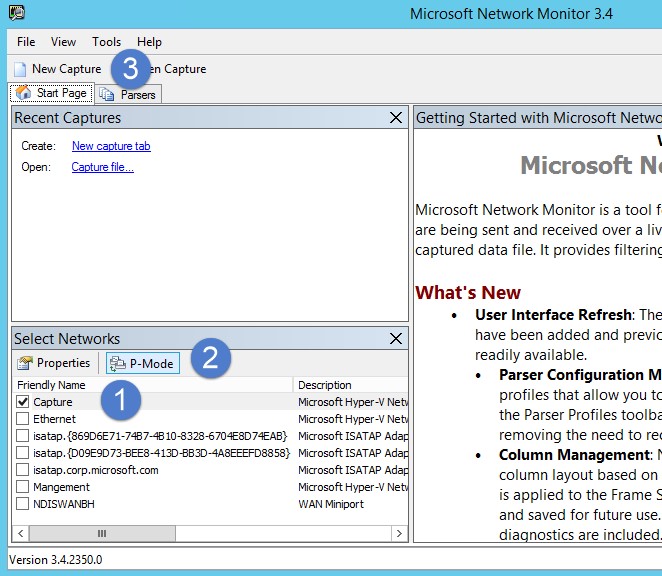
네트워크 모니터를 열고 새 캡처 탭을 만듭니다.
포트 미러 대상으로 구성된 스위치 포트에 연결된 네트워크 어댑터 또는 네트워크 어댑터 캡처만 선택합니다.
P 모드가 사용하도록 설정되어 있는지 확인합니다.
새 캡처를 클릭합니다.
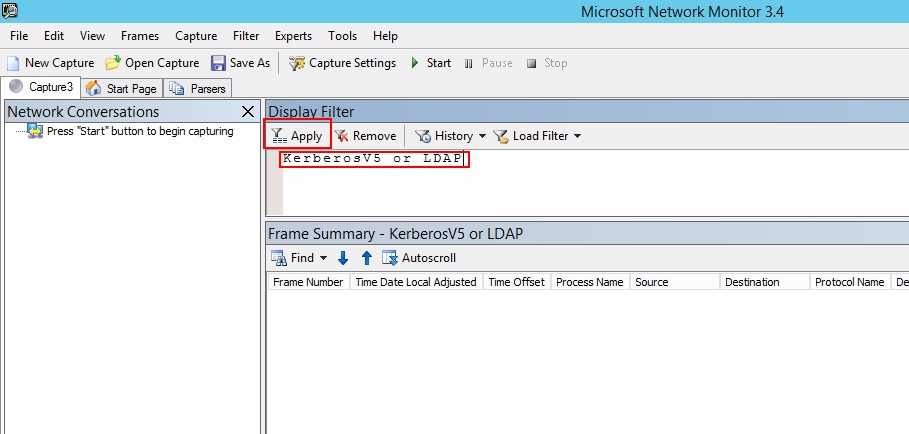
표시 필터 창에서 KerberosV5 또는 LDAP 필터를 입력한 다음 적용을 클릭합니다.
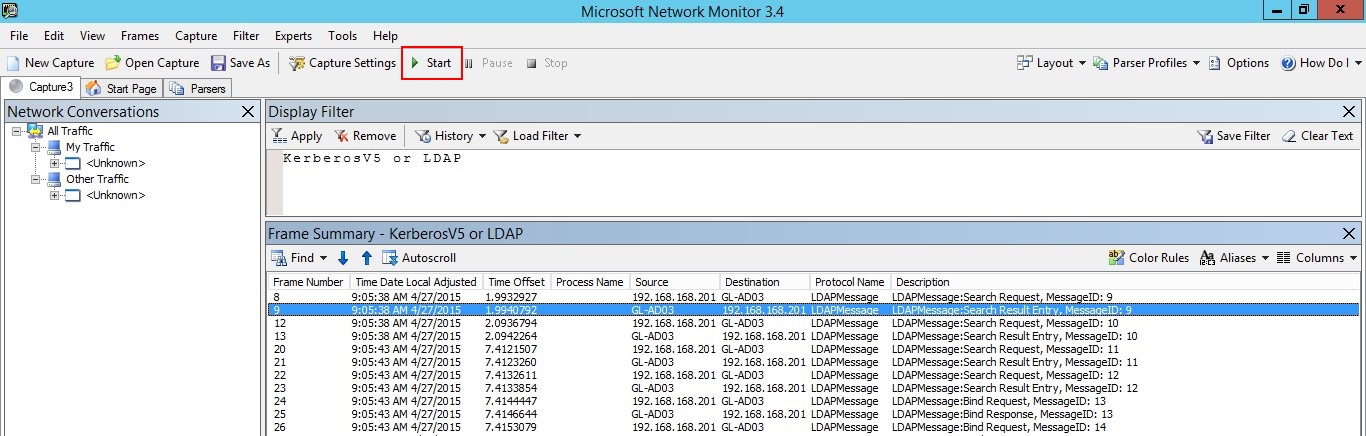
시작을 클릭하여 캡처 세션을 시작합니다. do기본 컨트롤러에서 트래픽이 표시되지 않으면 포트 미러 구성을 검토합니다.
참고 항목
할 일기본 컨트롤러에서 트래픽이 표시되는지 확인하는 것이 중요합니다.
한 방향으로만 트래픽이 표시되는 경우 네트워킹 또는 가상화 팀과 협력하여 포트 미러 구성 문제를 해결해야 합니다.