여러 인스턴스를 사용하여 SignalR Service 스케일링
SignalR Service SDK는 SignalR Service 인스턴스에 대해 여러 엔드포인트를 지원합니다. 이 기능을 동시 연결 스케일링이나 지역 간 메시징에 사용할 수 있습니다.
ASP.NET Core의 경우
구성에서 여러 엔드포인트 추가
SignalR Service 연결 문자열에 Azure:SignalR:ConnectionString 또는 Azure:SignalR:ConnectionString: 키를 사용하여 구성합니다.
Azure:SignalR:ConnectionString:으로 시작하는 키는 Azure:SignalR:ConnectionString:{Name}:{EndpointType} 형식이어야 합니다. 여기서 Name 및 EndpointType은 ServiceEndpoint 개체의 속성이며 코드에서 액세스할 수 있습니다.
다음 dotnet 명령을 사용하여 여러 인스턴스 연결 문자열을 추가할 수 있습니다.
dotnet user-secrets set Azure:SignalR:ConnectionString:east-region-a <ConnectionString1>
dotnet user-secrets set Azure:SignalR:ConnectionString:east-region-b:primary <ConnectionString2>
dotnet user-secrets set Azure:SignalR:ConnectionString:backup:secondary <ConnectionString3>
코드에서 여러 엔드포인트 추가
ServiceEndpoint 클래스는 Azure SignalR Service 엔드포인트의 속성을 설명합니다.
다음을 통해 Azure SignalR Service SDK를 사용하는 경우 여러 인스턴스 엔드포인트를 구성할 수 있습니다.
services.AddSignalR()
        .AddAzureSignalR(options =>
        {
            options.Endpoints = new ServiceEndpoint[]
            {
                // Note: this is just a demonstration of how to set options.Endpoints
                // Having ConnectionStrings explicitly set inside the code is not encouraged
                // You can fetch it from a safe place such as Azure KeyVault
                new ServiceEndpoint("<ConnectionString0>"),
                new ServiceEndpoint("<ConnectionString1>", type: EndpointType.Primary, name: "east-region-a"),
                new ServiceEndpoint("<ConnectionString2>", type: EndpointType.Primary, name: "east-region-b"),
                new ServiceEndpoint("<ConnectionString3>", type: EndpointType.Secondary, name: "backup"),
            };
        });
엔드포인트 라우터 사용자 지정
기본적으로 SDK는 DefaultEndpointRouter를 사용하여 엔드포인트를 선택합니다.
기본 동작
클라이언트 요청 라우팅:
클라이언트가 앱 서버와
/negotiate를 수행하는 경우입니다. 기본적으로 SDK는 사용 가능한 서비스 엔드포인트 집합에서 엔드포인트 하나를 임의로 선택합니다.서버 메시지 라우팅:
메시지를 특정 연결로 전송하고 대상 연결이 현재 서버로 라우팅되는 경우 메시지가 연결된 엔드포인트로 직접 이동합니다. 그렇지 않으면 메시지가 모든 Azure SignalR 엔드포인트에 브로드캐스트됩니다.
라우팅 알고리즘 사용자 지정
메시지가 이동해야 하는 엔드포인트를 식별하는 특별한 지식이 있는 경우 사용자 고유의 라우터를 만들 수 있습니다.
다음 예제에서는 east-로 시작하는 그룹의 메시지를 east라는 엔드포인트로 라우팅하는 사용자 지정 라우터를 정의합니다.
private class CustomRouter : EndpointRouterDecorator
{
    public override IEnumerable<ServiceEndpoint> GetEndpointsForGroup(string groupName, IEnumerable<ServiceEndpoint> endpoints)
    {
        // Override the group broadcast behavior, if the group name starts with "east-", only send messages to endpoints inside east
        if (groupName.StartsWith("east-"))
        {
            return endpoints.Where(e => e.Name.StartsWith("east-"));
        }

        return base.GetEndpointsForGroup(groupName, endpoints);
    }
}
다음 예제에서는 기본 협상 동작을 재정의하고 앱 서버의 위치에 따라 엔드포인트를 선택합니다.
private class CustomRouter : EndpointRouterDecorator
{    public override ServiceEndpoint GetNegotiateEndpoint(HttpContext context, IEnumerable<ServiceEndpoint> endpoints)
    {
        // Override the negotiate behavior to get the endpoint from query string
        var endpointName = context.Request.Query["endpoint"];
        if (endpointName.Count == 0)
        {
            context.Response.StatusCode = 400;
            var response = Encoding.UTF8.GetBytes("Invalid request");
            context.Response.Body.Write(response, 0, response.Length);
            return null;
        }

        return endpoints.FirstOrDefault(s => s.Name == endpointName && s.Online) // Get the endpoint with name matching the incoming request
               ?? base.GetNegotiateEndpoint(context, endpoints); // Or fallback to the default behavior to randomly select one from primary endpoints, or fallback to secondary when no primary ones are online
    }
}
다음을 사용하여 DI 컨테이너에 라우터를 등록해야 합니다.
services.AddSingleton(typeof(IEndpointRouter), typeof(CustomRouter));
services.AddSignalR()
        .AddAzureSignalR(
            options =>
            {
                options.Endpoints = new ServiceEndpoint[]
                {
                    new ServiceEndpoint(name: "east", connectionString: "<connectionString1>"),
                    new ServiceEndpoint(name: "west", connectionString: "<connectionString2>"),
                    new ServiceEndpoint("<connectionString3>")
                };
            });
ASP.NET의 경우
구성에서 여러 엔드포인트 추가
SignalR Service 연결 문자열에 Azure:SignalR:ConnectionString 또는 Azure:SignalR:ConnectionString: 키를 사용하여 구성합니다.
Azure:SignalR:ConnectionString:으로 시작하는 키는 Azure:SignalR:ConnectionString:{Name}:{EndpointType} 형식이어야 합니다. 여기서 Name 및 EndpointType은 ServiceEndpoint 개체의 속성이며 코드에서 액세스할 수 있습니다.
web.config에 여러 인스턴스 연결 문자열을 추가할 수 있습니다.
<?xml version="1.0" encoding="utf-8" ?>
<configuration>
  <connectionStrings>
    <add name="Azure:SignalR:ConnectionString" connectionString="<ConnectionString1>"/>
    <add name="Azure:SignalR:ConnectionString:en-us" connectionString="<ConnectionString2>"/>
    <add name="Azure:SignalR:ConnectionString:zh-cn:secondary" connectionString="<ConnectionString3>"/>
    <add name="Azure:SignalR:ConnectionString:Backup:secondary" connectionString="<ConnectionString4>"/>
  </connectionStrings>
  ...
</configuration>
코드에서 여러 엔드포인트 추가
ServiceEndpoint 클래스는 Azure SignalR Service 엔드포인트의 속성을 설명합니다.
다음을 통해 Azure SignalR Service SDK를 사용하는 경우 여러 인스턴스 엔드포인트를 구성할 수 있습니다.
app.MapAzureSignalR(
    this.GetType().FullName,
    options => {
            options.Endpoints = new ServiceEndpoint[]
            {
                // Note: this is just a demonstration of how to set options. Endpoints
                // Having ConnectionStrings explicitly set inside the code is not encouraged.
                // You can fetch it from a safe place such as Azure KeyVault
                new ServiceEndpoint("<ConnectionString1>"),
                new ServiceEndpoint("<ConnectionString2>"),
                new ServiceEndpoint("<ConnectionString3>"),
            }
        });
라우터 사용자 지정
ASP.NET SignalR과 ASP.NET Core SignalR의 유일한 차이점은 GetNegotiateEndpoint의 http 컨텍스트 형식입니다. ASP.NET SignalR의 경우 IOwinContext 형식입니다.
다음 코드는 ASP.NET SignalR에 대한 사용자 지정 협상 예제입니다.
private class CustomRouter : EndpointRouterDecorator
{
    public override ServiceEndpoint GetNegotiateEndpoint(IOwinContext context, IEnumerable<ServiceEndpoint> endpoints)
    {
        // Override the negotiate behavior to get the endpoint from query string
        var endpointName = context.Request.Query["endpoint"];
        if (string.IsNullOrEmpty(endpointName))
        {
            context.Response.StatusCode = 400;
            context.Response.Write("Invalid request.");
            return null;
        }

        return endpoints.FirstOrDefault(s => s.Name == endpointName && s.Online) // Get the endpoint with name matching the incoming request
               ?? base.GetNegotiateEndpoint(context, endpoints); // Or fallback to the default behavior to randomly select one from primary endpoints, or fallback to secondary when no primary ones are online
    }
}
다음을 사용하여 DI 컨테이너에 라우터를 등록해야 합니다.
var hub = new HubConfiguration();
var router = new CustomRouter();
hub.Resolver.Register(typeof(IEndpointRouter), () => router);
app.MapAzureSignalR(GetType().FullName, hub, options => {
    options.Endpoints = new ServiceEndpoint[]
                {
                    new ServiceEndpoint(name: "east", connectionString: "<connectionString1>"),
                    new ServiceEndpoint(name: "west", connectionString: "<connectionString2>"),
                    new ServiceEndpoint("<connectionString3>")
                };
});
서비스 엔드포인트 메트릭
고급 라우터를 사용하도록 설정하기 위해 SignalR 서버 SDK는 서버가 현명한 결정을 내리는 데 도움이 되는 여러 메트릭을 제공합니다. 속성은 ServiceEndpoint.EndpointMetrics 아래에 있습니다.
| 메트릭 이름 | 설명 |
|---|---|
ClientConnectionCount |
서비스 엔드포인트에 대한 모든 허브의 총 동시 클라이언트 연결 수 |
ServerConnectionCount |
서비스 엔드포인트에 대한 모든 허브의 총 동시 서버 연결 수 |
ConnectionCapacity |
클라이언트 및 서버 연결을 포함하여 서비스 엔드포인트에 대한 총 연결 할당량 |
다음 코드는 ClientConnectionCount에 따라 라우터를 사용자 지정하는 예제입니다.
private class CustomRouter : EndpointRouterDecorator
{
    public override ServiceEndpoint GetNegotiateEndpoint(HttpContext context, IEnumerable<ServiceEndpoint> endpoints)
    {
        return endpoints.OrderBy(x => x.EndpointMetrics.ClientConnectionCount).FirstOrDefault(x => x.Online) // Get the available endpoint with minimal clients load
               ?? base.GetNegotiateEndpoint(context, endpoints); // Or fallback to the default behavior to randomly select one from primary endpoints, or fallback to secondary when no primary ones are online
    }
}
동적 크기 조정 ServiceEndpoints
SDK 버전 1.5.0부터는 ASP.NET Core 버전에 대해 동적 크기 조정 ServiceEndpoints를 먼저 사용하도록 설정합니다. 따라서 ServiceEndpoint를 추가/제거해야 하는 경우 앱 서버를 다시 시작할 필요가 없습니다. ASP.NET Core는 appsettings.json과 같은 기본 구성을 reloadOnChange: true로 지원하므로 코드를 변경할 필요가 없으며 기본적으로 지원됩니다. 사용자 지정된 구성을 추가하고 핫 다시 로드를 사용하려면 ASP.NET Core의 구성을 참조하세요.
참고 항목
서버/서비스와 클라이언트/서비스 간의 연결 설정 시간이 다를 수 있다는 점을 고려하면 스케일링 프로세스 중에 메시지 손실이 없도록 하기 위해 새 ServiceEndpoint를 클라이언트에 열기 전에 서버 연결이 준비될 때까지 대기하는 준비 기간이 있습니다. 일반적으로 완료하는 데 몇 초가 걸리며 프로세스가 완료되었음을 나타내는 Succeed in adding endpoint: '{endpoint}'와 같은 로그 메시지를 볼 수 있습니다.
지역 간 네트워크 문제 또는 다른 앱 서버에서 구성이 일치하지 않는 등의 예기치 않은 상황에서는 스테이징 기간이 올바르게 완료되지 않을 수 있습니다. 이러한 경우 스케일링 프로세스가 제대로 작동하지 않는 경우 앱 서버를 다시 시작하는 것이 좋습니다.
스케일링의 기본 제한 시간은 5분이며 ServiceOptions.ServiceScaleTimeout의 값을 변경하여 사용자 지정할 수 있습니다. 앱 서버가 많은 경우 값을 조금 더 확장하는 것이 좋습니다.
참고 항목
현재 다중 엔드포인트 기능은 Persistent 전송 형식에서만 지원됩니다.
SignalR Functions 확장의 경우
구성
여러 SignalR Service 인스턴스를 사용하도록 설정하려면 다음을 수행해야 합니다.
Persistent전송 형식을 사용합니다.기본 전송 형식은
Transient모드입니다. Azure의local.settings.json파일이나 애플리케이션 설정에 다음 항목을 추가해야 합니다.{ "AzureSignalRServiceTransportType":"Persistent" }참고 항목
Transient모드에서Persistent모드로 전환할 때,Transient모드에서는 허브 메서드의 인수를 직렬화하는 데Newtonsoft.Json라이브러리가 사용되지만,Persistent모드에서는 기본적으로System.Text.Json라이브러리가 사용되므로 JSON serialization 동작이 변경될 수 있습니다.System.Text.Json은Newtonsoft.Json과 기본 동작에 있어 몇 가지 주요 차이점이 있습니다.Persistent모드에서Newtonsoft.Json을 사용하려면local.settings.json파일에"Azure:SignalR:HubProtocol":"NewtonsoftJson"구성 항목을 추가하거나 Azure Portal에Azure__SignalR__HubProtocol=NewtonsoftJson을 추가할 수 있습니다.구성에서 여러 SignalR Service 엔드포인트 항목을 구성합니다.
ServiceEndpoint개체를 사용하여 SignalR Service 인스턴스를 나타냅니다.<EndpointName>과<EndpointType>을 항목 키에 포함하고, 연결 문자열을 항목 값에 포함하여 서비스 엔드포인트를 정의할 수 있습니다. 키 형식은 다음과 같습니다.Azure:SignalR:Endpoints:<EndpointName>:<EndpointType><EndpointType>은 선택 사항이며 기본값은primary입니다. 아래의 샘플을 확인합니다.{ "Azure:SignalR:Endpoints:EastUs":"<ConnectionString>", "Azure:SignalR:Endpoints:EastUs2:Secondary":"<ConnectionString>", "Azure:SignalR:Endpoints:WestUs:Primary":"<ConnectionString>" }참고 항목
Azure Portal의 App Service에서 Azure SignalR 엔드포인트를 구성할 때 키에서
":"을 이중 밑줄인"__"로 바꿔야 합니다. 자세한 내용은 환경 변수를 참조하세요.{ConnectionStringSetting}키로 구성된 연결 문자열(기본값은 "AzureSignalRConnectionString")도 이름이 비어 있는 기본 서비스 엔드포인트로 인식됩니다. 하지만 이러한 구성 스타일은 여러 엔드포인트에는 권장되지 않습니다.
라우팅
기본 동작
기본적으로 함수 바인딩은 DefaultEndpointRouter를 사용하여 엔드포인트를 선택합니다.
클라이언트 라우팅: 기본 온라인 엔드포인트에서 임의로 하나의 엔드포인트를 선택합니다. 모든 기본 엔드포인트가 오프라인인 경우 임의로 하나의 보조 온라인 엔드포인트를 선택합니다. 선택이 다시 실패하면 예외가 throw됩니다.
서버 메시지 라우팅: 모든 서비스 엔드포인트가 반환됩니다.
사용자 지정
C# In Process 모델
실행할 단계는 다음과 같습니다.
사용자 지정 라우터를 구현합니다.
ServiceEndpoint에서 제공된 정보를 활용하여 라우팅 결정을 내릴 수 있습니다. 여기에서 가이드를 참조하세요: customize-route-algorithm. 사용자 지정 협상 방법에서HttpContext가 필요한 경우 협상 함수에서 Http 트리거가 필요하다는 점에 유의하세요.라우터를 DI 컨테이너에 등록합니다.
using Microsoft.Azure.Functions.Extensions.DependencyInjection;
using Microsoft.Azure.SignalR;
using Microsoft.Extensions.DependencyInjection;

[assembly: FunctionsStartup(typeof(SimpleChatV3.Startup))]
namespace SimpleChatV3
{
    public class Startup : FunctionsStartup
    {
        public override void Configure(IFunctionsHostBuilder builder)
        {
            builder.Services.AddSingleton<IEndpointRouter, CustomizedRouter>();
        }
    }
}
격리된 프로세스 모델
격리된 프로세스 모델에서 실행되는 함수의 경우 각 요청에서 대상 엔드포인트를 지정하는 것을 지원합니다. 새로운 바인딩 형식을 사용하여 엔드포인트 정보를 가져옵니다.
클라이언트 라우팅
SignalRConnectionInfo 바인딩은 기본 라우팅 규칙에 따라 하나의 엔드포인트를 선택합니다. 라우팅 규칙을 사용자 지정하려면 SignalRConnectionInfo 바인딩 대신 SignalRNegotiation 바인딩을 사용해야 합니다.
SignalRNegotiation 바인딩 구성 속성은 SignalRConnectionInfo와 동일합니다. function.json 파일 샘플은 다음과 같습니다.
{
    "type": "signalRNegotiation",
    "name": "negotiationContext",
    "hubName": "<HubName>",
    "direction": "in"
}
SignalRConnectionInfo와 마찬가지로 userId, idToken, claimTypeList와 같은 다른 바인딩 데이터를 추가할 수도 있습니다.
SignalRNegotiation 바인딩에서 가져오는 개체의 형식은 다음과 같습니다.
{
    "endpoints": [
        {
            "endpointType": "Primary",
            "name": "<EndpointName>",
            "endpoint": "https://****.service.signalr.net",
            "online": true,
            "connectionInfo": {
                "url": "<client-access-url>",
                "accessToken": "<client-access-token>"
            }
        },
        {
            "...": "..."
        }
    ]
}
SignalRNegotiation 바인딩의 JavaScript 사용 샘플은 다음과 같습니다.
module.exports = function (context, req, negotiationContext) {
    var userId = req.query.userId;
    if (userId.startsWith("east-")) {
        //return the first endpoint whose name starts with "east-" and status is online.
        context.res.body = negotiationContext.endpoints.find(endpoint => endpoint.name.startsWith("east-") && endpoint.online).connectionInfo;
    }
    else {
        //return the first online endpoint
        context.res.body = negotiationContext.endpoints.filter(endpoint => endpoint.online)[0].connectionInfo;
    }
}
메시지 라우팅
메시지나 작업 라우팅에는 두 가지 바인딩 형식이 필요합니다. 일반적으로, 사용 가능한 모든 엔드포인트 정보를 가져오려면 먼저 새로운 입력 바인딩 형식 SignalREndpoints가 필요합니다. 그런 다음 엔드포인트를 필터링하여 전송하려는 모든 엔드포인트가 포함된 배열을 가져옵니다. 마지막으로 SignalR 출력 바인딩에서 대상 엔드포인트를 지정합니다.
functions.json 파일의 SignalREndpoints 바인딩 구성 속성은 다음과 같습니다.
{
      "type": "signalREndpoints",
      "direction": "in",
      "name": "endpoints",
      "hubName": "<HubName>"
}
SignalREndpoints에서 가져오는 개체는 엔드포인트의 배열이며 각 엔드포인트는 다음 스키마를 사용하는 JSON 개체로 표현됩니다.
{
    "endpointType": "<EndpointType>",
    "name": "<EndpointName>",
    "endpoint": "https://****.service.signalr.net",
    "online": true
}
대상 엔드포인트 배열을 가져온 후 출력 바인딩 개체에 endpoints 속성을 추가합니다. 이는 JavaScript의 예입니다.
module.exports = function (context, req, endpoints) {
    var targetEndpoints = endpoints.filter(endpoint => endpoint.name.startsWith("east-"));
    context.bindings.signalRMessages = [{
        "target": "chat",
        "arguments": ["hello-world"],
        "endpoints": targetEndpoints,
    }];
    context.done();
}
관리 SDK용
구성에서 여러 엔드포인트 추가
SignalR Service 연결 문자열에 대해 키 Azure:SignalR:Endpoints를 사용하여 구성합니다. 키는 Azure:SignalR:Endpoints:{Name}:{EndpointType} 형식이어야 하며, 여기서 Name 및 EndpointType은 ServiceEndpoint 개체의 속성이며 코드에서 액세스할 수 있습니다.
다음 dotnet 명령을 사용하여 여러 인스턴스 연결 문자열을 추가할 수 있습니다.
dotnet user-secrets set Azure:SignalR:Endpoints:east-region-a <ConnectionString1>
dotnet user-secrets set Azure:SignalR:Endpoints:east-region-b:primary <ConnectionString2>
dotnet user-secrets set Azure:SignalR:Endpoints:backup:secondary <ConnectionString3>
코드에서 여러 엔드포인트 추가
ServiceEndpoint 클래스는 Azure SignalR Service 엔드포인트의 속성을 설명합니다.
Azure SignalR Management SDK를 사용하면 다음을 통해 여러 인스턴스 엔드포인트를 구성할 수 있습니다.
var serviceManager = new ServiceManagerBuilder()
                    .WithOptions(option =>
                    {
                        options.Endpoints = new ServiceEndpoint[]
                        {
                            // Note: this is just a demonstration of how to set options.Endpoints
                            // Having ConnectionStrings explicitly set inside the code is not encouraged
                            // You can fetch it from a safe place such as Azure KeyVault
                            new ServiceEndpoint("<ConnectionString0>"),
                            new ServiceEndpoint("<ConnectionString1>", type: EndpointType.Primary, name: "east-region-a"),
                            new ServiceEndpoint("<ConnectionString2>", type: EndpointType.Primary, name: "east-region-b"),
                            new ServiceEndpoint("<ConnectionString3>", type: EndpointType.Secondary, name: "backup"),
                        };
                    })
                    .BuildServiceManager();
엔드포인트 라우터 사용자 지정
기본적으로 SDK는 DefaultEndpointRouter를 사용하여 엔드포인트를 선택합니다.
기본 동작
클라이언트 요청 라우팅:
클라이언트가 앱 서버와
/negotiate를 수행하는 경우입니다. 기본적으로 SDK는 사용 가능한 서비스 엔드포인트 집합에서 엔드포인트 하나를 임의로 선택합니다.서버 메시지 라우팅:
메시지를 특정 연결로 전송하고 대상 연결이 현재 서버로 라우팅되는 경우 메시지가 연결된 엔드포인트로 직접 이동합니다. 그렇지 않으면 메시지가 모든 Azure SignalR 엔드포인트에 브로드캐스트됩니다.
라우팅 알고리즘 사용자 지정
메시지가 이동해야 하는 엔드포인트를 식별하는 특별한 지식이 있는 경우 사용자 고유의 라우터를 만들 수 있습니다.
다음 예제에서는 east-로 시작하는 그룹의 메시지를 east라는 엔드포인트로 라우팅하는 사용자 지정 라우터를 정의합니다.
private class CustomRouter : EndpointRouterDecorator
{
    public override IEnumerable<ServiceEndpoint> GetEndpointsForGroup(string groupName, IEnumerable<ServiceEndpoint> endpoints)
    {
        // Override the group broadcast behavior, if the group name starts with "east-", only send messages to endpoints inside east
        if (groupName.StartsWith("east-"))
        {
            return endpoints.Where(e => e.Name.StartsWith("east-"));
        }

        return base.GetEndpointsForGroup(groupName, endpoints);
    }
}
다음 예제에서는 기본 협상 동작을 재정의하고 앱 서버의 위치에 따라 엔드포인트를 선택합니다.
private class CustomRouter : EndpointRouterDecorator
{    public override ServiceEndpoint GetNegotiateEndpoint(HttpContext context, IEnumerable<ServiceEndpoint> endpoints)
    {
        // Override the negotiate behavior to get the endpoint from query string
        var endpointName = context.Request.Query["endpoint"];
        if (endpointName.Count == 0)
        {
            context.Response.StatusCode = 400;
            var response = Encoding.UTF8.GetBytes("Invalid request");
            context.Response.Body.Write(response, 0, response.Length);
            return null;
        }

        return endpoints.FirstOrDefault(s => s.Name == endpointName && s.Online) // Get the endpoint with name matching the incoming request
               ?? base.GetNegotiateEndpoint(context, endpoints); // Or fallback to the default behavior to randomly select one from primary endpoints, or fallback to secondary when no primary ones are online
    }
}
다음을 사용하여 DI 컨테이너에 라우터를 등록해야 합니다.
var serviceManager = new ServiceManagerBuilder()
                    .WithOptions(option =>
                    {
                        options.Endpoints = new ServiceEndpoint[]
                        {
                            // Note: this is just a demonstration of how to set options.Endpoints
                            // Having ConnectionStrings explicitly set inside the code is not encouraged
                            // You can fetch it from a safe place such as Azure KeyVault
                            new ServiceEndpoint("<ConnectionString0>"),
                            new ServiceEndpoint("<ConnectionString1>", type: EndpointType.Primary, name: "east-region-a"),
                            new ServiceEndpoint("<ConnectionString2>", type: EndpointType.Primary, name: "east-region-b"),
                            new ServiceEndpoint("<ConnectionString3>", type: EndpointType.Secondary, name: "backup"),
                        };
                    })
                    .WithRouter(new CustomRouter())
                    .BuildServiceManager();
지역 간 시나리오의 구성
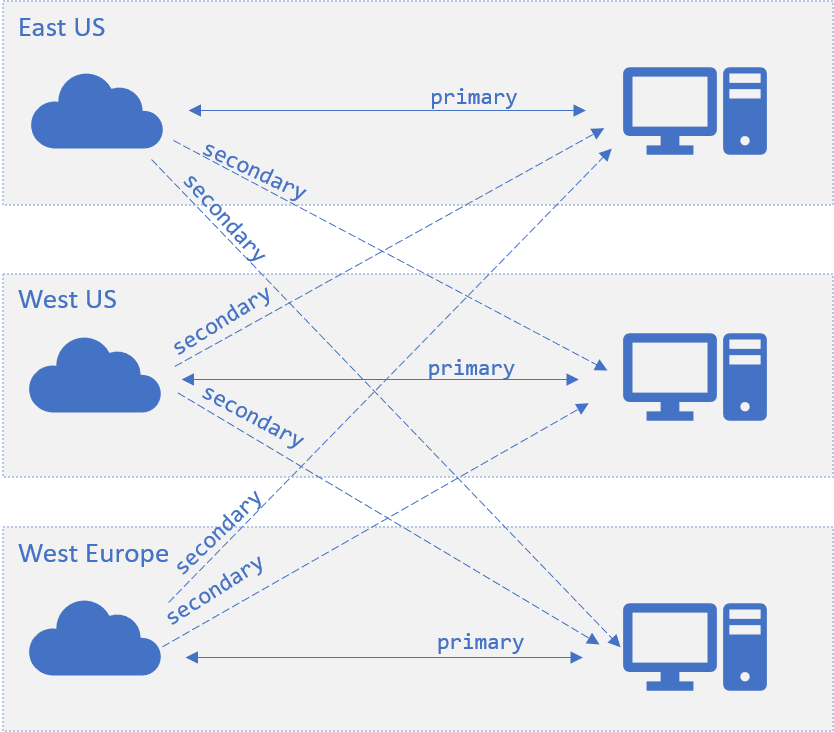
ServiceEndpoint 개체에는 값이 primary 또는 secondary인 EndpointType 속성이 있습니다.
기본 엔드포인트는 네트워크를 더 안정적으로 연결하기 때문에 클라이언트 트래픽을 수신하는 데 선호되는 엔드포인트입니다. 보조 엔드포인트는 네트워크 연결 신뢰도가 더 낮으며 서버에서 클라이언트 트래픽에만 사용됩니다. 예를 들어 보조 엔드포인트는 클라이언트에서 서버 트래픽으로 메시지를 브로드캐스트하는 데 사용됩니다.
지역 간 시나리오의 경우 네트워크가 불안정할 수 있습니다. 미국 동부에 있는 앱 서버의 경우 동일한 미국 동부 지역에 있는 SignalR Service 엔드포인트를 primary로, 다른 지역의 엔드포인트를 secondary로 표시합니다. 이 구성에서 다른 지역의 서비스 엔드포인트는 미국 동부 앱 서버로부터 메시지를 수신할 수 있지만 해당 앱 서버로 라우팅되는 지역 간 클라이언트는 없습니다. 다음 다이어그램은 아키텍처를 보여 줍니다.
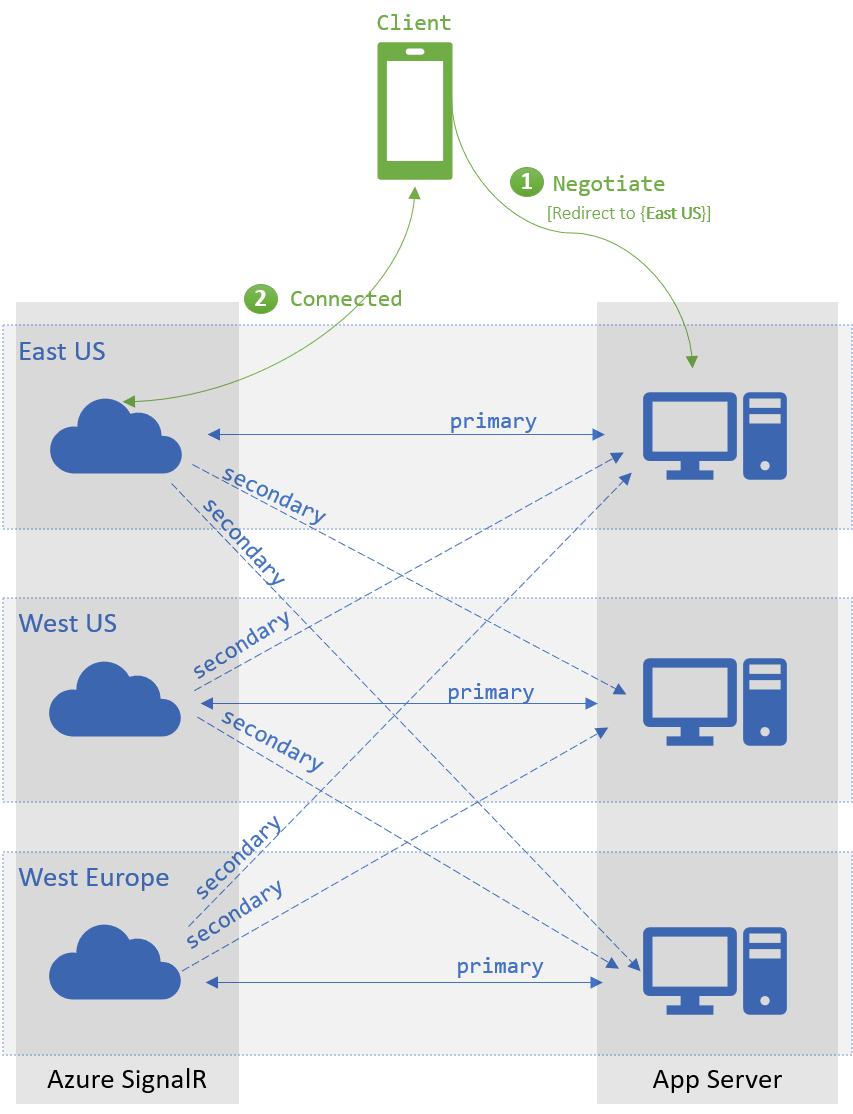
클라이언트가 기본 라우터를 사용하여 앱 서버와의 /negotiate를 시도하는 경우 SDK는 사용 가능한 primary 엔드포인트 집합에서 엔드포인트 하나를 임의로 선택합니다. 기본 엔드포인트를 사용할 수 없는 경우 SDK는 사용 가능한 모든 secondary 엔드포인트에서 임의로 선택합니다. 서버와 서비스 엔드포인트 간의 연결이 활성 상태이면 엔드포인트가 사용 가능으로 표시됩니다.
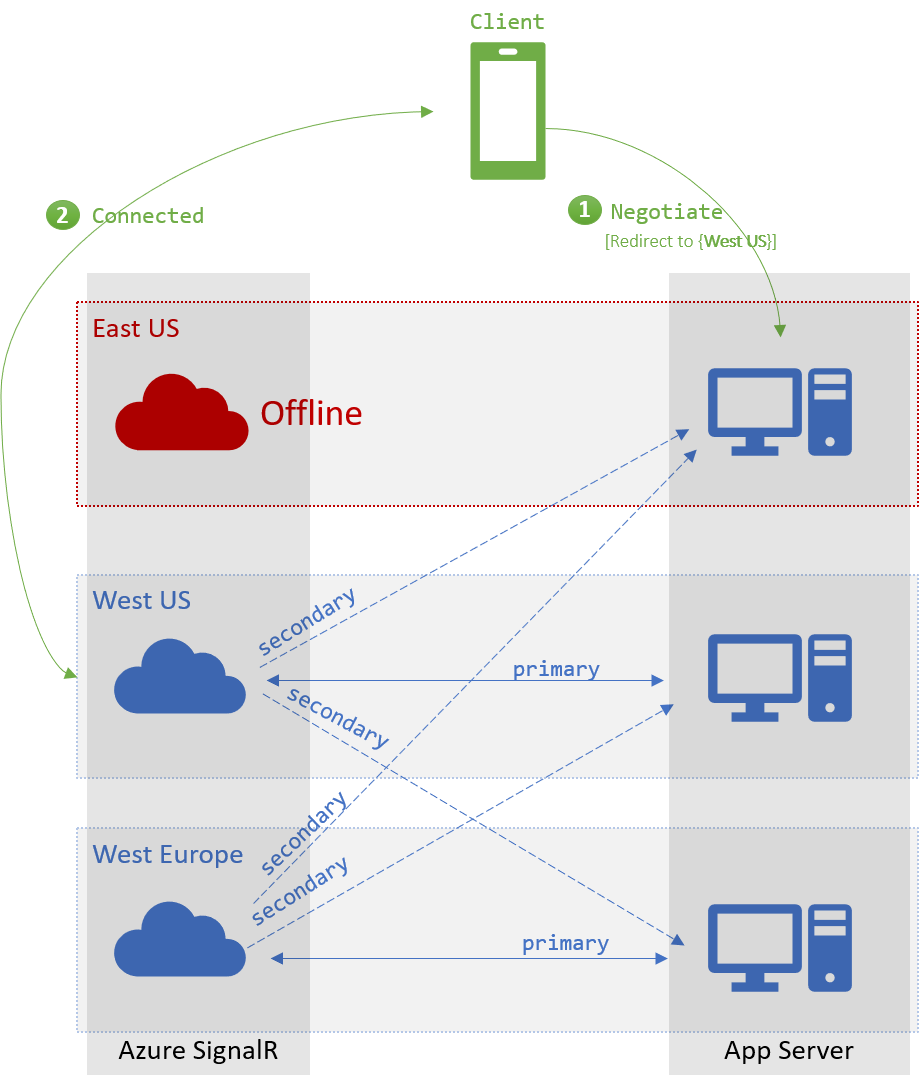
지역 간 시나리오에서 클라이언트가 미국 동부에서 호스트된 앱 서버와 /negotiate를 시도하는 경우 기본적으로 항상 동일한 지역에 있는 primary 엔드포인트가 반환됩니다. 미국 동부 엔드포인트를 모두 사용할 수 없는 경우 라우터가 클라이언트를 다른 지역의 엔드포인트로 리디렉션합니다. 다음 장애 조치(failover) 섹션에서는 시나리오에 대해 자세히 설명합니다.
장애 조치(Failover)
사용할 수 있는 primary 엔드포인트가 없으면 클라이언트의 /negotiate가 사용 가능한 secondary 엔드포인트에서 선택합니다. 이 장애 조치 메커니즘을 사용하려면 각 엔드포인트가 하나 이상의 앱 서버에 대한 primary 엔드포인트 역할을 합니다.
다음 단계
고가용성 및 재해 복구 시나리오에서 여러 엔드포인트를 사용할 수 있습니다.