통화에 푸시 알림 사용
여기서는 Azure Communication Services 호출에 푸시 알림을 사용하도록 설정하는 방법을 알아봅니다. 푸시 알림을 설정하면 사용자에게 전화가 걸려왔을 때 이를 알려 주고 전화를 받을 수 있습니다.
푸시 알림
푸시 알림을 사용하면 애플리케이션에서 사용자의 디바이스로 정보를 보낼 수 있습니다. 푸시 알림을 사용하여 대화 상자를 표시하거나, 소리를 재생하거나, 수신 전화를 앱 UI 계층에 표시할 수 있습니다. Azure Communication Services는 앱에 푸시 알림을 추가하는 데 사용할 수 있는 Azure Event Grid 및 Azure Notification Hubs와의 통합을 제공합니다.
TTL 토큰
TTL(Time To Live) 토큰은 알림 토큰이 무효화되기 전까지 유효한 기간을 결정하는 설정입니다. 이 설정은 참여가 일상적인 상호 작용을 필요로 하지 않지만 장기간에 걸쳐 중요하게 유지되는 애플리케이션에 유용합니다.
TTL 구성을 사용하면 푸시 알림의 수명 주기를 관리할 수 있으므로 빈번한 토큰 갱신의 필요성이 줄어드는 동시에 애플리케이션과 사용자 간의 통신 채널이 오랫동안 열려 있고 안정적으로 유지됩니다.
현재 TTL의 최댓값은 180일(15,552,000초)이고 최솟값은 5분(300초)입니다. 이 값을 입력하고 필요에 따라 조정할 수 있습니다. 값을 제공하지 않는 경우 기본값은 24시간(86,400초)입니다.
Registrar에 디바이스 토큰 정보가 저장되면 등록 푸시 알림 API가 호출됩니다. TTL 수명이 끝나면 디바이스 엔드포인트 정보가 삭제됩니다. 해당 디바이스가 등록 푸시 알림 API를 다시 호출하지 않는 경우 해당 디바이스에서 들어오는 모든 호출을 디바이스로 전달할 수 없습니다.
ID를 철회하려면 이 프로세스를 따라야 하며, ID가 철회되면 등록기관 엔터티를 삭제해야 합니다.
참고 항목
Teams 사용자의 경우 최대 TTL 값은 24시간(86,400초)입니다. 이 값을 늘릴 수 있는 방법은 없습니다. Contoso는 백그라운드에서 24시간마다 애플리케이션을 통해 디바이스 토큰을 등록해야 합니다. iOS 플랫폼의 경우 여기의 지침을 따르고, Android의 경우 여기의 지침에 따라 애플리케이션을 통해 새 토큰을 가져온 후 등록을 수행하세요.
필수 조건
- 활성 구독이 있는 Azure 계정. 체험 계정을 만듭니다.
- 배포된 Communication Services 리소스. Communication Services 리소스 만들기
- 호출 클라이언트를 사용하도록 설정하는 사용자 액세스 토큰입니다. 자세한 내용은 액세스 토큰 만들기 및 관리를 참조하세요.
- 선택 사항: 빠른 시작을 완료하여 애플리케이션에 음성 통화를 추가합니다.
Azure Communication Services 웹 통화 SDK - 웹 푸시 알림 빠른 시작
Important
Azure Communication Services의 이 기능은 현재 미리 보기 상태입니다.
미리 보기 API 및 SDK는 서비스 수준 계약 없이 제공됩니다. 프로덕션 워크로드에는 사용하지 않는 것이 좋습니다. 일부 기능은 지원되지 않거나 기능이 제한될 수 있습니다.
자세한 내용은 Microsoft Azure 미리 보기에 대한 보충 사용 약관을 검토하세요.
Azure Communication Services 웹 통화 SDK - 웹 푸시 알림은 공개 미리 보기로 제공되며 1.12.0-beta.2+ 버전의 일부로 제공됩니다.
웹 푸시 알림 빠른 시작 자습서를 방문하세요. https://github.com/Azure-Samples/communication-services-javascript-quickstarts/blob/main/calling-web-push-notifications/README.md
Important
2023년 6월 20일에 Google은 FCM 레거시 API를 사용한 메시지 전송을 사용 중단한다고 공지했습니다. Google은 2024년 6월에 서비스에서 레거시 FCM을 제거할 예정입니다. Google에서는 레거시 FCM API에서 FCM HTTP v1로 마이그레이션을 권장합니다. 커뮤니케이션 리소스가 여전히 오래된 FCM 레거시 API를 사용하고 있는 경우 이 마이그레이션 가이드를 따릅니다.
SDK 설치
프로젝트 수준 build.gradle 파일을 찾아 mavenCentral()을 buildscript와 allprojects의 리포지토리 목록에 추가합니다.
buildscript {
    repositories {
    ...
        mavenCentral()
    ...
    }
}
allprojects {
    repositories {
    ...
        mavenCentral()
    ...
    }
}
그런 다음, 모듈 수준 build.gradle 파일에서 다음 줄을 dependencies 섹션에 추가합니다.
dependencies {
    ...
    implementation 'com.azure.android:azure-communication-calling:1.0.0'
    ...
}
필요한 개체 초기화
CallAgent 인스턴스를 만들려면 CallClient 인스턴스에서 createCallAgent 메서드를 호출해야 합니다. 이 호출은 CallAgent 인스턴스 개체를 비동기적으로 반환합니다.
createCallAgent 메서드는 CommunicationUserCredential을 인수로 사용하여 액세스 토큰을 캡슐화합니다.
DeviceManager에 액세스하려면 먼저 callAgent 인스턴스를 만들어야 합니다. 그런 다음 CallClient.getDeviceManager 메서드를 사용하여 DeviceManager를 가져올 수 있습니다.
String userToken = '<user token>';
CallClient callClient = new CallClient();
CommunicationTokenCredential tokenCredential = new CommunicationTokenCredential(userToken);
android.content.Context appContext = this.getApplicationContext(); // From within an activity, for instance
CallAgent callAgent = callClient.createCallAgent(appContext, tokenCredential).get();
DeviceManager deviceManager = callClient.getDeviceManager(appContext).get();
호출자의 표시 이름을 설정하려면 다음과 같은 대체 방법을 사용합니다.
String userToken = '<user token>';
CallClient callClient = new CallClient();
CommunicationTokenCredential tokenCredential = new CommunicationTokenCredential(userToken);
android.content.Context appContext = this.getApplicationContext(); // From within an activity, for instance
CallAgentOptions callAgentOptions = new CallAgentOptions();
callAgentOptions.setDisplayName("Alice Bob");
DeviceManager deviceManager = callClient.getDeviceManager(appContext).get();
CallAgent callAgent = callClient.createCallAgent(appContext, tokenCredential, callAgentOptions).get();
푸시 알림에 대한 추가 필수 구성 요소
Cloud Messaging(FCM)을 사용하도록 설정되었으며 Firebase Cloud Messaging 서비스가 Azure Notification Hub 인스턴스에 연결된 Firebase 계정 자세한 내용은 Communication Services 알림을 참조하세요. 또한 이 자습서에서는 Android Studio 버전 3.6 이상을 사용하여 애플리케이션을 빌드하는 것으로 가정합니다.
Firebase Cloud Messaging 서비스에서 알림 메시지를 받으려면 Android 애플리케이션에 대한 권한 세트가 필요합니다. AndroidManifest.xml 파일에서 <manifest ...> 바로 뒤에 또는 </application> 태그 바로 아래에 다음 권한 세트를 추가합니다.
<uses-permission android:name="android.permission.INTERNET"/>
<uses-permission android:name="android.permission.GET_ACCOUNTS"/>
<uses-permission android:name="com.google.android.c2dm.permission.RECEIVE" />
개요
모바일 푸시 알림은 모바일 디바이스에 표시되는 팝업 알림입니다. 통화에서는 VoIP(Voice over Internet Protocol) 푸시 알림을 집중적으로 다루겠습니다. 푸시 알림에 등록하고, 푸시 알림을 처리한 후 푸시 알림의 등록을 해제합니다.
참고 항목
푸시 알림에 등록하고 Teams 사용자에게 수신되는 푸시 알림을 처리하는 API는 동일합니다. 여기에 설명된 API는 CommonCallAgent 또는 TeamsCallAgent 클래스에서도 호출할 수 있습니다.
푸시 알림 등록
푸시 알림을 등록하려면 애플리케이션이 디바이스 등록 토큰을 사용하여 CallAgent 인스턴스에서 registerPushNotification()을 호출해야 합니다.
디바이스 등록 토큰을 가져오려면 dependencies 섹션에서 다음 줄을 추가하여(아직 없는 경우) Firebase SDK를 애플리케이션 모듈의 build.gradle 파일에 추가합니다.
// Add the SDK for Firebase Cloud Messaging
implementation 'com.google.firebase:firebase-core:16.0.8'
implementation 'com.google.firebase:firebase-messaging:20.2.4'
프로젝트 수준의 build.gradle 파일에서 다음 줄을 dependencies 섹션에 추가합니다(아직 없는 경우).
classpath 'com.google.gms:google-services:4.3.3'
다음 플러그 인이 아직 없는 경우 파일 첫 부분에 추가합니다.
apply plugin: 'com.google.gms.google-services'
도구 모음에서 지금 동기화를 선택합니다. 다음 코드 조각을 추가하여 클라이언트 애플리케이션 인스턴스에 대해 Firebase Cloud Messaging SDK에서 생성된 디바이스 등록 토큰을 가져옵니다. 인스턴스가 토큰을 검색할 수 있도록 기본 작업의 헤더에 아래 가져오기를 추가해야 합니다.
import com.google.android.gms.tasks.OnCompleteListener;
import com.google.android.gms.tasks.Task;
import com.google.firebase.iid.FirebaseInstanceId;
import com.google.firebase.iid.InstanceIdResult;
다음 코드 조각을 추가하여 토큰을 검색합니다.
FirebaseInstanceId.getInstance().getInstanceId()
    .addOnCompleteListener(new OnCompleteListener<InstanceIdResult>() {
        @Override
        public void onComplete(@NonNull Task<InstanceIdResult> task) {
            if (!task.isSuccessful()) {
                Log.w("PushNotification", "getInstanceId failed", task.getException());
                return;
            }

            // Get new Instance ID token
            String deviceToken = task.getResult().getToken();
            // Log
            Log.d("PushNotification", "Device Registration token retrieved successfully");
        }
    });
수신 통화 푸시 알림에 대한 Calling Services SDK에 디바이스 등록 토큰을 등록합니다.
String deviceRegistrationToken = "<Device Token from previous section>";
try {
    callAgent.registerPushNotification(deviceRegistrationToken).get();
}
catch(Exception e) {
    System.out.println("Something went wrong while registering for Incoming Calls Push Notifications.")
}
푸시 알림 처리
수신 통화 푸시 알림을 받으려면 페이로드가 있는 CallAgent 인스턴스에서 handlePushNotification()을 호출합니다.
Firebase Cloud Messaging에서 페이로드를 가져오려면 FirebaseMessagingService Firebase SDK 클래스를 확장하는 새 서비스(파일 > 새로 만들기 > 서비스 > 서비스)를 만들어 시작하고 onMessageReceived 메서드를 재정의합니다. 이 메서드는 Firebase Cloud Messaging에서 애플리케이션에 푸시 알림을 전달할 때 호출되는 이벤트 처리기입니다.
public class MyFirebaseMessagingService extends FirebaseMessagingService {
    private java.util.Map<String, String> pushNotificationMessageDataFromFCM;

    @Override
    public void onMessageReceived(RemoteMessage remoteMessage) {
        // Check if message contains a notification payload.
        if (remoteMessage.getNotification() != null) {
            Log.d("PushNotification", "Message Notification Body: " + remoteMessage.getNotification().getBody());
        }
        else {
            pushNotificationMessageDataFromFCM = remoteMessage.getData();
        }
    }
}
AndroidManifest.xml 파일의 <application> 태그 내부에 다음 서비스 정의를 추가합니다.
<service
    android:name=".MyFirebaseMessagingService"
    android:exported="false">
    <intent-filter>
        <action android:name="com.google.firebase.MESSAGING_EVENT" />
    </intent-filter>
</service>
페이로드를 검색한 후에는 CallAgent 인스턴스에서 handlePushNotification 메서드 호출을 처리하는 내부 IncomingCallInformation 개체로 구문 분석될 Communication Services SDK에 전달할 수 있습니다. CallAgent 인스턴스는 CallClient 클래스에서 createCallAgent(...) 메서드를 호출하여 만듭니다.
try {
    IncomingCallInformation notification = IncomingCallInformation.fromMap(pushNotificationMessageDataFromFCM);
    Future handlePushNotificationFuture = callAgent.handlePushNotification(notification).get();
}
catch(Exception e) {
    System.out.println("Something went wrong while handling the Incoming Calls Push Notifications.");
}
푸시 알림 메시지가 성공적으로 처리되고 모든 이벤트 처리기가 제대로 등록되면 애플리케이션이 전화를 겁니다.
푸시 알림 등록 취소
애플리케이션에서 언제든지 푸시 알림을 등록 취소할 수 있습니다. 등록을 취소하려면 callAgent에서 unregisterPushNotification() 메서드를 호출합니다.
try {
    callAgent.unregisterPushNotification().get();
}
catch(Exception e) {
    System.out.println("Something went wrong while un-registering for all Incoming Calls Push Notifications.")
}
수신 전화에 대한 내부 푸시 사용 안 함
수신 통화의 푸시 페이로드를 수신자에게 제공하는 방법에는 두 가지가 있습니다.
- FCM을 사용하고 위에 언급된 API로 디바이스 토큰을 등록합니다.
CallAgent또는TeamsCallAgent의registerPushNotification. CallAgent또는TeamsCallAgent가 만들어지면 SDK는 푸시 페이로드를 제공가져오기 위해 내부 서비스에도 등록됩니다.
CallAgentOptions 또는 TeamsCallAgentOptions의 setDisableInternalPushForIncomingCall 속성을 사용하면 내부 푸시 서비스를 사용하여 푸시 페이로드 제공을 사용하지 않도록 설정하도록 SDK에 지시할 수 있습니다.
CallAgentOptions callAgentOptions = new CallAgentOptions();
callAgentOptions.setDisableInternalPushForIncomingCall(true);
시스템 설정
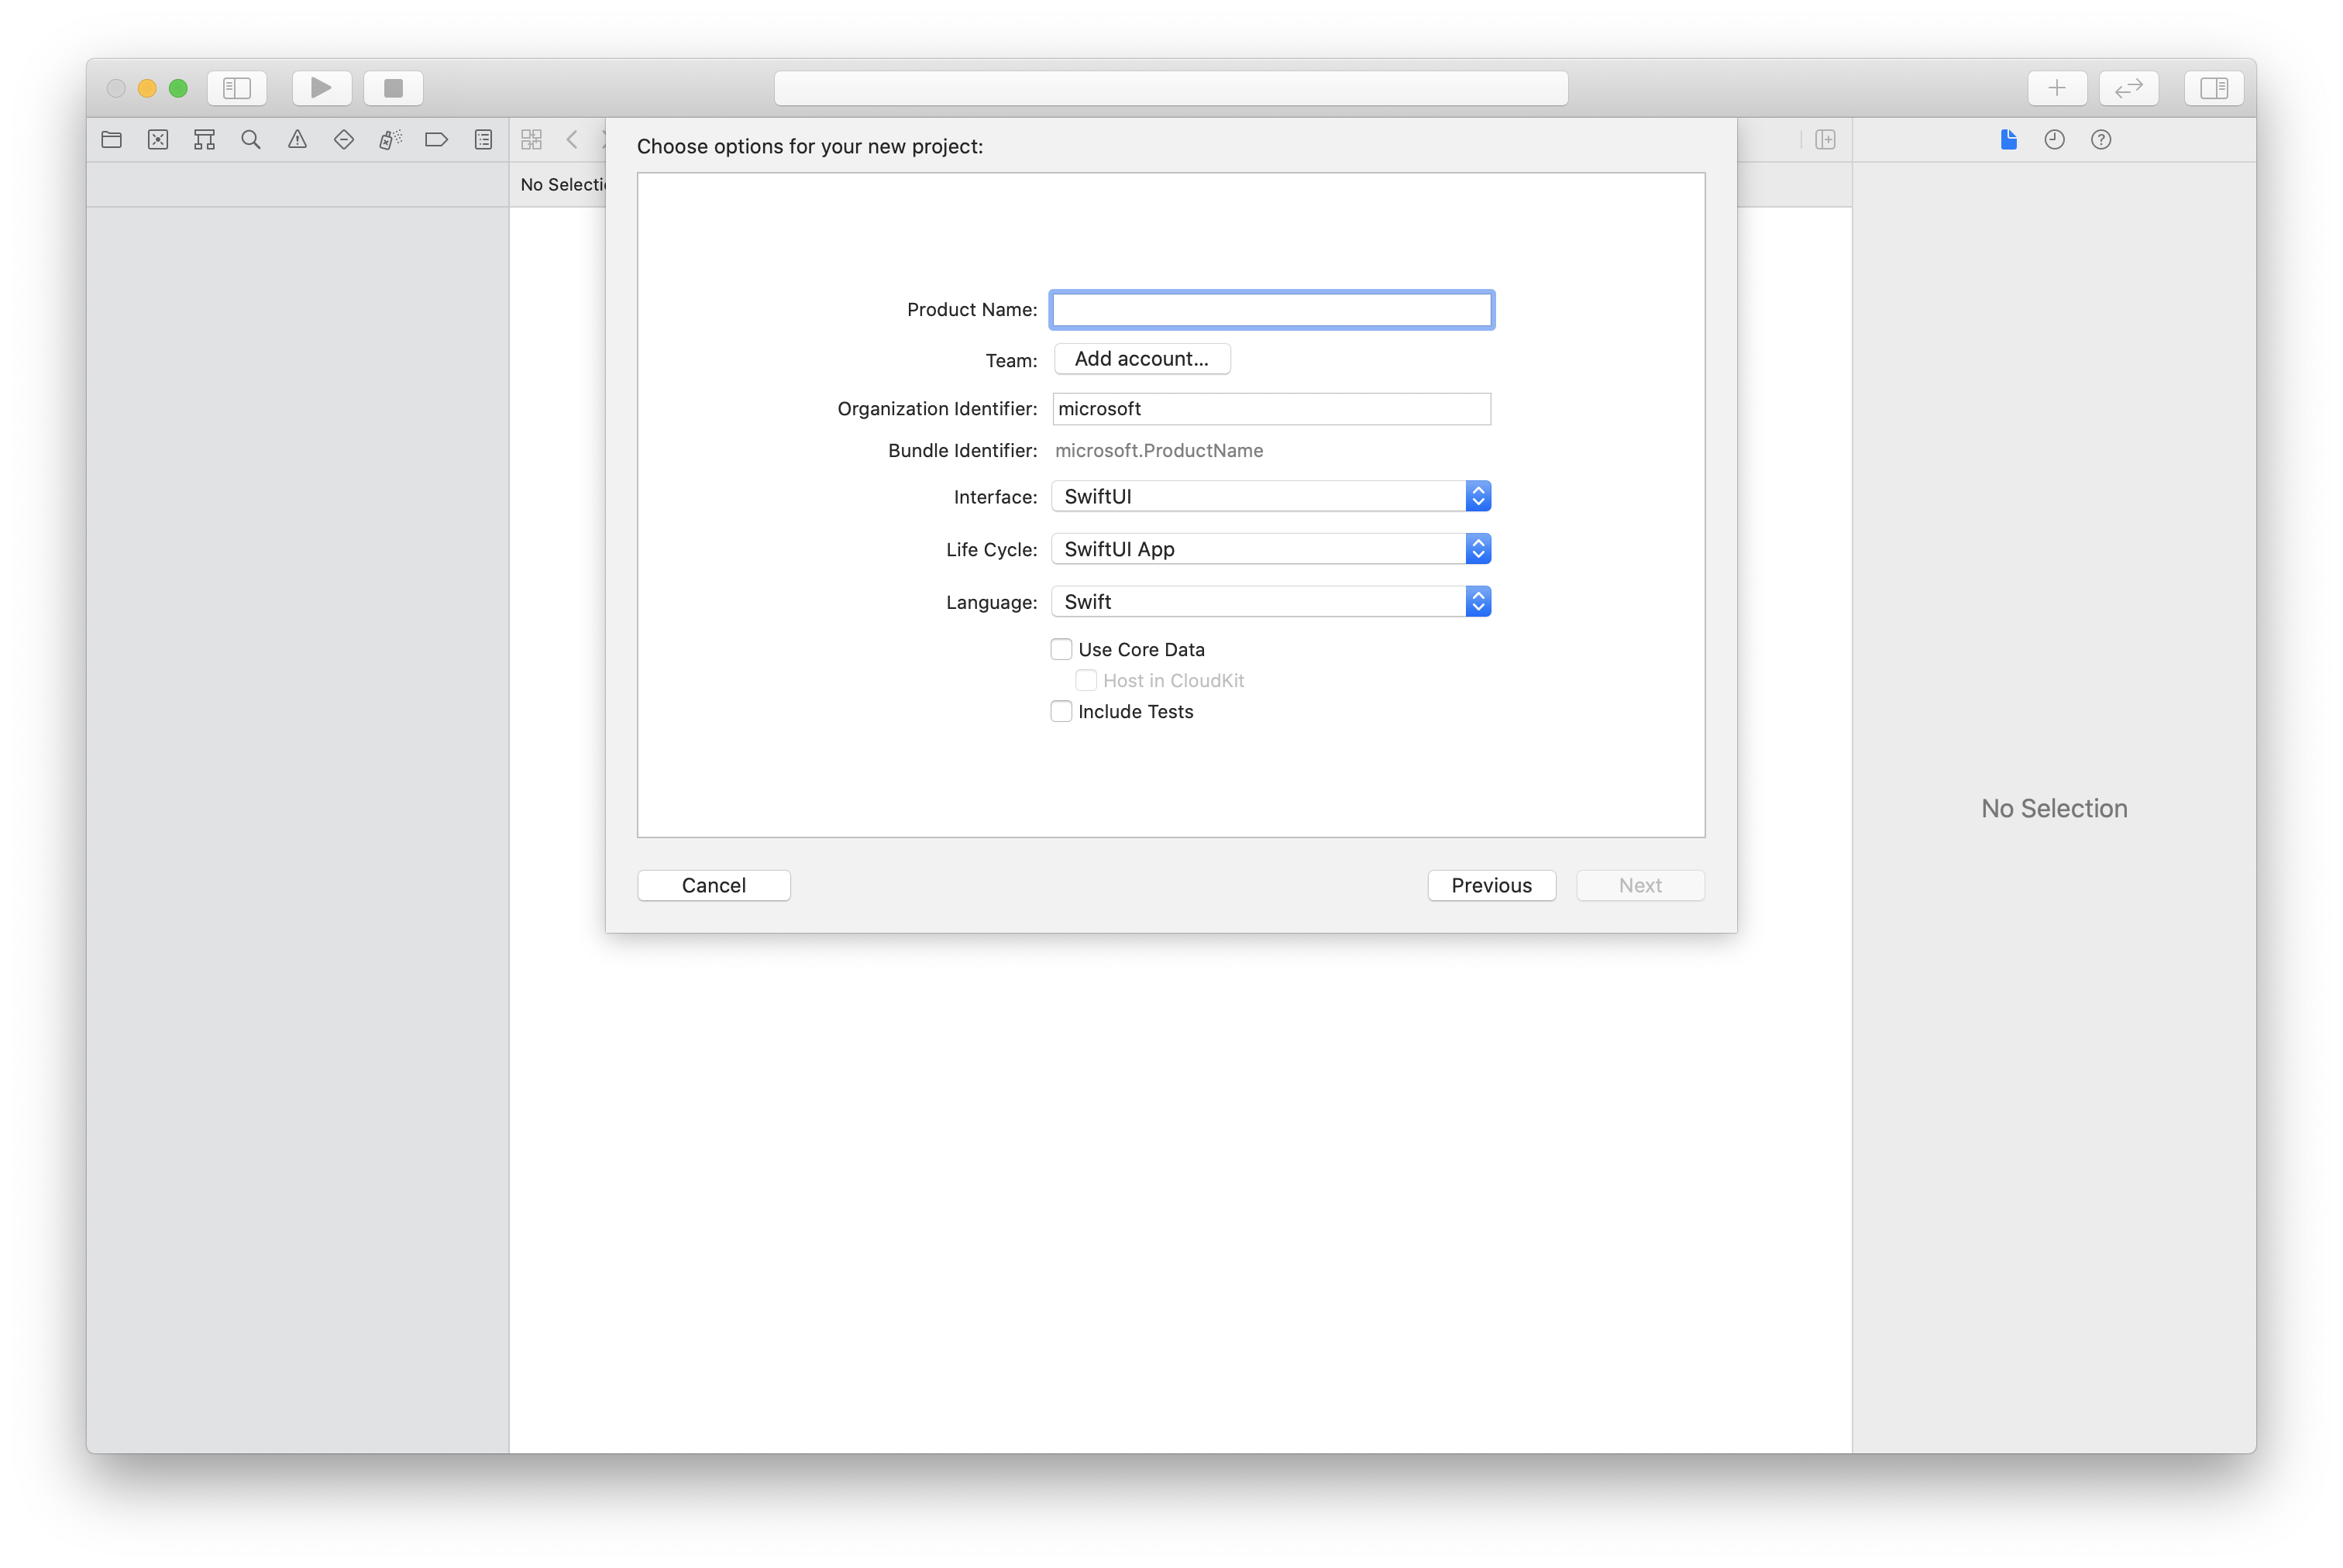
Xcode 프로젝트 만들기
Xcode에서 새 iOS 프로젝트를 만들고 단일 보기 앱 템플릿을 선택합니다. 이 빠른 시작에서는 SwiftUI 프레임워크를 사용하므로 언어를 Swift로 설정하고 인터페이스를 SwiftUI로 설정해야 합니다.
이 빠른 시작에서는 테스트를 만들지 않습니다. 테스트 포함 확인란을 선택 취소합니다.
CocoaPods를 사용하여 패키지 및 종속성 설치
다음 예제와 같이 애플리케이션에 대한 Podfile을 만듭니다.
platform :ios, '13.0'
use_frameworks!
target 'AzureCommunicationCallingSample' do
    pod 'AzureCommunicationCalling', '~> 1.0.0'
end
pod install를 실행합니다.Xcode로
.xcworkspace를 엽니다.
마이크에 대한 액세스 요청
디바이스의 마이크에 액세스하려면 앱의 정보 속성 목록을 NSMicrophoneUsageDescription(으)로 업데이트해야 합니다. 연결된 값을 시스템이 사용자의 액세스를 요청하는 데 사용하는 대화 상자에 포함될 문자열로 설정합니다.
프로젝트 트리의 Info.plist 항목을 마우스 오른쪽 단추로 클릭한 다음 Open As>Source Code를 선택합니다. 최상위 <dict> 섹션에 다음 줄을 추가한 다음, 파일을 저장합니다.
<key>NSMicrophoneUsageDescription</key>
<string>Need microphone access for VOIP calling.</string>
앱 프레임워크 설정
프로젝트의 ContentView.swift 파일을 엽니다. AzureCommunicationCalling 라이브러리를 가져오려면 파일 상단에 import 선언을 추가합니다. 추가로 AVFoundation을 가져옵니다. 코드에서 오디오 권한 요청에 필요합니다.
import AzureCommunicationCalling
import AVFoundation
CallAgent 초기화
CallAgent에서 CallClient 인스턴스를 만들려면 초기화된 후 비동기적으로 callClient.createCallAgent 개체를 반환하는 CallAgent 메서드를 사용해야 합니다.
호출 클라이언트를 만들려면 CommunicationTokenCredential 개체를 전달합니다.
import AzureCommunication

let tokenString = "token_string"
var userCredential: CommunicationTokenCredential?
do {
    let options = CommunicationTokenRefreshOptions(initialToken: token, refreshProactively: true, tokenRefresher: self.fetchTokenSync)
    userCredential = try CommunicationTokenCredential(withOptions: options)
} catch {
    updates("Couldn't created Credential object", false)
    initializationDispatchGroup!.leave()
    return
}

// tokenProvider needs to be implemented by Contoso, which fetches a new token
public func fetchTokenSync(then onCompletion: TokenRefreshOnCompletion) {
    let newToken = self.tokenProvider!.fetchNewToken()
    onCompletion(newToken, nil)
}
직접 만든 CommunicationTokenCredential 개체를 CallClient에 전달하고 표시 이름을 설정합니다.
self.callClient = CallClient()
let callAgentOptions = CallAgentOptions()
options.displayName = " iOS Azure Communication Services User"

self.callClient!.createCallAgent(userCredential: userCredential!,
    options: callAgentOptions) { (callAgent, error) in
        if error == nil {
            print("Create agent succeeded")
            self.callAgent = callAgent
        } else {
            print("Create agent failed")
        }
})
개요
모바일 푸시 알림은 모바일 디바이스에 표시되는 팝업 알림입니다. 통화에서는 VoIP(Voice over Internet Protocol) 푸시 알림을 집중적으로 다루겠습니다. 푸시 알림을 등록하고 푸시 알림을 처리한 다음, 푸시 알림을 등록 취소하겠습니다. iOS 애플리케이션의 CallKit 통합에 대한 안내는 여기에서 iOS ACS SDK와 CallKit 통합을 참조하세요.
참고 항목
푸시 알림에 등록하고 Teams 사용자에게 수신되는 푸시 알림을 처리하는 API는 동일합니다. 여기에 설명된 API는 CommonCallAgent 또는 TeamsCallAgent 클래스에서도 호출할 수 있습니다.
푸시 알림 설정
모바일 푸시 알림은 모바일 디바이스에 표시되는 팝업 알림입니다. 통화에서는 VoIP(Voice over Internet Protocol) 푸시 알림을 집중적으로 다루겠습니다.
다음 섹션에서는 푸시 알림을 등록, 처리 및 등록 취소하는 방법을 설명합니다. 이러한 작업을 시작하기 전에 다음 필수 조건을 완료해야 합니다.
- Xcode에서 서명 및 기능으로 이동합니다. + 기능을 선택하여 기능을 추가한 다음, 푸시 알림을 선택합니다.
- + 기능을 선택하여 다른 기능을 추가한 다음, 백그라운드 모드를 선택합니다.
- 백그라운드 모드에서 Voice over IP 및 원격 알림 확인란을 선택합니다.

푸시 알림 등록
푸시 알림을 등록하려면 디바이스 등록 토큰을 사용하여 CallAgent 인스턴스에서 registerPushNotification()을 호출해야 합니다.
성공적으로 초기화한 이후 푸시 알림에 대한 등록이 이루어져야 합니다. callAgent 개체가 destroy되면 푸시 알림을 자동으로 등록 취소하는 logout이 호출됩니다.
let deviceToken: Data = pushRegistry?.pushToken(for: PKPushType.voIP)
callAgent.registerPushNotifications(deviceToken: deviceToken!) { (error) in
    if(error == nil) {
        print("Successfully registered to push notification.")
    } else {
        print("Failed to register push notification.")
    }
}
푸시 알림 처리
수신 전화에 대한 푸시 알림을 받으려면 사전 페이로드를 사용하여 CallAgent 인스턴스에서 handlePushNotification()을 호출합니다.
let callNotification = PushNotificationInfo.fromDictionary(pushPayload.dictionaryPayload)

callAgent.handlePush(notification: callNotification) { (error) in
    if (error == nil) {
        print("Handling of push notification was successful")
    } else {
        print("Handling of push notification failed")
    }
}
푸시 알림 등록 취소
애플리케이션에서 언제든지 푸시 알림을 등록 취소할 수 있습니다. CallAgent에서 unregisterPushNotification 메서드를 호출하기만 하면 됩니다.
참고 항목
로그아웃 시 애플리케이션이 푸시 알림에서 자동으로 등록 취소되지 않습니다.
callAgent.unregisterPushNotification { (error) in
    if (error == nil) {
        print("Unregister of push notification was successful")
    } else {
       print("Unregister of push notification failed, please try again")
    }
}
수신 전화에 대한 내부 푸시 사용 안 함
수신 통화의 푸시 페이로드를 수신자에게 제공하는 방법에는 두 가지가 있습니다.
- APNS를 사용하고 위에 언급된 API로 디바이스 토큰을 등록합니다.
CallAgent또는TeamsCallAgent의registerPushNotification. CallAgent또는TeamsCallAgent가 만들어지면 SDK는 푸시 페이로드를 제공가져오기 위해 내부 서비스에도 등록됩니다.
CallAgentOptions 또는 TeamsCallAgentOptions의 disableInternalPushForIncomingCall 속성을 사용하면 내부 푸시 서비스를 사용하여 푸시 페이로드 제공을 사용하지 않도록 설정하도록 SDK에 지시할 수 있습니다.
let options = CallAgentOptions()
options.disableInternalPushForIncomingCall = true
시스템 설정
Visual Studio 프로젝트 만들기
UWP 앱의 경우 Visual Studio 2022에서 새 빈 앱(유니버설 Windows) 프로젝트를 만듭니다. 프로젝트 이름을 입력한 다음 10.0.17763.0보다 버전이 높은 Windows SDK를 아무거나 선택합니다.
WinUI 3 앱의 경우, 빈 앱, 패키지됨(데스크톱의 WinUI 3) 템플릿으로 새 프로젝트를 만들어 한 페이지 짜리 WinUI 3 앱을 설정합니다. Windows 앱 SDK 버전 1.3 이상이 필요합니다.
NuGet 패키지 관리자를 사용하여 패키지와 종속성 설치
Calling SDK API와 라이브러리는 NuGet 패키지를 통해 공개적으로 사용할 수 있습니다.
다음 단계는 Calling SDK NuGet 패키지를 찾고, 다운로드하고, 설치하는 방법을 안내합니다.
- 도구>NuGet 패키지 관리자>솔루션용 NuGet 패키지 관리를 선택해 NuGet 패키지 관리자를 엽니다.
- 찾아보기를 선택한 다음 검색 상자에
Azure.Communication.Calling.WindowsClient를 입력합니다. - 시험판 포함 확인란이 선택되어 있는지 확인합니다.
Azure.Communication.Calling.WindowsClient패키지를 선택한 다음Azure.Communication.Calling.WindowsClient1.4.0-beta.1 이후 버전을 선택합니다.- 오른쪽 탭에서 Communication Services 프로젝트에 해당하는 확인란을 선택합니다.
- 설치 단추를 선택합니다.
개요
Windows 플랫폼의 푸시 알림은 Windows Push Notification Service (WNS),를 사용하여 배달됩니다.
참고 항목
푸시 알림을 등록하고 CTE(사용자 지정 Teams 엔드포인트)에 대한 푸시 알림을 처리하려면 API가 동일합니다. 아래에 설명된 API는 CTE(사용자 지정 Teams 엔드포인트)의 CommonCallAgent 또는 TeamsCallAgent 클래스에서 호출될 수도 있습니다.
푸시 알림 설정
푸시 알림은 디바이스에서 가져오는 팝업 알림입니다. 통화에서는 VoIP(Voice over Internet Protocol) 푸시 알림을 집중적으로 다루겠습니다.
다음 섹션에서는 수신 전화를 응답/거절하는 Windows 알림을 등록, 처리 및 표시하는 방법을 설명합니다. 이러한 작업을 시작하기 전에 다음 필수 조건을 완료해야 합니다.
자습서: Azure Notification Hubs를 사용하여 유니버설 Windows 플랫폼 앱에 알림 보내기를 따르세요. 이 자습서를 따른 후 다음을 수행합니다.
WindowsAzure.Messaging.Managed및Microsoft.Toolkit.Uwp.Notifications패키지가 있는 애플리케이션입니다.<AZURE_PNH_HUB_NAME>(으)로 참조되는 Azure PNH(푸시 알림 허브) 허브 이름 및 이 빠른 시작에서<AZURE_PNH_HUB_CONNECTION_STRING>(으)로 참조되는 Azure PNH 연결 문자열입니다.
모든 애플리케이션 init에서 WNS(Windows 알림 서비스) 채널을 등록하려면 App.xaml.cs 파일에 초기화 코드를 추가해야 합니다.
// App.xaml.cs

protected override async void OnLaunched(LaunchActivatedEventArgs e)
{
    await InitNotificationsAsync();

    ...
}

private async Task InitNotificationsAsync()
{
    if (AZURE_PNH_HUB_NAME != "<AZURE_PNH_HUB_NAME>" && AZURE_PNH_HUB_CONNECTION_STRING != "<AZURE_PNH_HUB_CONNECTION_STRING>")
    {
        var channel = await PushNotificationChannelManager.CreatePushNotificationChannelForApplicationAsync();
        channel.PushNotificationReceived += Channel_PushNotificationReceived;

        var hub = new NotificationHub(AZURE_PNH_HUB_NAME, AZURE_PNH_HUB_CONNECTION_STRING);
        var result = await hub.RegisterNativeAsync(channel.Uri);

        if (result.ChannelUri != null)
        {
            PNHChannelUri = new Uri(result.ChannelUri);
        }
        else
        {
            Debug.WriteLine("Cannot register WNS channel");
        }
    }
}
- App.xaml.cs 새 푸시 알림 메시지가 도착하면 활성화된 이벤트 처리기를 등록합니다.
// App.xaml.cs

private void Channel_PushNotificationReceived(PushNotificationChannel sender, PushNotificationReceivedEventArgs args)
{
    switch (args.NotificationType)
    {
      case PushNotificationType.Toast:
      case PushNotificationType.Tile:
      case PushNotificationType.TileFlyout:
      case PushNotificationType.Badge:
          break;
      case PushNotificationType.Raw:
          var frame = (Frame)Window.Current.Content;
          if (frame.Content is MainPage)
          {
              var mainPage = frame.Content as MainPage;
              await mainPage.HandlePushNotificationIncomingCallAsync(args.RawNotification.Content);
          }
          break;
    }
}
푸시 알림 등록
푸시 알림을 등록하려면 애플리케이션 init에서 얻은 WNS 등록 채널이 있는 CallAgent 인스턴스에서 RegisterForPushNotificationAsync()을(를) 호출합니다.
성공적으로 초기화한 이후 푸시 알림에 대한 등록이 이루어져야 합니다.
// MainPage.xaml.cs

this.callAgent = await this.callClient.CreateCallAgentAsync(tokenCredential, callAgentOptions);

if ((Application.Current as App).PNHChannelUri != null)
{
    await this.callAgent.RegisterForPushNotificationAsync((Application.Current as App).PNHChannelUri.ToString());
}

this.callAgent.CallsUpdated += OnCallsUpdatedAsync;
this.callAgent.IncomingCallReceived += OnIncomingCallAsync;
푸시 알림 처리
수신 전화에 대한 푸시 알림을 받으려면 사전 페이로드를 사용하여 CallAgent 인스턴스에서 handlePushNotification()을 호출합니다.
// MainPage.xaml.cs

public async Task HandlePushNotificationIncomingCallAsync(string notificationContent)
{
    if (this.callAgent != null)
    {
        PushNotificationDetails pnDetails = PushNotificationDetails.Parse(notificationContent);
        await callAgent.HandlePushNotificationAsync(pnDetails);
    }
}
그러면 CallAgent에서 들어오는 호출 알림을 표시하는 수신 호출 이벤트가 트리거됩니다.
// MainPage.xaml.cs

private async void OnIncomingCallAsync(object sender, IncomingCallReceivedEventArgs args)
{
    incomingCall = args.IncomingCall;
    (Application.Current as App).ShowIncomingCallNotification(incomingCall);
}
// App.xaml.cs

public void ShowIncomingCallNotification(IncomingCall incomingCall)
{
    string incomingCallType = incomingCall.IsVideoEnabled ? "Video" : "Audio";
    string caller = incomingCall.CallerDetails.DisplayName != "" ? incomingCall.CallerDetails.DisplayName : incomingCall.CallerDetails.Identifier.RawId;
    new ToastContentBuilder()
    .SetToastScenario(ToastScenario.IncomingCall)
    .AddText(caller + " is calling you.")
    .AddText("New Incoming " + incomingCallType + " Call")
      .AddButton(new ToastButton()
          .SetContent("Decline")
          .AddArgument("action", "decline"))
      .AddButton(new ToastButton()
          .SetContent("Accept")
          .AddArgument("action", "accept"))
      .Show();
}
OnActivated 메서드에서 알림에 대한 단추 누름을 처리하는 코드를 추가합니다.
// App.xaml.cs

protected override async void OnActivated(IActivatedEventArgs e)
{
    // Handle notification activation
    if (e is ToastNotificationActivatedEventArgs toastActivationArgs)
    {
      ToastArguments args = ToastArguments.Parse(toastActivationArgs.Argument);
      string action = args?.Get("action");

      if (!string.IsNullOrEmpty(action))
      {
          var frame = Window.Current.Content as Frame;
          if (frame.Content is MainPage)
          {
              var mainPage = frame.Content as MainPage;
              await mainPage.AnswerIncomingCall(action);
          }
      }
    }
}
// MainPage.xaml.cs

public async Task AnswerIncomingCall(string action)
{
    if (action == "accept")
    {
      var acceptCallOptions = new AcceptCallOptions()
      {
          IncomingVideoOptions = new IncomingVideoOptions()
          {
              StreamKind = VideoStreamKind.RemoteIncoming
          }
      };

      call = await incomingCall?.AcceptAsync(acceptCallOptions);
      call.StateChanged += OnStateChangedAsync;
      call.RemoteParticipantsUpdated += OnRemoteParticipantsUpdatedAsync;
    }
    else if (action == "decline")
    {
      await incomingCall?.RejectAsync();
    }
}