Azure CLI를 사용하여 Web Application Firewall 활성화
애플리케이션 게이트웨이에서 WAF(웹 애플리케이션 방화벽)으로 트래픽을 제한할 수 있습니다. WAF는 OWASP 규칙을 사용하여 애플리케이션을 보호합니다. 이러한 규칙에는 SQL 삽입, 사이트 간 스크립팅 공격 및 세션 하이재킹과 같은 공격으로부터의 보호가 포함됩니다.
이 문서에서는 다음 방법을 설명합니다.
- 네트워크 설정
- WAF를 사용하는 애플리케이션 게이트웨이 만들기
- 가상 머신 확장 집합 만들기
- 스토리지 계정 만들기 및 진단 구성

원하는 경우 Azure PowerShell을 사용하여 이 절차를 완료할 수 있습니다.
Azure를 구독하고 있지 않다면 시작하기 전에 Azure 체험 계정을 만듭니다.
사전 요구 사항
Azure Cloud Shell에서 Bash 환경을 사용합니다. 자세한 내용은 Azure Cloud Shell의 Bash에 대한 빠른 시작을 참조하세요.

CLI 참조 명령을 로컬에서 실행하려면 Azure CLI를 설치합니다. Windows 또는 macOS에서 실행 중인 경우 Docker 컨테이너에서 Azure CLI를 실행하는 것이 좋습니다. 자세한 내용은 Docker 컨테이너에서 Azure CLI를 실행하는 방법을 참조하세요.
로컬 설치를 사용하는 경우 az login 명령을 사용하여 Azure CLI에 로그인합니다. 인증 프로세스를 완료하려면 터미널에 표시되는 단계를 수행합니다. 다른 로그인 옵션은 Azure CLI를 사용하여 로그인을 참조하세요.
메시지가 표시되면 처음 사용할 때 Azure CLI 확장을 설치합니다. 확장에 대한 자세한 내용은 Azure CLI에서 확장 사용을 참조하세요.
az version을 실행하여 설치된 버전과 종속 라이브러리를 찾습니다. 최신 버전으로 업그레이드하려면 az upgrade를 실행합니다.
- 이 문서에는 Azure CLI 버전 2.0.4 이상이 필요합니다. Azure Cloud Shell을 사용하는 경우 최신 버전이 이미 설치되어 있습니다.
리소스 그룹 만들기
리소스 그룹은 Azure 리소스가 배포 및 관리되는 논리적 컨테이너입니다. az group create를 사용하여 myResourceGroupAG라는 Azure 리소스 그룹을 만듭니다.
az group create --name myResourceGroupAG --location eastus
네트워크 리소스 만들기
가상 네트워크 및 서브넷을 사용하여 애플리케이션 게이트웨이 및 연결된 리소스에 대한 네트워크 연결을 제공합니다. myVNet이라는 가상 네트워크와 myAGSubnet이라는 서브넷을 만듭니다. 그런 다음, myAGPublicIPAddress라는 공용 IP 주소를 만듭니다.
az network vnet create \
  --name myVNet \
  --resource-group myResourceGroupAG \
  --location eastus \
  --address-prefix 10.0.0.0/16 \
  --subnet-name myBackendSubnet \
  --subnet-prefix 10.0.1.0/24

az network vnet subnet create \
  --name myAGSubnet \
  --resource-group myResourceGroupAG \
  --vnet-name myVNet \
  --address-prefix 10.0.2.0/24

az network public-ip create \
  --resource-group myResourceGroupAG \
  --name myAGPublicIPAddress \
  --allocation-method Static \
  --sku Standard
WAF 정책을 사용하여 애플리케이션 게이트웨이 만들기
az network application-gateway create를 사용하여 myAppGateway라는 애플리케이션 게이트웨이를 만들 수 있습니다. Azure CLI를 사용하여 애플리케이션 게이트웨이를 만들 때 용량, sku, HTTP 설정 등의 구성 정보를 지정합니다. 애플리케이션 게이트웨이는 myAGSubnet 및 myAGPublicIPAddress에 할당됩니다.
az network application-gateway waf-policy create \
  --name waf-pol \
  --resource-group myResourceGroupAG \
  --type OWASP \
  --version 3.2

az network application-gateway create \
  --name myAppGateway \
  --location eastus \
  --resource-group myResourceGroupAG \
  --vnet-name myVNet \
  --subnet myAGSubnet \
  --capacity 2 \
  --sku WAF_v2 \
  --http-settings-cookie-based-affinity Disabled \
  --frontend-port 80 \
  --http-settings-port 80 \
  --http-settings-protocol Http \
  --public-ip-address myAGPublicIPAddress \
  --waf-policy waf-pol \
  --priority 1
애플리케이션 게이트웨이가 생성될 때까지 몇 분 정도 걸릴 수 있습니다. 애플리케이션 게이트웨이가 생성되면 다음과 같은 새 기능을 볼 수 있습니다.
- appGatewayBackendPool - 애플리케이션 게이트웨이에 백 엔드 주소 풀이 하나 이상 있어야 합니다.
- appGatewayBackendHttpSettings - 포트 80 및 HTTP 프로토콜을 통신에 사용하도록 지정합니다.
- appGatewayHttpListener - appGatewayBackendPool에 연결되는 기본 수신기입니다.
- appGatewayFrontendIP - myAGPublicIPAddress를 appGatewayHttpListener에 할당합니다.
- rule1 - appGatewayHttpListener에 연결되는 기본 라우팅 규칙입니다.
가상 머신 확장 집합 만들기
이 예제에서는 애플리케이션 게이트웨이의 백 엔드 풀에 두 개의 서버를 제공하는 가상 머신 확장 집합을 만듭니다. 확장 집합의 가상 머신은 myBackendSubnet 서브넷과 연결됩니다. 확장 집합을 만들려면 az vmss create를 사용합니다.
실행하기 전에 <username> 및 <password>를 사용자 값으로 바꿉니다.
az vmss create \
  --name myvmss \
  --resource-group myResourceGroupAG \
  --image Ubuntu2204 \
  --admin-username <username> \
  --admin-password <password> \
  --instance-count 2 \
  --vnet-name myVNet \
  --subnet myBackendSubnet \
  --vm-sku Standard_DS2 \
  --upgrade-policy-mode Automatic \
  --app-gateway myAppGateway \
  --backend-pool-name appGatewayBackendPool
NGINX 설치
az vmss extension set \
  --publisher Microsoft.Azure.Extensions \
  --version 2.0 \
  --name CustomScript \
  --resource-group myResourceGroupAG \
  --vmss-name myvmss \
  --settings '{ "fileUris": ["https://raw.githubusercontent.com/Azure/azure-docs-powershell-samples/master/application-gateway/iis/install_nginx.sh"],"commandToExecute": "./install_nginx.sh" }'
스토리지 계정 만들기 및 진단 구성
이 문서에서 애플리케이션 게이트웨이는 스토리지 계정을 사용하여 검색 및 방지 목적으로 데이터를 저장합니다. Azure Monitor 로그 또는 Event Hub를 사용하여 데이터를 기록할 수도 있습니다.
저장소 계정 만들기
az storage account create를 사용하여 myagstore1이라는 스토리지 계정을 만듭니다.
az storage account create \
  --name myagstore1 \
  --resource-group myResourceGroupAG \
  --location eastus \
  --sku Standard_LRS \
  --encryption-services blob
진단 구성
ApplicationGatewayAccessLog, ApplicationGatewayPerformanceLog 및 ApplicationGatewayFirewallLog 로그에 데이터를 기록하도록 진단을 구성합니다. <subscriptionId>를 구독 식별자로 바꾼 다음, az monitor diagnostic-settings create를 사용하여 진단을 구성합니다.
appgwid=$(az network application-gateway show --name myAppGateway --resource-group myResourceGroupAG --query id -o tsv)

storeid=$(az storage account show --name myagstore1 --resource-group myResourceGroupAG --query id -o tsv)

az monitor diagnostic-settings create --name appgwdiag --resource $appgwid \
  --logs '[ { "category": "ApplicationGatewayAccessLog", "enabled": true, "retentionPolicy": { "days": 30, "enabled": true } }, { "category": "ApplicationGatewayPerformanceLog", "enabled": true, "retentionPolicy": { "days": 30, "enabled": true } }, { "category": "ApplicationGatewayFirewallLog", "enabled": true, "retentionPolicy": { "days": 30, "enabled": true } } ]' \
  --storage-account $storeid
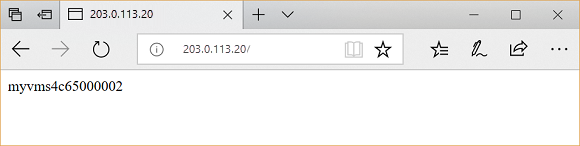
애플리케이션 게이트웨이 테스트
애플리케이션 게이트웨이의 공용 IP 주소를 가져오려면 az network public-ip show를 사용합니다. 공용 IP 주소를 복사하여 브라우저의 주소 표시줄에 붙여넣습니다.
az network public-ip show \
  --resource-group myResourceGroupAG \
  --name myAGPublicIPAddress \
  --query [ipAddress] \
  --output tsv
리소스 정리
더 이상 필요 없는 리소스 그룹, 애플리케이션 게이트웨이 및 모든 관련 리소스를 제거합니다.
az group delete --name myResourceGroupAG