IP 보안 <추가>
개요
<add> 컬렉션의 <ipSecurity> 요소는 고유한 IP 보안 제한을 정의합니다. 각 제한은 IP 버전 4 주소, IP 버전 4 주소 범위 또는 DNS 도메인 이름을 기반으로 할 수 있습니다.
호환성
| 버전 | 참고 |
|---|---|
| IIS 10.0 | <add> 요소가 IIS 10.0에서 수정되지 않았습니다. |
| IIS 8.5 | <add> 요소가 IIS 8.5에서 수정되지 않았습니다. |
| IIS 8.0 | <add> 요소가 IIS 8.0에서 수정되지 않았습니다. |
| IIS 7.5 | <add> 요소가 IIS 7.5에서 수정되지 않았습니다. |
| IIS 7.0 | <add> 컬렉션의 <ipSecurity> 요소는 IIS 7.0에서 도입되었습니다. |
| IIS 6.0 | 컬렉션은 <ipSecurity> IIS 6.0 IPSecurity 메타베이스 속성을 대체합니다. |
설치 프로그램
IIS의 기본 설치에는 IP 보안을 위한 역할 서비스 또는 Windows 기능이 포함되지 않습니다. IIS에서 IP 보안을 사용하려면 다음 단계를 사용하여 역할 서비스 또는 Windows 기능을 설치해야 합니다.
Windows Server 2012 또는 Windows Server 2012 R2
- 작업 표시줄에서 서버 관리자를 클릭합니다.
- 서버 관리자관리 메뉴를 클릭한 다음 역할 및 기능 추가를 클릭합니다.
- 역할 및 기능 추가 마법사에서 다음을 클릭합니다. 설치 유형을 선택하고 다음을 클릭합니다. 대상 서버를 선택하고 다음을 클릭합니다.
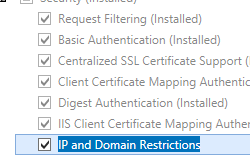
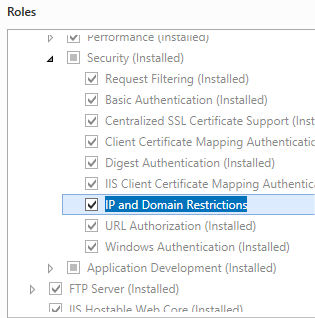
- 서버 역할 페이지에서 웹 서버(IIS)를 확장하고, 웹 서버를 확장하고, 보안을 확장한 다음, IP 및 도메인 제한을 선택합니다. 다음을 클릭합니다.
 .
. - 기능 선택 페이지에서 다음을 클릭합니다.
- 설치 선택 확인 페이지에서 설치를 클릭합니다.
- Results(결과) 페이지에서 Close(닫기)를 클릭합니다.
Windows 8 또는 Windows 8.1
- 시작 화면에서 포인터를 왼쪽 아래 모서리로 이동하고 시작 단추를 마우스 오른쪽 단추로 클릭한 다음 제어판 클릭합니다.
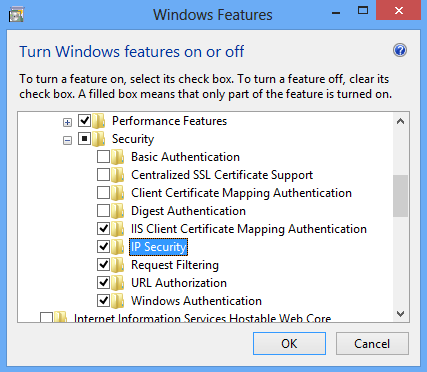
- 제어판프로그램 및 기능을 클릭한 다음 Windows 기능 켜기 또는 끄기를 클릭합니다.
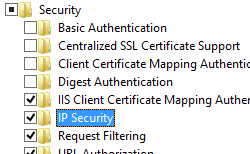
- 인터넷 정보 서비스를 확장하고 World Wide Web Services를 확장한 다음 보안을 확장한 다음 IP 보안을 선택합니다.
- 확인을 클릭합니다.
- 닫기를 클릭합니다.
Windows Server 2008 또는 Windows Server 2008 R2
작업 표시줄에서 시작을 클릭하고 관리 도구를 가리킨 다음 서버 관리자 클릭합니다.
서버 관리자 계층 구조 창에서 역할을 확장한 다음 웹 서버(IIS)를 클릭합니다.
웹 서버(IIS) 창에서 Role Services 섹션으로 스크롤한 다음 역할 서비스 추가를 클릭합니다.
역할 서비스 추가 마법사의 역할 서비스 선택 페이지에서 IP 및 도메인 제한을 선택하고 다음을 클릭합니다.

설치 선택 확인 페이지에서 설치를 클릭합니다.
Results(결과) 페이지에서 Close(닫기)를 클릭합니다.

Windows Vista 또는 Windows 7
작업 표시줄에서 시작을 클릭한 다음 제어판 클릭합니다.
제어판프로그램 및 기능을 클릭한 다음 Windows 기능 켜기 또는 끄기를 클릭합니다.
인터넷 정보 서비스, World Wide Web Services, 보안을 차례로 확장합니다.
IP 보안을 선택한 다음 확인을 클릭합니다.

방법
웹 사이트에 대한 액세스를 거부하는 IP 제한을 추가하는 방법
IIS(인터넷 정보 서비스) 관리자를 엽니다.
Windows Server 2012 또는 Windows Server 2012 R2를 사용하는 경우:
- 작업 표시줄에서 서버 관리자 클릭하고 도구를 클릭한 다음 IIS(인터넷 정보 서비스) 관리자를 클릭합니다.
Windows 8 또는 Windows 8.1 사용하는 경우:
- Windows 키를 누른 채로 문자 X를 누른 다음 제어판 클릭합니다.
- 관리 도구를 클릭한 다음 IIS(인터넷 정보 서비스) 관리자를 두 번 클릭합니다.
Windows Server 2008 또는 Windows Server 2008 R2를 사용하는 경우:
- 작업 표시줄에서 시작을 클릭하고 관리 도구를 가리킨 다음 IIS(인터넷 정보 서비스) 관리자를 클릭합니다.
Windows Vista 또는 Windows 7을 사용하는 경우:
- 작업 표시줄에서 시작을 클릭한 다음 제어판 클릭합니다.
- 관리 도구를 두 번 클릭한 다음 IIS(인터넷 정보 서비스) 관리자를 두 번 클릭합니다.
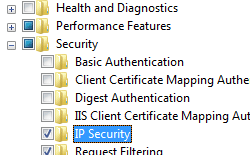
연결 창에서 서버 이름을 확장하고 사이트를 확장한 다음 IP 제한을 추가할 사이트, 애플리케이션 또는 웹 서비스를 확장합니다.
홈 창에서 IP 주소 및 도메인 제한 기능을 두 번 클릭합니다.

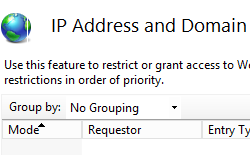
IP 주소 및 도메인 제한 기능의 작업 창에서 거부 항목 추가...를 클릭합니다.
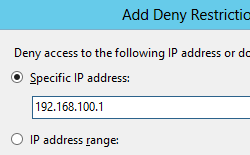
거부하려는 IP 주소를 입력한 다음 확인을 클릭합니다.


웹 사이트에 대한 IP 제한 기능 설정을 편집하는 방법
IIS(인터넷 정보 서비스) 관리자를 엽니다.
Windows Server 2012 또는 Windows Server 2012 R2를 사용하는 경우:
- 작업 표시줄에서 서버 관리자 클릭하고 도구를 클릭한 다음 IIS(인터넷 정보 서비스) 관리자를 클릭합니다.
Windows 8 또는 Windows 8.1 사용하는 경우:
- Windows 키를 누른 채로 문자 X를 누른 다음 제어판 클릭합니다.
- 관리 도구를 클릭한 다음 IIS(인터넷 정보 서비스) 관리자를 두 번 클릭합니다.
Windows Server 2008 또는 Windows Server 2008 R2를 사용하는 경우:
- 작업 표시줄에서 시작을 클릭하고 관리 도구를 가리킨 다음 IIS(인터넷 정보 서비스) 관리자를 클릭합니다.
Windows Vista 또는 Windows 7을 사용하는 경우:
- 작업 표시줄에서 시작을 클릭한 다음 제어판 클릭합니다.
- 관리 도구를 두 번 클릭한 다음 IIS(인터넷 정보 서비스) 관리자를 두 번 클릭합니다.
연결 창에서 서버 이름을 확장하고 사이트를 확장한 다음 IP 제한을 추가할 사이트, 애플리케이션 또는 웹 서비스를 확장합니다.
홈 창에서 IP 주소 및 도메인 제한 기능을 두 번 클릭합니다.

IP 주소 및 도메인 제한 기능의 작업 창에서 기능 설정 편집...을 클릭합니다.

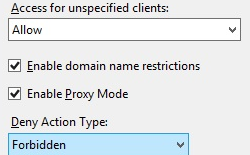
지정되지 않은 클라이언트에 대한 기본 액세스 동작을 선택하고 도메인 이름으로 제한을 사용하도록 설정할지 여부를 지정하고 프록시 모드를 사용하도록 설정할지 여부를 지정하고 거부 작업 유형을 선택한 다음 확인을 클릭합니다.


구성
규칙은 목록에 표시되는 순서대로 위에서 아래로 처리됩니다. 허용 목록에 있는 특성이 마지막으로 처리됩니다. IPsec(인터넷 프로토콜 보안) 제한에 대한 모범 사례는 거부 규칙을 먼저 나열하는 것입니다.
특성
| attribute | Description |
|---|---|
allowed |
선택적 부울 특성입니다. 주소 공간에 대한 액세스를 허용할지 여부를 지정합니다. 기본값은 false입니다. |
domainName |
선택적 문자열 특성입니다. 제한 규칙을 적용할 도메인 이름을 지정합니다. 별표(*)를 와일드카드로 사용할 수 있습니다. |
ipAddress |
선택적 문자열 특성입니다. 제한 규칙을 적용할 IP 버전 4 주소를 지정합니다. |
subnetMask |
선택적 문자열 특성입니다. 이 제한 규칙에 대한 IP 주소를 평가할 서브넷 마스크를 지정합니다. 서브넷 마스크를 사용하여 주소 공간에서 IP 주소 범위를 식별할 수 있습니다. 기본값을 사용하려면 평가 중인 IP 주소의 직접 일치(사실상 단일 주소 범위)가 필요합니다. 기본값은 255.255.255.255입니다. |
자식 요소
없음
구성 샘플
다음 구성 샘플에서는 기본 웹 사이트에 두 개의 IP 제한을 추가합니다. 첫 번째 제한은 IP 주소 192.168.100.1에 대한 액세스를 거부하고 두 번째 제한은 전체 169.254.0.0 네트워크에 대한 액세스를 거부합니다.
<location path="Default Web Site">
   <system.webServer>
      <security>
         <ipSecurity>
            <add ipAddress="192.168.100.1" />
            <add ipAddress="169.254.0.0" subnetMask="255.255.0.0" />
         </ipSecurity>
      </security>
   </system.webServer>
</location>
샘플 코드
다음 코드 샘플은 기본 웹 사이트에 두 개의 IP 제한을 추가합니다. 첫 번째 제한은 IP 주소 192.168.100.1에 대한 액세스를 거부하고 두 번째 제한은 전체 169.254.0.0 네트워크에 대한 액세스를 거부합니다.
AppCmd.exe
appcmd.exe set config "Default Web Site" -section:system.webServer/security/ipSecurity /+"[ipAddress='192.168.100.1',allowed='False']" /commit:apphost

appcmd.exe set config "Default Web Site" -section:system.webServer/security/ipSecurity /+"[ipAddress='169.254.0.0',subnetMask='255.255.0.0',allowed='False']" /commit:apphost
참고
AppCmd.exe 사용하여 이러한 설정을 구성할 때 commit 매개 변수 apphost 를 로 설정해야 합니다. 그러면 구성 설정이 ApplicationHost.config 파일의 적절한 위치 섹션에 커밋됩니다.
C#
using System;
using System.Text;
using Microsoft.Web.Administration;

internal static class Sample
{
   private static void Main()
   {
      using (ServerManager serverManager = new ServerManager())
      {
         Configuration config = serverManager.GetApplicationHostConfiguration();
         ConfigurationSection ipSecuritySection = config.GetSection("system.webServer/security/ipSecurity", "Default Web Site");
         ConfigurationElementCollection ipSecurityCollection = ipSecuritySection.GetCollection();

         ConfigurationElement addElement = ipSecurityCollection.CreateElement("add");
         addElement["ipAddress"] = @"192.168.100.1";
         addElement["allowed"] = false;
         ipSecurityCollection.Add(addElement);

         ConfigurationElement addElement1 = ipSecurityCollection.CreateElement("add");
         addElement1["ipAddress"] = @"169.254.0.0";
         addElement1["subnetMask"] = @"255.255.0.0";
         addElement1["allowed"] = false;
         ipSecurityCollection.Add(addElement1);

         serverManager.CommitChanges();
      }
   }
}
VB.NET
Imports System
Imports System.Text
Imports Microsoft.Web.Administration

Module Sample

   Sub Main()
      Dim serverManager As ServerManager = New ServerManager
      Dim config As Configuration = serverManager.GetApplicationHostConfiguration
      Dim ipSecuritySection As ConfigurationSection = config.GetSection("system.webServer/security/ipSecurity", "Default Web Site")
      Dim ipSecurityCollection As ConfigurationElementCollection = ipSecuritySection.GetCollection

      Dim addElement As ConfigurationElement = ipSecurityCollection.CreateElement("add")
      addElement("ipAddress") = "192.168.100.1"
      addElement("allowed") = False
      ipSecurityCollection.Add(addElement)

      Dim addElement1 As ConfigurationElement = ipSecurityCollection.CreateElement("add")
      addElement1("ipAddress") = "169.254.0.0"
      addElement1("subnetMask") = "255.255.0.0"
      addElement1("allowed") = False
      ipSecurityCollection.Add(addElement1)

      serverManager.CommitChanges()
   End Sub

End Module
JavaScript
var adminManager = new ActiveXObject('Microsoft.ApplicationHost.WritableAdminManager');
adminManager.CommitPath = "MACHINE/WEBROOT/APPHOST";
var ipSecuritySection = adminManager.GetAdminSection("system.webServer/security/ipSecurity", "MACHINE/WEBROOT/APPHOST/Default Web Site");
var ipSecurityCollection = ipSecuritySection.Collection;

var addElement = ipSecurityCollection.CreateNewElement("add");
addElement.Properties.Item("ipAddress").Value = "192.168.100.1";
addElement.Properties.Item("allowed").Value = false;
ipSecurityCollection.AddElement(addElement);

var addElement1 = ipSecurityCollection.CreateNewElement("add");
addElement1.Properties.Item("ipAddress").Value = "169.254.0.0";
addElement1.Properties.Item("subnetMask").Value = "255.255.0.0";
addElement1.Properties.Item("allowed").Value = false;
ipSecurityCollection.AddElement(addElement1);

adminManager.CommitChanges();
VBScript
Set adminManager = WScript.CreateObject("Microsoft.ApplicationHost.WritableAdminManager")
adminManager.CommitPath = "MACHINE/WEBROOT/APPHOST"
Set ipSecuritySection = adminManager.GetAdminSection("system.webServer/security/ipSecurity", "MACHINE/WEBROOT/APPHOST/Default Web Site")
Set ipSecurityCollection = ipSecuritySection.Collection

Set addElement = ipSecurityCollection.CreateNewElement("add")
addElement.Properties.Item("ipAddress").Value = "192.168.100.1"
addElement.Properties.Item("allowed").Value = False
ipSecurityCollection.AddElement(addElement)

Set addElement1 = ipSecurityCollection.CreateNewElement("add")
addElement1.Properties.Item("ipAddress").Value = "169.254.0.0"
addElement1.Properties.Item("subnetMask").Value = "255.255.0.0"
addElement1.Properties.Item("allowed").Value = False
ipSecurityCollection.AddElement(addElement1)

adminManager.CommitChanges()