연습 - 데이터 업로드
이제 기계 학습 모델을 학습시키는 데 사용할 이미지를 업로드해야 합니다. 다음 두 가지 방법으로 이미지를 업로드할 수 있습니다.
- Custom Vision 포털에서 이미지를 선택하고 업로드한 후 태그를 지정합니다.
- Jupyter Notebook과 같은 도구에서 Custom Vision SDK에 포함된 이미지를 사용합니다.
업로드할 데이터, 이미지 클래스 및 태그의 양이 많은 경우 Custom Vision SDK를 사용하는 편이 더 빠릅니다. 하지만 다음 섹션에서 설명하는 옵션 중 하나를 선택할 수도 있습니다. 가장 효과적으로 데이터 세트의 이미지를 업로드하는 단계를 완료합니다.
옵션 1: Custom Vision 포털을 사용하여 이미지 업로드 및 태그 지정
각 하위 폴더에서 이미지를 개별적으로 업로드하고 태그를 지정해야 합니다. 이 연습에서는 업로드 속도에 따라 하위 폴더 중 4~5개에서만 이미지를 업로드할 수 있습니다. 기계 학습 모듈을 학습할 때 점점 더 다양한 예제가 더 나은 결과를 얻을 수 있다는 사실에 유의하세요.
Custom Vision 포털에서 프로젝트를 만듭니다.
https://www.customvision.ai/projects로 이동해 로그인합니다. 새 프로젝트를 선택합니다.
새 프로젝트 만들기에서:
이름에 선택한 프로젝트 이름을 입력합니다.
설명에 모델의 설명을 입력합니다.
리소스 그룹에서 Azure Portal에서 만든 리소스 그룹을 선택합니다.
프로젝트 형식에서 분류를 선택합니다.
분류 형식에서 다중 클래스(이미지당 단일 태그)를 선택합니다.
도메인에서 일반을 선택합니다.
프로젝트 만들기를 선택합니다.

참고 항목
모바일 디바이스 또는 TensorFlow.js 또는 IoT에서 배포하기 위해 모델을 내보내려는 경우 도메인에서 압축 모델 옵션을 선택합니다. 프로젝트를 만든 후에 설정에서 이 옵션을 변경할 수 있습니다.
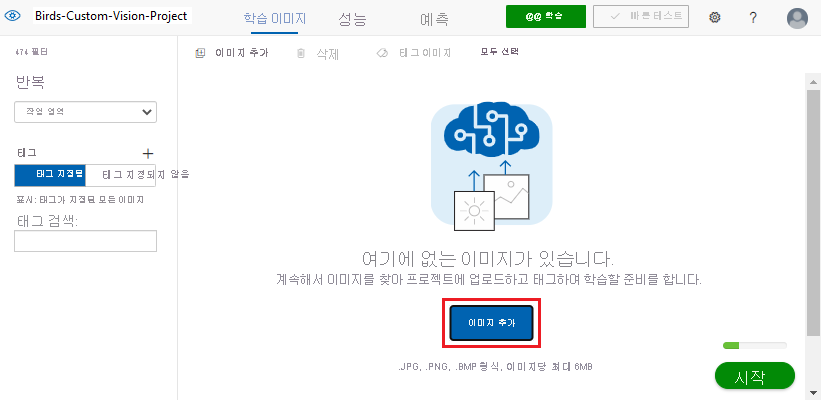
조류 종의 이미지와 태그를 추가합니다.
Custom Vision 프로젝트에서 이미지 추가를 선택합니다.
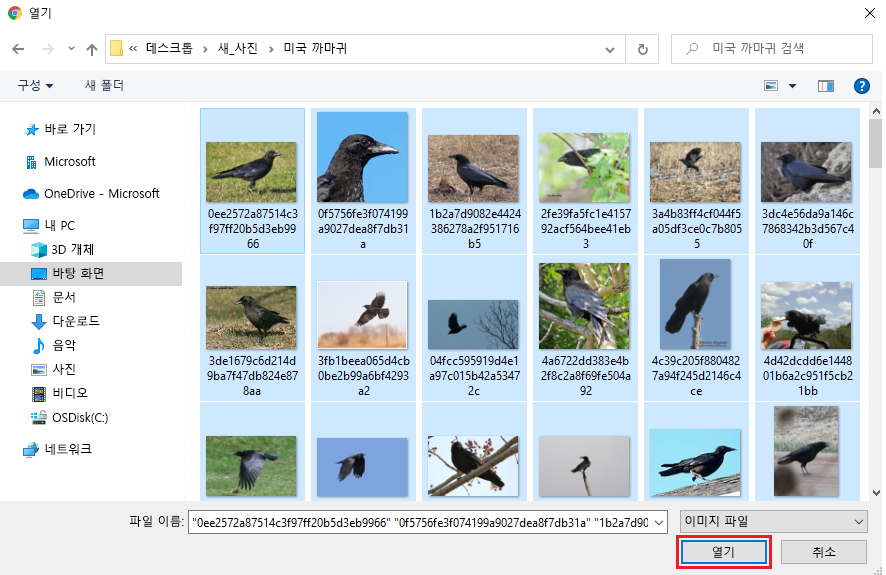
열기에서 데이터 세트 zip 파일의 이미지 파일 압축을 해제한 birds-photo 폴더로 이동합니다.
조류 종 폴더를 엽니다.
Ctrl + A를 선택하여 종 폴더에 있는 모든 이미지를 선택한 다음 열기를 선택합니다.
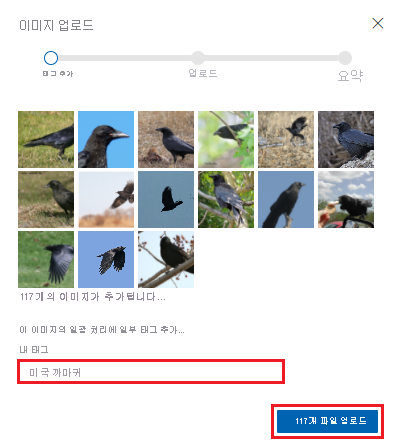
이미지 업로드에서 사진에 나온 조류의 종을 나타내는 내 태그의 설명을 추가합니다.
업로드 <번호> 파일을 선택합니다.
앞의 단계를 반복하여 다운로드한 데이터 세트에 있는 각 조류 종 폴더의 사진을 업로드합니다.
옵션 2: Python 및 Custom Vision SDK를 사용하여 이미지 업로드 및 태그 지정
Custom Vision SDK는 다음 프로그래밍 언어로 제공됩니다. Python, .NET, Node.js, Go 및 Java. 가 있습니다. 이 모듈에서는 Python을 사용하겠습니다. Python이 아직 설치되어 있지 않다면 Anaconda를 설치하여 사용하는 것이 좋습니다. Anaconda를 다운로드하면 Python을 얻을 수 있습니다.
대신 GitHub에서 코드를 다운로드하려는 경우 다음 명령을 사용하여 리포지토리를 복제할 수 있습니다.
git clone https://github.com/MicrosoftDocs/mslearn-cv-classify-bird-species.git
다음 단계에 따라 가상 환경을 만들고 환경에 코드를 붙여넣습니다.
원하는 IDE를 엽니다. 그리고 나서 다음 명령을 실행하여 패키지를 가져옵니다.
!pip install azure-cognitiveservices-vision-customvision스크립트를 실행하는 데 필요한 패키지를 가져옵니다.
from azure.cognitiveservices.vision.customvision.training import CustomVisionTrainingClient
from azure.cognitiveservices.vision.customvision.training.models import ImageFileCreateEntry
from azure.cognitiveservices.vision.customvision.training.models import ImageFileCreateBatch
from msrest.authentication import ApiKeyCredentials
import numpy as np
이제 다음 코드를 사용하여 Custom Vision 프로젝트를 만듭니다. 코드를 실행하기 전에
<endpoint>및<key>자리 표시자를 Custom Vision 리소스의 값으로 바꿉니다.Custom Vision 리소스 값을 가져오려면 다음을 수행합니다.
Azure Portal에서 Custom Vision 리소스로 이동합니다.
리소스 메뉴의 리소스 관리에서 키 및 엔드포인트를 선택합니다.
엔드포인트 상자에서 값을 복사합니다. 코드에서
<endpoint>자리 표시자를 이 값으로 바꿉니다.KEY 1에서 복사 아이콘을 선택하여 키를 복사합니다. 코드에서
<key>자리 표시자를 이 값으로 바꿉니다.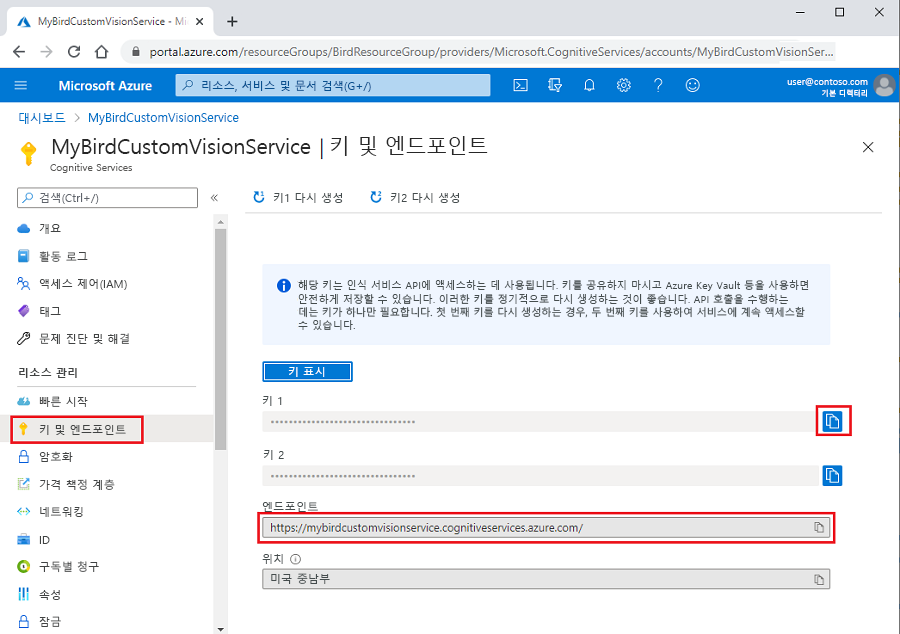
코드는 다음 예제와 같이 표시됩니다.
ENDPOINT = "<endpoint>"

# Replace with a valid key
training_key = "<key>"
credentials = ApiKeyCredentials(in_headers={"Training-key": training_key})
publish_iteration_name = "classifyBirdModel"

trainer = CustomVisionTrainingClient(ENDPOINT, credentials)

# Create a new project
print ("Creating project...")
project = trainer.create_project("Bird Classification")

print("Project created!")
다운로드한 bird-photos.zip 파일의 압축을 Jupyter Notebook 파일이 저장된 디렉터리와 같은 디렉터리에 풉니다. 다음 코드를 추가하여 프로젝트의 조류 사진 디렉터리로 변경합니다.
# Change to the directory for the bird photos
import os
os.chdir('./bird-photos/custom-photos')
경고
이 셀에서 코드를 한 번만 실행하세요. Python 커널을 다시 시작하지 않고 셀을 두 번 이상 실행하려고 하면 셀 실행이 실패합니다.
다음 코드를 추가하여 조류 종류 태그의 목록을 가져옵니다. 태그는 bird-photos/custom-photos 디렉터리의 폴더 이름을 기준으로 만들어집니다.
# Create a tag list from folders in bird directory
tags = [name for name in os.listdir('.') if os.path.isdir(name)]
print(tags)
다음으로
for루프에서 호출할 세 개의 함수를 만듭니다.createTag함수는 Custom Vision 프로젝트에 클래스 태그를 만듭니다.createImageList함수는 태그 이름과 태그 ID를 사용하여 이미지 목록을 만듭니다.image_list함수는 목록에서 이미지를 일괄 처리로 업로드합니다.
세 함수를 만들려면 다음을 수행합니다.
Jupyter Notebook 파일에서
createTag함수 코드를 추가합니다. 이 함수는 Custom Vision 프로젝트에 이미지 이름 태그를 만듭니다.tag_id = createTag(tag) print(f"tag creation done with tag id {tag_id}") image_list = createImageList(tag, tag_id) print("image_list created with length " + str(len(image_list))) # Break list into lists of 25 and upload in batches for i in range(0, len(image_list), 25): batch = ImageFileCreateBatch(images=image_list[i:i + 25]) print(f'Upload started for batch {i} total items {len(image_list)} for tag {tag}...') uploadImageList(batch) print(f"Batch {i} Image upload completed. Total uploaded {len(image_list)} for tag {tag}")다음으로
createImageList함수의 코드를 추가합니다. 이 함수는 폴더 이름 목록의tag이름과 Custom Vision 프로젝트에서 만든 태그의tag_id라는 2개의 매개 변수를 사용합니다. 이 함수는base_image_url값을 사용하여 디렉터리를 폴더 이름에서 만든tag의 이미지가 포함된 폴더로 설정합니다. 그런 다음 목록에 각 이미지를 추가합니다. 목록은 생성된tag에 일괄 처리로 업로드하는 데 사용됩니다.def createImageList(tag, tag_id): # Set directory to current tag. base_image_url = f"./{tag}/" photo_name_list = os.listdir(base_image_url) image_list = [] for file_name in photo_name_list: with open(base_image_url+file_name, "rb") as image_contents: image_list.append(ImageFileCreateEntry(name=base_image_url+file_name, contents=image_contents.read(), tag_ids=[tag_id])) return image_list추가할 마지막 코드는
uploadImageList함수를 만들기 위한 것입니다. 폴더에서 만든image_list를 전달한 다음 이 목록을tag에 업로드합니다.def uploadImageList(image_list): upload_result = trainer.create_images_from_files(project_id=project.id, batch=image_list) if not upload_result.is_batch_successful: print("Image batch upload failed.") for image in upload_result.images: print("Image status: ", image.status) exit(-1)
이제 주 메서드에 대한 코드를 추가합니다. 각 태그마다 메서드는 생성된 세 함수를 호출합니다. bird_photos/custom-photos 디렉터리의 폴더에서 만든
tags컬렉션의 각 태그(폴더 이름)를 반복합니다.for루프의 단계는 다음과 같습니다.앞에서 만든
createTag함수를 호출하여 Custom Vision 프로젝트에tag클래스를 만듭니다.Custom Vision에서 반환된
tag이름과tag_id값을 사용하여 앞에서 만든createImageList함수를 호출합니다. 이 함수는 업로드할 이미지 목록을 반환합니다.앞에서 만든
imageList함수를 호출하여image_list의 이미지를 25개 일괄 처리로 업로드합니다. 전체 데이터 세트를 한 번에 모두 업로드하려고 하면 Custom Vision이 시간 초과되므로 25개 일괄 처리로 업로드합니다.for tag in tags: tag_id = createTag(tag) print(f"tag creation done with tag id {tag_id}") image_list = createImageList(tag, tag_id) print("image_list created with length " + str(len(image_list))) # Break list into lists of 25 and upload in batches. for i in range(0, len(image_list), 25): batch = ImageFileCreateBatch(images=image_list[i:i + 25]) print(f'Upload started for batch {i} total items {len (image_list)} for tag {tag}...') uploadImageList(batch) print(f"Batch {i} Image upload completed. Total uploaded {len(image_list)} for tag {tag}")경고
이 셀에서 코드를 한 번만 실행하세요. Custom Vision 프로젝트를 삭제하지 않고 셀을 두 번 이상 실행하려고 하면 셀 실행이 실패합니다.