연습 - ARM 템플릿 배포
참고
처음으로 샌드박스를 활성화하고 약관에 동의하면 Microsoft 계정이 Microsoft Learn 샌드박스라는 새로운 Azure 디렉터리와 연결됩니다. 사용자는 Concierge Subscription이라는 특수 구독에 추가됩니다.
여기서는 URI를 지정하여 컴퓨터 및 GitHub 리포지토리에서 ARM(Azure Resource Manager) 템플릿을 배포합니다.
중요
이 연습에서는 Visual Studio Code용 Azure Resource Manager 도구를 사용합니다. Visual Studio Code에서 해당 확장을 설치해야 합니다.
Microsoft Learn 샌드박스 구독을 사용하여 환경 설정
이 단원에서 각 배포를 수행하려면 Visual Studio Code 터미널에서 Azure 계정에 로그인해야 합니다.
샌드박스를 활성화한 동일한 계정에 로그인해야 합니다.
Azure에 로그인
Visual Studio Code의 터미널에서 다음 명령을 실행하여 Azure에 로그인합니다. 이 명령을 실행하면 계정에 로그인할 수 있는 브라우저가 열립니다.
Connect-AzAccount로그인하면 터미널에 계정과 연결된 구독 목록이 표시됩니다. 샌드박스를 활성화한 경우 컨시어지 구독이 해당 목록에 있습니다.
구독 이름을 확인합니다. 다음 명령은 구독, 이름 및 해당 ID를 읽기 쉬운 테이블 형식으로 나열합니다.
Concierge Subscription를 찾아보세요.Get-AzSubscription활성 구독을 Concierge Subscription으로 변경합니다.
$context = Get-AzSubscription -SubscriptionName "Concierge Subscription" | Set-AzContext
기본 리소스 그룹 설정
이제 샌드박스 환경에서 생성된 리소스 그룹을 기본 리소스 그룹으로 설정해야 합니다. 해당 작업을 수행하려면 먼저 다음 명령을 실행하여 리소스 그룹 이름을 가져와야 합니다.
Get-AzResourceGroup | where-object ResourceGroupName -match "learn" | Set-AzDefault
이 명령에는 이전 명령에서 가져온 리소스 이름을 사용합니다. learn-a73131a1-b618-48b8-af70-21af7ca420c4와 같이 표시됩니다. 이 명령을 사용하면 연습의 나머지 Azure PowerShell 명령에서 해당 매개 변수를 생략할 수 있습니다.
참고
일반적으로 PowerShell 또는 Azure CLI 명령을 실행하여 템플릿을 배포하는 경우 대상 리소스 그룹 이름을 지정해야 합니다. 우리는 이전 명령을 실행하여 배포 컨텍스트를 설정했습니다. 우리는 Set-AzDefault PowerShell 명령을 실행하여 샌드박스 리소스 그룹 이름을 지정했습니다.
Set-AzDefault -ResourceGroupName {Resource Group Name}
로컬 템플릿 배포
다음 연습에서는 로컬 컴퓨터에서 템플릿을 배포합니다. 이전 섹션에서 기본 리소스 그룹을 이미 정의했으므로 여기서는 자체 환경에서 배포할 때 일반적으로 사용하는 리소스 그룹 이름이 필요하지 않습니다.
시작하려면 다음 템플릿 코드의 콘텐츠를 복사하고 로컬 디렉터리의 파일에 붙여넣습니다. 예를 들어
C:\JSON\maintemplate.json을 사용합니다.{ "$schema": "https://schema.management.azure.com/schemas/2019-04-01/deploymentTemplate.json#", "contentVersion": "1.0.0.0", "parameters": { "VnetName": { "type": "string", "defaultValue": "VNet-001", "metadata": { "description": "Virtual Network Name" } }, "CostCenterIO": { "type": "string", "defaultValue": "12345", "metadata": { "description": "Cost Center IO number for cross billing" } }, "OwnerName": { "type": "string", "defaultValue": "John Smith", "metadata": { "description": "Name of the stakeholder responsible for this resource" } } }, "variables": {}, "resources": [ { "apiVersion": "2018-10-01", "type": "Microsoft.Network/virtualNetworks", "name": "[parameters('VnetName')]", "location": "[resourceGroup().location]", "tags": { "CostCenter": "[parameters('CostCenterIO')]", "Owner": "[parameters('OwnerName')]" }, "properties": { "addressSpace": { "addressPrefixes": [ "10.0.0.0/16" ] }, "enableVmProtection": false, "enableDdosProtection": false, "subnets": [ { "name": "subnet001", "properties": { "addressPrefix": "10.0.0.0/24" } }, { "name": "subnet002", "properties": { "addressPrefix": "10.0.1.0/24" } } ] } } ] }파일을 로컬로 저장한 후 PowerShell 명령을 사용하여 마지막 단원에서 설명한 리소스 그룹 수준에서 파일을 배포할 수 있습니다. 즉, New-AzResourceGroupDeployment 명령을 사용합니다.
$templateFile="C:\JSON\maintemplate.json"
$today=Get-Date -Format "MM-dd-yyyy"
$DeploymentName="DeployLocalTemplate-"+"$today"

New-AzResourceGroupDeployment `
-Name $DeploymentName `
-TemplateFile $templateFile
완료되면 이 예와 같은 결과가 표시됩니다.
DeploymentName          : DeployLocalTemplate-08-24-2020
ResourceGroupName       : learn-03f041a7-cd17-4f50-9c81-5f6678feb217
ProvisioningState       : Succeeded
Timestamp               : 2020-08-24 5:50:04 p.m.
Mode                    : Incremental
TemplateLink            :
Parameters              :
                          Name             Type                       Value
                          ===============  =========================  ==========
                          vnetName         String                     VNet-001
                          costCenterIO     String                     12345
                          ownerName        String                     John Smith

Outputs                 :
DeploymentDebugLogLevel :
매개 변수 값을 사용하여 동일한 로컬 템플릿 배포
마지막 연습에서는 매개 변수의 기본값을 사용하여 템플릿을 배포했습니다. 로컬 ARM 템플릿을 배포할 때 매개 변수 값을 전달해야 할 수 있습니다. 인라인 매개 변수 또는 매개 변수 파일을 사용할 수 있습니다.
인라인 매개 변수를 배포에 전달하려면 New-AzResourceGroupDeployment cmdlet에 매개 변수 이름을 제공해야 합니다. 다음 연습에서는 매개 변수를 인라인 매개 변수 및 매개 변수 파일로 전달합니다.
마지막 연습과 동일한 템플릿을 사용하여 필수 템플릿 매개 변수 값이 포함된 해시 테이블을 구성합니다.
$parameters = @{vnetName = "VNet-001"; costCenterIO = "12345"; ownerName = "John Smith"}
$templateFile="C:\JSON\maintemplate.json"
$today=Get-Date -Format "MM-dd-yyyy"
$DeploymentName="DeployLocalTemplate-2-"+"$today"

New-AzResourceGroupDeployment `
    -Name $DeploymentName `
    -TemplateFile $templateFile `
    -TemplateParameterObject $parameters
완료되면 다음과 같은 결과가 표시됩니다.
DeploymentName          : DeployLocalTemplate-2-08-24-2020
ResourceGroupName       : learn-03f041a7-cd17-4f50-9c81-5f6678feb217
ProvisioningState       : Succeeded
Timestamp               : 2020-08-24 5:51:55 p.m.
Mode                    : Incremental
TemplateLink            :
Parameters              :
                          Name             Type                       Value
                          ===============  =========================  ==========
                          vnetName         String                     VNet-001
                          costCenterIO     String                     12345
                          ownerName        String                     John Smith

Outputs                 :
DeploymentDebugLogLevel :
스크립트에서 매개 변수를 인라인 값으로 전달하는 것보다는 매개 변수 값이 포함된 JSON 파일을 사용하는 것이 더 쉬울 수 있습니다. 매개 변수 파일은 로컬 파일이거나 액세스 가능한 URI가 있는 외부/원격 파일일 수 있습니다. 매개 변수 파일에 대한 자세한 내용은 Resource Manager 매개 변수 파일 만들기를 참조하세요.
로컬 매개 변수 파일을 전달하려면 사용 중인 동일한 명령에서
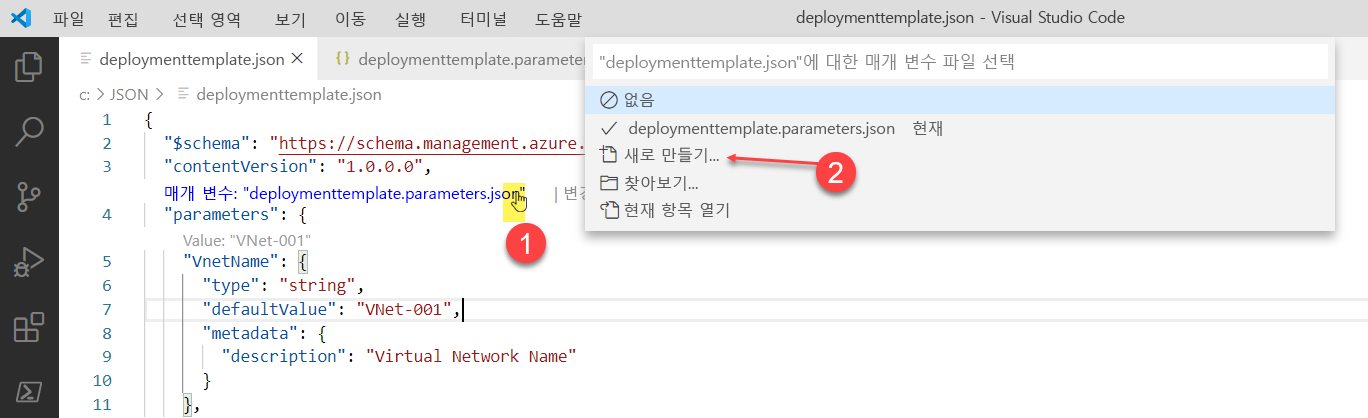
TemplateParameterFile매개 변수를 사용합니다. 그러나 먼저 매개 변수 파일을 만들고 저장해야 합니다.Visual Studio Code에서 Azure Resource Manager 도구 확장을 사용하고 있으므로, 로컬에 저장한 ARM 템플릿을 열고 매개 변수 파일 선택/만들기... 링크를 선택할 수 있습니다.
메뉴에서 새로 만들기를 선택한 다음 필수 매개 변수만을 선택합니다. 확장은 현재 열려 있는 템플릿을 기반으로 매개 변수 파일을 만듭니다.
TemplateParameterFile매개 변수와 함께 다음 PowerShell 명령을 사용합니다.$parameters = @{vnetName = "VNet-001"; costCenterIO = "12345"; ownerName = "John Smith"} $templateFile="C:\JSON\maintemplate.json" $TemplateParameterFile= "C:\JSON\maintemplate.parameters.json" $today=Get-Date -Format "MM-dd-yyyy" $DeploymentName="DeployLocalTemplate-3-"+"$today" New-AzResourceGroupDeployment ` -Name $DeploymentName ` -TemplateFile $templateFile ` -TemplateParameterFile $TemplateParameterFile배포 후 결과는 다음 예와 같아야 합니다.
DeploymentName          : DeployLocalTemplate-3-08-24-2020
ResourceGroupName       : learn-03f041a7-cd17-4f50-9c81-5f6678feb217
ProvisioningState       : Succeeded
Timestamp               : 2020-08-24 5:54:40 p.m.
Mode                    : Incremental
TemplateLink            :
Parameters              :
                          Name             Type                       Value
                          ===============  =========================  ==========
                          vnetName         String                     VNet-001
                          costCenterIO     String                     12345
                          ownerName        String                     John Smith

Outputs                 :
DeploymentDebugLogLevel :
외부 또는 원격 템플릿 배포
경우에 따라 로컬 컴퓨터의 템플릿이 아닌 외부 또는 원격 위치에서 배포해야 합니다. 원본 제어 리포지토리(예: GitHub)에 템플릿을 저장할 수 있습니다. 또는 조직에서 공유 액세스에 대한 Azure Storage 계정에 저장할 수 있습니다.
외부 템플릿을 배포하려면
TemplateUri매개 변수를 사용합니다.다음 연습에서는 GitHub 리포지토리에서 ARM 템플릿을 배포합니다. 리포지토리는 퍼블릭이므로 SAS(공유 액세스 서명) 토큰이 필요한 템플릿 배포에 관해 걱정할 필요가 없습니다. 프라이빗 또는 보안 원격 위치를 사용하는 방법에 관한 자세한 내용은 SAS 토큰을 사용하여 프라이빗 템플릿 배포를 참조하세요.
연습용 템플릿 URI는 https://raw.githubusercontent.com/Azure/azure-quickstart-templates/master/quickstarts/microsoft.storage/storage-account-create/azuredeploy.json입니다. 샌드박스 환경에 기본 스토리지 계정을 배포하는 짧은 템플릿입니다.
PowerShell 명령은 로컬 템플릿의 경우와 똑같습니다. 유일한 차이점은
-TemplateUri매개 변수가-TemplateFile매개 변수를 대체한다는 것입니다.다음 코드를 사용하여 제공된 샌드박스에서 배포합니다.
$parameters = @{vnetName = "VNet-001"; costCenterIO = "12345"; ownerName = "John Smith"}
$today=Get-Date -Format "MM-dd-yyyy"
$DeploymentName="DeployLocalTemplate-4-"+"$today"

New-AzResourceGroupDeployment `
    -Name $DeploymentName `
    -TemplateUri https://raw.githubusercontent.com/Azure/azure-quickstart-templates/master/quickstarts/microsoft.storage/storage-account-create/azuredeploy.json
결과는 다음 화면 캡처와 같습니다. 결과는 템플릿 위치 정보를 요약합니다.
DeploymentName          : DeployLocalTemplate-4-08-24-2020
ResourceGroupName       : learn-03f041a7-cd17-4f50-9c81-5f6678feb217
ProvisioningState       : Succeeded
Timestamp               : 2020-08-24 5:56:55 p.m.
Mode                    : Incremental
TemplateLink            :
                          Uri            :
                          https://raw.githubusercontent.com/Azure/azure-quickstart-templates/master/quickstarts/microsoft.storage/storage-account-create/azuredeploy.json
                          ContentVersion : 1.0.0.0

Parameters              :
                          Name                  Type                       Value
                          ====================  =========================  ==========
                          storageAccountType    String                     Standard_LRS
                          location              String                     westus

Outputs                 :
                          Name                  Type                       Value
                          ====================  =========================  ==========
                          storageAccountName    String                     storepgxosadmbq77e

DeploymentDebugLogLevel :
참고
이 섹션은 Windows 10에서 WSL2(Windows Linux 하위 시스템)의 Azure CLI 명령을 사용하여 작성되었습니다. PowerShell, CMD 또는 Bash 셸에서 Azure CLI를 사용 중인지 여부에 관계없이 명령은 동일합니다. 하지만 변수 처리 방법은 다를 수 있습니다.
Azure에 로그인
Visual Studio Code의 터미널에서 다음 명령을 실행하여 Azure에 로그인합니다. 이 명령을 실행하면 계정에 로그인할 수 있는 브라우저가 열립니다.
az login로그인하면 터미널에 계정과 연결된 구독의 JSON 목록이 표시됩니다. 샌드박스를 활성화한 경우 컨시어지 구독이 해당 목록에 있습니다.
구독 ID를 복사합니다. 다음 명령은 구독과 해당 ID를 나열합니다. 구독 ID는 세 번째 열입니다.
Concierge Subscription을 찾고 세 번째 열을 복사합니다.cf49fbbc-217c-4eb6-9eb5-a6a6c68295a0과 같이 표시됩니다.az account list -o table활성 구독을 Concierge Subscription으로 변경합니다.
{Your subscription ID}를 이전 명령에서 얻은 컨시어지 구독의 ID로 대체해야 합니다.az account set -s {Your subscription ID}
기본 리소스 그룹 설정
이제 샌드박스 환경에서 생성된 리소스 그룹을 기본 리소스 그룹으로 설정해야 합니다. 해당 작업을 수행하려면 먼저 다음 명령을 사용하여 리소스 그룹 이름을 가져와야 합니다.
az group list -o table
이 명령에는 이전 명령에서 가져온 리소스 이름을 사용합니다. learn-a73131a1-b618-48b8-af70-21af7ca420c4와 같이 표시됩니다. 이 명령을 사용하면 연습의 나머지 Azure CLI 명령에서 해당 매개 변수를 생략할 수 있습니다.
참고
일반적으로 Azure CLI 명령을 사용하여 템플릿을 배포하는 경우 대상 리소스 그룹 이름을 지정해야 합니다. 이 모듈의 연습에서는 배포 컨텍스트를 설정하여 요구 사항을 무시합니다. az configure Azure CLI 명령을 사용하여 다음 단계에서 샌드박스 리소스 그룹 이름을 지정합니다.
az configure --defaults group={Resource Group Name}
로컬 템플릿 배포
다음 연습에서는 로컬 컴퓨터에서 템플릿을 배포합니다. 이전 섹션에서 기본 리소스 그룹을 이미 정의했으므로 여기서는 자체 환경에서 배포할 때 일반적으로 사용하는 리소스 그룹 이름이 필요하지 않습니다.
시작하려면 다음 템플릿 코드의 콘텐츠를 복사하고 로컬 디렉터리의 파일에 붙여넣습니다. 예를 들어
C:\JSON\maintemplate.json또는/mnt/c/Users/you/json/maintemplate.json을 사용합니다.{ "$schema": "https://schema.management.azure.com/schemas/2019-04-01/deploymentTemplate.json#", "contentVersion": "1.0.0.0", "parameters": { "VnetName": { "type": "string", "defaultValue": "VNet-001", "metadata": { "description": "Virtual Network Name" } }, "CostCenterIO": { "type": "string", "defaultValue": "12345", "metadata": { "description": "Cost Center IO number for cross billing" } }, "OwnerName": { "type": "string", "defaultValue": "John Smith", "metadata": { "description": "Name of the stakeholder responsible for this resource" } } }, "variables": {}, "resources": [ { "apiVersion": "2018-10-01", "type": "Microsoft.Network/virtualNetworks", "name": "[parameters('VnetName')]", "location": "[resourceGroup().location]", "tags": { "CostCenter": "[parameters('CostCenterIO')]", "Owner": "[parameters('OwnerName')]" }, "properties": { "addressSpace": { "addressPrefixes": [ "10.0.0.0/16" ] }, "enableVmProtection": false, "enableDdosProtection": false, "subnets": [ { "name": "subnet001", "properties": { "addressPrefix": "10.0.0.0/24" } }, { "name": "subnet002", "properties": { "addressPrefix": "10.0.1.0/24" } } ] } } ] }파일을 로컬로 저장한 후 Azure CLI 명령을 사용하여 마지막 단원에서 설명한 리소스 그룹 수준에서 파일을 배포할 수 있습니다. 즉, az deployment group create를 사용합니다.
참고
다음 예제에서 템플릿 파일은 WSL2(Windows Linux 하위 시스템)에서 홈 드라이브의 json 폴더에 있습니다. 선택한 셸에 따라 명령을 조정합니다.
templateFile=/mnt/c/Users/<UserName>/json/maintemplate.json
today=$(date +"%Y-%m-%d")
deploymentname="DeployLocalTemplate-"$today

az deployment group create \
  --name $deploymentname \
  --template-file $templateFile
완료되면 결과 출력은 다음 예와 같아야 합니다. 배포에 성공했는지 확인하려면
"provisioningState": "Succeeded"줄을 검색합니다.{ "id": "/subscriptions/082d0d73-f197-45c5-9884-581c8f0ce102/resourceGroups/learn-e692001a-b605-48d4-97bd-7c05669db9dd/providers/Microsoft.Resources/deployments/DeployLocalTemplate-2020-08-19", "location": null, "name": "DeployLocalTemplate-2020-08-19", "properties": { "correlationId": "6ad759d5-cda5-4a71-a772-05a03d983c6f", "debugSetting": null, "dependencies": [], "duration": "PT8.9060761S", "error": null, "mode": "Incremental", "onErrorDeployment": null, "outputResources": [ { "id": "/subscriptions/082d0d73-f197-45c5-9884-581c8f0ce102/resourceGroups/ learn-e692001a-b605-48d4-97bd-7c05669db9dd/providers/Microsoft.Network/virtualNetworks/VNet-001", "resourceGroup": "learn-e692001a-b605-48d4-97bd-7c05669db9dd" } ], "outputs": null, "parameters": { "costCenterIO": { "type": "String", "value": "12345" }, "ownerName": { "type": "String", "value": "John Smith" }, "vnetName": { "type": "String", "value": "VNet-001" } }, "parametersLink": null, "providers": [ { "id": null, "namespace": "Microsoft.Network", "registrationPolicy": null, "registrationState": null, "resourceTypes": [ { "aliases": null, "apiVersions": null, "capabilities": null, "locations": [ "westus" ], "properties": null, "resourceType": "virtualNetworks" } ] } ], "provisioningState": "Succeeded", "templateHash": "11553431046699679955", "templateLink": null, "timestamp": "2020-08-19T14:47:06.403362+00:00", "validatedResources": null }, "resourceGroup": "learn-e692001a-b605-48d4-97bd-7c05669db9dd", "tags": null, "type": "Microsoft.Resources/deployments" }
매개 변수 값을 사용하여 동일한 로컬 템플릿 배포
마지막 연습에서는 매개 변수의 기본값을 사용하여 템플릿을 배포했습니다. 로컬 ARM 템플릿을 배포할 때 매개 변수 값을 전달해야 할 수 있습니다. 인라인 매개 변수 또는 매개 변수 파일을 사용할 수 있습니다.
다음 연습에서는 인라인 매개 변수를 배포에 전달합니다. 인라인 매개 변수를 사용하든 매개 변수 파일을 사용하든 상관없이 az deployment group create 명령을 사용하여 매개 변수 이름을 제공해야 합니다.
마지막 연습과 동일한 템플릿을 사용하여 필수 템플릿 매개 변수의 JSON 문자열 형식에 매개 변수를 포함할 변수를 생성합니다.
참고 항목
다음 예제에서 템플릿 파일은 WSL2(Windows Linux 하위 시스템)에서 json 폴더에 있습니다. 선택한 셸 및 OS에 따라 명령을 조정합니다.
parameters="{\"vnetName\":{\"value\":\"VNet-001\"},\"costCenterIO\":{\"value\":\"12345\"},\"ownerName\":{\"value\":\"John Smith\"}}"
templateFile=/mnt/c/Users/<UserName>/json/maintemplate.json
today=$(date +"%Y-%m-%d")
deploymentname="DeployLocalTemplate-2-"$today

az deployment group create \
--name $deploymentname \
--template-file $templateFile \
--parameters "$parameters"
완료된 후 다음 예제와 같은 결과가 표시됩니다. 명령이 성공적이었는지 확인하려면
"parameters"섹션과"provisioningState"값을 확인합니다.{- Finished .. "id": "/subscriptions/082d0d73-f197-45c5-9884-581c8f0ce102/resourceGroups/learn-e692001a-b605-48d4-97bd-7c05669db9dd/providers/Microsoft.Resources/deployments/DeployLocalTemplate-2-2020-08-19", "location": null, "name": "DeployLocalTemplate-2-2020-08-19", "properties": { "correlationId": "edb2992e-08be-4ec2-940e-df23b1c09453", "debugSetting": null, "dependencies": [], "duration": "PT4.6990388S", "error": null, "mode": "Incremental", "onErrorDeployment": null, "outputResources": [ { "id": "/subscriptions/082d0d73-f197-45c5-9884-581c8f0ce102/resourceGroups/learn-e692001a-b605-48d4-97bd-7c05669db9dd/providers/Microsoft.Network/virtualNetworks/VNet-001", "resourceGroup": "learn-e692001a-b605-48d4-97bd-7c05669db9dd" } ], "outputs": null, "parameters": { "costCenterIO": { "type": "String", "value": "12345" }, "ownerName": { "type": "String", "value": "John Smith" }, "vnetName": { "type": "String", "value": "VNet-001" } }, "parametersLink": null, "providers": [ { "id": null, "namespace": "Microsoft.Network", "registrationPolicy": null, "registrationState": null, "resourceTypes": [ { "aliases": null, "apiVersions": null, "capabilities": null, "locations": [ "westus" ], "properties": null, "resourceType": "virtualNetworks" } ] } ], "provisioningState": "Succeeded", "templateHash": "11553431046699679955", "templateLink": null, "timestamp": "2020-08-19T16:40:20.249786+00:00", "validatedResources": null }, "resourceGroup": "learn-e692001a-b605-48d4-97bd-7c05669db9dd", "tags": null, "type": "Microsoft.Resources/deployments" }스크립트에서 매개 변수를 인라인 값으로 전달하는 것보다는 매개 변수 값이 포함된 JSON 파일을 사용하는 것이 더 쉬울 수 있습니다. 매개 변수 파일은 로컬 파일이거나 액세스 가능한 URI가 있는 외부/원격 파일일 수 있습니다. 매개 변수 파일에 대한 자세한 내용은 Resource Manager 매개 변수 파일 만들기를 참조하세요.
로컬 매개 변수 파일을 전달하려면 사용 중인 동일한 명령에서
--parameters매개 변수를 사용합니다. 그러나 먼저 매개 변수 파일을 만들고 저장해야 합니다.Azure Resource Manager 도구 확장과 함께 Visual Studio Code를 사용하고 있으므로, 로컬에 저장한 ARM 템플릿을 열고 전체 유효성 검사를 사용하도록 매개 변수 파일 선택 또는 만들기 링크를 선택할 수 있습니다.
메뉴에서 새로 만들기를 선택합니다. 확장은 현재 열려 있는 템플릿을 기반으로 매개 변수 파일을 만듭니다.
--parameters매개 변수와 함께 다음 Azure CLI 명령을 사용합니다.참고
다음 예제에서 템플릿 파일은 WSL2(Windows Linux 하위 시스템)에서 json 폴더에 있습니다. 선택한 셸 및 OS에 따라 명령을 조정합니다.
templateFile=/mnt/c/Users/<UserName>/json/maintemplate.json
templateparameterfile=/mnt/c/Users/<UserName>/json/maintemplate.parameters.json
today=$(date +"%Y-%m-%d")
deploymentname="DeployLocalTemplate-3-"$today

az deployment group create \
--name $deploymentname \
--template-file $templateFile \
--parameters $templateparameterfile
배포 후 결과는 다음 예와 같습니다.
  {- Finished ..
    "id": "/subscriptions/00000000-0000-0000-0000-000000000000/resourceGroups/learn-159e2742-d3a1-4e71-84a3-16e19830242b/providers/Microsoft.Resources/deployments/DeployLocalTemplate-3-2020-08-19",
    "location": null,
    "name": "DeployLocalTemplate-3-2020-08-19",
    "properties": {
      "correlationId": "2a668f55-d8d0-48ac-862f-7170b48c02b6",
      "debugSetting": null,
      "dependencies": [],
      "duration": "PT4.2058912S",
      "error": null,
      "mode": "Incremental",
      "onErrorDeployment": null,
      "outputResources": [
        {
          "id": "/subscriptions/00000000-0000-0000-0000-000000000000/resourceGroups/learn-159e2742-d3a1-4e71-84a3-16e19830242b/providers/Microsoft.Network/virtualNetworks/VNet-001",
          "resourceGroup": "learn-159e2742-d3a1-4e71-84a3-16e19830242b"
        }
      ],
      "outputs": null,
      "parameters": {
        "costCenterIO": {
          "type": "String",
          "value": "12345"
        },
        "ownerName": {
          "type": "String",
          "value": "John Smith"
        },
        "vnetName": {
          "type": "String",
          "value": "VNet-001"
        }
      },
      "parametersLink": null,
      "providers": [
        {
          "id": null,
          "namespace": "Microsoft.Network",
          "registrationPolicy": null,
          "registrationState": null,
          "resourceTypes": [
            {
              "aliases": null,
              "apiVersions": null,
              "capabilities": null,
              "locations": [
                "westus"
              ],
              "properties": null,
              "resourceType": "virtualNetworks"
            }
          ]
        }
      ],
      "provisioningState": "Succeeded",
      "templateHash": "11553431046699679955",
      "templateLink": null,
      "timestamp": "2020-08-19T20:42:44.069215+00:00",
      "validatedResources": null
    },
    "resourceGroup": "learn-159e2742-d3a1-4e71-84a3-16e19830242b",
    "tags": null,
    "type": "Microsoft.Resources/deployments"
  }
외부 또는 원격 템플릿 배포
경우에 따라 로컬 컴퓨터의 템플릿이 아닌 외부 또는 원격 위치에서 배포해야 합니다. 원본 제어 리포지토리(예: GitHub)에 템플릿을 저장할 수 있습니다. 또는 조직에서 공유 액세스에 대한 Azure Storage 계정에 저장할 수 있습니다.
- 외부 템플릿을 배포하려면
--template-uri매개 변수를 사용합니다.
이 연습에서는 GitHub 리포지토리에서 ARM 템플릿을 배포합니다. 리포지토리는 퍼블릭이므로 SAS(공유 액세스 서명) 토큰이 필요한 템플릿 배포에 관해 걱정할 필요가 없습니다. 프라이빗 또는 보안 원격 위치를 사용하는 방법에 관한 자세한 내용은 SAS 토큰을 사용하여 프라이빗 템플릿 배포를 참조하세요.
연습용 템플릿 URI는 https://raw.githubusercontent.com/Azure/azure-quickstart-templates/master/quickstarts/microsoft.storage/storage-account-create/azuredeploy.json입니다. 샌드박스 환경에 기본 스토리지 계정을 배포하는 짧은 템플릿입니다.
Azure CLI 명령은 로컬 템플릿의 경우와 똑같습니다. 유일한 차이점은
--template-uri매개 변수가--template-file매개 변수를 대체한다는 것입니다.다음 코드를 사용하여 제공된 샌드박스에서 배포합니다.
parameters="{\"vnetName\":{\"value\":\"VNet-001\"},\"costCenterIO\":{\"value\":\"12345\"},\"ownerName\":{\"value\":\"John Smith\"}}"
today=$(date +"%Y-%m-%d")
deploymentname="DeployLocalTemplate-4-"$today

az deployment group create \
--name $deploymentname \
--template-uri https://raw.githubusercontent.com/Azure/azure-quickstart-templates/master/quickstarts/microsoft.storage/storage-account-create/azuredeploy.json
결과는 다음 코드 블록과 같습니다. 결과는
"templateLink"섹션에서 템플릿 위치 정보를 요약합니다. 또한"provisioningState"섹션에 배포 성공 여부도 표시됩니다.{- Finished .. "id": "/subscriptions/00000000-0000-0000-0000-000000000000/resourceGroups/learn-159e2742-d3a1-4e71-84a3-16e19830242b/providers/Microsoft.Resources/deployments/DeployLocalTemplate-4-2020-08-19", "location": null, "name": "DeployLocalTemplate-4-2020-08-19", "properties": { "correlationId": "2ccc49de-9d46-4375-a25d-19ec10daf88b", "debugSetting": null, "dependencies": [], "duration": "PT24.3286124S", "error": null, "mode": "Incremental", "onErrorDeployment": null, "outputResources": [ { "id": "/subscriptions/00000000-0000-0000-0000-000000000000/resourceGroups/learn-159e2742-d3a1-4e71-84a3-16e19830242b/providers/Microsoft.Storage/storageAccounts/store7zk7eyqew54l4", "resourceGroup": "learn-159e2742-d3a1-4e71-84a3-16e19830242b" } ], "outputs": { "storageAccountName": { "type": "String", "value": "store7zk7eyqew54l4" } }, "parameters": { "location": { "type": "String", "value": "westus" }, "storageAccountType": { "type": "String", "value": "Standard_LRS" } }, "parametersLink": null, "providers": [ { "id": null, "namespace": "Microsoft.Storage", "registrationPolicy": null, "registrationState": null, "resourceTypes": [ { "aliases": null, "apiVersions": null, "capabilities": null, "locations": [ "westus" ], "properties": null, "resourceType": "storageAccounts" } ] } ], "provisioningState": "Succeeded", "templateHash": "12600309984865991765", "templateLink": { "contentVersion": "1.0.0.0", "id": null, "relativePath": null, "uri": "https://raw.githubusercontent.com/Azure/azure-quickstart-templates/master/quickstarts/microsoft.storage/storage-account-create/azuredeploy.json" }, "timestamp": "2020-08-19T20:53:36.759312+00:00", "validatedResources": null }, "resourceGroup": "learn-159e2742-d3a1-4e71-84a3-16e19830242b", "tags": null, "type": "Microsoft.Resources/deployments" }