SharePoint 2013 | Migrate local term store from one site collection in source farm to destination farm using Managed Metadata Application
Scenario:
- Consider that you have a SharePoint 2013 farm with site collection https://sp and a local Term store for navigation created at the site level. You also have a Managed Metadata Service Application where Global Navigation term store is also created which is used for global navigation. Now, you are trying to migrate only this Site collection to another SharePoint 2013 farm. While your site back up and restore activity is completed successfully, you are not able to get Local Term store navigation to work.
- You have already moved the MMS service application to destination farm and you are able to see the Global Navigation termstore successfully in destination farm, but local termstores are not visible either in MMS service application or in Local site collection settings.
Requirement :
- Move the SharePoint site local navigation termstore from source farm to destination farm successfully along with Global navigation Termstore in Managed Metadata Service Application.
Note : If this is the scenario you are running into, please read ahead. There are a lot of moving pieces in getting the Local and Global Termstores successfully from one SharePoint 2013 farm to another so please make sure that you follow these steps exactly and in the same order to complete this task successfully.
- In the destination farm, Make sure that your MMS service account has bulkadmin Server role on SQL server.
- From the Source farm, Export Entire Term Store. Run following script in SharePoint PowerShell on Source farm.
- $mmsApplication = Get-SPServiceApplication | ? {$_.TypeName -eq "Managed Metadata Service"}
- $mmsProxy = Get-SPServiceApplicationProxy | ? {$_.TypeName -eq "Managed Metadata Service Connection"}
- Export-SPMetadataWebServicePartitionData $mmsApplication.Id -ServiceProxy $mmsProxy -Path "C:\\New Folder\mmsdata.cab"
- Copy over this backup file "mmsdata.cab" to SQL server in Destination farm and create a Network Share like \\SQL\New Folder\mmsdata.cab and give Everyone Read/Write access to this folder ( This is only temporary and you can remove this access once next step is complete.)
- Create a new Managed Metadata Service Application in Destination farm. ( if you already have one created, no need to create another one)
- Now, Go to SharePoint PowerShell on Destination Farm and run following PowerShell script
- $mmsApplication = Get-SPServiceApplication | ? {$_.TypeName -eq "Managed Metadata Service"}
- $mmsProxy = Get-SPServiceApplicationProxy | ? {$_.TypeName -eq "Managed Metadata Service Connection"}
- Import-SPMetadataWebServicePartitionData $mmsApplication.Id -ServiceProxy $mmsProxy -Path " \\SQL\New folder\mmsdata.cab" -OverwriteExisting
- Change the highlighted path with correct Network share file path where you copied over the mmsdata.cab file.
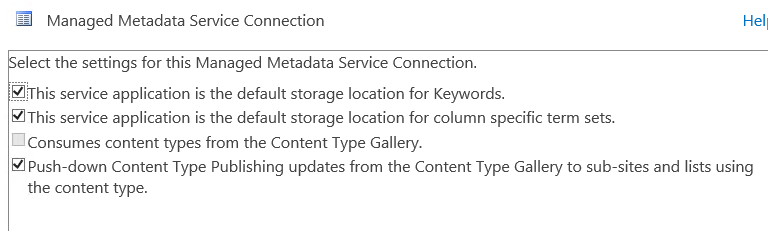
- Once this is completed successfully, go to Destination farm -> Central Admin -> Manage Service Applications -> Select MMS Proxy -> Properties -> Make sure "This service application is the default storage location for column specific term set" option is selected.
- Now, go back to Source farm and go the site collection where the Local Term store is present. Go to Site Settings -> Navigation -> For both "Global Navigation" and "Current Navigation" -> Make sure that Structural Navigation option is selected. ( Again, this is temporary selection and we will change it back to Managed Navigation once Backup-Spsite command is completed)
- Now, run following command on Source farm to get backup of the site collection in question.
- Backup-SPSite -Identity "https://sourcesite/" -Path "C:\\New Folder\site.bak"
- Now, go to source site -> site settings -> Navigation -> Change the settings for "Global Navigation" and "Current Navigation" back to Managed Navigation option.
- Now, copy the site backup file (site.bak) to Destination Farm SharePoint server.
- On the Destination farm, run following command to restore the site with exact URL and content database that you want to restore to.
- Restore-SPSite -Identity "https://destinationsite/ " -Path "C:\\New Folder\site.bak" -contentdatabase "WSS_Content" -force
- Once restore process is complete, Run following commands to add the farm admin account/ MMS Service account to Termstore administrator in this destination farm.
- $site = get-spsite https://destinationsite
- $tx = New-Object Microsoft.SharePoint.Taxonomy.TaxonomySession($site)
- $termstore = $tx.DefaultSiteCollectionTermStore
- $termstore.AddTermStoreAdministrator("contoso\administrator")
- $termstore.CommitAll()
- Now, that we have completed adding Farm account to Term store administrator for this destination farm, we will proceed to grant permission for this restored site collection to the Local term store that was copied over from Source farm.
- On the Destination farm,
- $site = get-spsite https://destinationsite
- $tx = New-Object Microsoft.SharePoint.Taxonomy.TaxonomySession($site)
- $termstore = $tx.DefaultSiteCollectionTermStore
- $termstore.Groups
- From above commands output (see below example image), identify the Term Group that was specific to Source site collection, you should be able to identify that group based on Name Property.
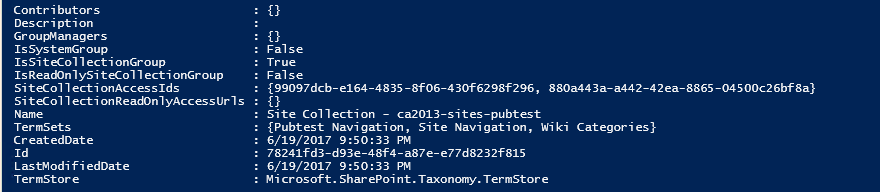
- Now, copy over ID property from above output for that specific group. In above screenshot, for my example,
- Name = "Site Collection - ca2013-sites-pubtest"
- ID = 78241fd3-d93e-48f4-a87e-e77d8232f815
- Now, on Destination farm, run following commands to add your restored site collection to be able to access the Local term store. (Until this point, even though your Local termstore is present in MMS service application on destination farm, your restored site collection is not connected to that Local termstore and thus not able to access it.)
- $site = get-spsite https://destinationsite
- $tx = New-Object Microsoft.SharePoint.Taxonomy.TaxonomySession($site)
- $termstore = $tx.DefaultSiteCollectionTermStore
- $group = $termstore.groups | where {$_.id -eq "78241fd3-d93e-48f4-a87e-e77d8232f815"}
- $group.AddSiteCollectionAccess($site.id)
- $termstore.CommitAll()
- Please change the highlighted part with correct Group ID that you got from above step.
- Now, on Destination farm, go to Central Admin -> Application Management -> Change Site Collection Administrators -> Add yourself (or whoever you want) as site collection admin for restored site collection.
- Go to restored site collection -> Site settings -> Site Administration -> Term Store Management.
- Select the Local Term store -> Select Each Term group and change the Owner to appropriate user that you would like. You can make Site Collection admin as Term group owner.
- Go to restored site collection -> Site settings -> Navigation -> For Current Navigation -> Select Managed Navigation -> Select Correct Term group. Click Ok.
- At this point, your Local Termstore on the destination farm should be correctly connected to restored site collection and site collection administrator should have proper permissions to access that Local Term store.
- Check if your Local Navigation is showing up correctly now on restored site collection.
Hope this helps ! Please provide any feedback or suggestions in the comments below.
Happy Sharepointing !