Introducing Multi-Input Shader Effects
Thus far in this series on Effects, we've discussed building and using Effects that have a single "texture" or "sampler" as input to them. In the Beta of .NET 3.5 SP1, that's all that was available. With the RTM release, we've added the ability to provide multiple samplers as input to the pixel shaders that drive Effects, thus substantially increasing the flexibility of what can be done with Effects.
In this post, I'll show a very simple example of multi-input effects. The result isn't anything particularly useful from a UI construction perspective, but it shows the general technique that can be used in more UI-relevant ways. In fact, in the next post I do, I'll show something that's quite a bit more interesting from a UI perspective.
The result
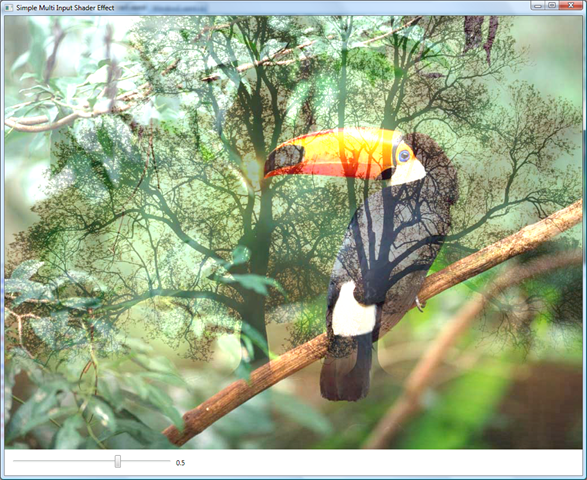
I'll demonstrate a simple shader that just combines, via pixel addition, two images. This lets me take these two images:


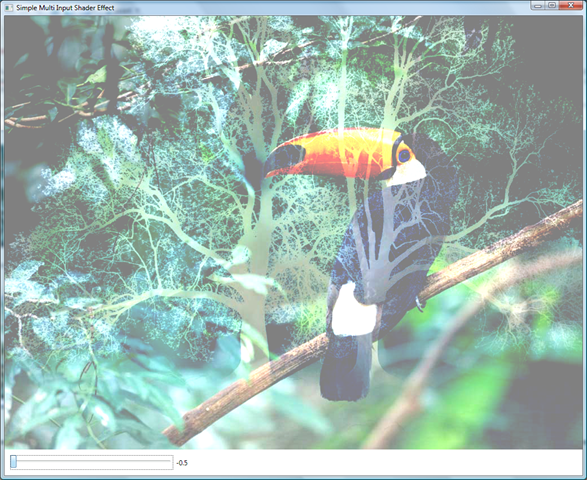
and create a little app that can produce these sorts of combinations of the two:

The code
Let's first look at the XAML needed to build this. This example, in fact, has no code at all... it's all XAML. (At least the program that consumes the Effect... the Effect definition itself requires code.)
<Window ... >
   <Window.Resources>
      <ImageBrush x:Key="treeKey" ImageSource="tree.jpg" />
  </Window.Resources>
<StackPanel>
      <Image Source="toucan.jpg" Width="1024" Height="768">
         <Image.Effect>
             <eff:SimpleMultiInputEffect Input2="{StaticResource treeKey}"
                             MixInAmount="{Binding ElementName=slider1, Path=Value}" />
         </Image.Effect>
     </Image>
         <StackPanel Margin="10" Orientation="Horizontal">
            <Slider Minimum="-0.5" Maximum="1" SmallChange="1" LargeChange="1" Value="0.5" Name="slider1" Width="289" />
            <Label HorizontalAlignment="Left"  Name="label1" VerticalAlignment="Bottom" Width="120" Content="{Binding ElementName=slider1, Path=Value}" />
        </StackPanel>
    </StackPanel>
</Window>
The large text is the stuff that's more relevant here. First note that we reference our tree.jpg image in an ImageBrush that's defined as a resource. That's because all sampler inputs come in through WPF as Brushes. In this case, it's an ImageBrush, but it could just as easily have been a VisualBrush, and thus anything that can be constructed in a WPF tree.
Next, the <Image> displays the Toucan image, and we apply our custom "SimpleMultiInputEffect" to the <Image>. Here, we set a property, Input2, as a reference to our ImageBrush holding the tree. We also set a double-valued property MixInAmount, which is bound to the slider value. The Effect itself lets MixInAmount control the amount of blending that Input2 will do against the primary input.
Moving to the Effect definition itself. In the C# for the Effect, the only thing notable is that we define another Brush-valued DependencyProperty:
 public Brush Input2
{
    get { return (Brush)GetValue(Input2Property); }
    set { SetValue(Input2Property, value); }
}

public static readonly DependencyProperty Input2Property =
    ShaderEffect.RegisterPixelShaderSamplerProperty("Input2", typeof(SimpleMultiInputEffect), 1);
The "1" provided as the last argument to RegisterPixelShaderSamplerProperty() indicates that this Brush's realization will be available in sampler register "1" in the pixel shader.
The HLSL gets a little more interesting:
 //-----------------------------------------------------------------------------------------
// Shader constant register mappings (scalars - float, double, Point, Color, Point3D, etc.)
//-----------------------------------------------------------------------------------------

float mixInAmount : register(C0);

//--------------------------------------------------------------------------------------
// Sampler Inputs (Brushes, including ImplicitInput)
//--------------------------------------------------------------------------------------

sampler2D input1 : register(S0);
sampler2D input2 : register(S1);


//--------------------------------------------------------------------------------------
// Pixel Shader
//--------------------------------------------------------------------------------------

float4 main(float2 uv : TEXCOORD) : COLOR
{
   float4 color1 = tex2D(input1, uv);
   float4 color2 = tex2D(input2, uv);
   return color1 + mixInAmount * color2;
}
This is also very simple. All that's happening here is that color1 and color2 are being sampled from the two input samplers (the Toucan and the Tree images, in our application), and combined according to the value of mixInAmount. When that value is 0, we end up with pure Toucan . When it's positive, we're adding Tree in. When negative, we're subtracting Tree out. All on a per-pixel basis.
More explanation
There are a few more details worth expanding on here:
- The secondary inputs get sized to the rendered size of the UIElement that the effect is being applied to. Thus, when they make it into the shader, all the sampler inputs are the same pixel size. You can use transforms on the incoming brushes, or viewport/viewbox, to manipulate different portions of the brush into place for finer control. (In the above example, both the toucan image and the tree image are the same size, so it didn't matter here.)
- You might be wondering how the initial sampler input gets its value, since we never assigned in Brush-valued resources through XAML or code in previous examples. That's because the default for all samplers (registered via RegisterPixelShaderSamplerProperty) is a special Brush that you get from accessing Effect.ImplicitInput. ImplicitInput just means "construct a brush from the image resulting from rendering the UIElement that this Effect is being applied to". So, in the case above, this is the <Image> element that we have the Toucan in. If we were applying the Effect to a Button, it'd be the rasterization of the Button.
That's it
That's it for now. I've attached the solution that demonstrates this. To build it, it requires the Shader Build Task that I had previously written about. Next time I'll show a use of multiple effects that has a more practical use for UIs than the simple blending demonstrated above.
Comments
Anonymous
September 15, 2008
PingBack from http://informationsfunnywallpaper.cn/?p=5481Anonymous
September 16, 2008
Greg - Does SP1 support more than shader model 2.0? I created some effects with pre-RTM and was hitting the 96 instruction (?) limit without much effort. FYI I attempted to implement a chroma-key effect; the idea being to selectively replace shades of green with equivalent levels of transparency to allow the background to show through (with some semblance of anti-aliasing). It worked, but not as well as I'd hoped. To improve it I tried to convert the colors to HSV first, but that's when I hit the shader 2.0 limits. Using multi-input, is it possible to chain effects? I'm wondering about having a few effects; one to cnovert to HSV, one to apply the transparency, then one to convert back to RGBA. Any comments? (suggestions on better ways to implement it would be greatly appreciated). Thanks! :o)Anonymous
September 16, 2008
good blog this is . i think u r good in blogging .keep it up. visit ma blog www.netfandu.blogspot.com wanna blog link exchange contect me at eck.naresh@gmail.comAnonymous
September 17, 2008
I appreciate your helpful article - I was actually able to create a working VS 2008 sample from your code with no problem at all! Question: What do we need to do, to create an Effect that translates the pixels horizontally, and the distance being a function of the frame-rate? My purpose is simply to scroll an image horizontally, with complete smoothness as though it were a video panning. Thank you so very much for your advice and excellent articles, JHAnonymous
September 27, 2008
The comment has been removedAnonymous
September 27, 2008
James asked about Effects being able to translate based on frame rate. Yes, this is absolutely possible. The most direct way of doing this is to register with CompositionTarget.Rendering. This is an event that will be invoked every frame. You can then monitor the frame rate you're getting, and feed that information back into the shader as a registered DependencyProperty for the shader to use as it needs to.Anonymous
September 27, 2008
In my last post , I introduced multi-input effects, where you can send in arbitrary WPF brushes thatAnonymous
September 27, 2008
The comment has been removedAnonymous
September 30, 2008
Chris Cavanagh with Actionscript layout library, Martin Mihaylov with Voting control, Bart CzernickiAnonymous
October 01, 2008
Whilst my day job continues on its ever-accelerating decline :-) I thought I'd entertain myself by experimenting...Anonymous
December 19, 2008
Artur Żarski u mnie w firmie, od jakiegoś czasu, a dokładniej odkąd zobaczył moje zabawy z Xna męczył