Writing custom GPU-based Effects for WPF
The last few posts in this series on Effects have focused on the perspective of those using Effects. These Effects have to come into being somehow, and that's where we turn to now.
In this post we showed how to apply a ColorComplementEffect to go from this to this:
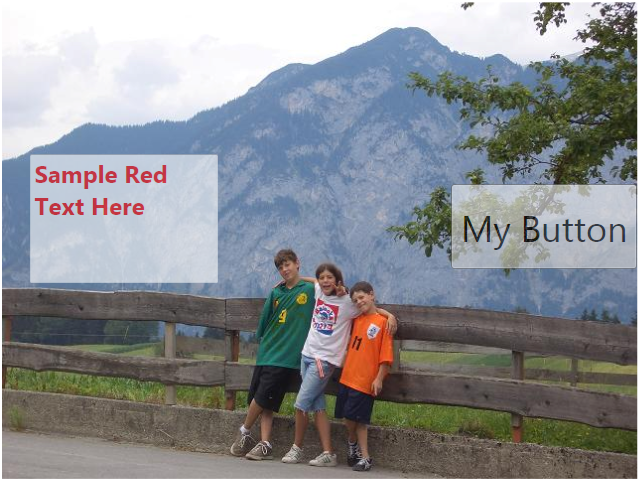
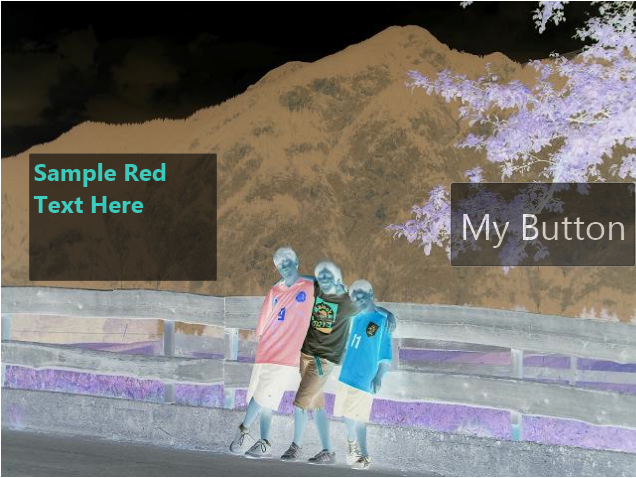
ColorComplementEffect, which very much looks like a photographic negative, is just about the simplest Effect one can imagine. Conceptually, all it does is take the RGB color components and create a new color with each component subtracted from 1.0. Let's first show what it takes to write it and add it to your app, then we'll expand and generalize from there in the next post.
Creating the HLSL for color complement
Here's some simple HLSL for doing the color complement. Note that this series is not in the least intended to be an HLSL tutorial. There are a bunch out on the Net, and there is also a Programmer's Guide and Reference Guide on MSDN that can be a good place to start. Also starting from existing examples (like those included here) and tweaking and experimenting is always a good approach.
 sampler2D implicitInput : register(s0);

float4 main(float2 uv : TEXCOORD) : COLOR
{
    float4 color = tex2D(implicitInput, uv);

    float4 complement;
    complement.r = color.a - color.r;
    complement.g = color.a - color.g;
    complement.b = color.a - color.b;
    complement.a = color.a;

    return complement;
}
There are a few initial things worth noting here:
- The "implicitInput" shader constant is what's in shader constant sampler register S0. That's going to be the "original" composition of the textbox and button over the image, all converted to a "sampler". We'll see in a bit how the association to register s0 happens.
- "main" is the entrypoint to the pixel shader. It receives as input the texture coordinate (of type 'float2') of where we're currently outputting in the texture coordinate space of the element being applied to. This varies from 0-1 in u and v. Note again that while HLSL in general provides more flexibility on input types to shaders, for WPF currently, this is always a float2-valued texture coordinate.
- Only a pixel shader is being provided here. No vertex shader.
Given these, we now get to the body of the function. The first line "tex2D" samples our input texture at the current sampling position uv, and receives a float4 (a 4-component vector with each value a float) that represents the color. After declaring a local 'complement' float4, we proceed to assign it's R, G, and B values to A minus the corresponding sampled value. The A value (alpha) receives the corresponding sampled value's alpha directly. Finally, we return that value.
[May 1, 2009: My esteemed colleagues Ashraf and Don pointed out that my earlier incarnation of this of (1 - component) was wrong, and it should be (A - component). That's because color RGB has their alpha value premultiplied through already. (1 - component) would work for non-premultiplied. The reason it hasn't come up when I used it was the images I supplied were all opaque (A = 1) images, and in this case (1 - component) == (A - component).]
When the Effect runs, this main() function is executed on every pixel affected. It's run very fast, and quite a bit in parallel, but it is run.
The above isn't the best way to express this HLSL. The thing is that HLSL drives a SIMD vector processor, so rather than have these three separate RGB calculations, we can use HLSL to combine them:
 float4 main(float2 uv : TEXCOORD) : COLOR
{
    float4 color = tex2D(implicitInput, uv);

    float4 complement;
    complement.rgb = color.a - color.rgb;
    complement.a = color.a;

    return complement;
}
The syntax "complement.rgb = color.a - color.rgb" will treat the "color.a" as replicated into each element of a 3-vector, and then do the subtraction on each element, all with a single PS 2.0 instruction. (Actually, the HLSL compiler deduces this without me being explicit so the two above shaders generate the same number of instructions, but I never like to count on understanding exactly when compiler optimizations will or won't kick in in super performance sensitive code.)
Compiling the HLSL
WPF Effects do not take the HLSL text directly. You need to compile it into the binary bytecode that DirectX natively accepts, which is how WPF passes it along. To do this, you run fxc.exe on your shader file. Fxc.exe is the shader compiler that comes with the Microsoft DirectX SDK. You can find it at Utilities\Bin\x86\fxc.exe in the SDK.
Say your HLSL was in 'cc.fx', the following command line would generate the compiled bytecode int 'cc.ps' in the same directory:
> fxc /T ps_2_0 /E main /Focc.ps cc.fx
This says to compile to the PS 2.0 profile, and to look for the entrypoint named "main".
(We have a rough prototype that adds the fxc.exe compilation as a MSBuild build task so that it can be incorporated directly into projects without having to break out to a command line shader compiler. When that's further along, we'll post this out there for all to use.)
Writing your managed code Effect subclass
Now it's time to write our managed code that will expose this Effect out to WPF developers. We'll use C# here.
 using System;
using System.Windows;
using System.Windows.Media;
using System.Windows.Media.Effects;

namespace MyEffects
{
    public class ColorComplementEffect : ShaderEffect
    {
        public ColorComplementEffect()
        {
            PixelShader = _shader;
            UpdateShaderValue(InputProperty);
        }

        public Brush Input
        {
            get { return (Brush)GetValue(InputProperty); }
            set { SetValue(InputProperty, value); }
        }

        public static readonly DependencyProperty InputProperty =
            ShaderEffect.RegisterPixelShaderSamplerProperty(
                    "Input",
                    typeof(ColorComplementEffect),
                    0);
private static PixelShader _shader = new PixelShader() { UriSource = new Uri(@"pack://application:,,,/MyEffects;component/ColorComplementEffect.ps") }; } }
Here's basically how this works:
We derive from ShaderEffect, itself a subclass of Effect. Most importantly, ShaderEffect exposes a PixelShader property of type PixelShader.
We define a static PixelShader instance which references the compiled bytecode. It's static because the same PixelShader object can be shared amongst all instances of the Effect.
We define a Brush-valued DependencyProperty called InputProperty, and the corresponding Input CLR property. This is almost identical to how we define other DPs in WPF. The difference is that we use a helper method called ShaderEffect.RegisterPixelShaderSamplerProperty. As in other DP definitions, both the name and the owning type are specified. But the third parameter here (0, in this case) represents the sampler register that the Input property will be able to be accessed from in the shader. Note that this 0 matches the s0 in the HLSL above:
sampler2D implicitInput : register(s0);
- The instance constructor just assigns in the static _shader to the per-instance PixelShader property, and calls UpdateShaderValue() on any DPs that are associated with shader registers. In this case, just the InputProperty. This latter is necessary to ensure it's set for the first time, since DPs don't call their PropertyChangedCallbacks on the setting of their default values.
The other thing worth mentioning here is the gibberish in the "pack://" URI when we reference our pixel shader bytecode file, ColorComponentEffect.ps. Since we don't want to reference a loose file on disk, and we'd like the shader bytecode to live in whatever packaging the C# ColorComponentEffect class goes into (since they should travel together), we use the WPF "pack://" URI syntax. In this case, we're building a library called "MyEffects", which is why that appears in the pack URI.
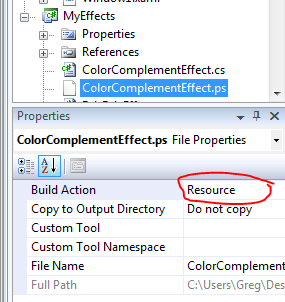
In order for this "pack://" URI to work, the bytecode needs to make its way into the built component. You do this by adding the shader bytecode file into your project, and ensuring that its Build Action is set to "Resource" as this snip from the Solution Explorer shows:
I have a little helper function that lets me express this URI string without hardwiring in "MyEffects", and without re-generating this same gibberish each time:
new PixelShader() { UriSource = Global.MakePackUri("ColorComplementEffect.ps") }
I include the code for the Global helper class at the bottom of this post.
(Note also that PixelShader objects can also be defined via a Stream, which enables, for instance, authoring tools to construct shader bytecode on the fly and pass it to WPF without ever having to persist it to the file system.)
<Geek-Out-Alert--Somewhat-Esoteric-Stuff-Here> (as if this whole topic isn't geeky enough to start with)
Recall that we considered ColorComplementEffect to be a zero-parameter effect. So what's with this "Input" DP? Note that the Effect is invoked via this XAML:
   <Grid >
    <Grid.Effect>
        <eff:ColorComplementEffect />
    </Grid.Effect>

    ...
  </Grid>
The "sampler" that the shader works on is the rasterization of the Grid itself into a bitmap. You can think of the implementation as creating a VisualBrush of the Grid, then providing that Brush as the value for the Input DP. It doesn't quite work like that, and we expose a new type of Brush called ImplicitInput to represent this usage. ImplicitInput is the default value for DPs that defined using "RegisterPixelShaderSamplerProperty", meaning that they automatically receive the "brush" of the element that they're applied to as their shader sampler (register 0 in this case, since that's what we specified).
We'll see in later posts why exposing these as Brushes, and having the ability to control whether ImplicitInput is used is important. Hint: it has to do with multi-input effects.
</Geek-Out-Alert--Somewhat-Esoteric-Stuff-Here>
OK, that's it for this post... in the next one we'll get into somewhat more complicated Effect definition. In particular, parameterized effects.
Appendix: Global.MakePackUri
This is the MakePackUri helper I referenced above. It's nice in that it's not verbose (like the pack:// URI itself), and, more importantly, it doesn't hardwire in a module name.
 internal static class Global
{
    /// <summary>
    /// Helper method for generating a "pack://" URI for a given relative file based on the
    /// assembly that this class is in.
    /// </summary>
    public static Uri MakePackUri(string relativeFile)
    {
        string uriString = "pack://application:,,,/" + AssemblyShortName + ";component/" + relativeFile;
        return new Uri(uriString);
    }

    private static string AssemblyShortName
    {
        get
        {
            if (_assemblyShortName == null)
            {
                Assembly a = typeof(Global).Assembly;

                // Pull out the short name.
                _assemblyShortName = a.ToString().Split(',')[0];
            }

            return _assemblyShortName;
        }
    }

    private static string _assemblyShortName;
}
Comments
Anonymous
May 12, 2008
> You need to compile it into the binary bytecode that DirectX natively accepts has this part of DX gone through security review? I assume the idea is that you can do gpu effects from XBAP so they run without any prompts from the browser, which would be nice. Seems like a good place to poke for holes if that bytecode or something it addresses gets passed to drivers. Is there a risk that old driver bug could allow intrusion through this feature or does DirectX verify everything. Though ASLR/dynamic base probably mitigates a lot of the risk if it's used.Anonymous
May 12, 2008
zzz, in the previous post Greg said that effects currently require full permissions, so you can't use them in an XBAP.Anonymous
May 13, 2008
Very nice. It would be nicer when you have an IL->FX->PS converter so that we can write the effect as a simple delegate. Any chance of making the FX compiler a separate download?Anonymous
May 13, 2008
Greg, thank you so much for this continuing series. Along with these articles and sample code snippets, even a very simple but complete (.sln to .ps) "hello pixel shaders in WPF" sample would be very helpful. Would it be possible for you to zip up the Color Complement example and post it for us to check out? No need to sort out MSBuild steps or clean up anything, we will be grateful for anything and everything we get :)Anonymous
May 14, 2008
Greg Schechterのブログ に、.NET Framework 3.5 SP1 の GPU ベースのカスタムエフェクトのサンプルが掲載されています。HLSLのコードとWPFへのその組み込み方はAnonymous
May 15, 2008
joewood asks about an IL->FX->PS converter. Microsoft Research had a research project called Accelerator (you can find their Technical Report at ftp://ftp.research.microsoft.com/pub/tr/TR-2005-184.pdf) that produced something like what you describe. However, for WPF shaders, it's not really a goal to come up with a "managed language" way of implementing shaders that run massively parallel on the GPU. We feel that the sweetspot is having a top-notch mechanism for integrating shaders (as we're doing with the features I describe in this series). Further, ultimately the best way to write shaders is not going to be through some textual language at all (whether HLSL or C#), but rather through visual tools, which don't really care (or at least not nearly as much) about what the underlying language they need to emit is. robburke asks about getting a sample posted. You can now find one (along with a ClickOnce app) in the next post in this series.Anonymous
May 18, 2008
Greg, have you guys looked at making the fx->ps transition easier by extending VS with something similar to the XNA Game Studio content pipeline? The pipeline in XNA solves the problem and you simply have to include the fx file in the project and then just let the content pipeline take care of the fx compilation into a ps file.Anonymous
May 18, 2008
先週書いた.NET Framework 3.5 SP1 の GPU ベースの カスタムエフェクトのサンプル をちょっといじるだけで、ModelVisual3DにもMediaElementにも同じエフェクトが適用できます。Anonymous
May 21, 2008
SysRq2000 asks about automating the compilation of HLSL to pixel shader bytecode. Yes, we're working on a VS build task that will help here.Anonymous
May 21, 2008
The comment has been removedAnonymous
May 22, 2008
robburke: This is a good scenario, and you're right, our primary expectation is that one would "turn an Effect off" by setting it to null, but yes, that can mess with storyboards. I think for this release, you're going to need to either: a) keep your effect modifying animations in a separate storyboard you either use or don't depending on the presence of the effect. b) runtime remove those timelines from a storyboard. c) maintain two storyboards, one with, one without, and instantiate the right one. I know that none of those are the best answers here. I'm going to put this in as an potential addition for the next version. GregAnonymous
June 02, 2008
The comment has been removedAnonymous
August 11, 2008
The comment has been removedAnonymous
September 09, 2008
So I hit the trail of trying to understand all that I can about HLSL and Effects in general, and to be honest, the whole subject is a bit like reading a book that you can never get past the first 10 pages without falling asleep… it just goes on and onAnonymous
May 04, 2009
BitmapEffect已经过时了。UIElement.BitmapEffectpropertyisobsolete没办法,BitmapEffect的效率过于低下,有时还有莫名其妙的界面闪...