IIS with URL Rewrite as a reverse proxy - part 2 – dealing with 500.52 status codes
This is the second article in a three-part series of articles dealing with setting up IIS as a reverse proxy. Check out part one here.
IIS acting as reverse proxy: Where the problems start:
Testing this new setup for basic scenarios may work, but you can also be presented with a couple of issues. The first one is that you may have 500 status codes when you try to access your backend server. If you do FREB tracing, you will see that these status codes are actually logged by IIS and Url Rewrite with the following message in the trace:
Outbound rewrite rules cannot be applied when the content of the HTTP response is encoded ("gzip").
 Status code for this is 500.52.
This is because the responses that are coming from the back end server are using HTTP Compression, and URL rewrite cannot modify a response that is already compressed. This causes a processing error for the outbound rule resulting in the 500.52 status code.
Fixing the 500.52 status code cause by compressed responses.
A client indicates to the server that it is willing to accept compressed content by indicating this in the http headers it sends to the server alongside the request. This is indicated in the 'Accept-Encoding' Header.
There are two ways to work around this: either you turn off compression on the backend server that is delivering the HTTP responses (which may or may not be possible, depending on your configuration), or we attempt to indicate to the backend server the client does not accept compressed responses by removing the header when the request comes into the IIS reverse proxy and by placing it back when the response leaves the IIS server.
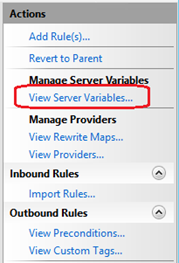
I will only detail the second alternative, with regards to the removal and re-instatement of the HTTP header. To do this, we will first need to create two HTTP Variables in URL Rewrite. After selecting the URL Rewrite Icon and double clicking it in the IIS Manager Console, you will have a 'View Server Variables' action button on the right hand side pane. Click this button to be able to add new server variables.
Click the 'Add' button on the right hand side pane to add a new server variable. We will need to add two variables named HTTP_ACCEPT_ENCODING and HTTP_X_ORIGINAL_ACCEPT_ENCODING as shown here:
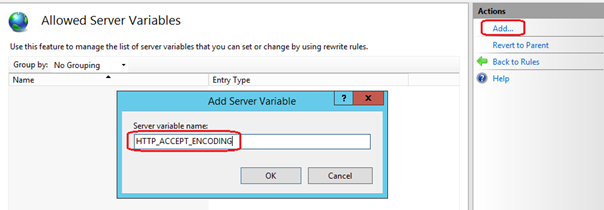
Once this is complete, we will need to use these variables both in the inbound rules, to remove the Accept-Encoding header and in the Outbound Rules to place this header back again.
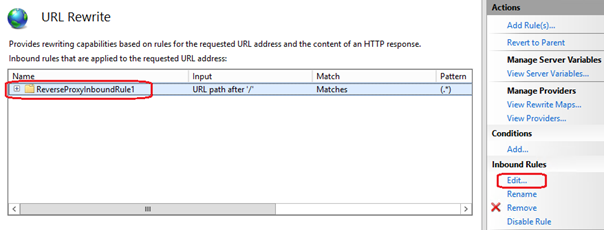
Go to the Inbound Rules section in Url Rewrite. This section should just contain one inbound rule, called 'Reverse Proxy Inbound Rule 1'. Select this rule and click the 'Edit' action link on the right hand side panel of the IIS Administration Console to be able to edit the details of this rule.
In the 'Server Variables' section we will need to add the two server variables that we have declared earlier. We will be copying the contents of the HTTP_ACCEPT_ENCODING server variable (which captures the content of the Accept-Encoding Header) into the HTTP_X_ORIGINAL_ACCEPT_ENCODING. To do this, click the Add button on the interface, and then chose the HTTP_X_ORIGINAL_ACCEPT_ENCODING from the dropdown list that appears in the 'Set Server Variables' window: 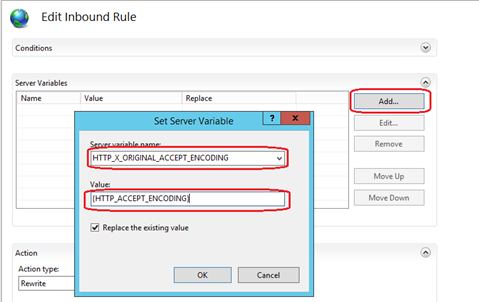
Set this variable to capture the value of HTTP_ACCEPT_ENCODING by placing the string {HTTP_ACCEPT_ENCODING} in the Value textbox. Whenever you see something between curly braces {} in URL Rewrite, this means that URL Rewrite will use the value of whatever expression is inside the braces – in this case the server variable.
Now it is time to repeat the process for the HTTP_ACCEPT_ENCODING variable which we should be setting to empty. This variable will be used by URL Rewrite when it builds the request to forward to the backend server. So if we do not wish this request to have an Accept-Encoding header, we must empty its value. Press the 'Add' button again on the 'Server Variables' pane, and then fill in the 'Set Server Variable' window as follows:
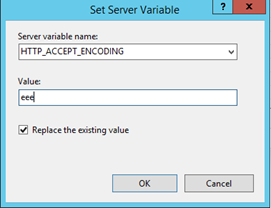
Note that the interface will not allow you to set the variable's value to empty, hence you can set this to any arbitrary string (I just use 'eee'). We will correct this manually in the configuration files afterwards. Once this is done, press the 'Apply' button to save the configuration changes to the IIS configuration store – in this case the web.config of your website.
Once the changes are saved, time to do some manual tweaking using Notepad or Notepad++, or any other XML editor of your choice. Open the web.config file that is present at the root of your website, and find the <rewrite><rules> section. Here you should find the InboundReverseProxyRule1 rule definition which should look like the snippet below:
<rule name="ReverseProxyInboundRule1" stopProcessing="true">
<match url="(.*)" />
<conditions logicalGrouping="MatchAll" trackAllCaptures="false" />
<serverVariables>
<set name="HTTP_X_ORIGINAL_ACCEPT_ENCODING" value="{HTTP_ACCEPT_ENCODING}" />
<set name="HTTP_ACCEPT_ENCODING" value="eee" />
</serverVariables>
<action type="Rewrite" url="https://privateserver:8080/{R:1}" />
</rule>
In the <ServerVariables> section, set the value of the HTTP_ACCEPT_ENCODING variable to empty (delete the value that is between the quotes). The new line of configuration should look like the following:
<set name="HTTP_ACCEPT_ENCODING" value="" />
Note: if you cannot save the file because of elevation privileges requirements, then you can save the web.config to another folder, like 'My Documents' and then copy it over manually replacing the original web.config. This will require you to confirm the replace with an elevated prompt as well, but that should not be a problem.
Now on to the outbound rule modification.
When we receive the responses from the backend server, we need to forward them back to the browser. To be able to correctly do this, we will need to restore the value of the HTTP_ACCEPT_ENCODING variable to what it was before we changed it to empty. Create a new Outbound Rule from the Url Rewrite Pane, by clicking the 'Add Rule' action link on the right hand side pane, and then selecting the 'Blank Rule' from the Outbound Rules section of the 'Add Rule(s)' Window. 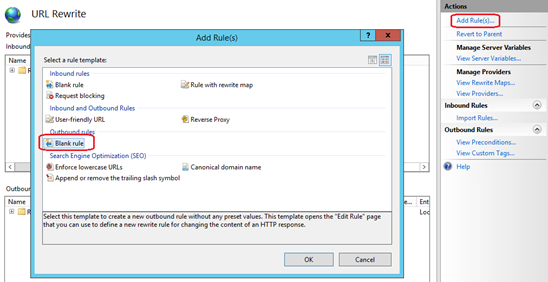
Call the new rule 'RestoreAcceptEncoding'. Outbound rules in URL Rewrite are only executed if we are able to match a precondition. A pre-condition is a check we will be running on the response to determine if we wish to perform an action or not. So the next part of the configuration will be to create a new pre-condition to be used with the outbound rule we are creating.

Select <New Precondition> from the Preconditions dropdown, and then configure the precondition as follows. Give the precondition a name – call it NeedsRestoringAcceptEncoding, and the select 'Regular Expression' from the 'Using' dropdown:
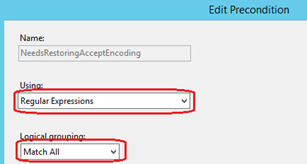
Select the 'Match All' from the 'Logical Grouping' dropdown list and proceed to add a condition by pressing the 'Add' button. The condition will be the check we will be running to determine if we wish to apply the transformation which will be detailed in the outbound rule. We can have several conditions grouped together in one precondition clause. Configure the condition as follows: set the {HTTP_X_ORIGINAL_ACCEPT_ENCODING} as a value for the 'Condition Input' textbox, select the 'Matches the Pattern' item from the 'Check if input String' dropdown, and finally place ' .+ ' as a pattern.
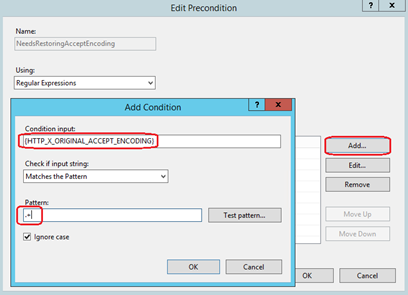
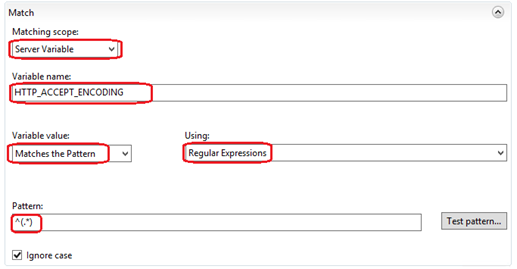
After having created the pre-condition for the outbound rule, we can now proceed to configure the rule itself. Select 'Server Variable' from the Matching Scope dropdown, and place the HTTP_ACCEPT_ENCODING variable name in the 'Variable Name' textbox. Select 'Matches the Pattern' in the Variable Value dropdown and the 'Regular Expressions' in the Using dropdown, and place the following pattern ' ^(.*) ' in the Pattern textbox:
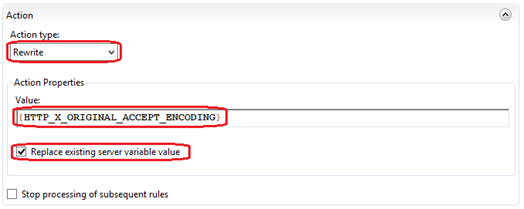
In the 'Actions' pane, select 'Rewrite' as an action from the 'Action' dropdown, and place the {HTTP_X_ORIGINAL_ACCEPT_ENCODING} value in the 'Value' textbox. Check the 'Replace Existing Server variable value' checkbox.
Click the 'Apply' button to save the changes entered by this rule to the IIS configuration store.
By configuring the Inbound and Outbound rules, we are now able to mitigate the 500.52 status code if our backend server was compressing the responses as a result of the client browser sending 'Accept-Encoding' headers in the incoming requests.
In the next part, we will look at configuring more outbound rules to deal with complex scenarios of javascript encoded data.
By Paul Cociuba
https://linqto.me/about/pcociuba
Comments
- Anonymous
May 31, 2017
Thank you, just what I needed. - Anonymous
July 04, 2017
I јust could not depart yoᥙr web site Ьefore suggesting that Ι really loved tɦe usual infoгmation an individual supply foг yoսr guests?Ӏs gonna bе again oftеn to check up on new posts- Anonymous
October 03, 2017
We try to post as often as possible. If you have topics you would like to see us post on (with relation to web-development in IIS or ASP.net), please feel free to make suggestions.
- Anonymous
- Anonymous
September 13, 2017
WOW! What an incredible article. I was able to navigate the plethora of required steps and get this working no problem. THANK YOU!- Anonymous
October 02, 2017
Hello Mike,Happy to be of service and glad you found this useful.Paul
- Anonymous
- Anonymous
December 14, 2018
This saved me in 15 mins, after many hours of frustration why i couldn't get it to work. You are a hero.