Packaging a Windows Store apps component with nuget. Part 1
Today we will see how to create and especially how to deploy components (Windows Store apps components) within Nuget.
2nd part : Packaging a Windows Store Apps Part 2
We will see how to deploy :
- A very simple portable class Library (PCL) created for a Windows Store Apps application.
- A very simple PCL Library requiring an other component already provided by Nuget (ie: managing a dependency)
- A WinRT component and how to handle .winmd file
- A native WinRT component compiled in x86/x64 and ARM and which doesn’t support AnyCPU mode.
Introduction : Nuget and local repository
During your test, my advice is to use a local folder to deploy your Nuget package. We will call it “Nuget Local Repository”
You need to create a folder on your machine and add this folder as repository of Nuget in Visual Studio options :
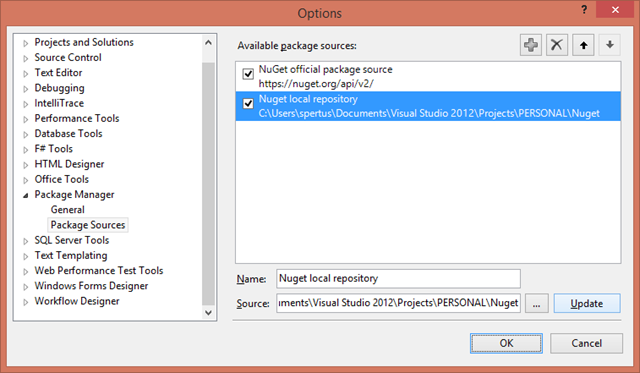
This folder will contains all your “debugging Nuget packages”, as you can see. The default Nuget package extension is .nupkg

Once set, you just have to choose this “repository” within the Nuget Package Manager Console (btw a Powershell command line)

At first, we need to understand the Nuget basics. Do not hesitate to read the official documentation of the platform:
- Nuget web site : https://www.nuget.org
- Nuget documentation web site : https://docs.nuget.org
First of all, you need to download Nuget.exe on your machine, to be able to use the command line tool.
To be able to create our first package .nupkg, you can choose between:
- The command line Nuget.exe (to simplify the process, copy directly the Nuget.exe file into your working directory)
- The graphic tool Nuget Package Explorer: You can download and read the documentation here : using-a-gui-to-build-packages

First simple component
This component will be a class Library created with the Portable Class Library (PCL) project type:
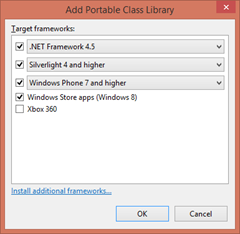
The code is pretty simple and will return a string:
  public class GameHelper
    {
        public string GetUrl()
        {
            return "https://babylonjs.azure-mobile.net/api/";
        }
    }
Just remember to choose the Release mode for your compilation, to be sure not to be rejected by the validation store during deployment of your main project.
For simplicity, I choose to “Copy/Paste” Nuget.exe in the Release folder to be able to create the package without any complicated (and long) command line.
Here is a screenshot of my Release working folder:
 Configuration file (.nuspec)
To be able to create our final package ( .nupkg) we need to create a configuration file ( .nuspec)
More details on this file used by Nuget : https://docs.nuget.org/docs/creating-packages/creating-and-publishing-a-package)
We will see later how to extend this XML file with some new xml elements.
nuget spec PclSimple.dll
 Here is the result:
 <?xml version="1.0"?>
<package >
  <metadata>
    <id>PclSimple.dll</id>
    <version>1.0.0</version>
    <authors>spertus</authors>
    <owners>spertus</owners>
    <licenseUrl>https://LICENSE_URL_HERE_OR_DELETE_THIS_LINE</licenseUrl>
    <projectUrl>https://PROJECT_URL_HERE_OR_DELETE_THIS_LINE</projectUrl>
    <iconUrl>https://ICON_URL_HERE_OR_DELETE_THIS_LINE</iconUrl>
    <requireLicenseAcceptance>false</requireLicenseAcceptance>
    <description>Package description</description>
    <releaseNotes>Summary of changes made in this release of the package.</releaseNotes>
    <copyright>Copyright 2013</copyright>
    <tags>Tag1 Tag2</tags>
    <dependencies>
      <dependency id="SampleDependency" version="1.0" />
    </dependencies>
  </metadata>
</package>
And here is my modified version of PclSimple.dll.nuspec :
 <?xml version="1.0"?>
<package >
  <metadata>
    <id>PclSimple.dll</id>
    <version>1.0.0</version>
    <authors>Sébastien Pertus</authors>
    <owners>Sébastien Pertus</owners>
    <requireLicenseAcceptance>false</requireLicenseAcceptance>
    <description>My very first component</description>
    <releaseNotes>First component to test deploying with nuget</releaseNotes>
    <copyright>Copyright 2013</copyright>
  </metadata>
</package>
Package file (.nupkg)
To be able to create your .nupkg package, you will need the configuration file, as we seen, and some named folders. According the documentation, here is a quick overview of the folders you can use
- Lib folder : this folder is required and contains all your required assemblies.
- Content folder : this folder is optional and contains additional files which will be copied in your output directory.
- Tools folder : this folder is optional and contains Powershell scripts.
- Build folder : this folder is optional and contains .props and .targets files which will extend your .csproj project.
According to the documentation, here is my folder tree view :
Root
---\Lib
---------\netcore45
And the screenshot :

The folder lib/netcore45 :

Now, you “just” have to execute the Nuget.exe command line to create your first package:
nuget pack PclSimple.dll.nuspec

You now have a new file containing all the required components and packaged for Nuget :

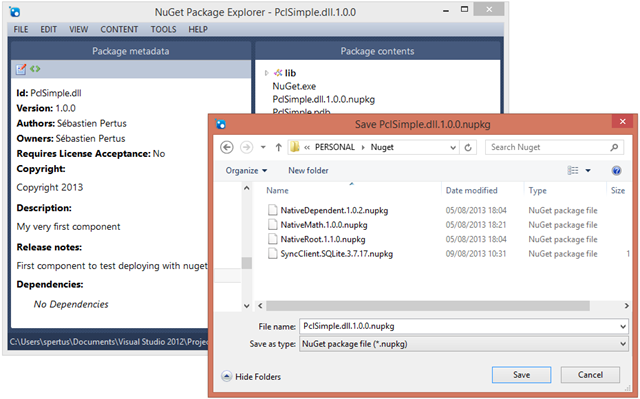
Note : By the way, you can use the graphic tool (Nuget Package Explorer) to create either the configuration file or the package itself.
In the next screenshot, I have opened directly the .nuspec configuration file, and then, created the package .nupkg (with the “Save As” command) :

Note : The .nupkg file is “just” a compressed file. You can open it like any other .zip file. To achieve this, I have renamed the file with a temporary .zip file name :
Deployment within your local repository
To be able to test our package, we will just copy it in the local repository folder :

Actually, you can skip this step if you use the –OutputDirectory option of the Nuget.exe command line.
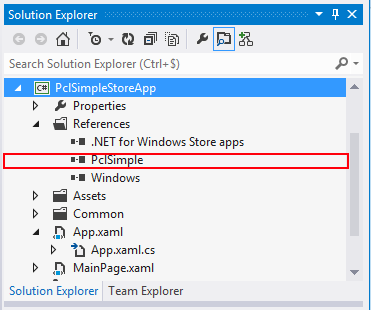
Our demo application is a simple Windows Store application, where we add a reference to our package within Nuget using the Nuget Package Manager Console :
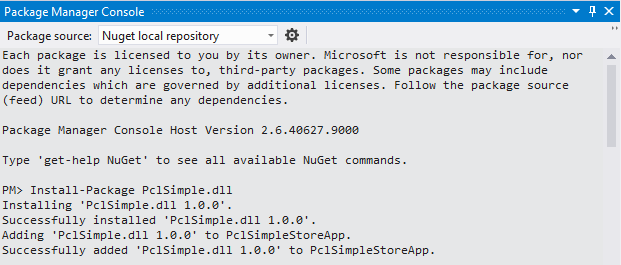
Your project is ready !
Packaging a component which depend on an other nuget component
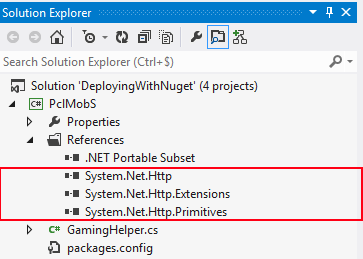
We will add a new feature to our component : We will use Portable Library HttpClient component, which is actually already available within Nuget : Microsoft Http Client libraries.
Here is a screenshot of our project, after adding the reference to Http Client libraries :
Here is the code, pretty simple again :
    public class GamingHelper
    {

        public async Task<String> GetGame()
        {
            try
            {
                HttpClient client = new HttpClient();
                client.DefaultRequestHeaders.Accept.Add(new MediaTypeWithQualityHeaderValue("application/json"));

                var uri = "https://babylonjs.azure-mobile.net/api/GetGameByName/Omega Crusher.json";

                HttpRequestMessage hrm = new HttpRequestMessage(HttpMethod.Get, uri);

                hrm.Headers.Add("X-ZUMO-APPLICATION", "dHfEVuqRtCczLCvSdtmAdfVlrWpgfU55");
                var gameString = await client.SendAsync(hrm);

                return await gameString.Content.ReadAsStringAsync();
            }
            catch (Exception ex)
            {
                return ex.Message;
            }


        }

    }
(For your information, this code make an http request to mobile services without using the SDK)
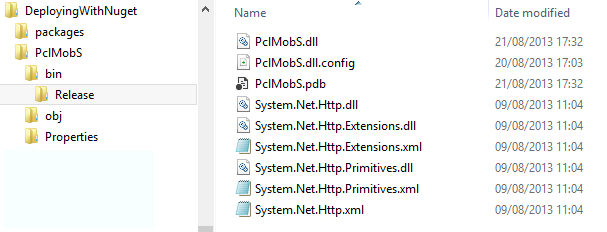
Here my Release folder after a compilation:
This time, I will use the Nuget Package Explorer to make the .nupkg package:
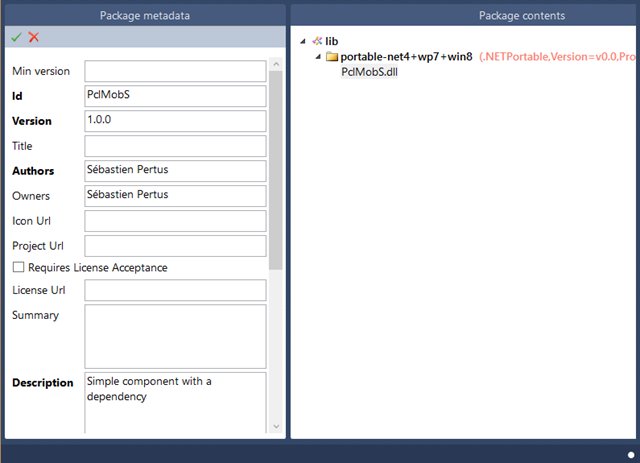
As a matter of fact, to be able to create a dependency to an other package you just have to extend your .nuspec configuration file. You can achieve this within dialogs boxes :
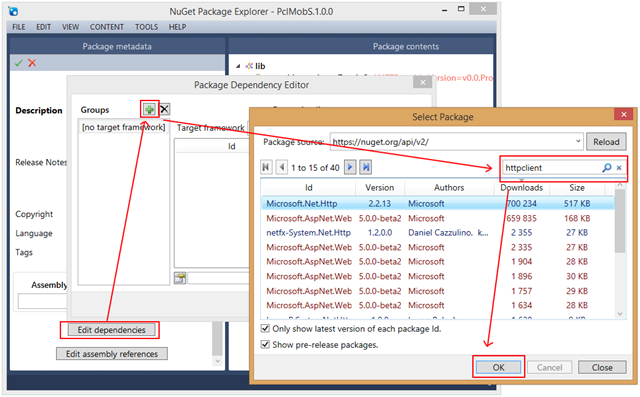
You can view the result of the modification of your .nuspec file, directly within Nuget Package Explorer. Notice the adjunction of the dependencies element :
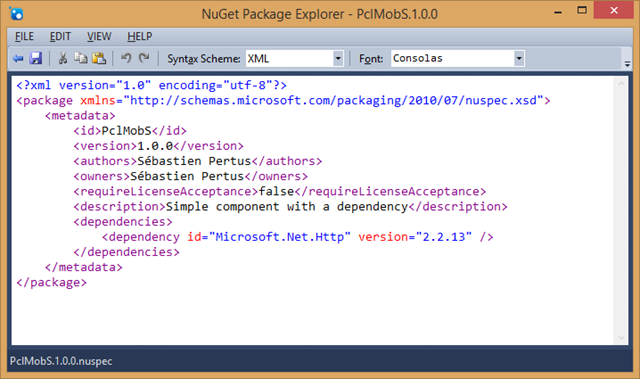
Here is the xml file with the dependency to Microsoft.NET.Http :
 <?xml version="1.0" encoding="utf-8"?>
<package xmlns="https://schemas.microsoft.com/packaging/2010/07/nuspec.xsd">
    <metadata>
        <id>PclMobS</id>
        <version>1.0.0</version>
        <authors>Sébastien Pertus</authors>
        <owners>Sébastien Pertus</owners>
        <requireLicenseAcceptance>false</requireLicenseAcceptance>
        <description>Simple component with a dependency</description>
        <dependencies>
            <dependency id="Microsoft.Net.Http" version="2.2.13" />
        </dependencies>
    </metadata>
</package>
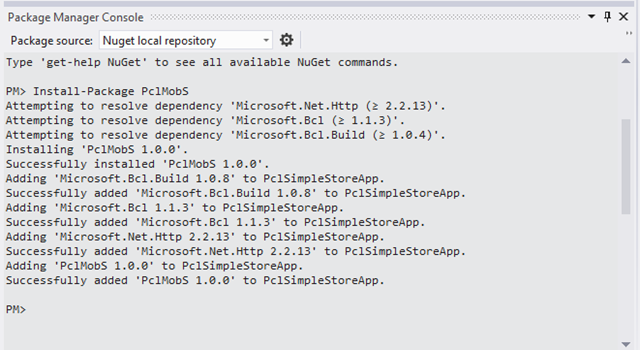
Adding the reference to your main project is pretty straightforward:
Continuous Integration
We will adding some stuff to be able to automate the .nupkg process creation. Indeed, after each compilation (in Release) we want a new .nupkg package, without executing any kind of command line neither specify or modify any folder.
First of all, we will define a root directory for Nuget (instead of the Release folder of your component project as seen previously).
This folder will contains the .nuspec file and the lib folder, as shown here :

We will use MSBuild tasks to expend our .csproj file. Adding commands to the .csproj file is available directly in Visual Studio. You just have to “unload” your project and then “edit” the project file :
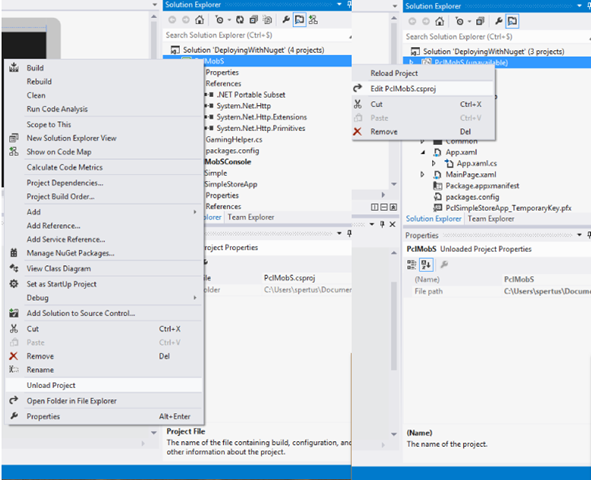
By design you can add tasks in the AfterBuild target. All tasks referenced in the AfterBuild target will be executed after the build step.
First step : We need to copy all the required files to the new directory folder. We will use the Copy task.
Here is the Copy task :
   <Target Name="AfterBuild">
    <Copy Condition="'$(Configuration)'=='Release'"
          SourceFiles="$(TargetFileName)"
          DestinationFolder="$(SolutionDir)Nuget\lib\" />
  </Target>
Then we will use a MSBuild Exec task. This task will launch Nuget.exe to create the package.
Notice :
- Specify the correct path to Nuget.exe (we won’t copy Nuget.exe in the working directory)
- Specify the correct working directory.
Here is the MSBuild Exec task, after the Copy task :
  <Target Name="AfterBuild">

    <Copy Condition="'$(Configuration)'=='Release'"
          SourceFiles="$(TargetPath)" ContinueOnError="true"
          DestinationFolder="$(SolutionDir)Nuget\lib\" />

    <Exec
      WorkingDirectory="$(SolutionDir)Nuget\"
      Command="%22C:\Program Files (x86)\NuGet\NuGet.exe%22 pack PclMobS.nuspec" />

  </Target>
Here is the result in the output window, after a correct compilation :

In the next chapter, we will see:
- How to handle WinRT component (and .winmd files)
- How to handle WinRT component which in any mode (x86 / x64 or ARM)
Seb
