How to clone a virtual Domain Controller
Hello my name is Paulo Viralhadas and I'm a Premier Field Engineer at Microsoft.
On one of my previous posts I wrote about vDC cloning which is my preferred feature in Windows Server 2012 "https://blogs.technet.com/b/reference_point/archive/2012/12/11/so-you-wanted-to-deploy-domain-controllers-faster-now-you-can.aspx".
VDC cloning gives you the ability to scale up your production forest and to recover from disasters faster, or simply to build a lab in a blink of the eye.
In this post you may watch a number of videos that show how to clone a vDC.
Note: I tried to keep the videos as simple as possible for quick reference.
HOW TO CLONE A vDC
The Requirements are:
Hypervisor must have support for VMGID (VM-Generation ID).
ADDS schema version 56
Windows Server 2003 Forest Functional Level.
Source DC must be running Windows Server 2012.
PDCe must be running on a Windows Server 2012 DC.
PDCe and RID master online and available.
The video contents are:
Video 1 - Pre-requisit check.
Step 1 - Verify that the source VDC is running on a supported hypervisor.
Step 2 - Verify Schema version.
Step 3 - Verify Forest Functional Level.
Step 4 - Check if the VDC source Operating System.
Step 5 - Verify that the PDCe FSMO role is running on a Windows Server 2012 DC
Step 6 - Ensure that PDC and RID master are available during cloning process.
Video 2 - Getting the Clone ready.
Step 7 - Create DCCloneConfig.xml file.
Step 8 - Add the source VDC to the "Cloneable Domain Controllers" security group.
Step 9 - Shutdown the source VDC.
Video 3 - Cloning...
Step 10 - Export the source VM (Virtual Machine).
Step 11 - Import the VM with the option "Copy the virtual machine (create a new unique ID)".
Step 12 - Start the new VM.
Detailed steps:
Step 1 - Verify that the source VDC is running on a supported hypervisor.
On the source vDC:
open [Device Manager]
expand [System Devices]
open properties of [Microsoft Hyper-V Generation Counter]
select the "Driver" tab
click "Driver details"
verify that the driver is "vmgencounter.sys"
This is the driver that makes vDC cloning and snapshot restore possible in Windows Server 2012.
Step 2 - Verify Schema version.
On any DC in the forest:
run [regedit]
browse to HKLM\System\CCS\Services\NTDS\Parameters
verify that "Schema Version" REG_DWORD value is 56.
This is the Windows Server 2012 version of the schema.
Step 3 - Verify Forest Functional Level.
On any DC in the forest:
open [Powershell]
run [Get-ADForest]
verify that "ForestMode" value is "Windows2003Forest" or higher.
Step 4 - Check the vDC source Operating System.
On the source vDC:
run [winver]
verify that source vDC is a Windows Server 2012.
Step 5 - Verify that the PDCe FSMO role is running on a Windows Server 2012 DC
On any DC in the domain:
open [cmd]
run [netdom query fsmo]
copy the PDC FQDN
open [Powershell]
run [Get-ADDomainController -server <paste the PDC FQDN here>
verify that OperatingSystemVersion value is 6.2 (9200) or higher
Step 6 - Ensure that PDC and RID master are available during cloning process.
Step 7 - Create DCCloneConfig.xml file.
open [Powershell]
run [New-ADDCCloneconfigFile]
(this will create an empty configuration file, you might want to have a look on the table below before you add
configuration information to this file)
Note: If you get a failure for applications not cloneable you have 2 options add them to the excluded application list or uninstall them from the DC
To see the list of unsupported applications run:
Get-ADDCCloningExcludedApplicationList
and to generate the XML file (thus adding the application(s) to the excluded list run:
Get-ADDCCloningExcludedApplicationList -GenerateXML
Step 8 - Add the source VDC to the "Cloneable Domain Controllers" security group.
open [ADAC]
browse your domain to the "Users" container
double-click "Cloneable Domain Controllers" security group
Select "Members" tab and click "Add" button to add the source domain controller account
Step 9 - Shutdown the source VDC.
Step 10 - Export the source VM (Virtual Machine).
open [Hyper-V Manager]
Right-click the source vDC VM
Select Export
Specify where you want to save the files
Step 11 - Import the VM with the option "Copy the virtual machine (create a new unique ID)".
open [Hyper-V Manager]
click on "Import Virtual Machine"
Locate Folder
Select Virtual Machine
Choose import type: "Copy the virtual machine (create a new unique ID)"
Step 12 - Start the new VM.
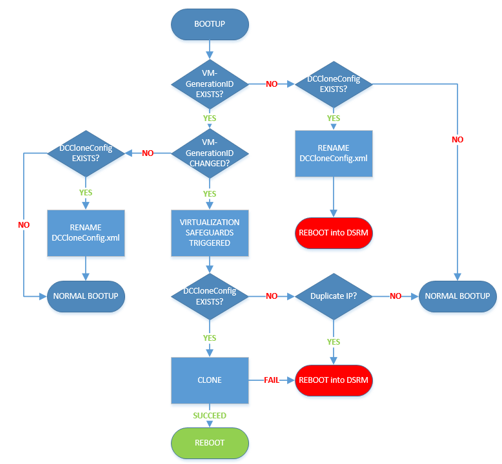
(Refer to the diagram below in order to understand the cloning/snapshot restore decision process)
The Cloning/Snapshot safeguards are:
•DC resets the Invocation ID
•Discards the RID pool
•Updates Up-to-Dateness-vector table
•Replicates AD object differences
•Replicates SYSVOL differences
•Updates msDS-GenerationID
The following table puts together the outcomes of the diagram above:
By the way you may find a playlist of all 3 videos above at:
https://www.youtube.com/playlist?list=PLRiiq9ROPBOtJhPx2SciZcMfhJ4PN4K7y
Hope it helps!
Best regards
Paulo
Comments
Anonymous
January 01, 2003
Just fixed the videos. Enjoy!Anonymous
March 07, 2013
Hi Paulo, You have great blog content! My name is Anna, and I am a Marketing Coordinator at Syncfusion. I am reaching out to see if you would blog about one of our free e-books, collectively known as the Succinctly series. It is a great way to add value to your personal website. For more information please email me at annah@syncfusion.com.Anonymous
September 19, 2014
This blog post is a study guide to help you to prepare Microsoft MCP 70-413 : Designing and Implementing

