More Questions From Customers About SQL Server Transparent Data Encryption – TDE + Azure Key Vault
Recently many customers have been moving from AIX and HPUX to Windows 2016 & SQL Server 2016 running on Azure as these UNIX platforms are no longer mainstream, developed or invested by their vendors
Most of these customers are deploying TDE to protect the Database files and backups. Encrypting databases with strong ciphers like AES-256 is a highly effective way to prevent theft of data, consequently great care must be taken with the keys. If there is a DR event or some need to restore the database and the keys cannot be found the database is for all purposes lost. It is not possible to unencrypt AES-256 by "brute force" methods.
To prevent this from happening we recommend leveraging the Azure Key Vault to securely store the SQL Server TDE keys
Many readers of this blog and customers have asked for an end to end process for a new SAP installation or migration on SQL 2016 on Azure with AlwaysOn with TDE using the Azure Key Vault.
Before reviewing the rest of this blog topic it is recommended to fully review this link https://msdn.microsoft.com/en-us/library/mt720686.aspx
Note: Using SQL Server TDE & storing SQL datafiles on Bitlocker or Azure ADE disks is not tested and is not recommended due to performance concerns
Prerequisites:
1. Segregate duties between the DBA and the Azure Key Manager. The DBA should not have access to the Azure Key Vault and the Key Administrator should not have access to SQL Server databases and backups
2. Ensure Azure Active Directory has been setup (most commonly this is integrated with on-premises Active Directory)
3. Ask the Key Administrator to assist with the Key Vault steps
4. Download the Azure Key Vault Integration
Before proceeding it is essential to read this documentation and understand the following process flow. More information is here
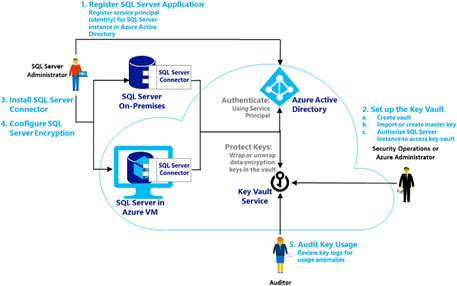
Implementation:
5. Register the SQL Server Application in Azure Active Directory
Open the ASM portal https://manage.windowsazure.com and navigate to the "Active Directory" service
Click on the Directory Service (either the default directory or if configured the integrated directory). Then click on "Applications"
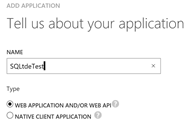
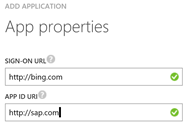
The values in the URL/URI can be any value so long as the site is available
After creating the Azure Active Directory Application, click on the configure tab and note the Client ID and the Client Secret
Note: Some documentation and the PowerShell scripts refer to the "Client ID" as the "ServicePrincipalName". In this procedure they are the same. A potential source of confusion.

Create the Secret with either 1 or 2 years duration under the "keys" section of the Configuration Tab of the Applications menu in Azure Active Directory

6. Create the vault, master key and authorize SQL Server to access the Key
Grant the Client ID (ServicePrincipalName) permissions to get, list, wrapKey and unwrapKey on the Key Vault that already exists or has just been created
Set-AzureRmKeyVaultAccessPolicy
-VaultName
'SAPKeyVault'
-ServicePrincipalName
2db602bd-4a4b-xxxx-xxxx-d128c143c8a9
-PermissionsToKeys
get, list, wrapKey, unwrapKey
Check permissions on the Key Vault with the following command. The application registered in Azure Active Directory can be seen highlighted below
Get-AzureRmKeyVault -VaultName 'SAPKeyVault'

Create the Key with the following command:
Add-AzureKeyVaultKey
-VaultName
'SAPKeyVault'
-Name
'SAPonSQLTDEKey'
-Destination
'Software'
Alternatively a Key can be created via the Azure Portal as shown below
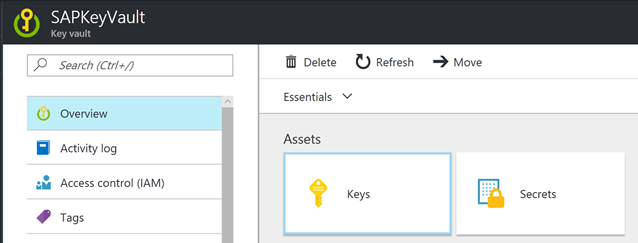
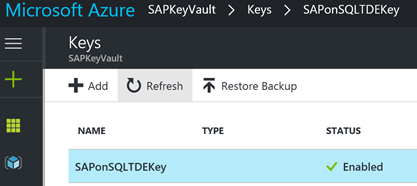
7. Create the database in advance in SQL Management Studio. Make the database size at creation large enough for the installation or import plus enough for a few months growth. Provided the database is created with the DB name = <SID> SAPInst will recognize this as the installation target database.
8. Set the database recovery model to SIMPLE
9. Enable TDE with this command
-- Enable advanced options.
USE
master;
GO
sp_configure
'show advanced options', 1 ;
GO
RECONFIGURE
;
GO
-- Enable EKM provider
sp_configure
'EKM provider enabled', 1 ;
GO
RECONFIGURE
;
GO
-- Create a cryptographic provider, using the SQL Server Connector
-- which is an EKM provider for the Azure Key Vault. This example uses
-- the name AzureKeyVault_EKM_Prov.
On all releases of SQL Server it is still required to download and install the SQL Server Connector for Microsoft Azure Key Vault.
After Installation of the connector run this command.
CREATE
CRYPTOGRAPHIC
PROVIDER AzureKeyVault_EKM_Prov
FROM
FILE
=
'C:\Program Files\SQL Server Connector for Microsoft Azure Key Vault\Microsoft.AzureKeyVaultService.EKM.dll';
GO
The next part is quite difficult. The Secret in this command is = Client ID (referenced as the ServicePrincipalName) with the hyphens removed + the Secret from the Azure Active Directory Application
Example:
Azure Active Directory Application Client ID = 2db602bd-4x4x-4322-8xxf-d128c143c8a9
Azure Active Directory Application Secret = FZCzXY3K8RpZoK12MxF/WFxxAw6aOxxPU2ixxEkQBbc=
Step A: remove the hyphens 2db602bd-4x4x-4322-8xxf-d128c143c8a9 -> 2db602bd4x4x43228xxfd128c143c8a9
Step B: concatenate Client ID (minus hyphens) and Secret = 2db602bd4x4x43228xxfd128c143c8a9FZCzXY3K8RpZoK12MxF/WFxxAw6aOxxPU2ixxEkQBbc=
******* NEXT STEP
USE
master;
CREATE
CREDENTIAL sysadmin_ekm_cred
WITH
IDENTITY
=
'SAPKeyVault',
-- for public Azure
-- WITH IDENTITY = 'ContosoDevKeyVault.vault.usgovcloudapi.net', -- for Azure Government
-- WITH IDENTITY = 'ContosoDevKeyVault.vault.azure.cn', -- for Azure China
-- WITH IDENTITY = 'ContosoDevKeyVault.vault.microsoftazure.de', -- for Azure Germany
SECRET
=
'2db602bd4a4b43228d7fd128c143c8a9fhEP5adz9FTrx2Nt4N36HGxxxx1X0Lo5VcTyJRxte7E='
FOR
CRYPTOGRAPHIC
PROVIDER AzureKeyVault_EKM_Prov;
-- Add the credential to the SQL Server administrator's domain login
-- The login needs to already exist. This would typically be the DBA or SAP <sid>adm user
ALTER
LOGIN [SQLTDETEST\cgardin]
ADD
CREDENTIAL sysadmin_ekm_cred;
******* NEXT STEP
-- While logged in as the DBA or SAP <sid>adm run this command. This may not work if logged in as another user
CREATE
ASYMMETRIC
KEY SAP_PRD_KEY
FROM
PROVIDER [AzureKeyVault_EKM_Prov]
WITH PROVIDER_KEY_NAME =
'SAPonSQLTDEKey',
CREATION_DISPOSITION = OPEN_EXISTING;
******* NEXT STEP
USE
master;
CREATE
CREDENTIAL Azure_EKM_TDE_cred
WITH
IDENTITY
=
'SAPKeyVault',
-- for public Azure
-- WITH IDENTITY = 'ContosoDevKeyVault.vault.usgovcloudapi.net', -- for Azure Government
-- WITH IDENTITY = 'ContosoDevKeyVault.vault.azure.cn', -- for Azure China
-- WITH IDENTITY = 'ContosoDevKeyVault.vault.microsoftazure.de', -- for Azure Germany
SECRET
=
'2db602bd4a4b43228d7fd128c143c8a9fhEP5adz9FTrx2Nt4N36HGxxxb1X0Lo5VcTyJRxte7E='
FOR
CRYPTOGRAPHIC
PROVIDER AzureKeyVault_EKM_Prov;
******* NEXT STEP
USE
master;
-- Create a SQL Server login associated with the asymmetric key
-- for the Database engine to use when it loads a database
-- encrypted by TDE.
CREATE
LOGIN TDE_Login
FROM
ASYMMETRIC
KEY SAP_PRD_KEY;
GO
-- Alter the TDE Login to add the credential for use by the
-- Database Engine to access the key vault
ALTER
LOGIN TDE_Login
ADD
CREDENTIAL Azure_EKM_TDE_cred ;
GO
******* NEXT STEP
USE PRD;
GO
CREATE
DATABASE
ENCRYPTION
KEY
WITH
ALGORITHM
=
AES_256
ENCRYPTION
BY
SERVER
ASYMMETRIC
KEY SAP_PRD_KEY;
GO
-- Alter the database to enable transparent data encryption.
ALTER
DATABASE PRD
SET
ENCRYPTION
ON;
GO
******* NEXT STEP
USE
master
SELECT
*
FROM
sys.asymmetric_keys
-- Check which databases are encrypted using TDE
SELECT d.name, dek.encryption_state
FROM
sys.dm_database_encryption_keys
AS dek
JOIN
sys.databases
AS d
ON dek.database_id = d.database_id;
11. Only when the ENCRYPTION STATUS = 3 continue this procedure
Even a blank database with no data will take some time to encrypt. The reason is that "nothing" is encrypted using a symmetric key and the original "nothing" or null value is represented by a completely random value. All of the above steps can be done prior to a SAP OS/DB migration and therefore these steps do not increase downtime
12. Run SWPM to install or migrate the SAP NetWeaver system
13. Complete post processing as per the SAP System Copy Guide
14. Set the SQL Server database recovery model to FULL
15. Start a full database backup
16. Copy the database backup file to a location where AlwaysOn Replica #1 can restore the file
17. Run the commands from step 9 up and including the step "ALTER LOGIN TDE_Login" step in this procedure to install the TDE Key on Replica #1 [Repeat on each AlwaysOn Replica node]
18. Restore the database on AlwaysOn Replica #1
19. Configure the Azure Internal Load Balancer - ILB if this has not already been done in advance (ensure Direct Server Return is enabled)
20. The AlwaysOn Availability Group Wizard will not work with TDE databases. It is not possible to use the wizard to setup AlwaysOn
These two blogs discuss how to setup AlwaysOn on TDE databases
In these blogs ignore the Key Management procedures as in this scenario Keys are stored in Azure and not locally. The T-SQL to create the AlwaysOn Availability Group is the same
21. Test failover by running the Failover wizard in SSMS
22. Run the step listed in topic #9 in this blog to create users on the new Replica Node (SAPInst would have already performed this activity as part of the install or migration on the Primary Node)
23. Check access to the database with a simple query SELECT * FROM <sid>.T000;
24. Change the default.pfl value for dbs/mss/server = <primary node hostname> to dbs/mss/sqlserver = <alwayson listener name> (for Java systems use ConfigTool)
25. Start the SAP application servers and run SICK
26. Run the Always On failover wizard again to test failover and failback.
Note: Azure Key Vault integration for SQL Server TDE requires these hosts and ports to be whitelisted
login.microsoftonline.com/*:443
*.vault.azure.net/*:443
If any problems are observed check the contents of the trace file dev_w0. The contents of the tracefile should look something like:
M Fri Mar 24 22:37:40 2017
M calling db_connect ...
B Loading DB library 'C:\usr\sap\PRD\DVEBMGS00\exe\dbmssslib.dll' ...
B Library 'C:\usr\sap\PRD\DVEBMGS00\exe\dbmssslib.dll' loaded
B Version of 'C:\usr\sap\PRD\DVEBMGS00\exe\dbmssslib.dll' is "745.04", patchlevel (0.201)
C Callback functions for dynamic profile parameter registered
C Warning: Env(MSSQL_SERVER) [<LISTENER>,<PORT>;MultiSubnetFailover=YES] <> Prof(dbs/mss/server) [<LISTENER>,<PORT>;MultiSubnetFailover=YES]
C Thread ID:15964
C Thank You for using the SLODBC-interface
C Using dynamic link library 'C:\usr\sap\PRD\DVEBMGS00\exe\dbmssslib.dll'
C 7450 dbmssslib.dll patch info
C SAP patchlevel 0
C SAP patchno 201
C Last MSSQL DBSL patchlevel 0
C Last MSSQL DBSL patchno 201
C Last MSSQL DBSL patchcomment SAP Support Package Stack Kernel 7.45 Patch Level 201 (2340627)
C ODBC Driver chosen: ODBC Driver 13 for SQL Server native
C Network connection used from <APPSERVER> to <LISTENER>,<PORT>;MultiSubnetFailover=YES using tcp: <LISTENER>,<PORT>;MultiSubnetFailover=YES
Comments
- Anonymous
April 10, 2017
HelloSome people who have setup LOCAL keys have asked if it is possible to migrate from LOCAL keys or HSM to Azure Key Vault.It appears the answer is no.Follow this process:1. Unencrypt the database using this procedure https://blogs.msdn.microsoft.com/batuhanyildiz/2012/10/16/how-to-enableremove-transparent-data-encryption-tde/ 2. Encrypt the database again using the above process 3. It would be recommended to do this procedure at a period of low activity 4. Monitor blocking/locking using the scripts in my blog here: https://blogs.msdn.microsoft.com/saponsqlserver/2017/04/04/sap-on-sql-general-update-for-customers-partners-march-2017/ 5. It should be possible to encrypt 1-2TB per hour on modern h/w - Anonymous
June 15, 2017
Hi Cameron,If there is a proxy server to connect to internet.What are the procedures ?RegardsPF- Anonymous
August 09, 2017
The comment has been removed
- Anonymous