The AlwaysOn Health Model Part 2 -- Extending the Health Model
In the first part of this series, we gave a general overview of the AlwaysOn Health model. In this part, we’ll show how you can extend this health model to meet your business needs.
Part 2: Extending the AlwaysOn Health Model
In Part 1, we learned that the AlwaysOn health model evaluates a collection of PBM policies. Extending the health model is simply a matter of creating your own PBM policies, then putting them in certain categories based on the type of object you’re monitoring. After creating these policies and altering a few settings, your policies will automatically be evaluated by the AlwaysOn Dashboard.
Consider the following scenario: I have an asynchronous replica, and I want the dashboard to show an error when databases on the replica gets too far behind the primary (for example, a networking issue may slow down data movement, and I want to know when this happens). Below we’ll walkthrough the process of creating a policy to monitor this condition, and integrating this policy into the AlwaysOn health model.
1) Define your condition.
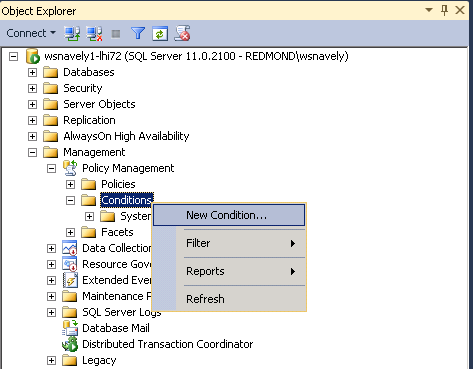
Connect to the primary instance of your availability group using SSMS, and navigate to Management > Policy Management > Conditions. Right click the Conditions folder and select the “New Condition…” menu item.
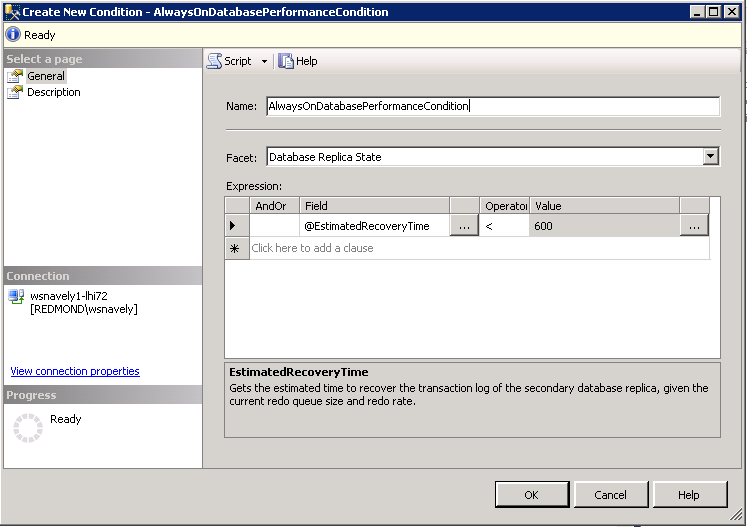
Give your condition a name – we’ll use “AlwaysOnDatabasePerformanceCondition” – and then choose an appropriate facet for this condition. A facet is a set of logical properties on top of a server object. We use these properties to construct the Boolean expression that defines the condition. AlwaysOn exposes a number of interesting facets:
- Availability Group State:
- Primarily contains roll-up properties of the availability group, such as the number disconnected availability replicas, the number of unhealthy availability replicas, etc. Go here for a list of the properties exposed by this facet and their descriptions.
- Availability Replica
- Contains various availability replica properties, such as the availability mode, failover mode, connection state (whether we can communicate with the replica or not), etc. Go here for a list of the properties exposed by this facet and their descriptions.
- Database Replica State
- Contains properties for individual database replicas. There’s a lot of useful performance data exposed through this facet, for example: estimated data loss and estimated recovery time. Go here for a list of the properties exposed by this facet and their descriptions.
Moreover, some of our policies target the "Server" facet. The interesting AlwaysOn-related properties in the Server facet are: IsHadrEnabled, ClusterQuorumState, HadrManagerStatus, and ClusterQuorumType.
For our scenario, the “Database Replica State” facet is useful, since we want to monitor the performance of a database. After choosing this facet we need to define the condition itself. In our case, let’s say we want to enforce that the “Estimated Recovery Time” must be less than 10 minutes. This means that my databases should be no more than 10 minutes behind the primary replica. This is what the completed dialog looks like:
I indicate that the “@EstimatedRecoveryTime” property must be less than 600 (60 seconds times 10 minutes). Note that our condition defines the "expected" state of the database, opposed to the error state. The idea is, if the condition evaluates to "True", then everything is OK. If the condition evaluates to false, then we have a policy failure. You can now click “OK”, and the condition will be created.
2) Create your policy
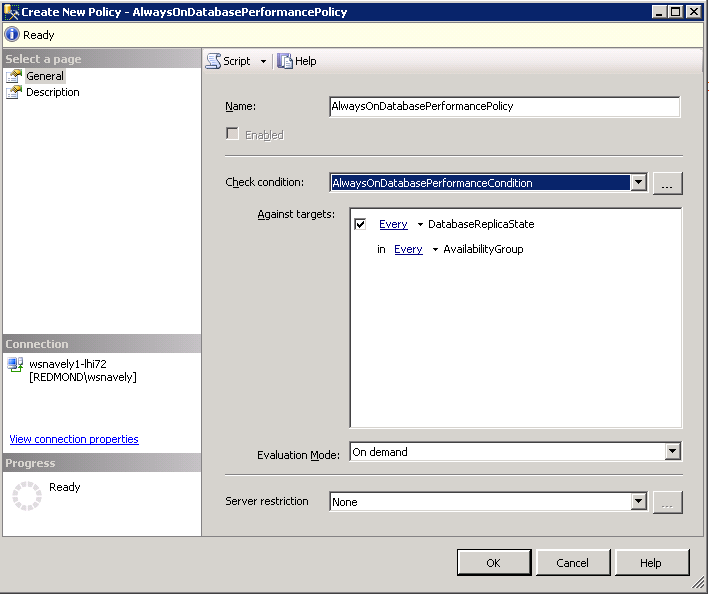
Now we can create the policy that will run this condition. Again in SSMS, navigate to Management > Policy Management > Policies. Right click on the Policies folder and select the “New Policy…” menu item. Give your policy a name – we’ll use “AlwaysOnDatabasePerformancePolicy” – and then set the condition for your policy to the condition defined above. You shouldn’t have to do anything in the “targets” pane, and don’t have to change the evaluation mode or server restriction.
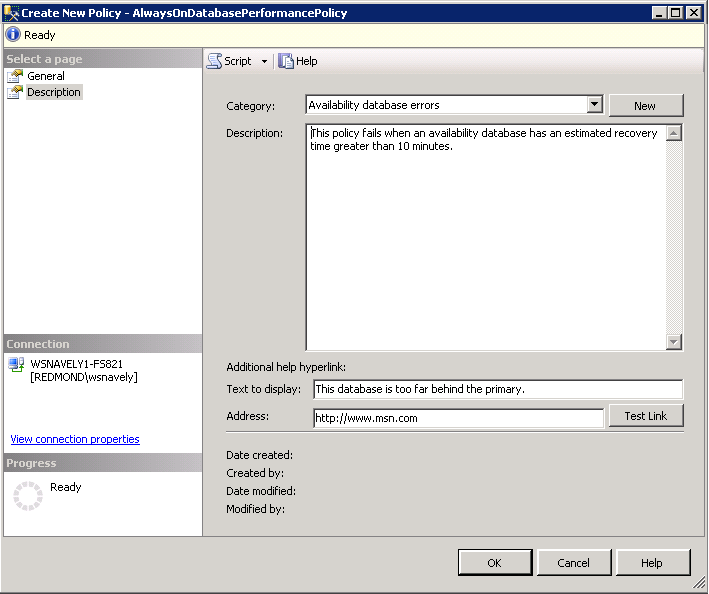
Now – very important – move to the “Description” page of this dialog, and choose a category for this policy. You can click the dropdown to view the available categories. Please see part 1 of this series for a detailed description of each category. Since we want this policy to run against a database replica, and we want this to show up as an error, we choose the “Availability database errors” category.
You can optionally fill in the “Description”, “Text to display”, and “Address” fields. You will see below how the dashboard makes use of these values. The “Description” field should explain in detail the condition that the policy is monitoring. The “Text to Display Field” should give a brief summary of the policy (think of this as the 'display name' of the policy). The “Address” field should be the URL of a help resource for the policy. You can now click “OK” to close the dialog.
3) Enable User-Defined Policies
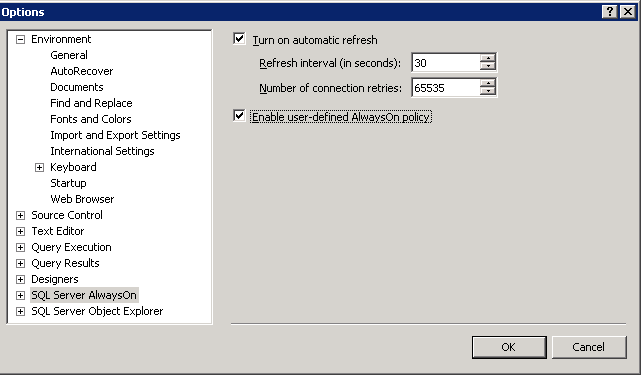
The last step here is to open up the Tools->Options menu in SSMS and navigate to the “SQL Server AlwaysOn” Options. Here you want to click the check box by “Enabled user-defined AlwaysOn policy.”
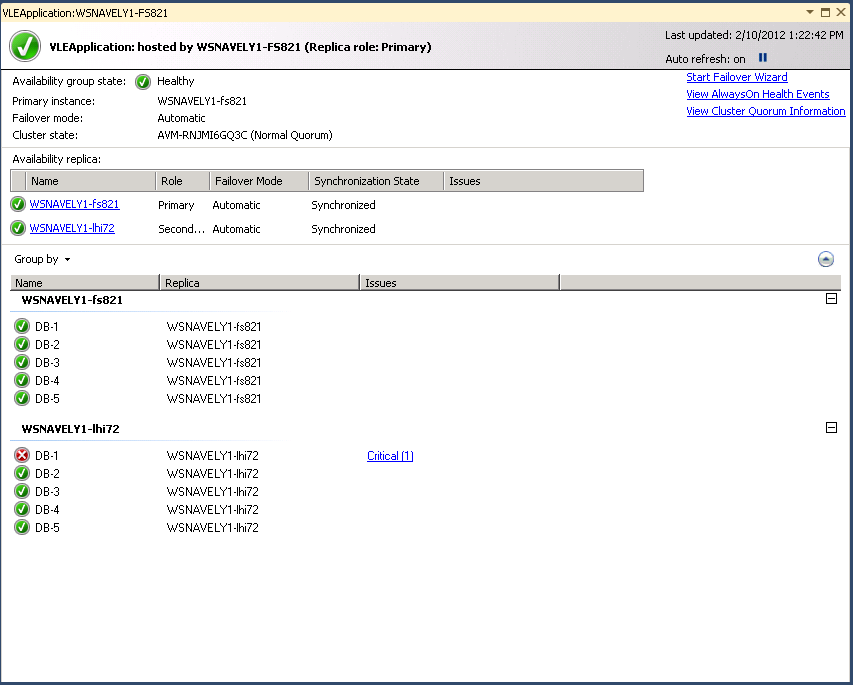
Now the dashboard will pick up our new policy. Note if you already have a dashboard open, you will either have to manually refresh the dashboard (View -> Refresh), or close the dashboard and reopen it. This is what the dashboard looks like when our policy fails:
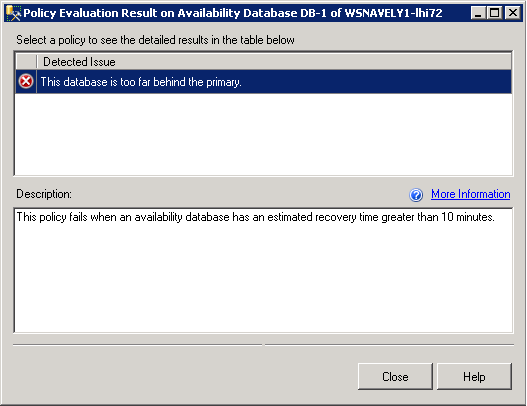
We see DB-1 on the secondary replica "WSNAVELY1-lhi72" has a critical error. When we click on the “Critical (1)” link, we see the following:
Here we see how the various fields from the policy creation dialog come into play. The “Text to Display” field of the policy shows up in the “Detected Issue” column of this dialog, and the “Description” field of the policy shows up in the corresponding “Description” field above. Lastly, the help link associated with the policy will be opened if the “More Information” link is clicked.
Overriding System Policies
I mentioned that we ship a collection of default AlwaysOn system policies with SQL Server 2012. In case you want to disable or change one of these default policies, we provide a means to override these system policies.
Suppose you want to disable execution of the “AlwaysOnDbrSuspendStatePolicy” policy. To do so, simply create a user policy with the name “^AlwaysOnDbrSuspendStatePolicy” – that is, the name of the system policy with a caret symbol (^) in front of it – and this user policy will now override the system policy. Note that as above you need to have user-defined policies enabled for this to work.
Moving Policies to Your Other AlwaysOn Servers
Generally, you will want to maintain copies of your policies on all the server instances participating in your availability group. The reason for this is, if your availability group fails over to a different server instance, you’ll want to have all your custom policies ready to go on the new primary. Happily, you can just define your policy once and import the definition into your other servers.
To do so, check out this help article: How to: Export and Import a Policy-Based Management Policy.
This concludes our two part series exploring the AlwaysOn health model. By now you should have a basic understanding of the health model architecture, and should know the general process for extending this health model.
Comments
Anonymous
December 20, 2014
Good Articles, Just one question, this can be done just in primary or secondary or both replicas?Anonymous
June 18, 2015
The comment has been removed
