How to create a user control (Windows Forms .NET)
This article teaches you how to add a user control to your project and then add that user control to a form. You'll create a reusable user control that's both visually appealing and functional. The new control groups a TextBox control with a Button control. When the user selects the button, the text in the text box is cleared. For more information about user controls, see User control overview.
Add a user control to a project
After opening your Windows Forms project in Visual Studio, use the Visual Studio templates to create a user control:
In Visual Studio, find the Project Explorer window. Right-click on the project and choose Add > User Control (Windows Forms).
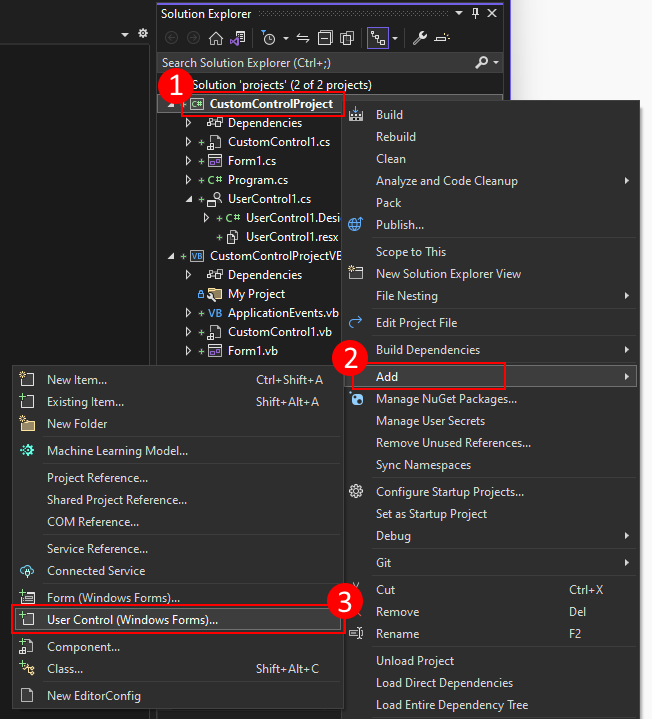
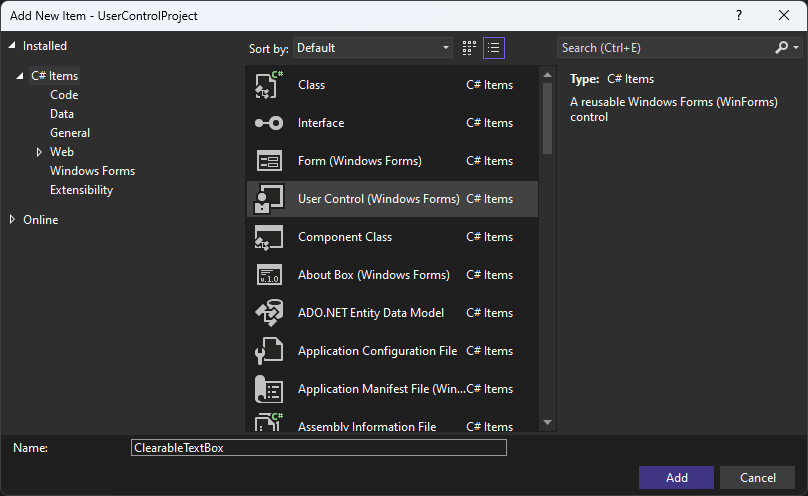
Set the Name of the control to ClearableTextBox, and press Add.
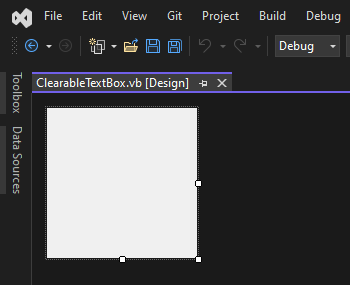
After the user control is created, Visual Studio opens the designer:
Design the clearable text box
The user control is made up of constituent controls, which are the controls you create on the design surface, just like how you design a form. Follow these steps to add and configure the user control and its constituent controls:
With the designer open, the user control design surface should be the selected object. If it's not, click on the design surface to select it. Set the following properties in the Properties window:
Property Value MinimumSize 84, 53Size 191, 53Add a Label control. Set the following properties:
Property Value Name lblTitleLocation 3, 5Add a TextBox control. Set the following properties:
Property Value Name txtValueAnchor Top, Left, RightLocation 3, 23Size 148, 23Add a Button control. Set the following properties:
Property Value Name btnClearAnchor Top, RightLocation 157, 23Size 31, 23Text ↻The control should look like the following image:
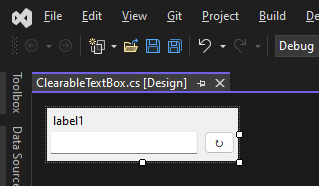
Press F7 to open the code editor for the
ClearableTextBoxclass.Make the following code changes:
At the top of the code file, import the
System.ComponentModelnamespace.Add the
DefaultEventattribute to the class. This attribute sets which event is generated by the consumer when the control is double-clicked in the designer. The consumer being the object declaring and using this control. For more information about attributes, see Attributes (C#) or Attributes overview (Visual Basic).using System.ComponentModel; namespace UserControlProject { [DefaultEvent(nameof(TextChanged))] public partial class ClearableTextBox : UserControlImports System.ComponentModel <DefaultEvent("TextChanged")> Public Class ClearableTextBoxAdd an event handler that forwards the
TextBox.TextChangedevent to the consumer:[Browsable(true)] public new event EventHandler? TextChanged { add => txtValue.TextChanged += value; remove => txtValue.TextChanged -= value; }<Browsable(True)> Public Shadows Custom Event TextChanged As EventHandler AddHandler(value As EventHandler) AddHandler txtValue.TextChanged, value End AddHandler RemoveHandler(value As EventHandler) RemoveHandler txtValue.TextChanged, value End RemoveHandler RaiseEvent(sender As Object, e As EventArgs) End RaiseEvent End EventNotice that the event has the
Browsableattribute declared on it. When theBrowsableis applied to an event or property, it controls whether or not the item is visible in the Properties window when the control is selected in the designer. In this case,trueis passed as a parameter to the attribute indicating that the event should be visible.Add a string property named
Text, which forwards theTextBox.Textproperty to the consumer:[Browsable(true)] public new string Text { get => txtValue.Text; set => txtValue.Text = value; }<Browsable(True)> Public Shadows Property Text() As String Get Return txtValue.Text End Get Set(value As String) txtValue.Text = value End Set End PropertyAdd a string property named
Title, which forwards theLabel.Textproperty to the consumer:[Browsable(true)] public string Title { get => lblTitle.Text; set => lblTitle.Text = value; }<Browsable(True)> Public Property Title() As String Get Return lblTitle.Text End Get Set(value As String) lblTitle.Text = value End Set End Property
Switch back to the
ClearableTextBoxdesigner and double-click thebtnClearcontrol to generate a handler for theClickevent. Add the following code for the handler, which clears thetxtValuetext box:private void btnClear_Click(object sender, EventArgs e) => Text = "";Private Sub btnClear_Click(sender As Object, e As EventArgs) txtValue.Text = "" End SubFinally, build the project by right-clicking the project in the Solution Explorer window, and selecting Build. There shouldn't be any errors, and after the build is finished, the
ClearableTextBoxcontrol appears in the toolbox for use.
The next step is using the control in a form.
Sample application
If you created a new project in the last section, you have a blank Form named Form1, otherwise, create a new form.
In the Solution Explorer window, double-click the form to open the designer. The form's design surface should be selected.
Set the form's
Sizeproperty to432, 315.Open the Toolbox window, and double-click the ClearableTextBox control. This control should be listed under a section named after your project.
Again, double-click on the ClearableTextBox control to generate a second control.
Move back to the designer and separate the controls so that you can see both of them.
Select one control and set the following properties:
Property Value Name ctlFirstNameLocation 12, 12Size 191, 53Title First NameSelect the other control and set the following properties:
Property Value Name ctlLastNameLocation 12, 71Size 191, 53Title Last NameBack in the Toolbox window, add a label control to the form, and set the following properties:
Property Value Name lblFullNameLocation 12, 252Next, you need to generate the event handlers for the two user controls. In the designer, double-click on the
ctlFirstNamecontrol. This action generates the event handler for theTextChangedevent, and opens the code editor.Swap back to the designer and double-click the
ctlLastNamecontrol to generate the second event handler.Swap back to the designer and double-click on the form's title bar. This action generates an event handler for the
Loadevent.In the code editor, add a method named
UpdateNameLabel. This method combines both names to create a message, and assigns the message to thelblFullNamecontrol.private void UpdateNameLabel() { if (string.IsNullOrWhiteSpace(ctlFirstName.Text) || string.IsNullOrWhiteSpace(ctlLastName.Text)) lblFullName.Text = "Please fill out both the first name and the last name."; else lblFullName.Text = $"Hello {ctlFirstName.Text} {ctlLastName.Text}, I hope you're having a good day."; }Private Sub UpdateNameLabel() If String.IsNullOrWhiteSpace(ctlFirstName.Text) Or String.IsNullOrWhiteSpace(ctlLastName.Text) Then lblFullName.Text = "Please fill out both the first name and the last name." Else lblFullName.Text = $"Hello {ctlFirstName.Text} {ctlLastName.Text}, I hope you're having a good day." End If End SubFor both
TextChangedevent handlers, call theUpdateNameLabelmethod:private void ctlFirstName_TextChanged(object sender, EventArgs e) => UpdateNameLabel(); private void ctlLastName_TextChanged(object sender, EventArgs e) => UpdateNameLabel();Private Sub ctlFirstName_TextChanged(sender As Object, e As EventArgs) Handles ctlFirstName.TextChanged UpdateNameLabel() End Sub Private Sub ctlLastName_TextChanged(sender As Object, e As EventArgs) Handles ctlLastName.TextChanged UpdateNameLabel() End SubFinally, call the
UpdateNameLabelmethod from the form'sLoadevent:private void Form1_Load(object sender, EventArgs e) => UpdateNameLabel();Private Sub Form1_Load(sender As Object, e As EventArgs) Handles MyBase.Load UpdateNameLabel() End Sub
Run the project and enter a first and last name:
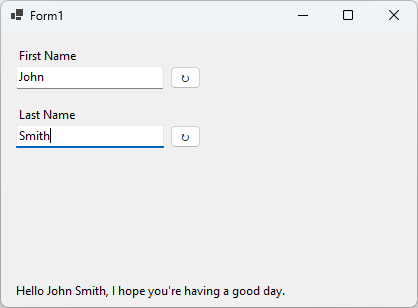
Try pressing the ↻ button to reset one of the text boxes.
.NET Desktop feedback
