Adaptive Tile Templates - Schema and Documentation
Adaptive tile templates are a new feature in Windows 10, allowing you to easily specify content on your tile notifications without being limited to the preset templates we previously provided in the "tile template catalog". You can still use most of those legacy templates from the catalog (some like ImageCollection no longer work), but adaptive tile templates allow you to design your own tile notification content using a simple and flexible markup language that adapts to different densities.
This documentation includes features added in the Anniversary Update of Windows 10. You can view the archived documentation for Windows 10 Version 1511 (10586).
How to send a Tile notification?
Please read our Quickstart on sending local Tile notifications. The documentation on this page explains all the visual UI possibilities you have with Adaptive Tiles.
Install Notifications library
In order to generate notifications via C# instead of XML, install a NuGet package called Microsoft.Toolkit.Uwp.Notifications. Our C# samples seen on this page use this Notifications library.
Install Notifications Visualizer
Notifications Visualizer helps you design an adaptive live tile with instant visual previews, similar to Visual Studio's XAML editor/design view. For more info and to download the app, read this blog post.
Quick Sample
Here is an example that quickly shows the essence of Adaptive Tile Templates and the results they produce.
<tile>
<visual>
<binding template="TileMedium">
...
</binding>
<binding template="TileWide">
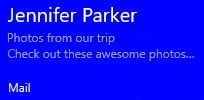
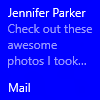
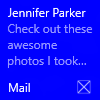
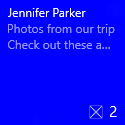
<text hint-style="subtitle">Jennifer Parker</text>
<text hint-style="captionSubtle">Photos from our trip</text>
<text hint-style="captionSubtle">Check out these awesome photos I took while in New Zealand!</text>
</binding>
<binding template="TileLarge">
...
</binding>
</visual>
</tile>
 TileContent content = new TileContent()
{
    Visual = new TileVisual()
    {
        TileMedium = ...

        TileWide = new TileBinding()
        {
            Content = new TileBindingContentAdaptive()
            {
                Children =
                {
                    new AdaptiveText()
                    {
                        Text = "Jennifer Parker",
                        HintStyle = AdaptiveTextStyle.Subtitle
                    },

                    new AdaptiveText()
                    {
                        Text = "Photos from our trip",
                        HintStyle = AdaptiveTextStyle.CaptionSubtle
                    },

                    new AdaptiveText()
                    {
                        Text = "Check out these awesome photos I took while in New Zealand!",
                        HintStyle = AdaptiveTextStyle.CaptionSubtle
                    }
                }
            }
        },

        TileLarge = ...
    }
};
auto tileContent = ref new TileContent();
auto tileVisual = ref new TileVisual();

tileVisual->TileMedium = ...

auto tileBinding = ref new TileBinding();
auto tileBindingContentAdaptive = ref new TileBindingContentAdaptive();

auto adaptiveText = ref new AdaptiveText();
adaptiveText->Text = "Jennifer Parker";
adaptiveText->HintStyle = AdaptiveTextStyle::Subtitle;
tileBindingContentAdaptive->Children->Append(adaptiveText);

adaptiveText = ref new AdaptiveText();
adaptiveText->Text = "Photos from our trip";
adaptiveText->HintStyle = AdaptiveTextStyle::CaptionSubtle;
tileBindingContentAdaptive->Children->Append(adaptiveText);

adaptiveText = ref new AdaptiveText();
adaptiveText->Text = "Check out these awesome photos I took while in New Zealand!";
adaptiveText->HintStyle = AdaptiveTextStyle::CaptionSubtle;
tileBindingContentAdaptive->Children->Append(adaptiveText);

tileBinding->Content = tileBindingContentAdaptive;

tileVisual->TileWide = tileBinding;

tileVisual->TileLarge = ...

tileContent->Visual = tileVisual;
var notifLib = Microsoft.Toolkit.Uwp.Notifications;

var tileContent = new notifLib.TileContent();
var tileVisual = new notifLib.TileVisual();

tileVisual.tileMedium = ...

var tileBinding = new notifLib.TileBinding();
var tileBindingContentAdaptive = new notifLib.TileBindingContentAdaptive();

var adaptiveText = new notifLib.AdaptiveText();
adaptiveText.text = "Jennifer Parker";
adaptiveText.hintStyle = notifLib.AdaptiveTextStyle.subtitle;
tileBindingContentAdaptive.children.push(adaptiveText);

adaptiveText = new notifLib.AdaptiveText();
adaptiveText.text = "Photos from our trip";
adaptiveText.hintStyle = notifLib.AdaptiveTextStyle.captionSubtle;
tileBindingContentAdaptive.children.push(adaptiveText);

adaptiveText = new notifLib.AdaptiveText();
adaptiveText.text = "Check out these awesome photos I took while in New Zealand!";
adaptiveText.hintStyle = notifLib.AdaptiveTextStyle.captionSubtle;
tileBindingContentAdaptive.children.push(adaptiveText);

tileBinding.content = tileBindingContentAdaptive;

tileVisual.tileWide = tileBinding;

tileVisual.tileLarge = ...

tileContent.visual = tileVisual;
Schema
 <tile>

  <!-- Child elements -->
  visual

</tile>
 <visual
  lang? = string
  baseUri? = anyURI
  branding? = "none" | "logo" | "name" | "nameAndLogo"
  addImageQuery? = boolean
  contentId? = string
  displayName? = string
  arguments? = string  (Added in 1607)  >

  <!-- Child elements -->
  binding+
</visual>
 <binding
  template = tileTemplateNameV3
  fallback? = tileTemplateNameV1
  lang? = string
  baseUri? = anyURI
  branding? = "none" | "logo" | "name" | "nameAndLogo"
  addImageQuery? = boolean
  contentId? = string
  displayName? = string
  hint-textStacking? = "top" | "center" | "bottom"
  hint-overlay? = [0-100]
  hint-presentation? = "photos" | "people" | "contact"
  hint-lockDetailedStatus1? = string
  hint-lockDetailedStatus2? = string
  hint-lockDetailedStatus3? = string
  arguments? = string  (Added in 1607)  >

  <!-- Child elements -->
  ( image
  | text
  | group
  )*
</binding>
 <image
  src = string
  placement? = "inline" | "background" | "peek"
  alt? = string
  addImageQuery? = boolean
hint-crop? = "none" | "circle"  (In 1511, this works for all image placements)
  hint-removeMargin? = boolean
  hint-align? = "stretch" | "left" | "center" | "right"
hint-overlay? = [0-100] (only applies to "background" or "peek" images)  (Added in 1511)  />
 <text
  lang? = string
  hint-style? = textStyle
  hint-wrap? = boolean
  hint-maxLines? = integer
  hint-minLines? = integer
  hint-align? = "left" | "center" | "right" >
  <!-- text goes here -->
</text>
textStyle values...
  caption
  captionSubtle
  body
  bodySubtle
  base
  baseSubtle
  subtitle
  subtitleSubtle
  title
  titleSubtle
  titleNumeral
  subheader
  subheaderSubtle
  subheaderNumeral
  header
  headerSubtle
  headerNumeral
 <group>
  <!-- Child elements -->
  subgroup+
</group>
 <subgroup
  hint-weight? = [0-100]
  hint-textStacking? = "top" | "center" | "bottom" >
  <!-- Child elements -->
  ( text
  | image
  )*
</subgroup>
The Basics
Adaptive templates are semantic in nature, since they are meant to work across different form factors and different types of notifications. For example, elements like group and subgroup are used to semantically link content together – they do not imply a specific visual behavior on their own. The final appearance is up to the specific device – be it a phone/desktop/Xbox, HoloLens, or smartwatch, and the type of notification – tile or toast.
Hints are optional attributes that can be added to elements in order to achieve a specific visual behavior. Some hints might be device-specific or notification-specific, hence why they are optional.
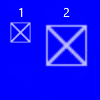
The Templates (Tile Sizes)
Content for each tile size is individually specified in separate <binding> elements within the XML payload. The size you are targeting is specified by setting the template attribute to one of the following values…
- TileSmall
- TileMedium
- TileWide
- TileLarge (desktop only)
In a single tile notification XML payload, you should provide <binding> elements for each tile size you choose to support, as shown by the example below.
<tile>
<visual>
<binding template="TileSmall">
<text>Small</text>
</binding>
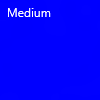
<binding template="TileMedium">
<text>Medium</text>
</binding>
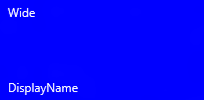
<binding template="TileWide">
<text>Wide</text>
</binding>
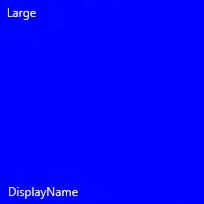
<binding template="TileLarge">
<text>Large</text>
</binding>
</visual>
</tile>
 TileContent content = new TileContent()
{
    Visual = new TileVisual()
    {
        TileSmall = new TileBinding()
        {
            Content = new TileBindingContentAdaptive()
            {
                Children =
                {
                    new AdaptiveText() { Text = "Small" }
                }
            }
        },

        TileMedium = new TileBinding()
        {
            Content = new TileBindingContentAdaptive()
            {
                Children =
                {
                    new AdaptiveText() { Text = "Medium" }
                }
            }
        },

        TileWide = new TileBinding()
        {
            Content = new TileBindingContentAdaptive()
            {
                Children =
                {
                    new AdaptiveText() { Text = "Wide" }
                }
            }
        },

        TileLarge = new TileBinding()
        {
            Content = new TileBindingContentAdaptive()
            {
                Children =
                {
                    new AdaptiveText() { Text = "Large" }
                }
            }
        }
    }
};
auto tileContent = ref new TileContent();
auto tileVisual = ref new TileVisual();
auto tileBinding = ref new TileBinding();
auto tileBindingContentAdaptive = ref new TileBindingContentAdaptive();

auto adaptiveText = ref new AdaptiveText();
adaptiveText->Text = "Small";
tileBindingContentAdaptive->Children->Append(adaptiveText);

tileBinding->Content = tileBindingContentAdaptive;

tileVisual->TileSmall = tileBinding;

tileBinding = ref new TileBinding();
tileBindingContentAdaptive = ref new TileBindingContentAdaptive();

adaptiveText = ref new AdaptiveText();
adaptiveText->Text = "Medium";
tileBindingContentAdaptive->Children->Append(adaptiveText);

tileBinding->Content = tileBindingContentAdaptive;

tileVisual->TileMedium = tileBinding;

tileBinding = ref new TileBinding();
tileBindingContentAdaptive = ref new TileBindingContentAdaptive();

adaptiveText = ref new AdaptiveText();
adaptiveText->Text = "Wide";
tileBindingContentAdaptive->Children->Append(adaptiveText);

tileBinding->Content = tileBindingContentAdaptive;

tileVisual->TileWide = tileBinding;

tileBinding = ref new TileBinding();
tileBindingContentAdaptive = ref new TileBindingContentAdaptive();

adaptiveText = ref new AdaptiveText();
adaptiveText->Text = "Large";
tileBindingContentAdaptive->Children->Append(adaptiveText);

tileBinding->Content = tileBindingContentAdaptive;

tileVisual->TileLarge = tileBinding;

tileContent->Visual = tileVisual;
var notifLib = Microsoft.Toolkit.Uwp.Notifications;

var tileContent = new notifLib.TileContent();
var tileVisual = new notifLib.TileVisual();
var tileBinding = new notifLib.TileBinding();
var tileBindingContentAdaptive = new notifLib.TileBindingContentAdaptive();

var adaptiveText = new notifLib.AdaptiveText();
adaptiveText.text = "Small";
tileBindingContentAdaptive.children.push(adaptiveText);

tileBinding.content = tileBindingContentAdaptive;

tileVisual.tileSmall = tileBinding;

tileBinding = new notifLib.TileBinding();
tileBindingContentAdaptive = new notifLib.TileBindingContentAdaptive();

adaptiveText = new notifLib.AdaptiveText();
adaptiveText.text = "Medium";
tileBindingContentAdaptive.children.push(adaptiveText);

tileBinding.content = tileBindingContentAdaptive;

tileVisual.tileMedium = tileBinding;

tileBinding = new notifLib.TileBinding();
tileBindingContentAdaptive = new notifLib.TileBindingContentAdaptive();

adaptiveText = new notifLib.AdaptiveText();
adaptiveText.text = "Wide";
tileBindingContentAdaptive.children.push(adaptiveText);

tileBinding.content = tileBindingContentAdaptive;

tileVisual.tileWide = tileBinding;

tileBinding = new notifLib.TileBinding();
tileBindingContentAdaptive = new notifLib.TileBindingContentAdaptive();

adaptiveText = new notifLib.AdaptiveText();
adaptiveText.text = "Large";
tileBindingContentAdaptive.children.push(adaptiveText);

tileBinding.content = tileBindingContentAdaptive;

tileVisual.tileLarge = tileBinding;

tileContent.visual = tileVisual;

Branding
While a notification is being displayed, you can control the branding on the bottom of the live tile (display name and corner logo) via the branding attribute on the notification payload. You can choose to have “none” displayed, just the “name”, just the “logo”, or both “nameAndLogo”.
Note: Mobile does not support the corner logo. On builds 14273 and newer, "logo" will fall back to "name" (on older builds it will display a blank branding bar), and "nameAndLogo" will simply become "name" on Mobile.
 <visual branding="logo">
  ...
</visual>
 new TileVisual()
{
    Branding = TileBranding.Logo,
    ...
}
auto tileVisual = ref new TileVisual();
tileVisual->Branding = TileBranding::Logo;
var tileVisual = new notifLib.TileVisual();
tileVisual.branding = notifLib.TileBranding.logo;
| none | name | logo (Desktop) | nameAndLogo (Desktop) |
|---|---|---|---|
 |
 |
 |
Branding can be specified for specific tile sizes by applying the attribute on the <binding> element, or it can be specified for the entire notification payload by applying the attribute on the <visual> element. If a binding doesn’t have branding specified, it will use the branding provided on the visual element (if provided).
 <tile>
  <visual branding="nameAndLogo">
    <binding template="TileMedium" branding="logo">
      ...
    </binding>

    <!--Inherits branding from visual-->
    <binding template="TileWide">
      ...
    </binding>
  </visual>
</tile>
 TileContent content = new TileContent()
{
    Visual = new TileVisual()
    {
        Branding = TileBranding.NameAndLogo,

        TileMedium = new TileBinding()
        {
            Branding = TileBranding.Logo,
            ...
        },

        // Inherits branding from Visual
        TileWide = new TileBinding()
        {
            ...
        }
    }
};
auto tileContent = ref new TileContent();
auto tileVisual = ref new TileVisual();
tileVisual->Branding = TileBranding::NameAndLogo;

auto tileBinding = ref new TileBinding();
tileBinding->Branding = TileBranding::Logo;
tileVisual->TileMedium = tileBinding;

// Inherits branding from Visual
tileBinding = ref new TileBinding();
tileVisual->TileWide = tileBinding;

tileContent->Visual = tileVisual;
var tileContent = new notifLib.TileContent();
var tileVisual = new notifLib.TileVisual();
tileVisual.branding = notifLib.TileBranding.nameAndLogo;

var tileBinding = new notifLib.TileBinding();
tileBinding.branding = notifLib.TileBranding.logo;
tileVisual.tileMedium = tileBinding;

// Inherits branding from Visual
tileBinding = new notifLib.TileBinding();
tileVisual.tileWide = tileBinding;

tileContent.visual = tileVisual;
If your notification payload doesn’t specify branding, the branding will be determined from the base tile’s properties. If the display name is shown on the base tile, then the branding will default to “name”. Otherwise, if the display name isn’t shown, the branding will default to “none”.
Note: This is a change from Windows 8, where by default, branding was always “logo”.
| ShowName | Base Tile | Default Branding | |
|---|---|---|---|
| false |  | after notification -> | 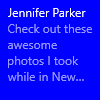 |
| true |  | |
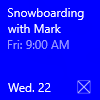
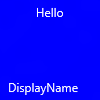
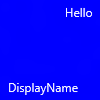
Display name
Additionally, notifications can override the display name while the notification is being shown. Use the displayName attribute to specify a string of your choice. Just like branding, this can be specified on the <visual> element, or for each individual tile size on the <binding> element.
Known Issue: On Windows Mobile, if you specify a ShortName for your Tile, the display name provided in your notification will not be used (the ShortName will always be displayed).
 <tile>
  <visual branding="nameAndLogo" displayName="Wednesday 22">
    <binding template="TileMedium" displayName="Wed. 22">
      ...
    </binding>

    <!--Inherits displayName from visual-->
    <binding template="TileWide">
      ...
    </binding>
  </visual>
</tile>
 TileContent content = new TileContent()
{
    Visual = new TileVisual()
    {
        Branding = TileBranding.NameAndLogo,
        DisplayName = "Wednesday 22",
        TileMedium = new TileBinding()
        {
            DisplayName = "Wed. 22",
            ...
        },
        // Inherits DisplayName from Visual
        TileWide = new TileBinding()
        {
            ...
        }
    }
};
auto tileContent = ref new TileContent();
auto tileVisual = ref new TileVisual();
tileVisual->DisplayName = "Wednesday 22";
tileVisual->Branding = TileBranding::NameAndLogo;

auto tileBinding = ref new TileBinding();
tileBinding->DisplayName = "Wed. 22";
tileVisual->TileMedium = tileBinding;

// Inherits DisplayName from Visual
tileBinding = ref new TileBinding();
tileVisual->TileWide = tileBinding;

tileContent->Visual = tileVisual;
var tileContent = new notifLib.TileContent();
var tileVisual = new notifLib.TileVisual();
tileVisual.displayName = "Wednesday 22";
tileVisual.branding = notifLib.TileBranding.nameAndLogo;

var tileBinding = new notifLib.TileBinding();
tileBinding.displayName = "Wed. 22";
tileVisual.tileMedium = tileBinding;

// Inherits DisplayName from Visual
tileBinding = new notifLib.TileBinding();
tileVisual.tileWide = tileBinding;

tileContent.visual = tileVisual;
| Base tile | Notification overriding display name |
|---|---|
 |
 |
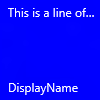
Text
The text element is used to display text. Its usage is quite simple, but the appearance of the text can be modified in a number of different ways using hints.
<text>This is a line of text</text>
 new AdaptiveText()
{
    Text = "This is a line of text"
};
auto adaptiveText = ref new AdaptiveText();
adaptiveText->Text = "This is a line of text";
var adaptiveText = new notifLib.AdaptiveText();
adaptiveText.text = "This is a line of text";
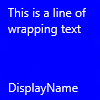
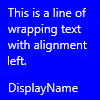
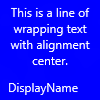
Text Wrapping
Use the hint-wrap attribute to set text wrapping on a text element. By default, text does not wrap and will continue off the edge of the tile. You can also control the minimum and maximum amount of lines with hint-minLines and hint-maxLines (which both accept positive integers).
<text hint-wrap="true">This is a line of wrapping text</text>
 new AdaptiveText()
{
    Text = "This is a line of wrapping text",
    HintWrap = true
};
auto adaptiveText = ref new AdaptiveText();
adaptiveText->Text = "This is a line of wrapping text";
adaptiveText->HintWrap = true;
var adaptiveText = new notifLib.AdaptiveText();
adaptiveText.text = "This is a line of wrapping text";
adaptiveText.hintWrap = true;
Text Styles
Styles control the font size, color, and weight of text elements. There are a number of available styles, including a “Subtle” version of each style, which simply sets the opacity to 60% (usually resulting in a more gray color instead of white).
 <text hint-style="base">Header content</text>
<text hint-style="captionSubtle">Subheader content</text>
 new AdaptiveText()
{
    Text = "Header content",
    HintStyle = AdaptiveTextStyle.Base
},
new AdaptiveText()
{
    Text = "Subheader content",
    HintStyle = AdaptiveTextStyle.CaptionSubtle
}
auto adaptiveText = ref new AdaptiveText();
adaptiveText->Text = "Header content";
adaptiveText->HintStyle = AdaptiveTextStyle::Base;

auto adaptiveText2 = ref new AdaptiveText();
adaptiveText2->Text = "Subheader content";
adaptiveText2->HintStyle = AdaptiveTextStyle::CaptionSubtle;
var adaptiveText = new notifLib.AdaptiveText();
adaptiveText.text = "Header content";
adaptiveText.hintStyle = notifLib.AdaptiveTextStyle.base;

var adaptiveText2 = new notifLib.AdaptiveText();
adaptiveText2.text = "Subheader content";
adaptiveText2.hintStyle = notifLib.AdaptiveTextStyle.captionSubtle;

Note: if hint-style is not specified, the style defaults to caption.
Basic Text Styles
| <text hint-style="*" /> | Font Height | Weight |
|---|---|---|
| caption | 12 epx | Regular |
| body | 15 epx | Regular |
| base | 15 epx | SemiBold |
| subtitle | 20 epx | Regular |
| title | 24 epx | Semilight |
| subheader | 34 epx | Light |
| header | 46 epx | Light |
Numeral Text Style Variations
These variations reduce the line height so that content above and below come extremely close to the text.
| titleNumeral |
| subheaderNumeral |
| headerNumeral |
Subtle Text Style Variations
There is a subtle variation of every style previously mentioned, which simply makes the text 60% opaque, typically resulting in text that is more gray than white.
| captionSubtle |
| bodySubtle |
| baseSubtle |
| subtitleSubtle |
| titleSubtle |
| titleNumeralSubtle |
| subheaderSubtle |
| subheaderNumeralSubtle |
| headerSubtle |
| headerNumeralSubtle |
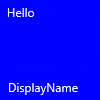
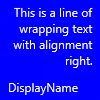
Text Alignment
Text can be horizontally aligned left, center, or right. In left-to-right languages like English, text defaults to left-aligned. In right-to-left languages like Arabic, text defaults to right-aligned. You can manually set alignment with the hint-align attribute on elements.
<text hint-align="center">Hello</text>
 new AdaptiveText()
{
    Text = "Hello",
    HintAlign = AdaptiveTextAlign.Center
};
auto adaptiveText = ref new AdaptiveText();
adaptiveText->Text = "Hello";
adaptiveText->HintAlign = AdaptiveTextAlign::Center;
var adaptiveText = new notifLib.AdaptiveText();
adaptiveText.text = "Hello";
adaptiveText.hintAlign = notifLib.AdaptiveTextAlign.center;
| left | center | right |
|---|---|---|
 |
 |
 |
 |
 |
 |
Groups and Subgroups
Groups allow you to semantically declare that the content inside the group is related and must be displayed in its entirety for the content to make sense. For example, you might have two text elements, a header and a subheader, and it would not make sense for only the header to be shown. By placing those elements inside a subgroup in a group, the elements will either all be displayed (if they can fit) or not displayed at all (since not all could fit).
These groups allow your tile to adapt to larger screens, where each tile can fit more content. For example, say your tile displays new emails. On small-screen phones, the live tiles themselves are smaller, and therefore only one email can fit on the live tile. However, on large-screen phones, two emails can fit on the live tile. Thus, to provide the best experience, you should provide multiple groups.
Note: the only valid child of a group is a subgroup. Hence, you must place your content inside a subgroup in a group.
...
<binding template="TileMedium" branding="nameAndLogo">
<group>
<subgroup>
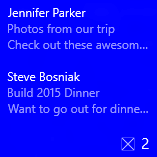
<text hint-style="subtitle">Jennifer Parker</text>
<text hint-style="captionSubtle">Photos from our trip</text>
<text hint-style="captionSubtle">Check out these awesome photos I took while in New Zealand!</text>
</subgroup>
</group>
<text />
<group>
<subgroup>
<text hint-style="subtitle">Steve Bosniak</text>
<text hint-style="captionSubtle">Build 2015 Dinner</text>
<text hint-style="captionSubtle">Want to go out for dinner after Build tonight?</text>
</subgroup>
</group>
</binding>
...
 ...
TileMedium = new TileBinding()
{
    Branding = TileBranding.NameAndLogo,
    Content = new TileBindingContentAdaptive()
    {
        Children =
        {
            CreateGroup(
                from: "Jennifer Parker",
                subject: "Photos from our trip",
                body: "Check out these awesome photos I took while in New Zealand!"),
            // For spacing
            new AdaptiveText(),
            CreateGroup(
                from: "Steve Bosniak",
                subject: "Build 2015 Dinner",
                body: "Want to go out for dinner after Build tonight?")
        }
    }
}
...
private static AdaptiveGroup CreateGroup(string from, string subject, string body)
{
    return new AdaptiveGroup()
    {
        Children =
        {
            new AdaptiveSubgroup()
            {
                Children =
                {
                    new AdaptiveText()
                    {
                        Text = from,
                        HintStyle = AdaptiveTextStyle.Subtitle
                    },
                    new AdaptiveText()
                    {
                        Text = subject,
                        HintStyle = AdaptiveTextStyle.CaptionSubtle
                    },
                    new AdaptiveText()
                    {
                        Text = body,
                        HintStyle = AdaptiveTextStyle.CaptionSubtle
                    }
                }
            }
        }
    };
}
auto tileBinding = ref new TileBinding();
tileBinding->Branding = TileBranding::NameAndLogo;

auto tileBindingContentAdaptive = ref new TileBindingContentAdaptive();

tileBindingContentAdaptive->Children->Append(CreateGroup(
    "Jennifer Parker",
    "Photos from our trip",
    "Check out these awesome photos I took while in New Zealand!");

tileBindingContentAdaptive->Children->Append(CreateGroup(
    "Steve Bosniak",
    "Build 2015 Dinner",
    "Want to go out for dinner after Build tonight?"));

tileBinding->Content = tileBindingContentAdaptive;


AdaptiveGroup^ MyClass::CreateGroup(String^ from, String^ subject, String^ body)
{
    auto adaptiveGroup = ref new AdaptiveGroup();

    auto adaptiveSubgroup = ref new AdaptiveSubgroup();

    auto adaptiveText = ref new AdaptiveText();
    adaptiveText->Text = from;
    adaptiveText->HintStyle = AdaptiveTextStyle::Subtitle;
    adaptiveSubgroup->Children->Append(adaptiveText);

    adaptiveText = ref new AdaptiveText();
    adaptiveText->Text = subject;
    adaptiveText->HintStyle = AdaptiveTextStyle::CaptionSubtle;
    adaptiveSubgroup->Children->Append(adaptiveText);

    adaptiveText = ref new AdaptiveText();
    adaptiveText->Text = body;
    adaptiveText->HintStyle = AdaptiveTextStyle::CaptionSubtle;
    adaptiveSubgroup->Children->Append(adaptiveText);

    adaptiveGroup->Children->Append(adaptiveSubgroup);

    return adaptiveGroup;
}
var tileBinding = new notifLib.TileBinding();
tileBinding.branding = notifLib.TileBranding.nameAndLogo;

var tileBindingContentAdaptive = new notifLib.TileBindingContentAdaptive();

tileBindingContentAdaptive.children.push(CreateGroup(
    "Jennifer Parker",
    "Photos from our trip",
    "Check out these awesome photos I took while in New Zealand!"));

tileBindingContentAdaptive.children.push(CreateGroup(
    "Steve Bosniak",
    "Build 2015 Dinner",
    "Want to go out for dinner after Build tonight?"));

tileBinding.content = tileBindingContentAdaptive;


function CreateGroup(from, subject, body) {
    var adaptiveGroup = new notifLib.AdaptiveGroup();
    var adaptiveSubgroup = new notifLib.AdaptiveSubgroup();

    var adaptiveText = new notifLib.AdaptiveText();
    adaptiveText.text = from;
    adaptiveText.hintStyle = notifLib.AdaptiveTextStyle.subtitle;
    adaptiveSubgroup.children.push(adaptiveText);

    adaptiveText = new notifLib.AdaptiveText();
    adaptiveText.text = subject;
    adaptiveText.hintStyle = notifLib.AdaptiveTextStyle.captionSubtle;
    adaptiveSubgroup.children.push(adaptiveText);

    adaptiveText = new notifLib.AdaptiveText();
    adaptiveText.text = body;
    adaptiveText.hintStyle = notifLib.AdaptiveTextStyle.captionSubtle;
    adaptiveSubgroup.children.push(adaptiveText);

    adaptiveGroup.children.push(adaptiveSubgroup);
    return adaptiveGroup;
}
| Desktop | Tablet | High-Density Mobile |
|---|---|---|
 |
 |
 |
Subgroups (columns)
Subgroups also allow you to divide data into semantic sections within a group. For live tiles, this visually translates to columns.
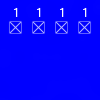
The hint-weight attribute allows you to control the widths of columns. The value of hint-weight is expressed as a weighted proportion of available space. This is identical to GridUnitType.Star behavior. For equal width columns, simply assign each weight to 1.
| hint-weight | Percent of Width |
|---|---|
| 1 | 25% (1/4) |
| 1 | 25% (1/4) |
| 1 | 25% (1/4) |
| 1 | 25% (1/4) |
| Total Weight: 4 |
To get one column twice as large as another, assign one column a weight of 1, and the desired larger column a weight of 2.
| hint-weight | Percent of Width |
|---|---|
| 1 | 33.3% (1/3) |
| 2 | 66.7% (2/3) |
| Total Weight: 3 |
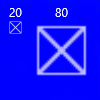
If you want your first column to take up 20% of the width, and your second column to take up 75% of the width, assign the first weight to be 25 and the second weight to be 75. As long as your weights sum to 100, they will essentially be percentages.
| hint-weight | Percent of Width |
|---|---|
| 20 | 20% (20/100) |
| 80 | 80% (80/100) |
| Total Weight: 100 |
Note: an 8 px margin is added between columns.
For subgroups of more than two, you typically should set hint-weight (which accepts positive integers). If the very first subgroup does not have hint-weight specified, it will be assigned a weight of 50. The next subgroup that does not have a hint-weight specified will be assigned a weight equal to 100 minus the sum of the preceding weights, or 1 if the result is zero. Remaining subgroups without hint-weight specified will be assigned a weight of 1.
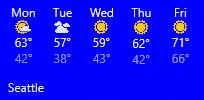
Here is a sample showing how you would achieve a tile with five columns of equal width, such as a weather tile displaying a five-day forecast.
 ...
<binding template="TileWide" displayName="Seattle" branding="name">
  <group>
    <subgroup hint-weight="1">
      <text hint-align="center">Mon</text>
      <image src="Assets\Weather\Mostly Cloudy.png" hint-removeMargin="true"/>
      <text hint-align="center">63°</text>
      <text hint-align="center" hint-style="captionsubtle">42°</text>
    </subgroup>
    <subgroup hint-weight="1">
      <text hint-align="center">Tue</text>
      <image src="Assets\Weather\Cloudy.png" hint-removeMargin="true"/>
      <text hint-align="center">57°</text>
      <text hint-align="center" hint-style="captionsubtle">38°</text>
    </subgroup>
    <subgroup hint-weight="1">
      <text hint-align="center">Wed</text>
      <image src="Assets\Weather\Sunny.png" hint-removeMargin="true"/>
      <text hint-align="center">59°</text>
      <text hint-align="center" hint-style="captionsubtle">43°</text>
    </subgroup>
    <subgroup hint-weight="1">
      <text hint-align="center">Thu</text>
      <image src="Assets\Weather\Sunny.png" hint-removeMargin="true"/>
      <text hint-align="center">62°</text>
      <text hint-align="center" hint-style="captionsubtle">42°</text>
    </subgroup>
    <subgroup hint-weight="1">
      <text hint-align="center">Fri</text>
      <image src="Assets\Weather\Sunny.png" hint-removeMargin="true"/>
      <text hint-align="center">71°</text>
      <text hint-align="center" hint-style="captionsubtle">66°</text>
    </subgroup>
  </group>
</binding>
...
 ...
TileWide = new TileBinding()
{
    DisplayName = "Seattle",
    Branding = TileBranding.Name,
    Content = new TileBindingContentAdaptive()
    {
        Children =
        {
            new AdaptiveGroup()
            {
                Children =
                {
                    CreateSubgroup("Mon", "Mostly Cloudy.png", "63°", "42°"),
                    CreateSubgroup("Tue", "Cloudy.png", "57°", "38°"),
                    CreateSubgroup("Wed", "Sunny.png", "59°", "43°"),
                    CreateSubgroup("Thu", "Sunny.png", "62°", "42°"),
                    CreateSubgroup("Fri", "Sunny.png", "71°", "66°")
                }
            }
        }
    }
}
...
private static AdaptiveSubgroup CreateSubgroup(string day, string image, string highTemp, string lowTemp)
{
    return new AdaptiveSubgroup()
    {
        HintWeight = 1,
        Children =
        {
            new AdaptiveText()
            {
                Text = day,
                HintAlign = AdaptiveTextAlign.Center
            },
            new AdaptiveImage()
            {
                Source = "Assets/Weather/" + image,
                HintRemoveMargin = true
            },
            new AdaptiveText()
            {
                Text = highTemp,
                HintAlign = AdaptiveTextAlign.Center
            },
            new AdaptiveText()
            {
                Text = lowTemp,
                HintAlign = AdaptiveTextAlign.Center,
                HintStyle = AdaptiveTextStyle.CaptionSubtle
            }
        }
    };
}
auto tileBinding = ref new TileBinding();
tileBinding->Branding = TileBranding::Name;
tileBinding->DisplayName = "Seattle";
auto tileBindingContentAdaptive = ref new TileBindingContentAdaptive();

auto adaptiveGroup = ref new AdaptiveGroup();
adaptiveGroup->Children->Append(CreateSubgroup("Mon", "Mostly Cloudy.png", "63°", "42°"));
adaptiveGroup->Children->Append(CreateSubgroup("Tue", "Cloudy.png", "57°", "38°"));
adaptiveGroup->Children->Append(CreateSubgroup("Wed", "Sunny.png", "59°", "43°"));
adaptiveGroup->Children->Append(CreateSubgroup("Thu", "Sunny.png", "62°", "42°"));
adaptiveGroup->Children->Append(CreateSubgroup("Fri", "Sunny.png", "71°", "66°"));

tileBindingContentAdaptive->Children->Append(adaptiveGroup);
tileBinding->Content = tileBindingContentAdaptive;


AdaptiveSubgroup^ MyClass::CreateSubgroup(String^ day, String^ image, String^ highTemp, String^ lowTemp)
{
    auto adaptiveSubgroup = ref new AdaptiveSubgroup();
    adaptiveSubgroup->HintWeight = 1;

    auto adaptiveText = ref new AdaptiveText();
    adaptiveText->Text = day;
    adaptiveText->HintAlign = AdaptiveTextAlign::Center;
    adaptiveSubgroup->Children->Append(adaptiveText);

    auto adaptiveImage = ref new AdaptiveImage();
    adaptiveImage->HintRemoveMargin = true;
    adaptiveImage->Source = image;
    adaptiveSubgroup->Children->Append(adaptiveImage);

    adaptiveText = ref new AdaptiveText();
    adaptiveText->Text = highTemp;
    adaptiveText->HintAlign = AdaptiveTextAlign::Center;
    adaptiveSubgroup->Children->Append(adaptiveText);

    adaptiveText = ref new AdaptiveText();
    adaptiveText->Text = lowTemp;
    adaptiveText->HintStyle = AdaptiveTextStyle::CaptionSubtle;
    adaptiveText->HintAlign = AdaptiveTextAlign::Center;
    adaptiveSubgroup->Children->Append(adaptiveText);

    return adaptiveSubgroup;
}
var tileBinding = new notifLib.TileBinding();
tileBinding.branding = notifLib.TileBranding.name;
tileBinding.displayName = "Seattle";
var tileBindingContentAdaptive = new notifLib.TileBindingContentAdaptive();

var adaptiveGroup = new notifLib.AdaptiveGroup();
adaptiveGroup.children.push(CreateSubgroup("Mon", "Mostly Cloudy.png", "63°", "42°"));
adaptiveGroup.children.push(CreateSubgroup("Tue", "Cloudy.png", "57°", "38°"));
adaptiveGroup.children.push(CreateSubgroup("Wed", "Sunny.png", "59°", "43°"));
adaptiveGroup.children.push(CreateSubgroup("Thu", "Sunny.png", "62°", "42°"));
adaptiveGroup.children.push(CreateSubgroup("Fri", "Sunny.png", "71°", "66°"));

tileBindingContentAdaptive.children.push(adaptiveGroup);
tileBinding.content = tileBindingContentAdaptive;


function CreateSubgroup(day, image, highTemp, lowTemp) {
    var adaptiveSubgroup = new notifLib.AdaptiveSubgroup();
    adaptiveSubgroup.hintWeight = 1;

    var adaptiveText = new notifLib.AdaptiveText();
    adaptiveText.text = day;
    adaptiveText.hintAlign = notifLib.AdaptiveTextAlign.center;
    adaptiveSubgroup.children.push(adaptiveText);

    var adaptiveImage = new notifLib.AdaptiveImage();
    adaptiveImage.hintRemoveMargin = true;
    adaptiveImage.source = image;
    adaptiveSubgroup.children.push(adaptiveImage);

    adaptiveText = new notifLib.AdaptiveText();
    adaptiveText.text = highTemp;
    adaptiveText.hintAlign = notifLib.AdaptiveTextAlign.center;
    adaptiveSubgroup.children.push(adaptiveText);

    adaptiveText = new notifLib.AdaptiveText();
    adaptiveText.text = lowTemp;
    adaptiveText.hintStyle = notifLib.AdaptiveTextStyle.captionSubtle;
    adaptiveText.hintAlign = notifLib.AdaptiveTextAlign.center;
    adaptiveSubgroup.children.push(adaptiveText);

    return adaptiveSubgroup;
}
Images
The <image> element is used to display images on the tile notification. Images can be placed inline within the tile content (default), as a background image behind your content, or as a peek image that animates in from the top of the notification.
Note: There are restrictions on the file size and dimensions of images.
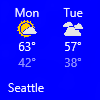
Without any extra behaviors specified, images will uniformly shrink/expand to fill the available width. The example below shows a tile using two columns and inline images. The inline images stretch to fill the width of the column.
 ...
<binding template="TileMedium" displayName="Seattle" branding="name">
  <group>
    <subgroup>
      <text hint-align="center">Mon</text>
      <image src="Assets\Apps\Weather\Mostly Cloudy.png" hint-removeMargin="true"/>
      <text hint-align="center">63°</text>
      <text hint-style="captionsubtle" hint-align="center">42°</text>
    </subgroup>
    <subgroup>
      <text hint-align="center">Tue</text>
      <image src="Assets\Apps\Weather\Cloudy.png" hint-removeMargin="true"/>
      <text hint-align="center">57°</text>
      <text hint-style="captionSubtle" hint-align="center">38°</text>
    </subgroup>
  </group>
</binding>
...
 ...
TileMedium = new TileBinding()
{
    DisplayName = "Seattle",
    Branding = TileBranding.Name,
    Content = new TileBindingContentAdaptive()
    {
        Children =
        {
            new AdaptiveGroup()
            {
                Children =
                {
                    CreateSubgroup("Mon", "Mostly Cloudy.png", "63°", "42°"),
                    CreateSubgroup("Tue", "Cloudy.png", "57°", "38°")
                }
            }
        }
    }
}
...
private static AdaptiveSubgroup CreateSubgroup(string day, string image, string highTemp, string lowTemp)
{
    return new AdaptiveSubgroup()
    {
        Children =
        {
            new AdaptiveText()
            {
                Text = day,
                HintAlign = AdaptiveTextAlign.Center
            },
            new AdaptiveImage()
            {
                Source = "Assets/Weather/" + image,
                HintRemoveMargin = true
            },
            new AdaptiveText()
            {
                Text = highTemp,
                HintAlign = AdaptiveTextAlign.Center
            },
            new AdaptiveText()
            {
                Text = lowTemp,
                HintAlign = AdaptiveTextAlign.Center,
                HintStyle = AdaptiveTextStyle.CaptionSubtle
            }
        }
    };
}
auto tileBinding = ref new TileBinding();
tileBinding->Branding = TileBranding::Name;
tileBinding->DisplayName = "Seattle";
auto tileBindingContentAdaptive = ref new TileBindingContentAdaptive();

auto adaptiveGroup = ref new AdaptiveGroup();
adaptiveGroup->Children->Append(CreateSubgroup("Mon", "Mostly Cloudy.png", "63°", "42°"));
adaptiveGroup->Children->Append(CreateSubgroup("Tue", "Cloudy.png", "57°", "38°"));

tileBindingContentAdaptive->Children->Append(adaptiveGroup);
tileBinding->Content = tileBindingContentAdaptive;


AdaptiveSubgroup^ MyClass::CreateSubgroup(String^ day, String^ image, String^ highTemp, String^ lowTemp)
{
    auto adaptiveSubgroup = ref new AdaptiveSubgroup();
    adaptiveSubgroup->HintWeight = 1;

    auto adaptiveText = ref new AdaptiveText();
    adaptiveText->Text = day;
    adaptiveText->HintAlign = AdaptiveTextAlign::Center;
    adaptiveSubgroup->Children->Append(adaptiveText);

    auto adaptiveImage = ref new AdaptiveImage();
    adaptiveImage->HintRemoveMargin = true;
    adaptiveImage->Source = image;
    adaptiveSubgroup->Children->Append(adaptiveImage);

    adaptiveText = ref new AdaptiveText();
    adaptiveText->Text = highTemp;
    adaptiveText->HintAlign = AdaptiveTextAlign::Center;
    adaptiveSubgroup->Children->Append(adaptiveText);

    adaptiveText = ref new AdaptiveText();
    adaptiveText->Text = lowTemp;
    adaptiveText->HintStyle = AdaptiveTextStyle::CaptionSubtle;
    adaptiveText->HintAlign = AdaptiveTextAlign::Center;
    adaptiveSubgroup->Children->Append(adaptiveText);

    return adaptiveSubgroup;
}
var tileBinding = new notifLib.TileBinding();
tileBinding.branding = notifLib.TileBranding.name;
tileBinding.displayName = "Seattle";
var tileBindingContentAdaptive = new notifLib.TileBindingContentAdaptive();

var adaptiveGroup = new notifLib.AdaptiveGroup();
adaptiveGroup.children.push(CreateSubgroup("Mon", "Mostly Cloudy.png", "63°", "42°"));
adaptiveGroup.children.push(CreateSubgroup("Tue", "Cloudy.png", "57°", "38°"));

tileBindingContentAdaptive.children.push(adaptiveGroup);
tileBinding.content = tileBindingContentAdaptive;


function CreateSubgroup(day, image, highTemp, lowTemp) {
    var adaptiveSubgroup = new notifLib.AdaptiveSubgroup();
    adaptiveSubgroup.hintWeight = 1;

    var adaptiveText = new notifLib.AdaptiveText();
    adaptiveText.text = day;
    adaptiveText.hintAlign = notifLib.AdaptiveTextAlign.center;
    adaptiveSubgroup.children.push(adaptiveText);

    var adaptiveImage = new notifLib.AdaptiveImage();
    adaptiveImage.hintRemoveMargin = true;
    adaptiveImage.source = image;
    adaptiveSubgroup.children.push(adaptiveImage);

    adaptiveText = new notifLib.AdaptiveText();
    adaptiveText.text = highTemp;
    adaptiveText.hintAlign = notifLib.AdaptiveTextAlign.center;
    adaptiveSubgroup.children.push(adaptiveText);

    adaptiveText = new notifLib.AdaptiveText();
    adaptiveText.text = lowTemp;
    adaptiveText.hintStyle = notifLib.AdaptiveTextStyle.captionSubtle;
    adaptiveText.hintAlign = notifLib.AdaptiveTextAlign.center;
    adaptiveSubgroup.children.push(adaptiveText);

    return adaptiveSubgroup;
}
Images placed in the <binding> root, or in the first group, will also stretch to fit available height.
Image Alignment
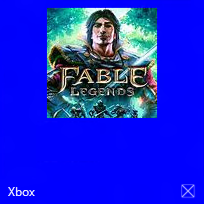
Images can be set to align left, center, or right, using the hint-align attribute. This will also cause images to display at their native resolution instead of stretching to fill width.
<image src="Assets/fable.jpg" hint-align="center"/>
new AdaptiveImage()
{
    Source = "Assets/fable.jpg",
    HintAlign = AdaptiveImageAlign.Center
}
auto adaptiveImage = ref new AdaptiveImage();
adaptiveImage->HintAlign = AdaptiveImageAlign::Center;
adaptiveImage->Source = "Assets/fable.jpg";
var adaptiveImage = new notifLib.AdaptiveImage();
adaptiveImage.hintAlign = notifLib.AdaptiveImageAlign.center;
adaptiveImage.source = "Assets/fable.jpg";
| left | center | right |
|---|---|---|
 |
 |
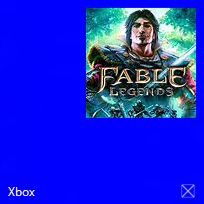 |
Image Margins
By default, inline images have an 8px margin between any content above or below the image. However, this margin can be removed by using the hint-removeMargin attribute on the image.
Note that inline images will always have the 8px margin from the edge of the tile, and subgroups (columns) will always have the 8px padding between columns.
 ...
<binding template="TileMedium" branding="none">
  <group>
    <subgroup>
      <text hint-align="center">Mon</text>
      <image src="Assets\Numbers\4.jpg" hint-removeMargin="true"/>
      <text hint-align="center">63°</text>
      <text hint-style="captionsubtle" hint-align="center">42°</text>
    </subgroup>
    <subgroup>
      <text hint-align="center">Tue</text>
      <image src="Assets\Numbers\3.jpg" hint-removeMargin="true"/>
      <text hint-align="center">57°</text>
      <text hint-style="captionsubtle" hint-align="center">38°</text>
    </subgroup>
  </group>
</binding>
...
 ...
TileMedium = new TileBinding()
{
    Branding = TileBranding.None,
    Content = new TileBindingContentAdaptive()
    {
        Children =
        {
            new AdaptiveGroup()
            {
                Children =
                {
                    CreateSubgroup("Mon", "4.jpg", "63°", "42°"),
                    CreateSubgroup("Tue", "3.jpg", "57°", "38°")
                }
            }
        }
    }
}
...
private static AdaptiveSubgroup CreateSubgroup(string day, string image, string highTemp, string lowTemp)
{
    return new AdaptiveSubgroup()
    {
        HintWeight = 1,
        Children =
        {
            new AdaptiveText()
            {
                Text = day,
                HintAlign = AdaptiveTextAlign.Center
            },
            new AdaptiveImage()
            {
                Source = "Assets/Numbers/" + image,
                HintRemoveMargin = true
            },
            new AdaptiveText()
            {
                Text = highTemp,
                HintAlign = AdaptiveTextAlign.Center
            },
            new AdaptiveText()
            {
                Text = lowTemp,
                HintAlign = AdaptiveTextAlign.Center,
                HintStyle = AdaptiveTextStyle.CaptionSubtle
            }
        }
    };
}
auto tileBinding = ref new TileBinding();
tileBinding->Branding = TileBranding::None;
auto tileBindingContentAdaptive = ref new TileBindingContentAdaptive();

auto adaptiveGroup = ref new AdaptiveGroup();
adaptiveGroup->Children->Append(CreateSubgroup("Mon", "4.jpg", "63°", "42°"));
adaptiveGroup->Children->Append(CreateSubgroup("Tue", "3.jpg", "57°", "38°"));

tileBindingContentAdaptive->Children->Append(adaptiveGroup);
tileBinding->Content = tileBindingContentAdaptive;


AdaptiveSubgroup^ MyClass::CreateSubgroup(String^ day, String^ image, String^ highTemp, String^ lowTemp)
{
    auto adaptiveSubgroup = ref new AdaptiveSubgroup();
    adaptiveSubgroup->HintWeight = 1;

    auto adaptiveText = ref new AdaptiveText();
    adaptiveText->Text = day;
    adaptiveText->HintAlign = AdaptiveTextAlign::Center;
    adaptiveSubgroup->Children->Append(adaptiveText);

    auto adaptiveImage = ref new AdaptiveImage();
    adaptiveImage->HintRemoveMargin = true;
    adaptiveImage->Source = "Assets/Numbers/" + image;
    adaptiveSubgroup->Children->Append(adaptiveImage);

    adaptiveText = ref new AdaptiveText();
    adaptiveText->Text = highTemp;
    adaptiveText->HintAlign = AdaptiveTextAlign::Center;
    adaptiveSubgroup->Children->Append(adaptiveText);

    adaptiveText = ref new AdaptiveText();
    adaptiveText->Text = lowTemp;
    adaptiveText->HintStyle = AdaptiveTextStyle::CaptionSubtle;
    adaptiveText->HintAlign = AdaptiveTextAlign::Center;
    adaptiveSubgroup->Children->Append(adaptiveText);

    return adaptiveSubgroup;
}
var tileBinding = new notifLib.TileBinding();
tileBinding.branding = notifLib.TileBranding.none;
var tileBindingContentAdaptive = new notifLib.TileBindingContentAdaptive();

var adaptiveGroup = new notifLib.AdaptiveGroup();
adaptiveGroup.children.push(CreateSubgroup("Mon", "4.jpg", "63°", "42°"));
adaptiveGroup.children.push(CreateSubgroup("Tue", "3.jpg", "57°", "38°"));

tileBindingContentAdaptive.children.push(adaptiveGroup);
tileBinding.content = tileBindingContentAdaptive;


function CreateSubgroup(day, image, highTemp, lowTemp) {
    var adaptiveSubgroup = new notifLib.AdaptiveSubgroup();
    adaptiveSubgroup.hintWeight = 1;

    var adaptiveText = new notifLib.AdaptiveText();
    adaptiveText.text = day;
    adaptiveText.hintAlign = notifLib.AdaptiveTextAlign.center;
    adaptiveSubgroup.children.push(adaptiveText);

    var adaptiveImage = new notifLib.AdaptiveImage();
    adaptiveImage.hintRemoveMargin = true;
    adaptiveImage.source = "Assets/Numbers/" + image;
    adaptiveSubgroup.children.push(adaptiveImage);

    adaptiveText = new notifLib.AdaptiveText();
    adaptiveText.text = highTemp;
    adaptiveText.hintAlign = notifLib.AdaptiveTextAlign.center;
    adaptiveSubgroup.children.push(adaptiveText);

    adaptiveText = new notifLib.AdaptiveText();
    adaptiveText.text = lowTemp;
    adaptiveText.hintStyle = notifLib.AdaptiveTextStyle.captionSubtle;
    adaptiveText.hintAlign = notifLib.AdaptiveTextAlign.center;
    adaptiveSubgroup.children.push(adaptiveText);

    return adaptiveSubgroup;
}
| hint-removeMargin | |
|---|---|
| false | true |
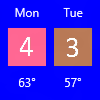 | 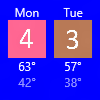 |
Image Cropping
Images can be cropped into a circle using the hint-crop attribute, which currently only supports the values “none” (default) or “circle”. In 1511, background and peek images also support the hint-crop attribute.
 ...
<binding template="TileLarge" hint-textStacking="center">
  <group>
    <subgroup hint-weight="1"/>
    <subgroup hint-weight="2">
      <image src="Assets/Apps/Hipstame/hipster.jpg" hint-crop="circle"/>
    </subgroup>
    <subgroup hint-weight="1"/>
  </group>
  <text hint-style="title" hint-align="center">Hi,</text>
  <text hint-style="subtitleSubtle" hint-align="center">MasterHip</text>
</binding>
...
 ...
TileLarge = new TileBinding()
{
    Content = new TileBindingContentAdaptive()
    {
        TextStacking = TileTextStacking.Center,
        Children =
        {
            new AdaptiveGroup()
            {
                Children =
                {
                    new AdaptiveSubgroup() { HintWeight = 1 },
                    new AdaptiveSubgroup()
                    {
                        HintWeight = 2,
                        Children =
                        {
                            new AdaptiveImage()
                            {
                                Source = "Assets/Apps/Hipstame/hipster.jpg",
                                HintCrop = AdaptiveImageCrop.Circle
                            }
                        }
                    },
                    new AdaptiveSubgroup() { HintWeight = 1 }
                }
            },
            new AdaptiveText()
            {
                Text = "Hi,",
                HintStyle = AdaptiveTextStyle.Title,
                HintAlign = AdaptiveTextAlign.Center
            },
            new AdaptiveText()
            {
                Text = "MasterHip",
                HintStyle = AdaptiveTextStyle.SubtitleSubtle,
                HintAlign = AdaptiveTextAlign.Center
            }
        }
    }
}
...
auto tileBinding = ref new TileBinding();
auto tileBindingContentAdaptive = ref new TileBindingContentAdaptive();
tileBindingContentAdaptive->TextStacking = TileTextStacking::Center;

auto adaptiveGroup = ref new AdaptiveGroup();

auto adaptiveSubgroup = ref new AdaptiveSubgroup();
adaptiveGroup->Children->Append(adaptiveSubgroup);

adaptiveSubgroup = ref new AdaptiveSubgroup();

auto adaptiveImage = ref new AdaptiveImage();
adaptiveImage->HintCrop = AdaptiveImageCrop::Circle;
adaptiveImage->Source = "Assets/Apps/Hipstame/hipster.jpg";
adaptiveSubgroup->Children->Append(adaptiveImage);

adaptiveGroup->Children->Append(adaptiveSubgroup);

adaptiveSubgroup = ref new AdaptiveSubgroup();
adaptiveGroup->Children->Append(adaptiveSubgroup);

tileBindingContentAdaptive->Children->Append(adaptiveGroup);

auto adaptiveText = ref new AdaptiveText();
adaptiveText->Text = "Hi,";
adaptiveText->HintStyle = AdaptiveTextStyle::Title;
adaptiveText->HintAlign = AdaptiveTextAlign::Center;
tileBindingContentAdaptive->Children->Append(adaptiveText);

adaptiveText = ref new AdaptiveText();
adaptiveText->Text = "MasterHip";
adaptiveText->HintStyle = AdaptiveTextStyle::SubtitleSubtle;
adaptiveText->HintAlign = AdaptiveTextAlign::Center;
tileBindingContentAdaptive->Children->Append(adaptiveText);

tileBinding->Content = tileBindingContentAdaptive;
var tileBinding = new notifLib.TileBinding();
var tileBindingContentAdaptive = new notifLib.TileBindingContentAdaptive();
tileBindingContentAdaptive.textStacking = notifLib.TileTextStacking.center;

var adaptiveGroup = new notifLib.AdaptiveGroup();

var adaptiveSubgroup = new notifLib.AdaptiveSubgroup();
adaptiveGroup.children.push(adaptiveSubgroup);

adaptiveSubgroup = new notifLib.AdaptiveSubgroup();

var adaptiveImage = new notifLib.AdaptiveImage();
adaptiveImage.hintCrop = notifLib.AdaptiveImageCrop.circle;
adaptiveImage.source = "Assets/Apps/Hipstame/hipster.jpg";
adaptiveSubgroup.children.push(adaptiveImage);

adaptiveGroup.children.push(adaptiveSubgroup);

adaptiveSubgroup = new notifLib.AdaptiveSubgroup();
adaptiveGroup.children.push(adaptiveSubgroup);

tileBindingContentAdaptive.children.push(adaptiveGroup);

var adaptiveText = new notifLib.AdaptiveText();
adaptiveText.text = "Hi,";
adaptiveText.hintStyle = notifLib.AdaptiveTextStyle.title;
adaptiveText.hintAlign = notifLib.AdaptiveTextAlign.center;
tileBindingContentAdaptive.children.push(adaptiveText);

adaptiveText = new notifLib.AdaptiveText();
adaptiveText.text = "MasterHip";
adaptiveText.hintStyle = notifLib.AdaptiveTextStyle.subtitleSubtle;
adaptiveText.hintAlign = notifLib.AdaptiveTextAlign.center;
tileBindingContentAdaptive.children.push(adaptiveText);

tileBinding.content = tileBindingContentAdaptive;

tileVisual.tileLarge = tileBinding;

Background Image
To set a background image, place an image element in the root of the <binding> and set the placement attribute to “background”.
 ...
<binding template="TileWide">
  <image src="Assets\Mostly Cloudy-Background.jpg" placement="background"/>
  <group>
    <subgroup hint-weight="1">
      <text hint-align="center">Mon</text>
      <image src="Assets\Weather\Mostly Cloudy.png" hint-removeMargin="true"/>
      <text hint-align="center">63°</text>
      <text hint-align="center" hint-style="captionsubtle">42°</text>
    </subgroup>
    ...
  </group>
</binding>
...
 ...
TileWide = new TileBinding()
{
    Content = new TileBindingContentAdaptive()
    {
        BackgroundImage = new TileBackgroundImage()
        {
            Source = "Assets/Mostly Cloudy-Background.jpg"
        },
        Children =
        {
            new AdaptiveGroup()
            {
                Children =
                {
                    CreateSubgroup("Mon", "Mostly Cloudy.png", "63°", "42°")
                    ...
                }
            }
        }
    }
}
auto tileBinding = ref new TileBinding();
auto tileBindingContentAdaptive = ref new TileBindingContentAdaptive();

auto tileBackgroundImage = ref new TileBackgroundImage();
tileBackgroundImage->Source = "Assets\Mostly Cloudy-Background.jpg";
tileBindingContentAdaptive->BackgroundImage = tileBackgroundImage;

...

tileBinding->Content = tileBindingContentAdaptive;
var tileBinding = new notifLib.TileBinding();
var tileBindingContentAdaptive = new notifLib.TileBindingContentAdaptive();

var tileBackgroundImage = new notifLib.TileBackgroundImage();
tileBackgroundImage.source = "Assets\Mostly Cloudy-Background.jpg";
tileBindingContentAdaptive.backgroundImage = tileBackgroundImage;

...

tileBinding.content = tileBindingContentAdaptive;

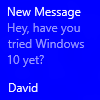
Peek Image
You can specify an image that “peeks” in from the top of the tile. The peek image uses an animation to slide down/up from the top of the tile, “peeking” into view, and then later sliding back out to reveal the main content on the tile.
To set a peek image, place an image element in the root of the <binding>, and set the placement attribute to “peek”.
 ...
<binding template="TileMedium">
  <image placement="peek" src="Assets/Apps/Hipstame/hipster.jpg"/>
  <text>New Message</text>
  <text hint-style="captionsubtle" hint-wrap="true">Hey, have you tried Windows 10 yet?</text>
</binding>
...
 ...
TileWide = new TileBinding()
{
    Content = new TileBindingContentAdaptive()
    {
        PeekImage = new TilePeekImage()
        {
            Source = "Assets/Apps/Hipstame/hipster.jpg"
        },
        Children =
        {
            new AdaptiveText()
            {
                Text = "New Message"
            },
            new AdaptiveText()
            {
                Text = "Hey, have you tried Windows 10 yet?",
                HintStyle = AdaptiveTextStyle.CaptionSubtle,
                HintWrap = true
            }
        }
    }
}
...
auto tileBinding = ref new TileBinding();
auto tileBindingContentAdaptive = ref new TileBindingContentAdaptive();

auto tilePeekImage = ref new TilePeekImage();
tilePeekImage->Source = "Assets/Apps/Hipstame/hipster.jpg";
tileBindingContentAdaptive->PeekImage = tilePeekImage;

auto adaptiveText = ref new AdaptiveText();
adaptiveText->Text = "New Message";
tileBindingContentAdaptive->Children->Append(adaptiveText);

adaptiveText = ref new AdaptiveText();
adaptiveText->Text = "Hey, have you tried Windows 10 yet?";
adaptiveText->HintStyle = AdaptiveTextStyle::CaptionSubtle;
adaptiveText->HintWrap = true;
tileBindingContentAdaptive->Children->Append(adaptiveText);

tileBinding->Content = tileBindingContentAdaptive;
var tileBinding = new notifLib.TileBinding();
var tileBindingContentAdaptive = new notifLib.TileBindingContentAdaptive();

var tilePeekImage = new notifLib.TilePeekImage();
tilePeekImage.source = "Assets/Apps/Hipstame/hipster.jpg";
tileBindingContentAdaptive.peekImage = tilePeekImage;

var adaptiveText = new notifLib.AdaptiveText();
adaptiveText.text = "New Message";
tileBindingContentAdaptive.children.push(adaptiveText);

adaptiveText = new notifLib.AdaptiveText();
adaptiveText.text = "Hey, have you tried Windows 10 yet?";
adaptiveText.hintStyle = notifLib.AdaptiveTextStyle.captionSubtle;
adaptiveText.hintWrap = true;
tileBindingContentAdaptive.children.push(adaptiveText);

tileBinding.content = tileBindingContentAdaptive;
| Animated | Peek shown | Peek sliding up | Content shown | Peek sliding down |
|---|---|---|---|---|
 |
 |
 |
 |
 |
Peek and Background Image Overlays
In order to make text that appears on top of images more readable, you can set an overlay. Before 1511, we only allowed overlays on background images, but now we support overlays on both background and peek images.
Setting overlay on background image
Your background image will default to a 20% overlay as long as you have some text elements in your payload (otherwise it will default to 0% overlay). If you're on 1511, you can specify hint-overlay on the background image element itself.
 ...
<binding template="TileWide" hint-overlay="60">
  <image src="Assets\Mostly Cloudy-Background.jpg" placement="background"/>
  ...
</binding>
...
new TileBackgroundImage()
{
    Source = "Assets/Mostly Cloudy-Background.jpg",
    HintOverlay = 60
}
auto tileBackgroundImage = ref new TileBackgroundImage();
tileBackgroundImage->Source = "Assets\Mostly Cloudy-Background.jpg";
tileBackgroundImage->HintOverlay = 60;
var tileBackgroundImage = new notifLib.TileBackgroundImage();
tileBackgroundImage.source = "Assets\Mostly Cloudy-Background.jpg";
tileBackgroundImage.hintOverlay = 60;
| hint-overlay | Result |
|---|---|
| 0 |  |
| 20 | 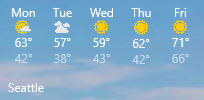 |
| 60 | 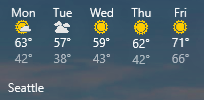 |
| 100 | 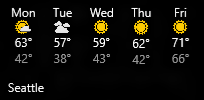 |
Setting overlay on peek image
In 1511, we allow you to specify an overlay for your peek image, just like your background image. Specify hint-overlay on the peek image element as an integer from 0-100. The default overlay for peek images is 0 (no overlay).
 ...
<binding template="TileMedium">
  <image hint-overlay="20" src="Assets\Map.jpg" placement="peek"/>
  ...
</binding>
...
new TilePeekImage()
{
    Source = "Assets/Map.jpg",
    HintOverlay = 20
}
auto tilePeekImage = ref new TilePeekImage();
tilePeekImage->Source = "Assets\Map.jpg";
tilePeekImage->HintOverlay = 20;
var tilePeekImage = new notifLib.TilePeekImage();
tilePeekImage.source = "Assets\Map.jpg";
tilePeekImage.hintOverlay = 20;
| With 20% Overlay | Without Overlay |
|---|---|
 |
 |
Setting overlay on both images
You can also set the overlay on both the background and peek image at the same time, by setting hint-overlay on the <binding> element instead of the individual images. This also has the advantage of working on RTM machines (since this is all that RTM supported). Do note that in RTM, however, the overlay specified on the binding element only applied to the background image. If you're using the Notifications library, simply assign the overlays on each individual peek/background as seen earlier.
 ...
<binding template="TileMedium" hint-overlay="30">
  <image src="Assets\Mostly Cloudy-Background.jpg" placement="background"/>
  <image src="Assets\Map.jpg" placement="peek"/>
  ...
</binding>
...
Vertical Alignment (Text Stacking)
You can control the vertical alignment of content on your tile with the hint-textStacking attribute on both the <binding> element, and <subgroup> elements. By default, everything is vertically aligned to the top, but you can also align content to the bottom or center.
Text stacking on binding element
When applied at the <binding> level, text stacking sets the vertical alignment of the notification content as a whole, aligning in the available vertical space above the branding/badge area.
 ...
<binding template="TileMedium" hint-textStacking="center" branding="logo">
  <text hint-style="base" hint-align="center">Hi,</text>
  <text hint-style="captionSubtle" hint-align="center">MasterHip</text>
</binding>
...
 ...
TileMedium = new TileBinding()
{
    Branding = TileBranding.Logo,
    Content = new TileBindingContentAdaptive()
    {
        TextStacking = TileTextStacking.Center,
        Children =
        {
            new AdaptiveText()
            {
                Text = "Hi,",
                HintStyle = AdaptiveTextStyle.Base,
                HintAlign = AdaptiveTextAlign.Center
            },
            new AdaptiveText()
            {
                Text = "MasterHip",
                HintStyle = AdaptiveTextStyle.CaptionSubtle,
                HintAlign = AdaptiveTextAlign.Center
            }
        }
    }
}
...
auto tileBinding = ref new TileBinding();
auto tileBindingContentAdaptive = ref new TileBindingContentAdaptive();
tileBindingContentAdaptive->TextStacking = TileTextStacking::Center;

auto adaptiveText = ref new AdaptiveText();
adaptiveText->Text = "Hi,";
adaptiveText->HintStyle = AdaptiveTextStyle::Base;
adaptiveText->HintAlign = AdaptiveTextAlign::Center;
tileBindingContentAdaptive->Children->Append(adaptiveText);

adaptiveText = ref new AdaptiveText();
adaptiveText->Text = "MasterHip";
adaptiveText->HintStyle = AdaptiveTextStyle::CaptionSubtle;
adaptiveText->HintAlign = AdaptiveTextAlign::Center;
tileBindingContentAdaptive->Children->Append(adaptiveText);

tileBinding->Content = tileBindingContentAdaptive;
var tileBinding = new notifLib.TileBinding();
var tileBindingContentAdaptive = new notifLib.TileBindingContentAdaptive();
tileBindingContentAdaptive.textStacking = notifLib.TileTextStacking.center;

var adaptiveText = new notifLib.AdaptiveText();
adaptiveText.text = "Hi,";
adaptiveText.hintStyle = notifLib.AdaptiveTextStyle.base;
adaptiveText.hintAlign = notifLib.AdaptiveTextAlign.center;
tileBindingContentAdaptive.children.push(adaptiveText);

adaptiveText = new notifLib.AdaptiveText();
adaptiveText.text = "MasterHip";
adaptiveText.hintStyle = notifLib.AdaptiveTextStyle.captionSubtle;
adaptiveText.hintAlign = notifLib.AdaptiveTextAlign.center;
tileBindingContentAdaptive.children.push(adaptiveText);

tileBinding.content = tileBindingContentAdaptive;
| hint-textStacking | top | center | bottom |
|---|---|---|---|
| With branding or badge |  |
 |
 |
| Without branding/badge |  |
 |
 |
Text stacking on subgroup element
When applied at the <subgroup> level, text stacking sets the vertical alignment of the subgroup (column) content, aligning in the available vertical space within the entire group.
 ...
<binding template="TileWide" branding="nameAndLogo">
  <group>
    <subgroup hint-weight="33">
      <image src="Assets/Apps/Hipstame/hipster.jpg" hint-crop="circle"/>
    </subgroup>
    <subgroup hint-textStacking="center">
      <text hint-style="subtitle">Hi,</text>
      <text hint-style="bodySubtle">MasterHip</text>
    </subgroup>
  </group>
</binding>
...
 ...
TileWide = new TileBinding()
{
    Branding = TileBranding.NameAndLogo,
    Content = new TileBindingContentAdaptive()
    {
        Children =
        {
            new AdaptiveGroup()
            {
                Children =
                {
                    // Image column
                    new AdaptiveSubgroup()
                    {
                        HintWeight = 33,
                        Children =
                        {
                            new AdaptiveImage()
                            {
                                Source = "Assets/Apps/Hipstame/hipster.jpg",
                                HintCrop = AdaptiveImageCrop.Circle
                            }
                        }
                    },
                    // Text column
                    new AdaptiveSubgroup()
                    {
                        // Vertical align its contents
                        TextStacking = TileTextStacking.Center,
                        Children =
                        {
                            new AdaptiveText()
                            {
                                Text = "Hi,",
                                HintStyle = AdaptiveTextStyle.Subtitle
                            },
                            new AdaptiveText()
                            {
                                Text = "MasterHip",
                                HintStyle = AdaptiveTextStyle.BodySubtle
                            }
                        }
                    }
                }
            }
        }
    }
}
...
auto tileBinding = ref new TileBinding();
auto tileBindingContentAdaptive = ref new TileBindingContentAdaptive();

auto adaptiveGroup = ref new AdaptiveGroup();

auto adaptiveSubgroup = ref new AdaptiveSubgroup();

auto adaptiveImage = ref new AdaptiveImage();
adaptiveImage->HintCrop = AdaptiveImageCrop::Circle;
adaptiveImage->Source = "Assets/Apps/Hipstame/hipster.jpg";
adaptiveSubgroup->Children->Append(adaptiveImage);

adaptiveGroup->Children->Append(adaptiveSubgroup);

adaptiveSubgroup = ref new AdaptiveSubgroup();

auto adaptiveText = ref new AdaptiveText();
adaptiveText->Text = "Hi,";
adaptiveText->HintStyle = AdaptiveTextStyle::Subtitle;
adaptiveSubgroup->Children->Append(adaptiveText);

adaptiveText = ref new AdaptiveText();
adaptiveText->Text = "MasterHip";
adaptiveText->HintStyle = AdaptiveTextStyle::BodySubtle;
adaptiveSubgroup->Children->Append(adaptiveText);

adaptiveSubgroup->HintTextStacking = AdaptiveSubgroupTextStacking::Center;
adaptiveGroup->Children->Append(adaptiveSubgroup);

tileBindingContentAdaptive->Children->Append(adaptiveGroup);

tileBinding->Content = tileBindingContentAdaptive;
var tileBinding = new notifLib.TileBinding();
var tileBindingContentAdaptive = new notifLib.TileBindingContentAdaptive();

var adaptiveGroup = new notifLib.AdaptiveGroup();

var adaptiveSubgroup = new notifLib.AdaptiveSubgroup();

var adaptiveImage = new notifLib.AdaptiveImage();
adaptiveImage.hintCrop = notifLib.AdaptiveImageCrop.circle;
adaptiveImage.source = "Assets/Apps/Hipstame/hipster.jpg";
adaptiveSubgroup.children.push(adaptiveImage);

adaptiveGroup.children.push(adaptiveSubgroup);

adaptiveSubgroup = new notifLib.AdaptiveSubgroup();

var adaptiveText = new notifLib.AdaptiveText();
adaptiveText.text = "Hi,";
adaptiveText.hintStyle = notifLib.AdaptiveTextStyle.subtitle;
adaptiveSubgroup.children.push(adaptiveText);

adaptiveText = new notifLib.AdaptiveText();
adaptiveText.text = "MasterHip";
adaptiveText.hintStyle = notifLib.AdaptiveTextStyle.bodySubtle;
adaptiveSubgroup.children.push(adaptiveText);

adaptiveSubgroup.hintTextStacking = notifLib.AdaptiveSubgroupTextStacking.center;
adaptiveGroup.children.push(adaptiveSubgroup);

tileBindingContentAdaptive.children.push(adaptiveGroup);

tileBinding.content = tileBindingContentAdaptive;
| top | center | bottom |
|---|---|---|
 |
 |
 |
Comments
Anonymous
June 30, 2015
That look's like a very cool addition ! On Windows Phone I had to generate in-memory bitmaps and save them to storage and that was cumbersome and not efficient regarding memory usage. This new approach should solve this :-)Anonymous
June 30, 2015
I have a helper for creating the XML required for this. Code: github.com/.../adaptivetileextensions Blog: metronuggets.com/.../introducing-adaptivetileextensions-for-windows-10Anonymous
July 03, 2015
The comment has been removedAnonymous
July 08, 2015
Hey Niels, I'm happy to answer your questions!
- "Back" and "Front" of tiles is an old phone Silverlight concept. You can use "peek" images, which slide in from the top (on Phone 8.1 these used to flip, but my guess is that on 10 they'll slide just like desktop). You can also use the notification queue if you want to cycle between up to 5 different notifications on a tile.
- The only restriction is the size of the payload (which is actually a serious restriction). The payload (your XML) cannot be more than 5 KB. That's even true about sending a tile notification locally, the 5 KB cap exists there. Images referenced inside your payload also have to be less than 200 KB each. Both of these restrictions were true in Windows 8.1, but since adaptive is more verbose than the previous tile templates, the 5 KB limit on the payload can easily be reached.
- I'm the one that created the Tile Template Visualizer :P I'm trying to work with internal teams here in order to include the actual DLL that renders the Start tiles into the Visualizer. Right now, I basically re-wrote their adaptive renderer by hand, so there are some slight differences between actual Start and the Visualizer. But obtaining permission to use the real DLL is taking longer than expected, so I might just publish my version of the Visualizer in the meantime, since mine is about 98% accurate compared to what you actually see on Start. When I release the Visualizer, I'll post it on this blog! Thanks! Andrew
- Anonymous
July 11, 2015
Hey Andrew, Thanks for your answer! Currently I'm using Azure to render my live tiles, but I'd like to move it back to the client with the Adaptive Tiles as they have much more flexibility. A few questions:
- Do you have a sample on how to insert data into the XML dynamically. E.g., how to insert the right weather icon based on the current weather condition.
- My tiles look like this: dl.dropboxusercontent.com/.../Tiles.png. Do you think these will be possible to make with the Adaptive Tiles? I can imagine that the graph on the blue tile is not, I could leverage Azure for that. But what about the text, multiple columns with different width's etc. Niels
Anonymous
July 13, 2015
Scott wrote an extension library that allows you to generate that XML via classes and properties: metronuggets.com/.../introducing-adaptivetileextensions-for-windows-10 Otherwise you could construct the XML as a string, injecting your live data values into the string (make sure to XML encode them though). Or you could even use XmlDocument and add elements and attributes through its methods. We're still internally debating on the best practice, but we'll publish something soon about all of that. I think your tile should mostly be possible using adaptive, but yes that graph would have to be rendered as an image. The annoying thing about adaptive is that for columns (which is the only way to get content arranged horizontally), you have to specify widths as percents. There's no Auto or Star like there are in XAML grids. So you'd have to do some playing around to find the correct percent to use to achieve some of those alignments.Anonymous
July 14, 2015
Nice :)! I'll try it out later this week.. One remaining question, what should the resolutions of icons and a background be? The same ol' WP8.1 691 x 336 for Wide?Anonymous
July 15, 2015
Provide exactly what the tile properties say - For medium, it's 150x150. However, you should also provide higher res scale versions.... Specifically scale-100, scale-200, and scale-400 (also providing scale-125 and scale-150 are recommended but not as important). Just multiply the base scale-100 resolutions by the scale number to get the higher res versions. I or someone else will hopefully be writing a blog post detailing all of this, but that should get you going hopefully!Anonymous
July 18, 2015
Thanks, Andrw! I have been using Scott's library and things are coming together quite nicely. Although I must say that the tiles look a bit different on phone or desktop. Is it also possible to vertically center groups, or set the margin between (or height of 2 groups? NielsAnonymous
July 20, 2015
The comment has been removedAnonymous
July 22, 2015
Hey Andrew, Thanks for the explanation - hopefully XAML tiles are coming soon to give us a bit more flexibility. I have, more or less, recreated my tiles like I did before. Only the wide one was too much of a hassle, so that will stay an image for now. There is one major bug though: tiles DO look different on phone and PC. I'm running the latest builds (RTM on PC, en 10166 on phone) and using the latest SDK release (10166). I have made a few screenshots: dl.dropboxusercontent.com/.../TileDifferences.png You can see that on phone it looks different (the tile is much 'bigger', fonts should be larger I guess). And when only 2 tiles are selected, everything disappears (I think because the content is then too big to fit the tile). I hope this gets fixed, because it's quite a hassle (maybe even impossible) to create tiles for every platform. This is my code for the medium tile (I'm using Scott's (awesome!) library): internal static TileBinding MediumTile(CurrentWeather CurrentWeather, string City) { TileBinding CurrentMediumTileBinding = TileBinding.Create(TemplateType.TileMedium); CurrentMediumTileBinding.Branding = Branding.Name; CurrentMediumTileBinding.DisplayName = City; CurrentMediumTileBinding.Add(new Text() { Content = CurrentWeather.Condition.ToUpper(), Alignment = Alignment.Left, Style = TextStyle.Caption }); SubGroup IconGroup = new SubGroup(); IconGroup.Width = 1; IconGroup.TextStacking = TextStacking.Top; IconGroup.AddImage(new TileImage(ImagePlacement.Inline) { ImageAlignment = Alignment.Left, RemoveMargin = true, Source = @"AssetsMediumTiles" + CurrentWeather.WeatherTileImage + ".png" }); CurrentMediumTileBinding.Add(IconGroup); SubGroup TempGroup = new SubGroup(); TempGroup.Width = 1; IconGroup.TextStacking = TextStacking.Top; TempGroup.AddText(new Text() { Content = CurrentWeather.Temperature, Alignment = Alignment.Right, Style = TextStyle.Base }); CurrentMediumTileBinding.Add(TempGroup); return CurrentMediumTileBinding; }Anonymous
July 28, 2015
The comment has been removedAnonymous
July 28, 2015
Sorry for the delayed response (I really wish MSDN had email notifications!) I believe your issue is caused by the image not being able to fit on that small density size, and so the entire group is dropped. You could fix this two different ways: (1) use a smaller image, or (2) don't set the alignment of the image, so that it stretches to fill width, and then make sure the subgroup's hint-weight is specified such that the image fits on the smallest screen density.Anonymous
July 29, 2015
I think it has to do with the height of the image then (I did this to actually horizontally align it in the center). I guess that's the only way. I hope you guys can fix this in an upcoming version - if it works on 2/3 devices it kinda defeats the whole 'universal' tiles idea. Any updates on the Tile Template Visualizer program?Anonymous
July 30, 2015
@Bottom Align Group You're correct, it's not possible to have some text top-aligned at the top of the tile, and other text bottom-aligned at the bottom of the tile. I've taken note of that feedback. We're not able to make any major changes to the tile renderer at this point, but we'll keep this in mind for the future. Thanks!Anonymous
July 31, 2015
The comment has been removedAnonymous
August 01, 2015
Hi, I guess it's not possible to use custom fonts or custom font sizes, right? I planned to use for my Win10 Store app "Battery Tile" Segoe MDL2 battery symbols but it looks like I'll just stick with with pre-rendered images for now. www.microsoft.com/.../9WZDNCRFJVFVAnonymous
August 01, 2015
Is there a way to set the image source to reference one of your outlook contacts?Anonymous
August 02, 2015
TileWide310x150ImageCollection version 2 templates don't work as expected on Windows 10. Only the first image is shown. No matter I target my app to WP8.1 or UWP, it just shows only a small image in the middle in Win10. Is this a bug?Anonymous
August 04, 2015
Hey Andrew, Thanks for the feedback! One last question about the payload: will there be an exception if it's more than 5 KB? Any way to track this? NielsAnonymous
August 05, 2015
@Martin - Correct, no custom fonts or custom font sizes right now. Some of the Segoe UI Symbol symbols are supported, but even lots of those aren't supported (ones marked as Private Use don't seem to work for example). @Leo - The legacy ImageCollection templates are no longer supported in Windows 10. I agree that it's frustrating. If more complaints come in, we can have incentive to fix it. @Niels - If you are sending the tile notification locally (through the client API's), then yes you'll get an exception if your payload is past the 5 KB limit. I'm not sure if push notifications from the server return any error codes for that though.Anonymous
August 05, 2015
@Tomas - You would have to use the contact API's in your app to retrieve the image source of a contact, and then save that image to your app's storage, and then reference the image from your own app's storage (using ms-appx:///). That definitely isn't ideal; it'd be easier if the contact API's simply returned a path you could reference, but that's how it is right now.Anonymous
August 06, 2015
Hi, Is it possible to include a peek image as well as a background image in a live tile template? The requirement I am trying to achieve is that - a peek image will slide off, showing some text with a background image. I tried the code shown below, <binding template="TileMedium" branding="name"> <image placement="peek" src="Assets/Apps/Hipstame/peekImage.jpg"/> <image placement="background" src="Assets/Apps/Hipstame/backgroundImage.jpg"/> <text hint-style="caption">New Message</text> <text hint-style="captionsubtle" hint-wrap="true">Hey, have you tried Windows 10 yet?</text> </binding> But the backgroundImage is also sliding up with the peekImage. Thank you!Anonymous
August 10, 2015
The comment has been removedAnonymous
August 11, 2015
The comment has been removedAnonymous
August 16, 2015
Hi Andrew, Thank you for your awesome explanation. I am having some trouble with providing scaled images though. I dynamically generate images containing a graph at scales 100, 200 and 400, resulting in files TileGenSmall.scale-100.png TileGenSmall.scale-200.png TileGenSmall.scale-400.png TileGenMedium.scale-100.png ...etc. My template is "<tile> <visual version='3'> <binding template='TileSmall' branding='none'> <image '[path to my package]]\LocalState\TileGenSmall.png' placement='background'/> </binding> <binding template='TileMedium' branding='none'> <image '[path to my package]\LocalState\TileGenMedium.png' placement='background'/> </binding> ... etc. </visual> </tile> That does not display the live tile. It only seems to work if I generate just the scale 100 images and use bare filenames: TileGenSmall.png TileGenMedium.png TileGenWide.png TileGenLarge.png Problem with that is that the graph looks rather bloated on phones (gets scaled up to scale 140 or 180). If I only provide a scale 200 or 400 image instead of scale 100, the image gets scaled down but looks horrible! It seems that scaling down is done by just simply skipping scanlines,.. Any thoughts?Anonymous
August 17, 2015
The comment has been removedAnonymous
August 17, 2015
For the displayName, how can we get that to show up as dark text?Anonymous
August 17, 2015
The comment has been removedAnonymous
August 18, 2015
Re above post: It's worth noting that if I use the legacy templates, I can get the peek behavior I want.Anonymous
August 19, 2015
@andrewbares7 - Had been looking for an API to provide me the drawscale, but could not find any (the old App.Current.Host.Content.ScaleFactor was deprecated). So assumed the dynamic tiles would use scaling in the same way as the static tiles. Did another search, and found DisplayInformation.GetForCurrentView().ResolutionScale. That seems to do the trick... (needs some more testing on various devices). Thank you.Anonymous
August 20, 2015
I have a windows 8 app, notifications enabled for my app. and its working great in windows 8 and windows 8.1 and Windows 10 machines. The only problem i am facing is when user taps on toast notification based on the launch arguments (which are present in toast can be read from LaunchActivatedEventArgs of Onlaunched event) I am redirecting the user to specific page. This functionality is working fine in Windows 8,8.1 machines but not working in windows 10 machine. Could you please suggest me what should i do ?Anonymous
August 20, 2015
Hi it is possible to change background color of my Tile in XML or c# code behind? CheerAnonymous
August 21, 2015
@What about dark text? - DisplayName no longer supports dark text. Design studio decided it should always be white. @Brandon - Could you paste your XML code? Alternatively, look at using the new NotificationsExtensions library I've just released, which lets you generate the XML using code, and it'll help you create valid XML: blogs.msdn.com/.../introducing-notificationsextensions-for-windows-10.aspx @Suresh - See the adaptive and interactive toasts post by Lei on this blog. In the "Activation Samples" -> "Foreground", you'll see that in Windows 10 apps, OnActivated is called instead of OnLaunched. But were you running a Windows 8 app on Windows 10 and the toast activation wasn't working? It should still work the same for existing Windows 8 apps... if not that's a bug. Please bring this conversation over to Lei's article about toasts! @Andrev - If you're talking about a primary tile, your tile's background color is permanent (specified in the app manifest). If you're talking about a secondary tile, it can be changed via C# code by setting the BackgroundColor property on the SecondaryTile (under VisualElements I think?). If you really need to change background color via a notification, you could pre-load some solid-color JPEG images, and reference the image as a background image, like "red.jpg", and then that'll have the same effect as creating a red background. The image should theoretically only need to be 1x1 px large too!Anonymous
August 22, 2015
Thank you for posting this, Andrew. I was hoping I could get someone from MSFT to comment on why this API is using XML and not XAML? The use of XML seems old skool, and the design decision to pass in an XML document smells like an anti-pattern. It seems like this should be Xaml, taking advantage of the built-in tooling (Intellisense) and design support in Visual Studio. I've piggybacked off Scott Lovegrove's great work in creating the C# version of this format, and have made a Xaml version here: github.com/.../AdaptiveTileExtensions XAML, BUDDY WOOOOOOOOO!!!!!!!!!!!!!!!!!!!!!!! github.com/.../Tile.xamlAnonymous
August 24, 2015
@Michael - We all agree that XML is old school and that it should be XAML. However, our Start screen isn't at the point where it can support XAML yet. We're working to get there. I saw your comment and pull request on Scott's library - pretty neat. I own the NotificationsExtensions library, the official helper library which has been updated for generating these new adaptive tile and toast notifications (github.com/.../NotificationsExtensions). Your pull request got me thinking about how I could integrate that with the official library. I'll think about it some more! We definitely want a way for devs to more visually design tile notifications. However, those notifications are usually generated programmatically (or even from servers), so leveraging XAML can be weird if it's from a server.Anonymous
August 24, 2015
The comment has been removedAnonymous
August 24, 2015
Thanks! Making an awesome live tile is difficult due to the lack of info out there, so I'm helping to change that. Staying active on the articles is necessary! When I think of XAML, I guess I incorrectly think of StackPanel, Grid, etc. Constructing the tile through a XAML file like your screenshot in the pull request showed is definitely pretty awesome. That's actually something that Matt (a fellow PM) has wanted to be able to do! We also would want a visualizer, so you could instantly see what the notification looks like... that'd be killer. Would the XAML that you currently have support data binding? There needs to be some way to inject live data into the XAML file, because a static XAML file is useless for a live tile which needs live data.Anonymous
August 24, 2015
In the early days, yes, Xaml was presentation/UI only. Then, it got pulled out into its own assembly to be used for other application purposes (Windows Foundation, etc.). Then, with the advent of WinRT, it got put back into a UI assembly (with very reduced featureset, unfortunately), pretty much wiping out the efforts made with System.Xaml. FWIW, in addition to the conversation in the link above, this vote is gaining traction to repair System.Xaml in the new UWP universe: wpdev.uservoice.com/.../7232264-add-markup-extensions-to-and-improve-winrt-xaml In the current implementation, the tile objects are simply POCOs. But, it would be possible to make them extend UI objects, to provide actual UI-based designer feedback in visual studio. That's something I can toy with to see if it can work. Unfortunately, as I have alluded to, WinRT/UWP Xaml is a terrible (TERRIBLE) adaptation of System.Xaml, so the functionality is limited. Even though it might render in a designer, we would not be guaranteed full fidelity of exact rendering of the live tile in production/deployed environment. Additionally, as such my current UWP implementation does not support data-binding. With the power of markup extensions, we could most certainly be able to provide any sort of data into any element/property within a Xaml file. But, unfortunately, markup extensions do not exist in UWP at the moment (see referenced link above). If possible, I would like to move this conversation to your GitHub repo. It is a much better communication channel than MSDN comments, which are pretty arcane and need a refresh/update. Disqus would be a better change. :P Here is the issue: github.com/.../5 Thank you, Andrew!Anonymous
August 31, 2015
It would be nice if we could specify the BitmapInterpolationMode for scaling. Right now, it appears to be defaulting to Nearest Neighbor, which results in pretty horrible looking images when a large image is downscaled. For example, here's the MS Edge Logo, downscaled: screens.gskinner.com/.../cWG.png If using Bilinear, it would look more like this: screens.gskinner.com/.../3fA.png At the very least, if we can not specify Interpolation, it would be nice to change the default to Linear.Anonymous
August 31, 2015
@Shawn - looking into this, thanks! I'll report back with an update.Anonymous
September 13, 2015
@andrewbares7 Hi, thanks for nice tutorial! I have a question. As far as I understood, there's no way to change text/image angle for now? Like on the tile here store-images.microsoft.com/.../apps.33156.9007199266312582.fed2e91f-56a2-420c-a251-f67869506fd0.61dab060-2230-4a81-902c-431ae3297ae9 Thanks!Anonymous
September 13, 2015
@Viachaslau - Correct, you cannot rotate text or images. You'd have to render your tile as an image if you want something as advanced and custom like that.Anonymous
September 14, 2015
@Shawn - RE: interpolation... From what we understand, there's no "best choice" between nearest neighbor and linear. Depending on the image and how it's being resized, one might be better than the other. Paint.NET seems to have a "best" option which performs both and calculates which is the best result, but that's not an option for us right now. And we haven't heard any other complains about the image scaling yet.Anonymous
September 14, 2015
Is it possible to create a tile as shown here - oi57.tinypic.com/2elgw39.jpg Tried the following steps - Add Image 1 into subgroup 1 with "hint-weight = 50" Create 2 more subgroups with" hint-weight = 25" to add Image 2 and Image 3 I couldn't figure out how to make the text extend across the last 2 subgroups. Is something similar to Column-Span available? Note: I could achieve the result using Image-alignment left/right but I am trying to add the images into subgroups so that it will stretch according to the tile size.Anonymous
September 15, 2015
@andrewbares7 Thanks a lot for answer! I do think I'd prefer new API to custom rendering as it may be tricky and fail from time to time, while this one I supposed should be quite quick in generating tiles so it should be fine for background task quotas, am I right?Anonymous
September 15, 2015
@ColumnSpan - No, there's nothing similar to column span right now. You likely cannot achieve your exact scenario using purely adaptive. You might have to try rendering one image as a background image, and then place other images and text on top of it with the adaptive. For example, place the large image as the background, and then create a group with subgroup 50%, subgroup 25%, subgroup 25%, and place the two smaller images in the last two subgroups (assume they have correct aspect ratio). And then create a second group that has two 50% subgroups, and put your text in the last subgroup. Only issue is that I believe the entire group will be dropped if the wrapping text has more content than can be displayed. So ultimately you probably can't achieve your scenario. @Viachaslau - Correct, when using adaptive templates, you no longer have to worry about memory impact on background tasks! That's one of the huge benefits over rendering your own custom tiles.Anonymous
September 17, 2015
Hi, I am using the following XML data to display on a tile - <tile> <visual> <binding template="TileMedium" branding="none"> <text hint-style="body">text 1</text> <text hint-style="caption">text 2</text> <text hint-style="caption">text 3</text> <text hint-style="caption">text 4</text> <text hint-style="caption">text 5</text> </binding> </visual> </tile> In 720p 5 inch emulator the tile displays as shown here - oi59.tinypic.com/333z8lu.jpg "text 5" is not displayed whereas enough space required by a text element is seen at the bottom. Is something extra need to be done?Anonymous
September 18, 2015
@ColumnSpan - Thanks for reporting that issue. That's a mobile-specific bug (desktop does not have this issue). When branding is set to "none", the tile is still behaving as if branding exists and thus not filling that extra space. I've filed a bug on the shell team for this, hopefully they will fix it for TH2.Anonymous
September 19, 2015
@andrewbares7 I've noticed that the tile data doesn't automatically scale to bigger dimension. For example I have a piece of data in the previous example by @ColumnSpan. In the WVGA dimension it looks fine filling all the space. But when I launch it on WXGA only left upper part of tile is filled with small non scaled piece of data and almost whole tile is empty, which looks ugly. Is there a way to autoscale to fill the tile, or group/subgroup? Or what should I do to make it nice on all dimensions?Anonymous
September 21, 2015
@Viachaslau - Not sure what you mean. Certain devices have more available screen space, and the adaptive tiles will take advantage of the extra space. They will NOT simply increase the font size. Look at the first set of photos under the "Groups and Subgroups" header. That shows how adaptive tiles "scale" to fill the tile. Font size should always remain relatively constant. If it's on a device where the tile itself is simply larger, then text will flow across all that extra space like seen in the photos I've referred you to. I tested the Mail tile on WXGA and it appeared correctly as seen here (bottom right tile): tinypic.com/view.php Since the live tile on WXGA is larger, more content is displayed. You'll have to show us some screenshots, or a sample payload, or somehow explain your issue further.Anonymous
September 22, 2015
@Niels Laute - We finally released the Visualizer! blogs.msdn.com/.../introducing-notifications-visualizer-for-windows-10.aspxAnonymous
September 24, 2015
@andrewbares7 - Thanks for the reply. NearestNeighbor is typically only used for PixelArt, or other very low-res assets. It creates very pixelated results when down-scaling any normal photo, logo, or any other hi-res 'smooth' image. I'd argue that if you have to choose one, which you're doing, Linear is the obvious choice, since the bulk of assets are not lo-res pixel art, and typically are downscaling, not upscaling, which NN might work better for. As an aside, you could just expose a property called "smoothing" or a 2nd image type, something... to give us some control. As it stands right now we can't use logos in our tiles, cause they're unreadable, which is unfortunate.Anonymous
September 30, 2015
...So what do we do with the TileContent content ? Do we call updater.update(content) ? It's unclear what we do next.... dose anybody know what we do with the content after we create it?Anonymous
October 01, 2015
@Alek - This documentation page doesn't cover updating tiles. Depending on whether you're updating a tile locally or via push, the technique varies. See the NotificationsExtensions documentation for some code snippets on what to do next: github.com/.../Tile-Notifications In short, for a local notification, you can use the GetXml() method on the TileContent object to retrieve the content as an XmlDocument, and then pass that to the WinRT TileNotification constructor. For push notifications, you would use the GetContent() method to get the content as a string, and then send that string (which is XML) to the push channel URL.Anonymous
November 09, 2015
How to remove margin between content and tile border? I set an image as tile background, and I have another image (with opacity) to overlay on it, but I found there is margin between the overlay image and tile border, my overlay image cannot stretch full over the tile. What I want is the overlay image can cover the entire tile without margin. For example, the 150 * 150 size tile, my overlay image will also be 150 * 150, any suggestions? <binding template="TileMedium"> <image src="background_image_url" placement="background"/> <image src="the_same_size_with_background_overlay_image_url"/> </binding>Anonymous
November 10, 2015
@Felix - There's no way to remove the margin between content and the tile border. We enforce this margin to ensure that tiles remain consistent, and so that you can easily create tiles that look correct without worrying about exact margins. You would have to render your background and your overlay image as one single image and then set that image as the background image.Anonymous
November 11, 2015
The comment has been removedAnonymous
November 11, 2015
i forgot to pase my xml: TileContent() { Visual = new TileVisual() { // TileMedium = new TileBinding() { Content = new TileBindingContentAdaptive() { Children = { new TileText() { // }, new TileText() { // } } } }, TileWide = new TileBinding() { Content = new TileBindingContentAdaptive() { Children = { new TileText() { // }, new TileText() { // } } } }, TileLarge = new TileBinding() { Content = new TileBindingContentAdaptive() { Children = { new TileText() { // }, new TileText() { // } } } } } }Anonymous
November 12, 2015
@James, thanks for writing us, glad to help!
- What do you mean by "the wide tile doesn't work" - what are you seeing? Also, include your entire TileBindingContentAdaptive() snippet for the Wide tile since something inside there might be causing it to break.
- Small tiles are always required. You'll notice that when creating a tile, even if you only provide a Medium tile logo, the user can still resize to Small and your Medium logo will simply be scaled down. You cannot "not use" the Small tile, it's our design philosophy that every tile should be able to be resized to small. If you don't want users using the Small tile, you could specify a logo that has a big X telling users not to use your small tile, so they see the X when resizing to small.
Anonymous
November 14, 2015
@Andrew thanks mate. for the tile not displaying, it was me who did not set it up in the original secondary tile. after repairing that it works well, my bad. for the small tile, i did not know it was required. thanks again.Anonymous
November 15, 2015
The comment has been removedAnonymous
November 16, 2015
@Dino - I'm having trouble understanding your comment, there are numerous characters missing in your comment. I'll attempt to answer your questions, but if I mis-understood anything, please clarify with properly spelled words. DisplayName will always be 28 effective pixels tall, there is no way to control that. If you don't want the display name to appear, set branding="none" and you will get that space back. You can use whatever XML you want for Desktop vs Mobile. You can check what device you're running on by using DeviceFamily: msdn.microsoft.com/.../Windows.System.Profile.AnalyticsInfo and then you can send the correct XML depending on the device family.Anonymous
December 07, 2015
its very nice concept to practice the live tiles but here I have a requirement how to show the user current location pin on tile when an user has pin the tile on its desktop, phone and tablet is there any possibility to show the user location pin in the tile and here I have mentioned one thing also I am show the map image on tile but I am failed to show the user location pin on that tile is any body can the suggestion. if any body has the solution please forward my mail id or else post that in MSDNFOURMS blog and this is mail id:astrani_sateesh@outllok.comAnonymous
December 10, 2015
On the Lumia 640, Microsoft forced the home screen to always be 3 columns. A standard rectangular 2x1 live tile now only occupies 2/3 the width of the home screen. Is there an option or any work around to create or display a 3x1 or 3x2 rectangular live that span the whole width of the home screen on the Lumia 640? If not will there be an enhancement to offer a 3x1 live tiles any time soon? Android has many options and sizes for their widgets so why can't WP offer such.. and take advantage of the larger screen display area and resolution...TIA!Anonymous
December 10, 2015
Hi Thai, This is a developer blog, we don't own the end-user-facing features of Start. But as a fellow Windows Phone user, I can answer some of your questions. The 2-column option is still there in W10M. Go to Settings -> Personalization -> Start, and scroll down, and disable the "Show more tiles" toggle. And no, there are currently no 3x1 or 3x2 live tiles (open the Feedback app and send that feedback so that it can be voted on / received by the team that owns Start).Anonymous
December 12, 2015
@sateesh - Your question about displaying the map on the live tile is already being answered on your MSDN thread, let's keep the conversation there: social.msdn.microsoft.com/.../how-to-show-the-location-map-on-live-tilesAnonymous
January 16, 2016
Is there some issue with using displayName in Windows 10 mobile? Medium/wide tile always displays just the app name defined in app manifest and not the displayName I set in the notification XML. Exactly same tile notification works correctly in desktop. Also Notifications Visualizer displays the tile correctly for mobile too. I am using SDK 10.0.10240.0 and tested this in a mobile device and emulator running 10.0.10586.0. Sample xml: <tile> <visual> <binding template="TileWide" branding="name" displayName="Wednesday 31"> <text>test</text> </binding> </visual> </tile>Anonymous
January 19, 2016
@kine - I’m unable to repro this issue on 10.0.10586.35 on Mobile, it’s possible that there was a bug in version 0 of the build. Can you try updating to a newer build?Anonymous
January 19, 2016
It seems that problem occurs only if tile's short name defined in package.appxmanifest / Visual Assets is NOT empty.Anonymous
January 19, 2016
Hey I was wondering how to create a tile with more than one image (5 would do) earlier we used to use TileUpdateManger to achieve this. I'm tried using Peek and background but it only shows the background and I couldn't add more than one peek image. Something like this : www.youtube.com/watchAnonymous
January 23, 2016
@AbsoluteSith - Sounds like you should use the Photos tile template: blogs.msdn.com/.../photos-tile-template-in-windows-10.aspx @kine - The workaround is to simply not use the ShortName property on your primary tile (it's not a required property as we discussed via email).Anonymous
March 01, 2016
string startTemplate = @"<tile> <visual> <binding template = 'TileMedium'> "; startTemplate += "n" + "<text hint-style='caption' hint-wrap='true' >" + title + " </text>"; startTemplate += "n" + "<text hint-style='captionSubtle' hint-wrap='true'>" + body + "</text>"; startTemplate += "n" + "</binding>" + "n <binding template='TileWide'> "; startTemplate += "n" + "<text hint-style='caption' hint-wrap='true'>" + title + " </text>"; startTemplate += "n" + "<text hint-style='captionSubtle' hint-wrap='true'>" + body + "</text>"; startTemplate += "n" + "</binding>" + "n <binding template='TileLarge'> "; startTemplate += "n" + "<text hint-style='caption' hint-wrap='true'>" + title + " </text>"; startTemplate += "n" + "<text hint-style='captionSubtle' hint-wrap='true'>" + body + "</text>"; startTemplate += @" </binding> </visual> </tile>"; Debug.WriteLine("The template is " + startTemplate); XmlDocument xmlDoc = new XmlDocument(); xmlDoc.LoadXml(startTemplate); TileNotification notifyTile = new TileNotification(xmlDoc); TileUpdateManager.CreateTileUpdaterForSecondaryTile(tile.TileId).Update(notifyTile); In the above sample if the body contains multiple lines "n" or "r" then the body content is not shown for medium or wide tiles. Note the tile size is within the limits. What could be the issue here?Anonymous
March 01, 2016
And also would like to know how to set the background color of the secondary tile. Like setting up from the xml.Anonymous
March 06, 2016
Hey AbsoluteSith, For your first comment, looks like you found a bug where <text> elements containing newlines will incorrectly be dropped rather than just using ellipsis trimming if all the text cannot be displayed. There's a few workarounds depending on your scenario... (1) replace all newline characters with spaces, removing the newlines, or (2) split the string based on the newlines, and then place each one in their own separate <text> element, thus avoiding this bug. I've filed this bug and will try to reply to this comment if/when it is fixed, but you should use one of those workarounds. For setting the background color via a notification - that is not possible. As a workaround, you could use a background image that is simply a solid color. The background image can be a 1x1 JPEG, so it'll be super small file size.Anonymous
March 06, 2016
very happy to see you're using the "Adaptive" term instead of the nonsense "Responsive" term used in HTML5 worldAnonymous
July 25, 2016
Hi,I am very new on Win 10 development and particularly on adaptive tiles. I am surely missing some information but I don't know where the code (XML or C#) goes in order to provide adaptive tiles.For instance: Where should I put the C# code listed on the samples?In the App.Xaml.cs? Inside a different predefined file? How do I reference it on my project? etc.Could you provide me a full example or tell me where I can get the documentation that explains this.Thanks- Anonymous
July 26, 2016
Hey Sebas, please see our quickstart for sending a tile notification, it includes a full code sample at the end! https://blogs.msdn.microsoft.com/tiles_and_toasts/2015/10/05/quickstart-sending-a-local-tile-notification-in-windows-10/
- Anonymous
Anonymous
February 19, 2017
Hi there,I've an adaptive tile schema like this. I would like to use different images for wide and large tiles. While resizing, it doesnt look good. Can you please help here.I dont see the right images being picked up. \ \ \ \ \ " +line0 +"\ " +line1+ "\ \ \ \ \ \ \ \ " +line0+ "\ " +line1+ "\ \ \ \ \ ";Anonymous
February 19, 2017
\ \ \ \ \ " +line0 +"\ " +line1+ "\ \ \ \\ \ \ \ \ " +line0+ "\ " +line1+ "\ \ \ \ \ ";- Anonymous
March 13, 2017
The comment has been removed
- Anonymous