Создание простого приложения данных с помощью WPF и Entity Framework 6
Предупреждение
Если вы используете Visual Studio 2022, для работы с этим руководством следует использовать Visual Studio 2022 версии 17.3( предварительная версия 3 или более поздняя версия).
В этом пошаговом руководстве показано, как создать базовое приложение forms over data в Visual Studio. Приложение использует SQL Server LocalDB, базу данных Northwind, Entity Framework 6 (не Entity Framework Core) и Windows Presentation Foundation для .NET Framework (не .NET Core или .NET 5 или более поздней версии). В нем показано, как выполнять базовую привязку данных с помощью представления мастер-деталь, а также настраиваемый навигатор привязки с кнопками для Переместить далее, Переместить назад, Перейти к началу, Переместить в конец, Обновить и Удалить.
Эта статья посвящена использованию средств данных в Visual Studio и не пытается объяснить базовые технологии в любой глубине. Предполагается, что у вас есть базовое знакомство с XAML, Entity Framework и SQL. В этом примере также не демонстрируется архитектура моделиView-ViewModel (MVVM), стандартная для приложений WPF. Однако этот код можно скопировать в собственное приложение MVVM с небольшими изменениями.
Окончательный код для этого руководства можно найти в примерах учебников Visual Studio на GitHub — EF6.
Установка и подключение к Northwind
В этом примере используется SQL Server Express LocalDB и пример базы данных Northwind. Если поставщик данных ADO.NET для этого продукта поддерживает Entity Framework, он должен работать с другими продуктами базы данных SQL так же хорошо.
Если у вас нет SQL Server Express LocalDB, установите его с помощью установщика Visual Studio . В установщике Visual Studioможно установить SQL Server Express LocalDB в рамках рабочей нагрузки хранилища данных и обработки или как отдельный компонент.
Установите пример базы данных Northwind, выполнив следующие действия.
В Visual Studio откройте окно обозревателя объектов SQL Server. (SQL Server Object Explorer устанавливается как часть нагрузки для хранения и обработки данных в установщике Visual Studio .) Разверните узел SQL Server. Щелкните правой кнопкой мыши экземпляр LocalDB и выберите Новый запрос.
Откроется окно редактора запросов.
Скопируйте скрипт Northwind Transact-SQL в буфер обмена. Этот скрипт T-SQL создает базу данных Northwind с нуля и заполняет ее данными.
Вставьте скрипт T-SQL в редактор запросов, а затем нажмите кнопку Выполнить.
Через некоторое время запрос завершает работу и создается база данных Northwind.
Добавьте новые подключения для Northwind.
Настройка проекта
В Visual Studio создайте новый проект приложения WPF (.NET Framework) C#.
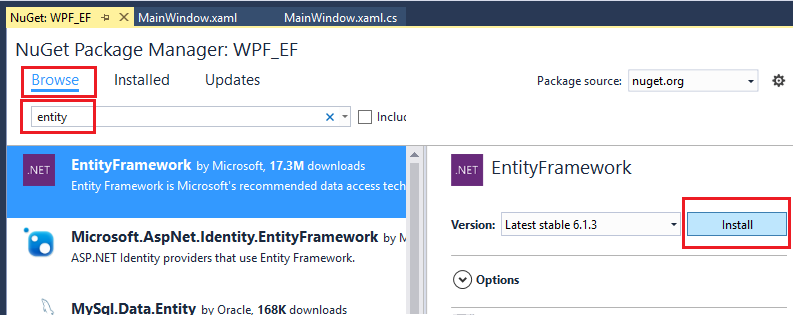
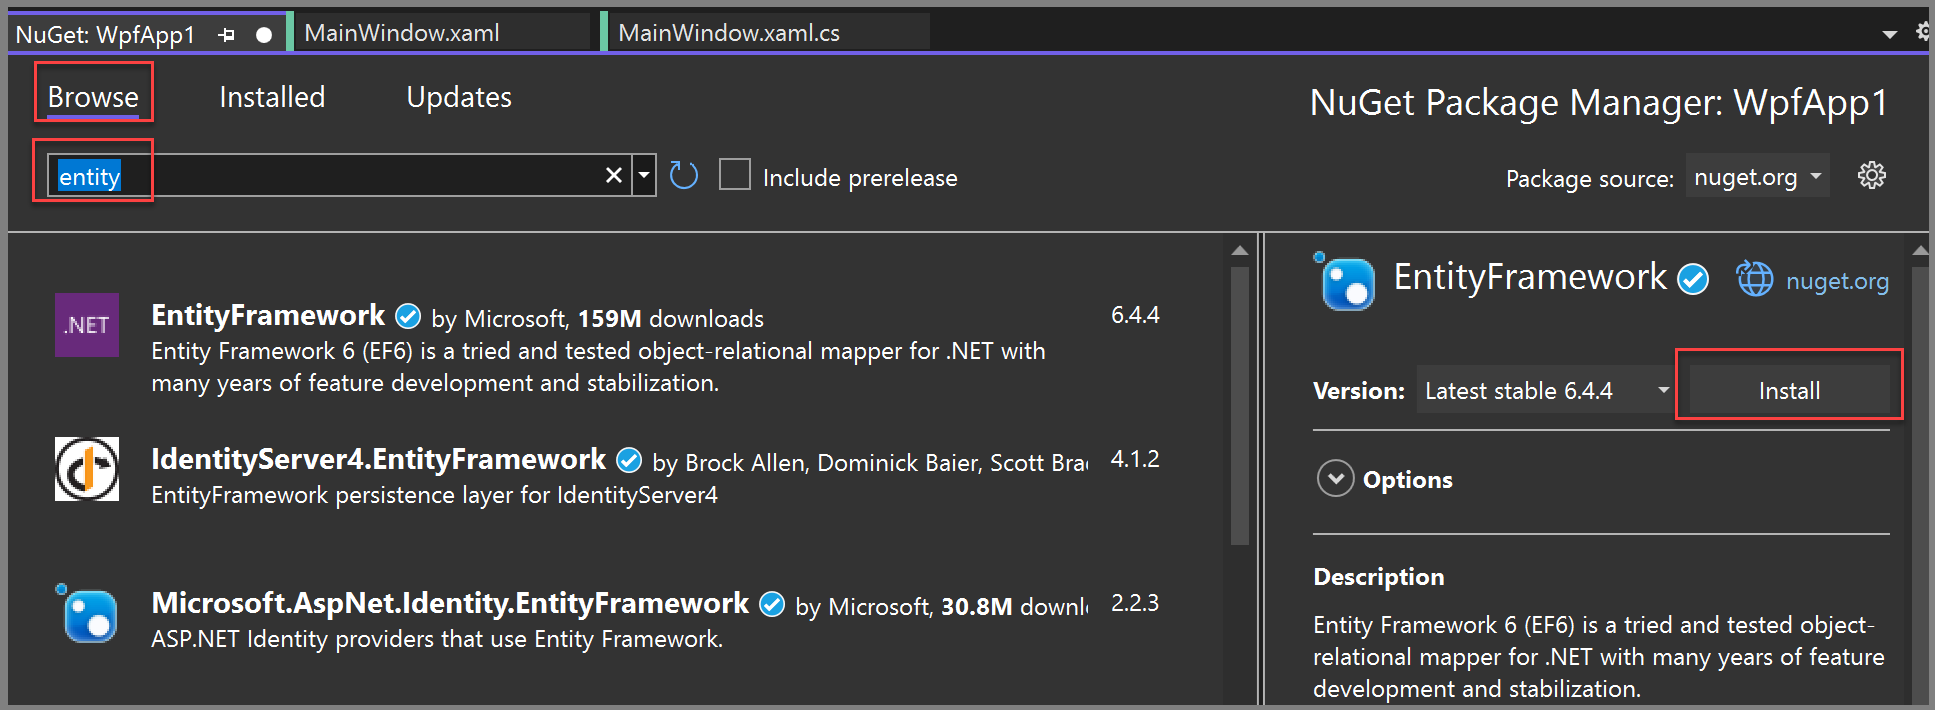
Добавьте пакет NuGet для Entity Framework 6. В обозревателе решенийвыберите узел проекта. В главном меню выберите Project>Manage NuGet Packages.
В Диспетчер пакетов NuGetщелкните вкладку Обзор. Entity Framework, вероятно, является лучшим пакетом в списке. Щелкните Установить в правой панели и следуйте инструкциям. Окно вывода сообщает о завершении установки.
Теперь можно использовать Visual Studio для создания модели на основе базы данных Northwind.
Создание модели
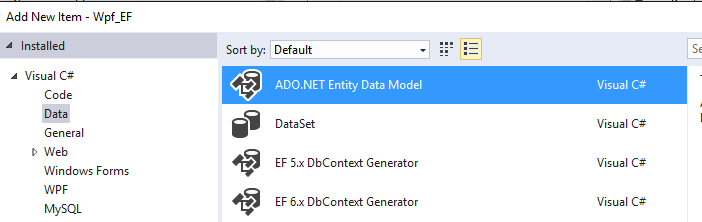
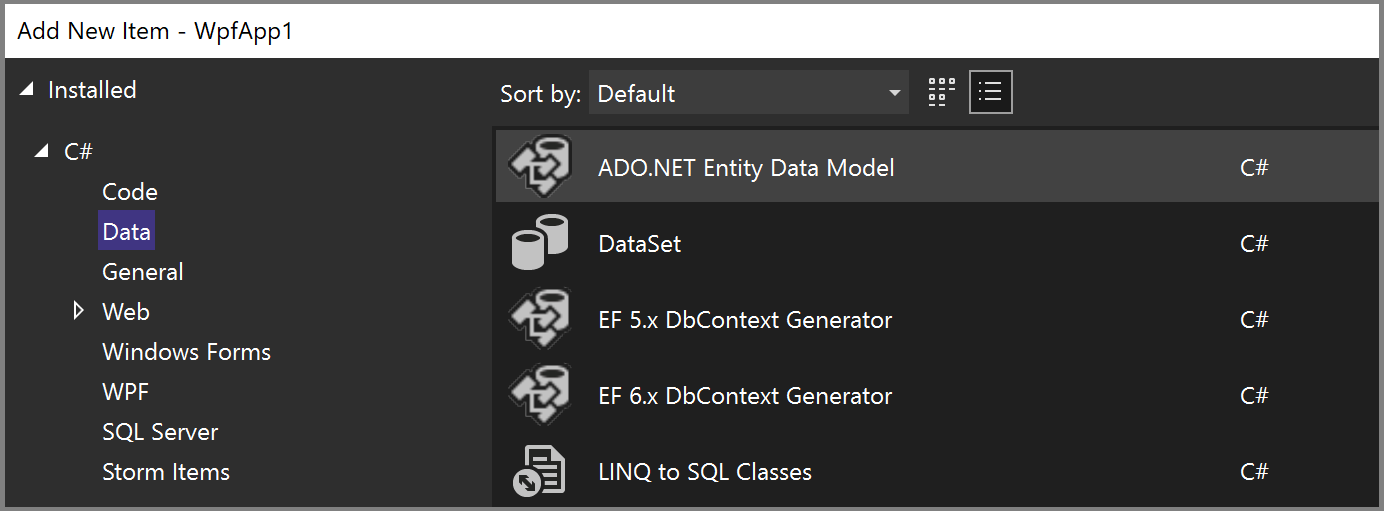
Щелкните правой кнопкой мыши узел проекта в обозревателе решений и выберите Добавить>новый элемент. В левой области, под узлом C#, выберите Данные, а в средней области выберите Модель данных сущностей ADO.NET.
Вызовите модуль
Northwind_modelи выберите , затем нажмите Добавить. Откроется мастер модели данных сущности. Выберите EF Designer из базы данных, а затем выберите Далее.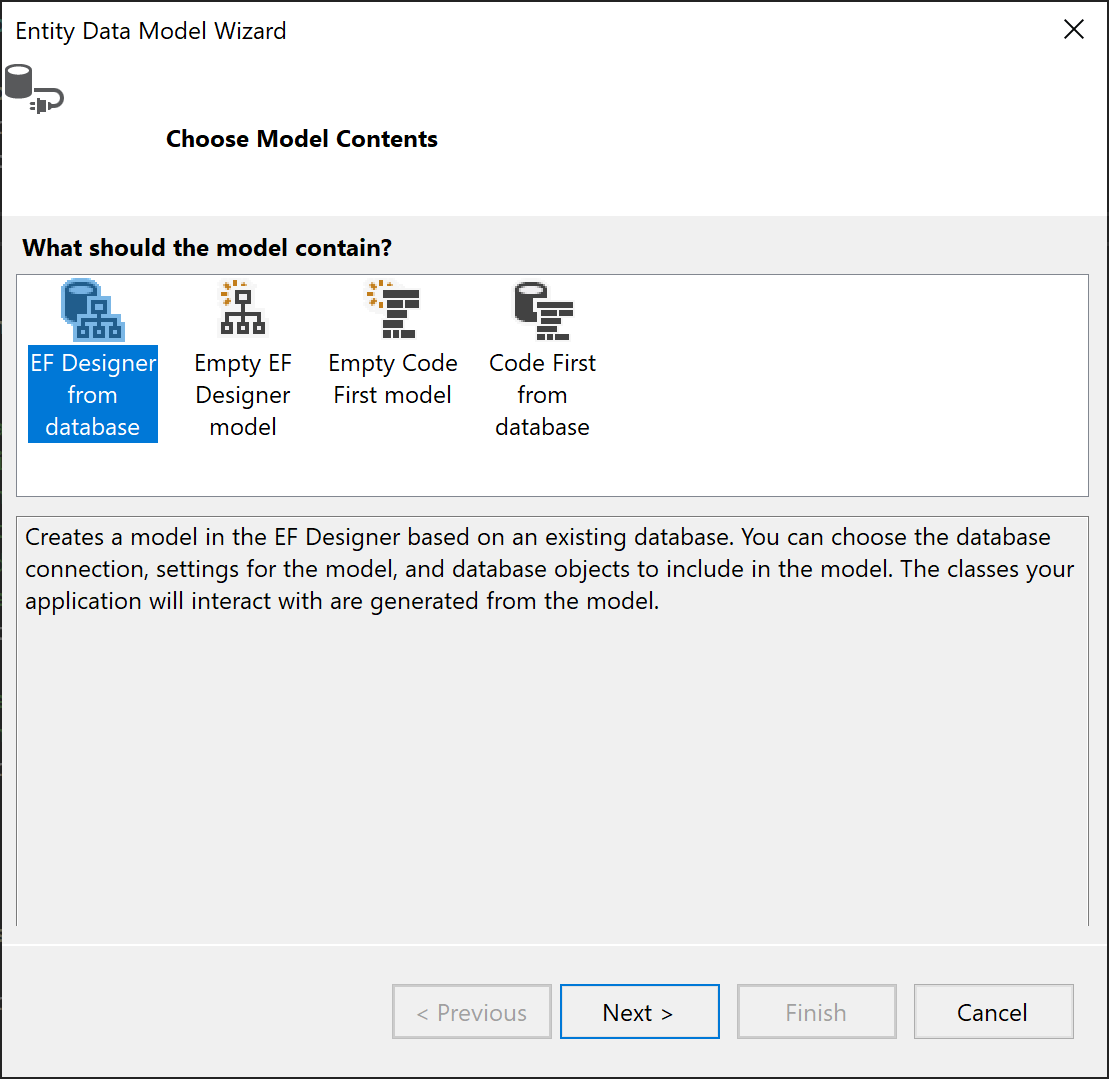
На следующем экране выберите подключение LocalDB Northwind (например, (localdb)\MSSQLLocalDB), укажите базу данных Northwind и нажмите кнопку Далее.
Если подключение не отображается, выберите Новое подключение, затем в диалоговом окне Выбор источника данных выберите Microsoft SQL Server, выберите Продолжить и в диалоговом окне Свойства подключения введите
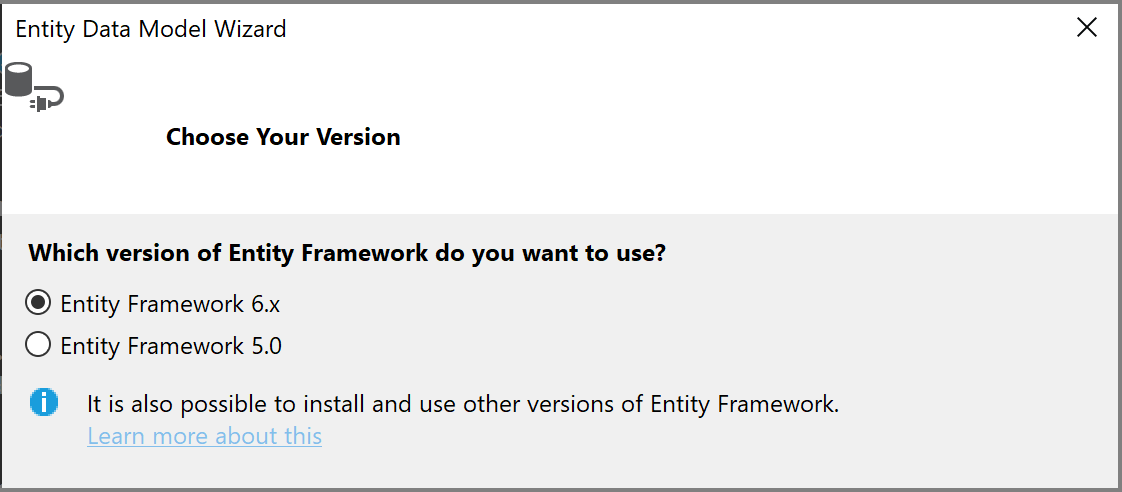
(localdb)\MSSQLLocalDB, затем в разделе Выберите или введите имя базы данныхвыберите Northwind, затем нажмите кнопку OK.При появлении запроса выберите используемую версию Entity Framework.
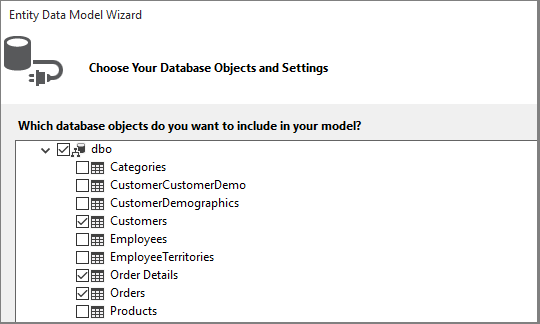
На следующей странице мастера выберите таблицы, хранимые процедуры и другие объекты базы данных для включения в модель Entity Framework. Разверните элемент dbo в древовидном представлении и выберите Клиенты, Заказыи Детали заказа. Оставьте параметры по умолчанию выбранными и нажмите Готово.
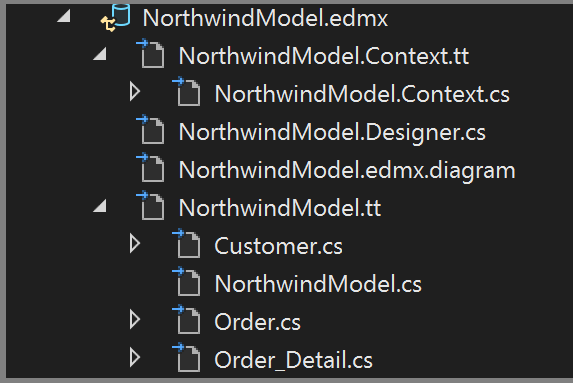
Мастер создает классы C#, представляющие модель Entity Framework. Классы являются обычными старыми классами C#, которые мы привязываем к пользовательскому интерфейсу WPF. Файл
.edmxописывает связи и другие метаданные, которые связывают классы с объектами в базе данных. Файлы.tt— это шаблоны T4, создающие код, который работает с моделью и сохраняет изменения в базе данных. Все эти файлы можно просмотреть в обозревателе решений на узле Northwind_model: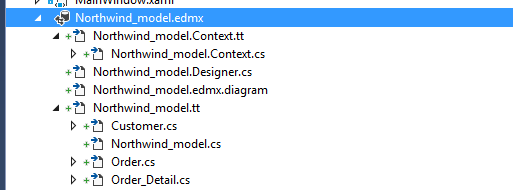
Область конструктора для файла
.edmxпозволяет изменять некоторые свойства и связи в модели. Мы не будем использовать конструктор в этом пошаговом руководстве.Файлы
.ttявляются файлами общего назначения, и вам нужно настроить один из них для работы с привязкой данных WPF, для которой требуются ObservableCollection. В обозревателе решений разверните узел Northwind_model, пока не найдете Northwind_model.tt. (Убедитесь, что вы не находитесь в файле .Context.tt, который находится непосредственно под файлом.edmx.)Замените два вхождения ICollection на ObservableCollection<T>.
Замените первое вхождение HashSet<T> на ObservableCollection<T> около строки 51. Не заменяйте второй экземпляр HashSet.
Замените единственное вхождение System.Collections.Generic (около строки 431) на System.Collections.ObjectModel.
Нажмите клавиши F5 или CTRL+F5, чтобы создать и запустить проект. При первом запуске приложения классы модели видны мастеру источников данных.
Теперь вы готовы подключить эту модель к странице XAML, чтобы вы могли просматривать, перемещаться и изменять данные.
Привяжите модель к странице XAML
Вы можете написать собственный код привязки данных, но гораздо проще позволить это сделать Visual Studio.
В главном меню выберите Project>Добавить новый источник данных, чтобы открыть мастер настройки источника данных . Выберите объект, так как вы привязываются к классам моделей, а не к базе данных:

Разверните узел проекта и выберите Customer. (Источники для заказов автоматически создаются из навигационного свойства Orders в объекте Customer.)
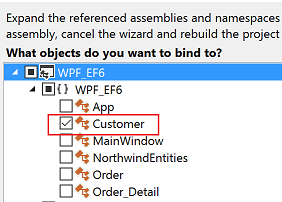

Нажмите кнопку Готово.
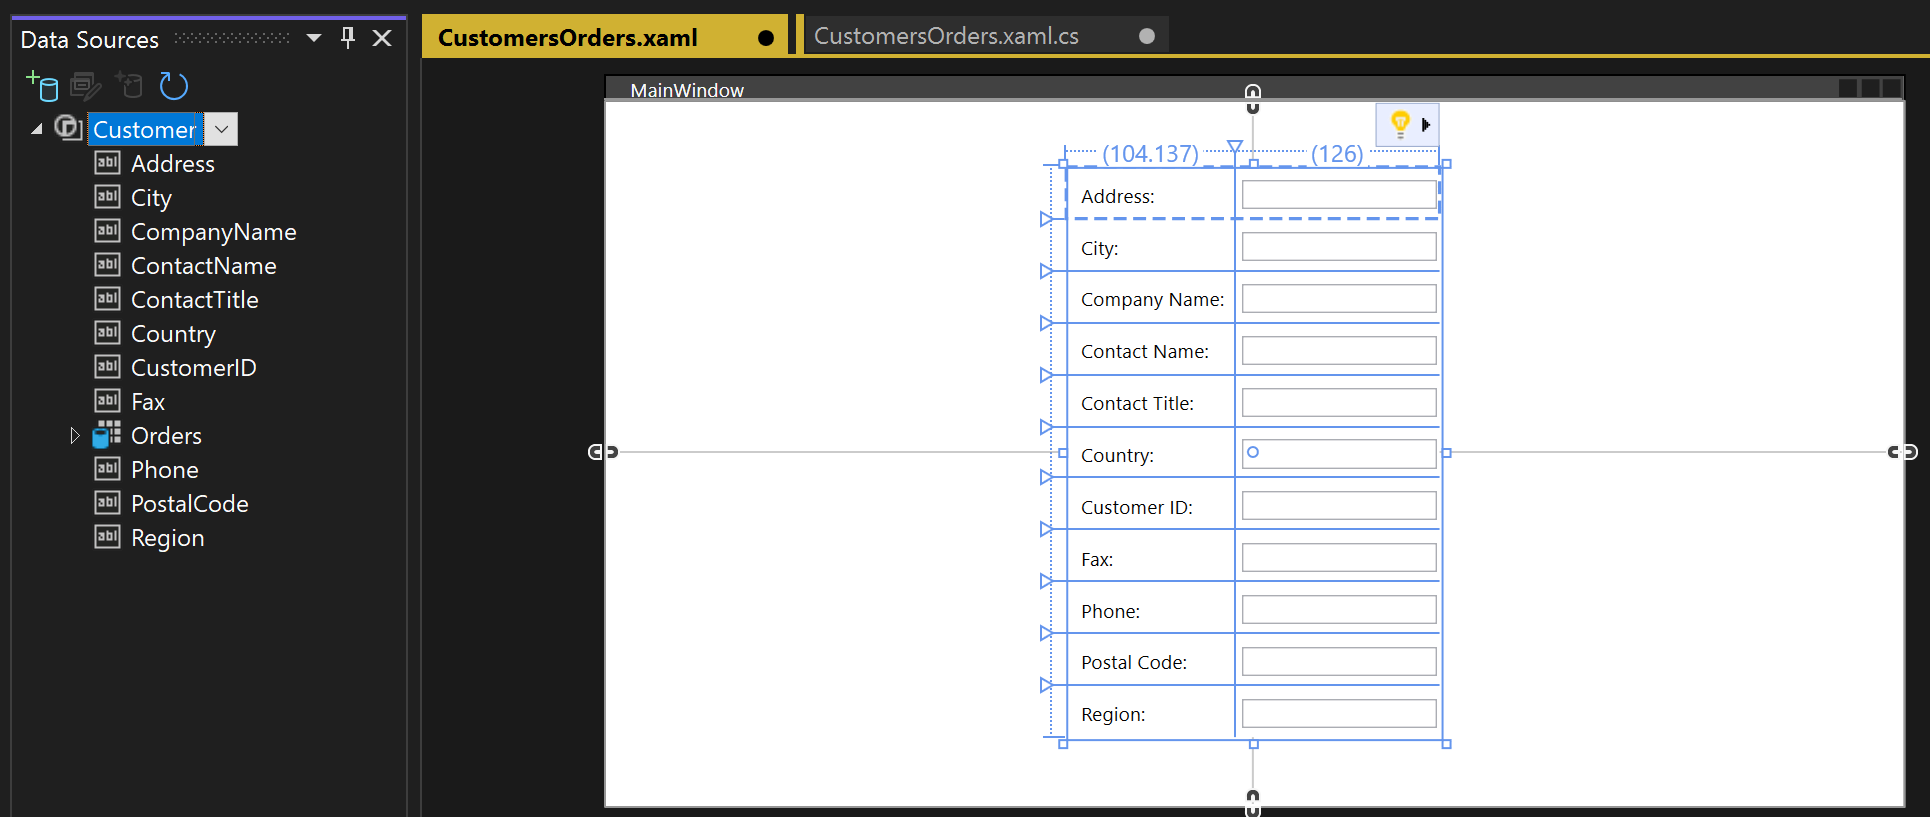
Перейдите к MainWindow.xaml в представлении кода. Мы сохраняем простой КОД XAML в целях этого примера. Измените заголовок MainWindow на что-то более описательное, и увеличьте его высоту и ширину до 600 x 800 на данный момент. Вы всегда можете изменить его позже. Теперь добавьте эти три определения строк в основную сетку, одну строку для кнопок навигации, одну для сведений клиента и одну для сетки, отображающую свои заказы:
    <Grid.RowDefinitions>
        <RowDefinition Height="auto"/>
        <RowDefinition Height="auto"/>
        <RowDefinition Height="*"/>
    </Grid.RowDefinitions>
Теперь откройте MainWindow.xaml, чтобы увидеть его в дизайнере. Это приводит к отображению окна источники данных в поле окна Visual Studio рядом с панели инструментов. Щелкните вкладку, чтобы открыть окно, или нажмите клавиши Shift Shift+Alt+D, или выберите Просмотр>Другие окна>Источники данных. Мы будем отображать каждое свойство в классе Customers в отдельном текстовом поле. Сначала щелкните стрелку в выпадающем меню Клиенты и выберите Сведения. Затем перетащите узел на середину поверхности дизайна, чтобы конструктор знал, что вы хотите переместить его в средний ряд. Если вы его потеряете, можно будет вручную указать строку в XAML (
Grid.Row="1"). По умолчанию элементы управления помещаются вертикально в элемент сетки, но на этом этапе вы можете расположить их на форме как угодно. Например, можно поместить поле с названием выше, над адресом. Пример приложения для этой статьи переставляет поля и располагает их в два столбца.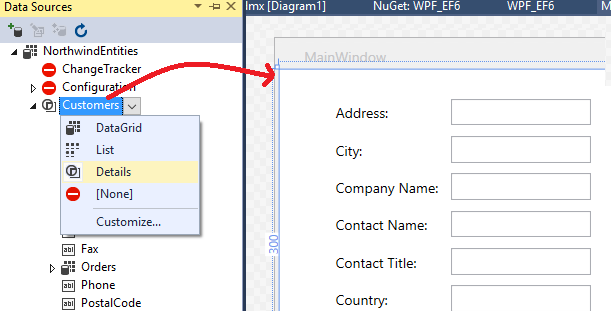
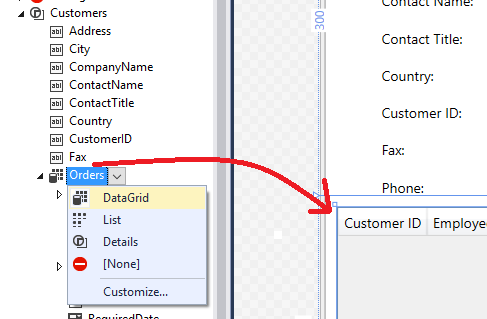
В представлении XAML теперь можно увидеть новый элемент
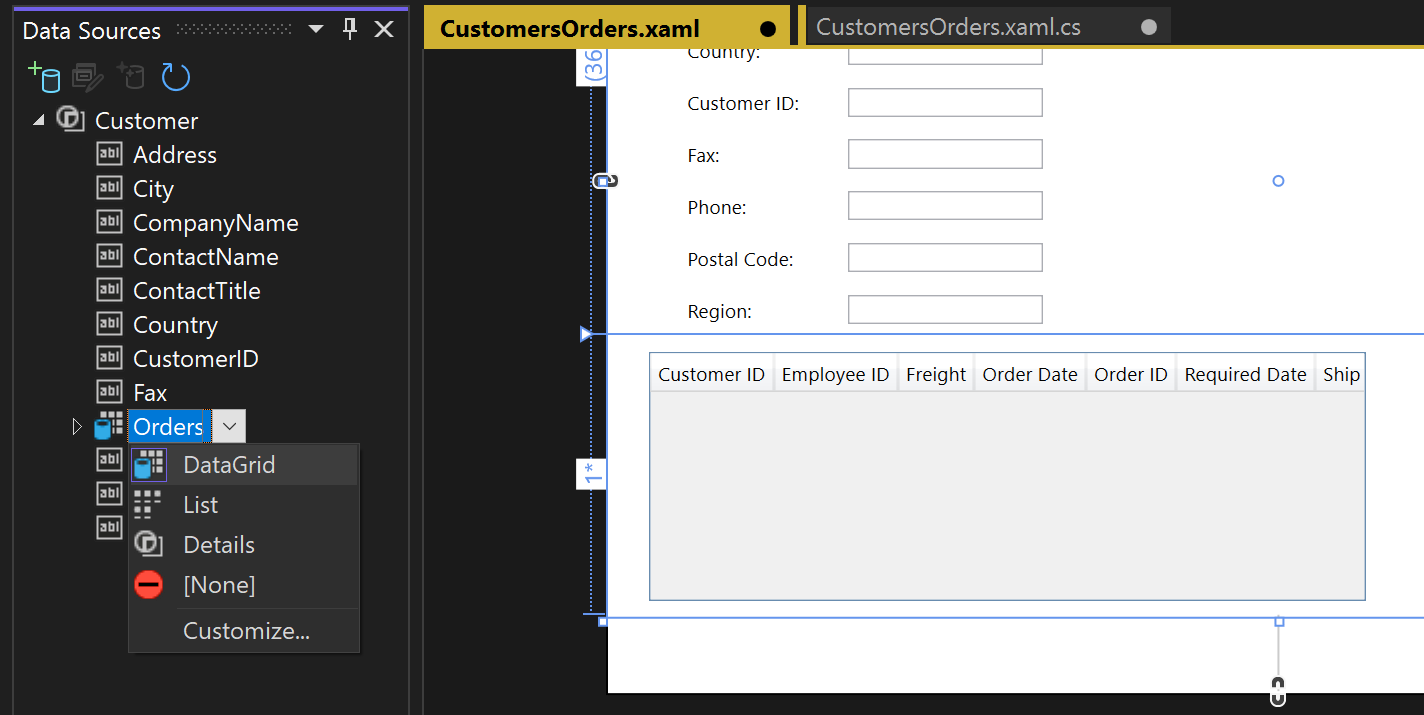
Gridв строке 1 (средней строке) родительской сетки. В родительской сетке есть атрибутDataContext, который ссылается на CollectionViewSource, добавленный в элементWindows.Resources. Учитывая контекст данных, когда первое текстовое поле связывается с адресом , это имя сопоставляется со свойствомAddressв текущем объектеCustomerвCollectionViewSource.<Grid DataContext="{StaticResource customerViewSource}">Когда клиент отображается в верхней половине окна, вы хотите увидеть свои заказы в нижней половине. Вы показываете заказы с помощью элемента управления в виде сетки. Чтобы привязка данных master-detail выполнялась должным образом, важно привязать свойство Orders в классе Customers, а не к отдельному узлу Orders. Перетащите свойство Orders класса Customers на нижнюю половину формы, чтобы конструктор разместил его в строку 2.
Visual Studio создал весь код привязки, который подключает элементы управления пользовательского интерфейса к событиям в модели. Все, что необходимо сделать, чтобы просмотреть некоторые данные, — написать код для заполнения модели. Сначала перейдите к MainWindow.xaml.cs и добавьте член данных в класс MainWindow для контекста данных. Этот объект, созданный для вас, действует как элемент управления, который отслеживает изменения и события в модели. Вы также добавите элементы данных CollectionViewSource для клиентов и заказов, а также связанную логику инициализации конструктора в существующий конструктор
MainWindow(). Верхняя часть класса должна выглядеть следующим образом:public partial class MainWindow : Window { NorthwindEntities context = new NorthwindEntities(); CollectionViewSource custViewSource; CollectionViewSource ordViewSource; public MainWindow() { InitializeComponent(); custViewSource = ((CollectionViewSource)(FindResource("customerViewSource"))); ordViewSource = ((CollectionViewSource)(FindResource("customerOrdersViewSource"))); DataContext = this; }Если он еще не существует, добавьте директиву
usingдля System.Data.Entity, чтобы перенести метод расширенияLoadв область действия:using System.Data.Entity;Теперь прокрутите вниз и найдите обработчик событий
Window_Loaded. Обратите внимание, что Visual Studio добавил объект CollectionViewSource. Это представляет объект NorthwindEntities, выбранный при создании модели. Вы добавили это уже, поэтому вам не нужно его здесь. Замените код вWindow_Loaded, чтобы метод выглядел следующим образом:private void Window_Loaded(object sender, RoutedEventArgs e) { // Load is an extension method on IQueryable, // defined in the System.Data.Entity namespace. // This method enumerates the results of the query, // similar to ToList but without creating a list. // When used with Linq to Entities, this method // creates entity objects and adds them to the context. context.Customers.Load(); // After the data is loaded, call the DbSet<T>.Local property // to use the DbSet<T> as a binding source. custViewSource.Source = context.Customers.Local; }Нажмите клавишу F5. Вы увидите сведения о первом клиенте, который был получен в CollectionViewSource. Кроме того, в сетке данных должны отображаться их заказы. Форматирование не здорово, поэтому давайте исправим это. Вы также можете создать способ просмотра других записей и выполнения базовых операций создания, чтения, обновления и удаления (CRUD).
Настройка макета страницы и добавление сетки для новых клиентов и заказов
Расположение по умолчанию, созданное Visual Studio, не идеально подходит для приложения, поэтому мы предоставим окончательный код XAML для копирования в код. Кроме того, вам нужны некоторые формы (которые на самом деле сетки) позволяют пользователю добавлять нового клиента или заказ. Чтобы добавить нового клиента и заказ, вам нужен отдельный набор текстовых полей, которые не привязаны к CollectionViewSource. Вы будете управлять сеткой, которую пользователь видит в любое время, задав свойство Visible в методах обработчика. Наконец, вы добавите кнопку "Удалить" в каждую строку в сетке "Заказы", чтобы пользователь мог удалить отдельный заказ.
Сначала добавьте эти стили в элемент Windows.Resources в MainWindow.xaml:
<Style x:Key="Label" TargetType="{x:Type Label}" BasedOn="{x:Null}">
    <Setter Property="HorizontalAlignment" Value="Left"/>
    <Setter Property="VerticalAlignment" Value="Center"/>
    <Setter Property="Margin" Value="3"/>
    <Setter Property="Height" Value="23"/>
</Style>
<Style x:Key="CustTextBox" TargetType="{x:Type TextBox}" BasedOn="{x:Null}">
    <Setter Property="HorizontalAlignment" Value="Right"/>
    <Setter Property="VerticalAlignment" Value="Center"/>
    <Setter Property="Margin" Value="3"/>
    <Setter Property="Height" Value="26"/>
    <Setter Property="Width" Value="120"/>
</Style>
Затем замените всю внешнюю сетку этой разметкой:
<Grid>
     <Grid.RowDefinitions>
         <RowDefinition Height="auto"/>
         <RowDefinition Height="auto"/>
         <RowDefinition Height="*"/>
     </Grid.RowDefinitions>
     <Grid x:Name="existingCustomerGrid" Grid.Row="1" HorizontalAlignment="Left" Margin="5" Visibility="Visible" VerticalAlignment="Top" Background="AntiqueWhite" DataContext="{StaticResource customerViewSource}">
         <Grid.ColumnDefinitions>
             <ColumnDefinition Width="Auto" MinWidth="233"/>
             <ColumnDefinition Width="Auto" MinWidth="397"/>
         </Grid.ColumnDefinitions>
         <Grid.RowDefinitions>
             <RowDefinition Height="Auto"/>
             <RowDefinition Height="Auto"/>
             <RowDefinition Height="Auto"/>
             <RowDefinition Height="Auto"/>
             <RowDefinition Height="Auto"/>
             <RowDefinition Height="Auto"/>
         </Grid.RowDefinitions>
         <Label Content="Customer ID:" Grid.Row="0" Style="{StaticResource Label}"/>
         <TextBox x:Name="customerIDTextBox" Grid.Row="0" Style="{StaticResource CustTextBox}"
                  Text="{Binding CustomerID, Mode=TwoWay, NotifyOnValidationError=true, ValidatesOnExceptions=true}"/>
         <Label Content="Company Name:" Grid.Row="1" Style="{StaticResource Label}"/>
         <TextBox x:Name="companyNameTextBox" Grid.Row="1" Style="{StaticResource CustTextBox}"
                  Text="{Binding CompanyName, Mode=TwoWay, NotifyOnValidationError=true, ValidatesOnExceptions=true}"/>
         <Label Content="Contact Name:" Grid.Row="2" Style="{StaticResource Label}"/>
         <TextBox x:Name="contactNameTextBox" Grid.Row="2" Style="{StaticResource CustTextBox}"
                  Text="{Binding ContactName, Mode=TwoWay, NotifyOnValidationError=true, ValidatesOnExceptions=true}"/>
         <Label Content="Contact title:" Grid.Row="3" Style="{StaticResource Label}"/>
         <TextBox x:Name="contactTitleTextBox" Grid.Row="3" Style="{StaticResource CustTextBox}"
                  Text="{Binding ContactTitle, Mode=TwoWay, NotifyOnValidationError=true, ValidatesOnExceptions=true}"/>
         <Label Content="Address:" Grid.Row="4" Style="{StaticResource Label}"/>
         <TextBox x:Name="addressTextBox" Grid.Row="4" Style="{StaticResource CustTextBox}"
                  Text="{Binding Address, Mode=TwoWay, NotifyOnValidationError=true, ValidatesOnExceptions=true}"/>
         <Label Content="City:" Grid.Column="1" Grid.Row="0" Style="{StaticResource Label}"/>
         <TextBox x:Name="cityTextBox" Grid.Column="1" Grid.Row="0" Style="{StaticResource CustTextBox}"
                  Text="{Binding City, Mode=TwoWay, NotifyOnValidationError=true, ValidatesOnExceptions=true}"/>
         <Label Content="Country:" Grid.Column="1" Grid.Row="1" Style="{StaticResource Label}"/>
         <TextBox x:Name="countryTextBox" Grid.Column="1" Grid.Row="1" Style="{StaticResource CustTextBox}"
                  Text="{Binding Country, Mode=TwoWay, NotifyOnValidationError=true, ValidatesOnExceptions=true}"/>
         <Label Content="Fax:" Grid.Column="1" Grid.Row="2" Style="{StaticResource Label}"/>
         <TextBox x:Name="faxTextBox" Grid.Column="1" Grid.Row="2" Style="{StaticResource CustTextBox}"
                  Text="{Binding Fax, Mode=TwoWay, NotifyOnValidationError=true, ValidatesOnExceptions=true}"/>
         <Label Content="Phone:" Grid.Column="1" Grid.Row="3" Style="{StaticResource Label}"/>
         <TextBox x:Name="phoneTextBox" Grid.Column="1" Grid.Row="3" Style="{StaticResource CustTextBox}"
                  Text="{Binding Phone, Mode=TwoWay, NotifyOnValidationError=true, ValidatesOnExceptions=true}"/>
         <Label Content="Postal Code:" Grid.Column="1" Grid.Row="4" VerticalAlignment="Center" Style="{StaticResource Label}"/>
         <TextBox x:Name="postalCodeTextBox" Grid.Column="1" Grid.Row="4" Style="{StaticResource CustTextBox}"
                  Text="{Binding PostalCode, Mode=TwoWay, NotifyOnValidationError=true, ValidatesOnExceptions=true}"/>
         <Label Content="Region:" Grid.Column="1" Grid.Row="5" Style="{StaticResource Label}"/>
         <TextBox x:Name="regionTextBox" Grid.Column="1" Grid.Row="5" Style="{StaticResource CustTextBox}"
                  Text="{Binding Region, Mode=TwoWay, NotifyOnValidationError=true, ValidatesOnExceptions=true}"/>
     </Grid>
     <Grid x:Name="newCustomerGrid" Grid.Row="1" HorizontalAlignment="Left" VerticalAlignment="Top" Margin="5" DataContext="{Binding RelativeSource={RelativeSource FindAncestor, AncestorType={x:Type Window}}, Path=newCustomer, UpdateSourceTrigger=Explicit}" Visibility="Collapsed" Background="CornflowerBlue">
         <Grid.ColumnDefinitions>
             <ColumnDefinition Width="Auto" MinWidth="233"/>
             <ColumnDefinition Width="Auto" MinWidth="397"/>
         </Grid.ColumnDefinitions>
         <Grid.RowDefinitions>
             <RowDefinition Height="Auto"/>
             <RowDefinition Height="Auto"/>
             <RowDefinition Height="Auto"/>
             <RowDefinition Height="Auto"/>
             <RowDefinition Height="Auto"/>
             <RowDefinition Height="Auto"/>
         </Grid.RowDefinitions>
         <Label Content="Customer ID:" Grid.Row="0" Style="{StaticResource Label}"/>
         <TextBox x:Name="add_customerIDTextBox" Grid.Row="0" Style="{StaticResource CustTextBox}"
                  Text="{Binding CustomerID, Mode=TwoWay, NotifyOnValidationError=true, ValidatesOnExceptions=true}"/>
         <Label Content="Company Name:" Grid.Row="1" Style="{StaticResource Label}"/>
         <TextBox x:Name="add_companyNameTextBox" Grid.Row="1" Style="{StaticResource CustTextBox}"
                  Text="{Binding CompanyName, Mode=TwoWay, NotifyOnValidationError=true, ValidatesOnExceptions=true }"/>
         <Label Content="Contact Name:" Grid.Row="2" Style="{StaticResource Label}"/>
         <TextBox x:Name="add_contactNameTextBox" Grid.Row="2" Style="{StaticResource CustTextBox}"
                  Text="{Binding ContactName, Mode=TwoWay, NotifyOnValidationError=true, ValidatesOnExceptions=true}"/>
         <Label Content="Contact title:" Grid.Row="3" Style="{StaticResource Label}"/>
         <TextBox x:Name="add_contactTitleTextBox" Grid.Row="3" Style="{StaticResource CustTextBox}"
                  Text="{Binding ContactTitle, Mode=TwoWay, NotifyOnValidationError=true, ValidatesOnExceptions=true}"/>
         <Label Content="Address:" Grid.Row="4" Style="{StaticResource Label}"/>
         <TextBox x:Name="add_addressTextBox" Grid.Row="4" Style="{StaticResource CustTextBox}"
                  Text="{Binding Address, Mode=TwoWay, NotifyOnValidationError=true, ValidatesOnExceptions=true}"/>
         <Label Content="City:" Grid.Column="1" Grid.Row="0" Style="{StaticResource Label}"/>
         <TextBox x:Name="add_cityTextBox" Grid.Column="1" Grid.Row="0" Style="{StaticResource CustTextBox}"
                  Text="{Binding City, Mode=TwoWay, NotifyOnValidationError=true, ValidatesOnExceptions=true}"/>
         <Label Content="Country:" Grid.Column="1" Grid.Row="1" Style="{StaticResource Label}"/>
         <TextBox x:Name="add_countryTextBox" Grid.Column="1" Grid.Row="1" Style="{StaticResource CustTextBox}"
                  Text="{Binding Country, Mode=TwoWay, NotifyOnValidationError=true, ValidatesOnExceptions=true}"/>
         <Label Content="Fax:" Grid.Column="1" Grid.Row="2" Style="{StaticResource Label}"/>
         <TextBox x:Name="add_faxTextBox" Grid.Column="1" Grid.Row="2" Style="{StaticResource CustTextBox}"
                  Text="{Binding Fax, Mode=TwoWay, NotifyOnValidationError=true, ValidatesOnExceptions=true}"/>
         <Label Content="Phone:" Grid.Column="1" Grid.Row="3" Style="{StaticResource Label}"/>
         <TextBox x:Name="add_phoneTextBox" Grid.Column="1" Grid.Row="3" Style="{StaticResource CustTextBox}"
                  Text="{Binding Phone, Mode=TwoWay, NotifyOnValidationError=true, ValidatesOnExceptions=true}"/>
         <Label Content="Postal Code:" Grid.Column="1" Grid.Row="4" VerticalAlignment="Center" Style="{StaticResource Label}"/>
         <TextBox x:Name="add_postalCodeTextBox" Grid.Column="1" Grid.Row="4" Style="{StaticResource CustTextBox}"
                  Text="{Binding PostalCode, Mode=TwoWay, NotifyOnValidationError=true, ValidatesOnExceptions=true}"/>
         <Label Content="Region:" Grid.Column="1" Grid.Row="5" Style="{StaticResource Label}"/>
         <TextBox x:Name="add_regionTextBox" Grid.Column="1" Grid.Row="5" Style="{StaticResource CustTextBox}"
                  Text="{Binding Region, Mode=TwoWay, NotifyOnValidationError=true, ValidatesOnExceptions=true}"/>
     </Grid>
     <Grid x:Name="newOrderGrid" Grid.Row="1" HorizontalAlignment="Left" VerticalAlignment="Top" Margin="5" DataContext="{Binding Path=newOrder, Mode=TwoWay}" Visibility="Collapsed" Background="LightGreen">
         <Grid.ColumnDefinitions>
             <ColumnDefinition Width="Auto" MinWidth="233"/>
             <ColumnDefinition Width="Auto" MinWidth="397"/>
         </Grid.ColumnDefinitions>
         <Grid.RowDefinitions>
             <RowDefinition Height="Auto"/>
             <RowDefinition Height="Auto"/>
             <RowDefinition Height="Auto"/>
             <RowDefinition Height="Auto"/>
             <RowDefinition Height="Auto"/>
             <RowDefinition Height="Auto"/>
             <RowDefinition Height="Auto"/>
         </Grid.RowDefinitions>
         <Label Content="New Order Form" FontWeight="Bold"/>
         <Label Content="Employee ID:"  Grid.Row="1" Style="{StaticResource Label}"/>
         <TextBox x:Name="add_employeeIDTextBox" Grid.Row="1" Style="{StaticResource CustTextBox}"
                  Text="{Binding EmployeeID, Mode=TwoWay, NotifyOnValidationError=true, ValidatesOnExceptions=true}"/>
         <Label Content="Order Date:"  Grid.Row="2" Style="{StaticResource Label}"/>
         <DatePicker x:Name="add_orderDatePicker" Grid.Row="2"  HorizontalAlignment="Right" Width="120"
                 SelectedDate="{Binding OrderDate, Mode=TwoWay, NotifyOnValidationError=true, ValidatesOnExceptions=true, UpdateSourceTrigger=PropertyChanged}"/>
         <Label Content="Required Date:" Grid.Row="3" Style="{StaticResource Label}"/>
         <DatePicker x:Name="add_requiredDatePicker" Grid.Row="3" HorizontalAlignment="Right" Width="120"
                  SelectedDate="{Binding RequiredDate, Mode=TwoWay, NotifyOnValidationError=true, ValidatesOnExceptions=true, UpdateSourceTrigger=PropertyChanged}"/>
         <Label Content="Shipped Date:"  Grid.Row="4"  Style="{StaticResource Label}"/>
         <DatePicker x:Name="add_shippedDatePicker"  Grid.Row="4"  HorizontalAlignment="Right" Width="120"
                 SelectedDate="{Binding ShippedDate, Mode=TwoWay, NotifyOnValidationError=true, ValidatesOnExceptions=true, UpdateSourceTrigger=PropertyChanged}"/>
         <Label Content="Ship Via:"  Grid.Row="5" Style="{StaticResource Label}"/>
         <TextBox x:Name="add_ShipViaTextBox"  Grid.Row="5" Style="{StaticResource CustTextBox}"
                  Text="{Binding ShipVia, Mode=TwoWay, NotifyOnValidationError=true, ValidatesOnExceptions=true}"/>
         <Label Content="Freight"  Grid.Row="6" Style="{StaticResource Label}"/>
         <TextBox x:Name="add_freightTextBox" Grid.Row="6" Style="{StaticResource CustTextBox}"
                  Text="{Binding Freight, Mode=TwoWay, NotifyOnValidationError=true, ValidatesOnExceptions=true}"/>
     </Grid>
     <DataGrid x:Name="ordersDataGrid" SelectionUnit="Cell" SelectionMode="Single" AutoGenerateColumns="False" CanUserAddRows="false" IsEnabled="True" EnableRowVirtualization="True" Width="auto" ItemsSource="{Binding Source={StaticResource customerOrdersViewSource}}" Margin="10,10,10,10" Grid.Row="2" RowDetailsVisibilityMode="VisibleWhenSelected">
         <DataGrid.Columns>
             <DataGridTemplateColumn>
                 <DataGridTemplateColumn.CellTemplate>
                     <DataTemplate>
                         <Button Content="Delete" Command="{StaticResource DeleteOrderCommand}" CommandParameter="{Binding}"/>
                     </DataTemplate>
                 </DataGridTemplateColumn.CellTemplate>
             </DataGridTemplateColumn>
             <DataGridTextColumn x:Name="customerIDColumn" Binding="{Binding CustomerID}" Header="Customer ID" Width="SizeToHeader"/>
             <DataGridTextColumn x:Name="employeeIDColumn" Binding="{Binding EmployeeID}" Header="Employee ID" Width="SizeToHeader"/>
             <DataGridTextColumn x:Name="freightColumn" Binding="{Binding Freight}" Header="Freight" Width="SizeToHeader"/>
             <DataGridTemplateColumn x:Name="orderDateColumn" Header="Order Date" Width="SizeToHeader">
                 <DataGridTemplateColumn.CellTemplate>
                     <DataTemplate>
                         <DatePicker SelectedDate="{Binding OrderDate, Mode=TwoWay, NotifyOnValidationError=true, ValidatesOnExceptions=true, UpdateSourceTrigger=PropertyChanged}"/>
                     </DataTemplate>
                 </DataGridTemplateColumn.CellTemplate>
             </DataGridTemplateColumn>
             <DataGridTextColumn x:Name="orderIDColumn" Binding="{Binding OrderID}" Header="Order ID" Width="SizeToHeader"/>
             <DataGridTemplateColumn x:Name="requiredDateColumn" Header="Required Date" Width="SizeToHeader">
                 <DataGridTemplateColumn.CellTemplate>
                     <DataTemplate>
                         <DatePicker SelectedDate="{Binding RequiredDate, Mode=TwoWay, NotifyOnValidationError=true, ValidatesOnExceptions=true, UpdateSourceTrigger=PropertyChanged}"/>
                     </DataTemplate>
                 </DataGridTemplateColumn.CellTemplate>
             </DataGridTemplateColumn>
             <DataGridTextColumn x:Name="shipAddressColumn" Binding="{Binding ShipAddress}" Header="Ship Address" Width="SizeToHeader"/>
             <DataGridTextColumn x:Name="shipCityColumn" Binding="{Binding ShipCity}" Header="Ship City" Width="SizeToHeader"/>
             <DataGridTextColumn x:Name="shipCountryColumn" Binding="{Binding ShipCountry}" Header="Ship Country" Width="SizeToHeader"/>
             <DataGridTextColumn x:Name="shipNameColumn" Binding="{Binding ShipName}" Header="Ship Name" Width="SizeToHeader"/>
             <DataGridTemplateColumn x:Name="shippedDateColumn" Header="Shipped Date" Width="SizeToHeader">
                 <DataGridTemplateColumn.CellTemplate>
                     <DataTemplate>
                         <DatePicker SelectedDate="{Binding ShippedDate, Mode=TwoWay, NotifyOnValidationError=true, ValidatesOnExceptions=true, UpdateSourceTrigger=PropertyChanged}"/>
                     </DataTemplate>
                 </DataGridTemplateColumn.CellTemplate>
             </DataGridTemplateColumn>
             <DataGridTextColumn x:Name="shipPostalCodeColumn" Binding="{Binding ShipPostalCode}" Header="Ship Postal Code" Width="SizeToHeader"/>
             <DataGridTextColumn x:Name="shipRegionColumn" Binding="{Binding ShipRegion}" Header="Ship Region" Width="SizeToHeader"/>
             <DataGridTextColumn x:Name="shipViaColumn" Binding="{Binding ShipVia}" Header="Ship Via" Width="SizeToHeader"/>
         </DataGrid.Columns>
     </DataGrid>
 </Grid>
Добавление кнопок для навигации, добавления, обновления и удаления
В приложениях Windows Forms вы получаете объект BindingNavigator с кнопками для навигации по строкам в базе данных и выполнении основных операций CRUD. WPF не предоставляет BindingNavigator, но достаточно просто создать его. Выполните это, используя кнопки внутри горизонтального StackPanel и свяжите кнопки с командами, связанными с методами в коде позади.
Существует четыре части логики команды: (1) команды, (2) привязки, (3) кнопки и (4) обработчики команд в коде.
Добавление команд, привязок и кнопок в XAML
Сначала добавьте команды в файл MainWindow.xaml в элементе
Windows.Resources:<RoutedUICommand x:Key="FirstCommand" Text="First"/> <RoutedUICommand x:Key="LastCommand" Text="Last"/> <RoutedUICommand x:Key="NextCommand" Text="Next"/> <RoutedUICommand x:Key="PreviousCommand" Text="Previous"/> <RoutedUICommand x:Key="DeleteCustomerCommand" Text="Delete Customer"/> <RoutedUICommand x:Key="DeleteOrderCommand" Text="Delete Order"/> <RoutedUICommand x:Key="UpdateCommand" Text="Update"/> <RoutedUICommand x:Key="AddCommand" Text="Add"/> <RoutedUICommand x:Key="CancelCommand" Text="Cancel"/>CommandBinding сопоставляет событие
RoutedUICommandс методом в коде позади. Добавьте этот элементCommandBindingsпосле закрывающего тегаWindows.Resources:<Window.CommandBindings> <CommandBinding Command="{StaticResource FirstCommand}" Executed="FirstCommandHandler"/> <CommandBinding Command="{StaticResource LastCommand}" Executed="LastCommandHandler"/> <CommandBinding Command="{StaticResource NextCommand}" Executed="NextCommandHandler"/> <CommandBinding Command="{StaticResource PreviousCommand}" Executed="PreviousCommandHandler"/> <CommandBinding Command="{StaticResource DeleteCustomerCommand}" Executed="DeleteCustomerCommandHandler"/> <CommandBinding Command="{StaticResource DeleteOrderCommand}" Executed="DeleteOrderCommandHandler"/> <CommandBinding Command="{StaticResource UpdateCommand}" Executed="UpdateCommandHandler"/> <CommandBinding Command="{StaticResource AddCommand}" Executed="AddCommandHandler"/> <CommandBinding Command="{StaticResource CancelCommand}" Executed="CancelCommandHandler"/> </Window.CommandBindings>Теперь добавьте
StackPanelс кнопками навигации, добавления, удаления и обновления. Сначала добавьте этот стиль вWindows.Resources:<Style x:Key="NavButton" TargetType="{x:Type Button}" BasedOn="{x:Null}"> <Setter Property="FontSize" Value="24"/> <Setter Property="FontFamily" Value="Segoe UI Symbol"/> <Setter Property="Margin" Value="2,2,2,0"/> <Setter Property="Width" Value="40"/> <Setter Property="Height" Value="auto"/> </Style>Во-вторых, вставьте этот код сразу после
RowDefinitionsдля внешнего элементаGridв верхней части страницы XAML:<StackPanel Orientation="Horizontal" Margin="2,2,2,0" Height="36" VerticalAlignment="Top" Background="Gainsboro" DataContext="{StaticResource customerViewSource}" d:LayoutOverrides="LeftMargin, RightMargin, TopMargin, BottomMargin"> <Button Name="btnFirst" Content="|◄" Command="{StaticResource FirstCommand}" Style="{StaticResource NavButton}"/> <Button Name="btnPrev" Content="◄" Command="{StaticResource PreviousCommand}" Style="{StaticResource NavButton}"/> <Button Name="btnNext" Content="►" Command="{StaticResource NextCommand}" Style="{StaticResource NavButton}"/> <Button Name="btnLast" Content="►|" Command="{StaticResource LastCommand}" Style="{StaticResource NavButton}"/> <Button Name="btnDelete" Content="Delete Customer" Command="{StaticResource DeleteCustomerCommand}" FontSize="11" Width="120" Style="{StaticResource NavButton}"/> <Button Name="btnAdd" Content="New Customer" Command="{StaticResource AddCommand}" FontSize="11" Width="80" Style="{StaticResource NavButton}"/> <Button Content="New Order" Name="btnNewOrder" FontSize="11" Width="80" Style="{StaticResource NavButton}" Click="NewOrder_click"/> <Button Name="btnUpdate" Content="Commit" Command="{StaticResource UpdateCommand}" FontSize="11" Width="80" Style="{StaticResource NavButton}"/> <Button Content="Cancel" Name="btnCancel" Command="{StaticResource CancelCommand}" FontSize="11" Width="80" Style="{StaticResource NavButton}"/> </StackPanel>
Добавление обработчиков команд в класс MainWindow
За исключением методов добавления и удаления, код программной части минимальный. Навигация выполняется путем вызова методов в свойстве View объекта CollectionViewSource. В DeleteOrderCommandHandler показано, как выполнить каскадное удаление по заказу. Сначала необходимо удалить Order_Details, связанные с ним. В UpdateCommandHandler добавляется новый клиент или заказ в коллекцию, или обновляется существующий клиент или заказ с изменениями, внесёнными пользователем в текстовые поля.
Добавьте эти методы обработчика в класс MainWindow в MainWindow.xaml.cs. Если в таблице CollectionViewSource для клиентов есть другое имя, необходимо изменить имя в каждом из следующих методов:
private void LastCommandHandler(object sender, ExecutedRoutedEventArgs e)
{
    custViewSource.View.MoveCurrentToLast();
}

private void PreviousCommandHandler(object sender, ExecutedRoutedEventArgs e)
{
    custViewSource.View.MoveCurrentToPrevious();
}

private void NextCommandHandler(object sender, ExecutedRoutedEventArgs e)
{
    custViewSource.View.MoveCurrentToNext();
}

private void FirstCommandHandler(object sender, ExecutedRoutedEventArgs e)
{
    custViewSource.View.MoveCurrentToFirst();
}

private void DeleteCustomerCommandHandler(object sender, ExecutedRoutedEventArgs e)
{
    // If existing window is visible, delete the customer and all their orders.
    // In a real application, you should add warnings and allow the user to cancel the operation.
    var cur = custViewSource.View.CurrentItem as Customer;

    var cust = (from c in context.Customers
                where c.CustomerID == cur.CustomerID
                select c).FirstOrDefault();

    if (cust != null)
    {
        foreach (var ord in cust.Orders.ToList())
        {
            Delete_Order(ord);
        }
        context.Customers.Remove(cust);
    }
    context.SaveChanges();
    custViewSource.View.Refresh();
}

// Commit changes from the new customer form, the new order form,
// or edits made to the existing customer form.
private void UpdateCommandHandler(object sender, ExecutedRoutedEventArgs e)
{
    if (newCustomerGrid.IsVisible)
    {
        // Create a new object because the old one
        // is being tracked by EF now.
        Customer newCustomer = new Customer
        {
            Address = add_addressTextBox.Text,
            City = add_cityTextBox.Text,
            CompanyName = add_companyNameTextBox.Text,
            ContactName = add_contactNameTextBox.Text,
            ContactTitle = add_contactTitleTextBox.Text,
            Country = add_countryTextBox.Text,
            CustomerID = add_customerIDTextBox.Text,
            Fax = add_faxTextBox.Text,
            Phone = add_phoneTextBox.Text,
            PostalCode = add_postalCodeTextBox.Text,
            Region = add_regionTextBox.Text
        };

        // Perform very basic validation
        if (newCustomer.CustomerID.Length == 5)
        {
            // Insert the new customer at correct position:
            int len = context.Customers.Local.Count();
            int pos = len;
            for (int i = 0; i < len; ++i)
            {
                if (String.CompareOrdinal(newCustomer.CustomerID, context.Customers.Local[i].CustomerID) < 0)
                {
                    pos = i;
                    break;
                }
            }
            context.Customers.Local.Insert(pos, newCustomer);
            custViewSource.View.Refresh();
            custViewSource.View.MoveCurrentTo(newCustomer);
        }
        else
        {
            MessageBox.Show("CustomerID must have 5 characters.");
        }

        newCustomerGrid.Visibility = Visibility.Collapsed;
        existingCustomerGrid.Visibility = Visibility.Visible;
    }
    else if (newOrderGrid.IsVisible)
    {
        // Order ID is auto-generated so we don't set it here.
        // For CustomerID, address, etc we use the values from current customer.
        // User can modify these in the datagrid after the order is entered.

        Customer currentCustomer = (Customer)custViewSource.View.CurrentItem;

        Order newOrder = new Order()
        {
            OrderDate = add_orderDatePicker.SelectedDate,
            RequiredDate = add_requiredDatePicker.SelectedDate,
            ShippedDate = add_shippedDatePicker.SelectedDate,
            CustomerID = currentCustomer.CustomerID,
            ShipAddress = currentCustomer.Address,
            ShipCity = currentCustomer.City,
            ShipCountry = currentCustomer.Country,
            ShipName = currentCustomer.CompanyName,
            ShipPostalCode = currentCustomer.PostalCode,
            ShipRegion = currentCustomer.Region
        };

        try
        {
            newOrder.EmployeeID = Int32.Parse(add_employeeIDTextBox.Text);
        }
        catch
        {
            MessageBox.Show("EmployeeID must be a valid integer value.");
            return;
        }

        try
        {
            // Exercise for the reader if you are using Northwind:
            // Add the Northwind Shippers table to the model.

            // Acceptable ShipperID values are 1, 2, or 3.
            if (add_ShipViaTextBox.Text == "1" || add_ShipViaTextBox.Text == "2"
                || add_ShipViaTextBox.Text == "3")
            {
                newOrder.ShipVia = Convert.ToInt32(add_ShipViaTextBox.Text);
            }
            else
            {
                MessageBox.Show("Shipper ID must be 1, 2, or 3 in Northwind.");
                return;
            }
        }
        catch
        {
            MessageBox.Show("Ship Via must be convertible to int");
            return;
        }

        try
        {
            newOrder.Freight = Convert.ToDecimal(add_freightTextBox.Text);
        }
        catch
        {
            MessageBox.Show("Freight must be convertible to decimal.");
            return;
        }

        // Add the order into the EF model
        context.Orders.Add(newOrder);
        ordViewSource.View.Refresh();
    }

    // Save the changes, either for a new customer, a new order
    // or an edit to an existing customer or order.
    context.SaveChanges();
}

// Sets up the form so that user can enter data. Data is later
// saved when user clicks Commit.
private void AddCommandHandler(object sender, ExecutedRoutedEventArgs e)
{
    existingCustomerGrid.Visibility = Visibility.Collapsed;
    newOrderGrid.Visibility = Visibility.Collapsed;
    newCustomerGrid.Visibility = Visibility.Visible;

    // Clear all the text boxes before adding a new customer.
    foreach (var child in newCustomerGrid.Children)
    {
        var tb = child as TextBox;
        if (tb != null)
        {
            tb.Text = "";
        }
    }
}

private void NewOrder_click(object sender, RoutedEventArgs e)
{
    var cust = custViewSource.View.CurrentItem as Customer;
    if (cust == null)
    {
        MessageBox.Show("No customer selected.");
        return;
    }

    existingCustomerGrid.Visibility = Visibility.Collapsed;
    newCustomerGrid.Visibility = Visibility.Collapsed;
    newOrderGrid.UpdateLayout();
    newOrderGrid.Visibility = Visibility.Visible;
}

// Cancels any input into the new customer form
private void CancelCommandHandler(object sender, ExecutedRoutedEventArgs e)
{
    add_addressTextBox.Text = "";
    add_cityTextBox.Text = "";
    add_companyNameTextBox.Text = "";
    add_contactNameTextBox.Text = "";
    add_contactTitleTextBox.Text = "";
    add_countryTextBox.Text = "";
    add_customerIDTextBox.Text = "";
    add_faxTextBox.Text = "";
    add_phoneTextBox.Text = "";
    add_postalCodeTextBox.Text = "";
    add_regionTextBox.Text = "";

    existingCustomerGrid.Visibility = Visibility.Visible;
    newCustomerGrid.Visibility = Visibility.Collapsed;
    newOrderGrid.Visibility = Visibility.Collapsed;
}

private void Delete_Order(Order order)
{
    // Find the order in the EF model.
    var ord = (from o in context.Orders.Local
               where o.OrderID == order.OrderID
               select o).FirstOrDefault();

    // Delete all the order_details that have
    // this Order as a foreign key
    foreach (var detail in ord.Order_Details.ToList())
    {
        context.Order_Details.Remove(detail);
    }

    // Now it's safe to delete the order.
    context.Orders.Remove(ord);
    context.SaveChanges();

    // Update the data grid.
    ordViewSource.View.Refresh();
}

private void DeleteOrderCommandHandler(object sender, ExecutedRoutedEventArgs e)
{
    // Get the Order in the row in which the Delete button was clicked.
    Order obj = e.Parameter as Order;
    Delete_Order(obj);
}
Запуск приложения
Чтобы начать отладку, нажмите клавишу F5 . Вы должны увидеть данные клиента и заказа, заполненные в сетке, и кнопки навигации должны работать должным образом. Щелкните Подтвердить, чтобы добавить нового клиента или заказы в модель после ввода данных. Нажмите Отмена, чтобы выйти из формы нового клиента или нового заказа, не сохраняя данные. Вы можете вносить изменения в существующие клиенты и заказы непосредственно в текстовых полях, и эти изменения записываются в модель автоматически.