Test and debug your Microsoft Teams bot
Important
This article is based on the v3 Bot Framework SDK. If you are looking for current documentation version 4.6 or later of the SDK, see the conversational bots section.
When testing your bot you have to take into consideration both the context(s) you want your bot to run in, and any functionality you may have added to your bot that requires data specific to Microsoft Teams. Ensure that the method you chose to test your bot aligns with its functionality.
Test by uploading to Teams
The most comprehensive way to test your bot is by creating an app package and uploading it to Teams. Uploading the app to Teams is the only method to test the full functionality available to your bot, across all scopes.
There are two methods for uploading your app. You can either use Developer Portal for Teams or you can manually create an app package and upload your app. If you need to alter your manifest, and reupload your app, you should delete your bot before uploading your altered app package.
Debug your bot locally
If you're hosting your bot locally during development, you'll need to use a tunneling service like ngrok in order to test your bot. Once you've downloaded and installed ngrok, run the below command to start the tunneling service. You may need to add ngrok to your path.
ngrok http <port> --host-header=localhost:<port>
Use the https endpoint provided by ngrok in your app manifest. If you close your command window and restart, you'll get a new URL, and need to update your bot endpoint address to use that one as well.
Testing your bot without uploading to Teams
Occasionally it's necessary to test your bot without installing it as an app in Teams. Testing your bot without installing it as an app can be useful to ensure your bot is available and responding, however it won't allow you to test the full breadth of Teams functionality you may have added to your bot. If you need to test your bot completely, follow the instructions for testing by uploading.
Use the Bot Emulator
The Bot Framework Emulator is a desktop application that allows bot developers to test and debug their bots, either locally or remotely. Using the emulator, you can chat with your bot and inspect the messages that your bot sends and receives. This can be useful for verifying that your bot is available and responding, however the emulator won't allow you to test any Teams-specific functionality you've added to your bot, nor will responses from your bot be an accurate visual representation of how they're rendered in Teams. If you need to test either of those things isn't best to upload your bot.
Complete instructions on the Bot Framework Emulator can be found here.
Blocking a bot in personal chat
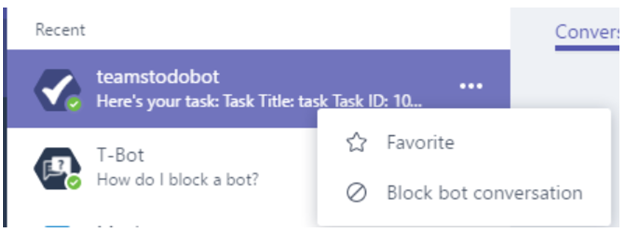
Users can choose to block your bot from sending personal chat messages. They may toggle this by right-clicking your bot in the chat channel and choosing Block bot conversation. This means your bots will continue to send messages but the user won't receive those messages.

Removing a bot from a team
Users can delete the bot by choosing the trash-can icon on the bots list in their teams view. Note this only removes the bot from that team's use, individual users can interact in personal context.
Bots in personal context can't be disabled or removed by a user, short of completely removing the bot from Teams.
Disabling a bot in Teams
To stop your bot receiving messages, go to your Bot Dashboard and edit the Microsoft Teams channel. Clear the Enable on Microsoft Teams option. Disabling a bot in Teams prevents users from interacting with the bot, but it will still be discoverable and users can add it to teams.
Deleting a bot from Teams
To remove your bot completely from Teams, go to your Bot Dashboard and edit the Microsoft Teams channel. Choose the Delete button at the bottom. Deleting a bot from Teams prevents users from discovering, adding, or interacting with your bot. Deleting a bot from Teams doesn't remove the bot from other users' Teams instances, although it will cease functioning for them as well.
Removing your bot from AppSource
If you want to remove your bot from your Teams app in AppSource (previously Office Store), you must remove the bot from your app manifest and resubmit your app for validation. For more information, see Publish your Microsoft Teams app to AppSource.
Platform Docs