Flikvy
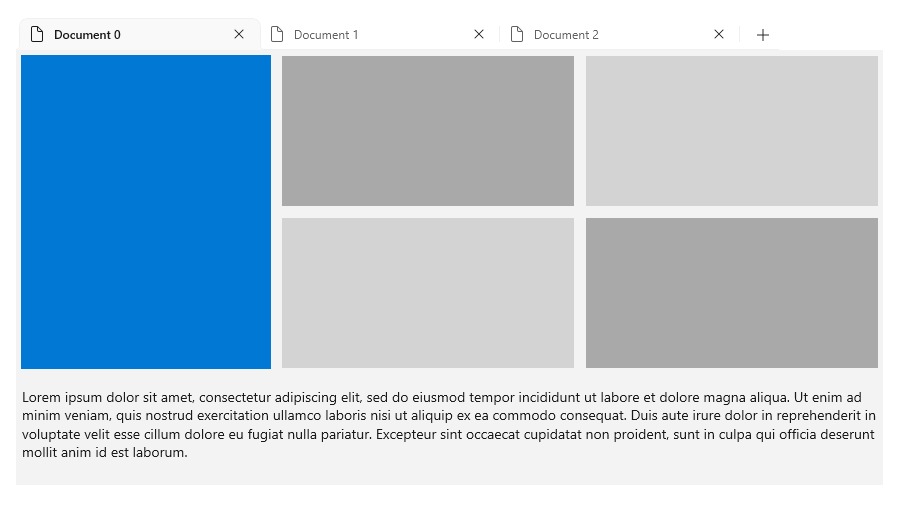
TabView-kontrollen är ett sätt att visa en uppsättning flikar och deras respektive innehåll. TabView-kontroller är användbara för att visa flera sidor (eller dokument) med innehåll samtidigt som en användare kan ordna om, stänga eller öppna nya flikar.

Är det här rätt kontroll?
I allmänhet finns flikade UIs i en av två distinkta format som skiljer sig åt i funktion och utseende:
- Statiska flikar är den typ av flikar som ofta finns i inställningsfönster. De innehåller ett angivet antal sidor i en fast ordning som vanligtvis innehåller fördefinierat innehåll.
- dokumentflikar är den typ av flikar som finns i en webbläsare, till exempel Microsoft Edge. Användare kan skapa, ta bort och ordna om flikar. flytta flikar mellan fönster. och ändra innehållet i flikar.
Som standard är TabView- konfigurerad för att tillhandahålla dokumentflikar. Vi rekommenderar TabView när användarna kommer att kunna:
- Öppna, stäng eller ordna om flikar dynamiskt.
- Öppna dokument eller webbsidor direkt i flikar.
- Dra och släpp flikar mellan fönster.
TabView-API:et tillåter konfiguration av kontrollen för statiska flikar. Om du vill följa designvägledningen för Windows och om det finns fler än några statiska navigeringsobjekt kan du överväga att använda en NavigationView- kontroll.
Anatomi
Användargränssnittet med flikar skapas med en TabView-kontroll och en eller flera TabViewItem-kontroller. TabView är värd för instanser av TabViewItem, som representerar en enda flik och dess innehåll.
TabView delar
Den här bilden visar delarna i TabView- kontroll. Den flikremsan har ett sidhuvud och sidfot, men till skillnad från ett dokument finns flikremsans sidhuvud respektive sidfot längst till vänster respektive längst till höger på remsan.

TabViewItem-delarna
Den här bilden visar delarna i TabViewItem kontroll. Även om innehållet visas i TabView-kontrollen är innehållet faktiskt en del av TabViewItem.

Rekommendationer
Flikval
De flesta användare har erfarenhet av att använda dokumentflikar genom att använda en webbläsare. När de använder dokumentflikar i din app informerar deras upplevelse deras förväntningar på hur flikarna ska bete sig.
Oavsett hur användaren interagerar med en uppsättning dokumentflikar bör det alltid finnas en aktiv flik. Om användaren stänger den valda fliken eller bryter ut den markerade fliken i ett annat fönster bör en annan flik bli den aktiva fliken. TabView försöker göra detta automatiskt genom att välja nästa flik. Om du har en bra anledning till att din app ska tillåta en TabView med en omarkerad flik är TabViews innehållsområde helt enkelt tomt.
Tangentbordsnavigering
TabView stöder många vanliga scenarier för tangentbordsnavigering som standard. Det här avsnittet beskriver de inbyggda funktionerna och ger rekommendationer om ytterligare funktioner som kan vara till hjälp för vissa appar.
Flik- och markörnyckelbeteende
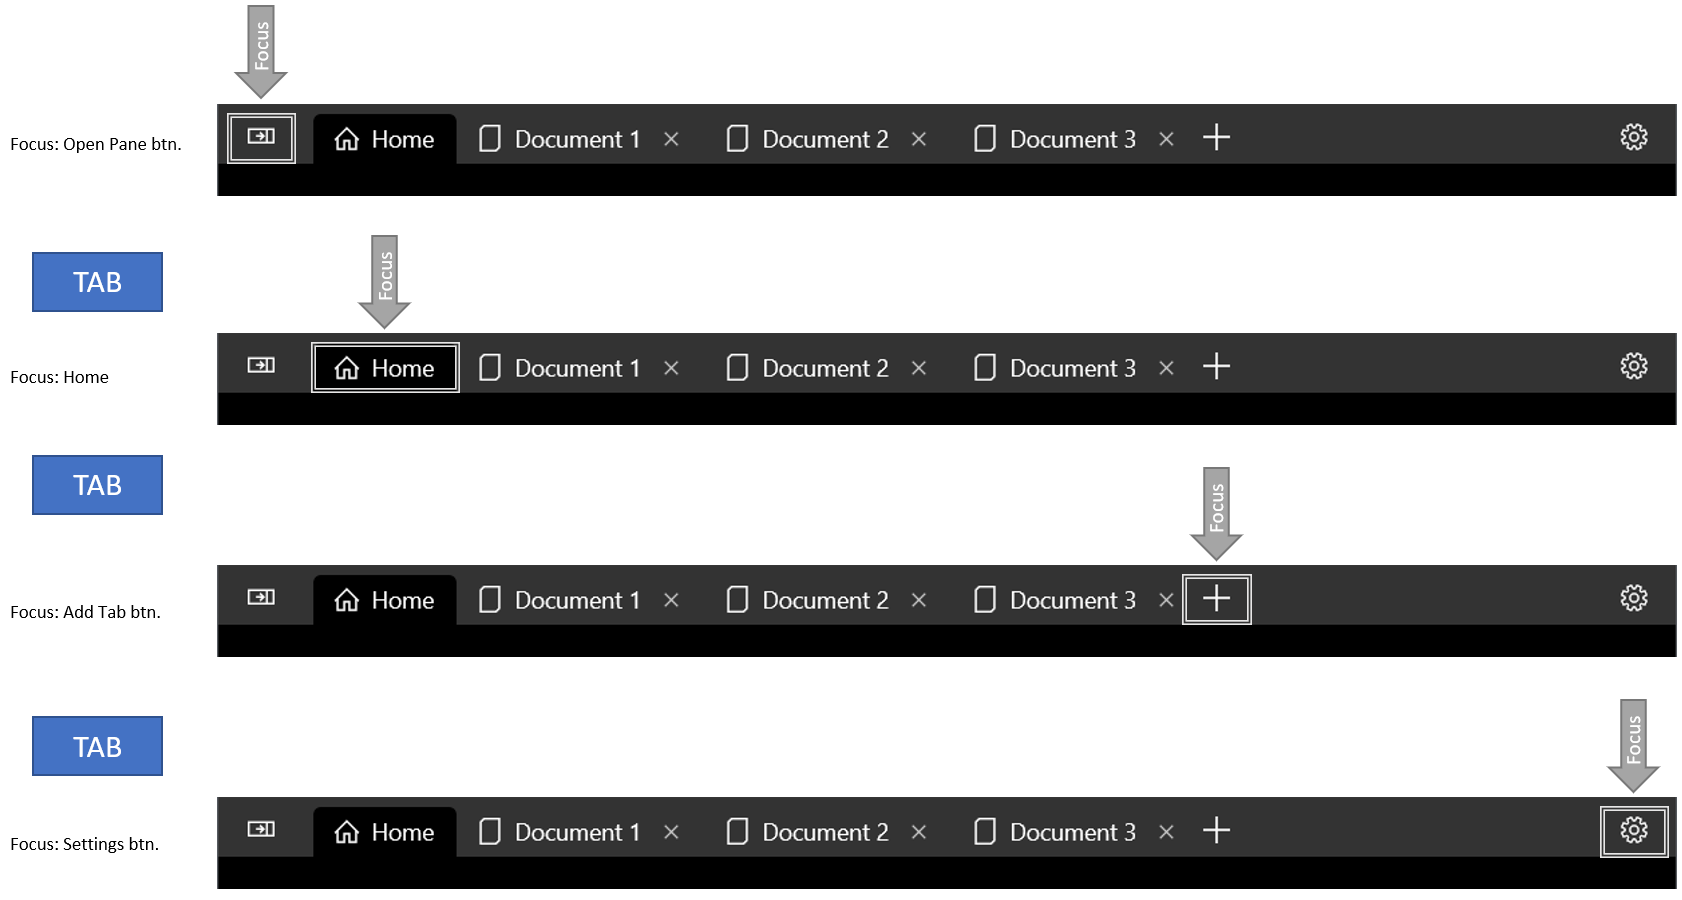
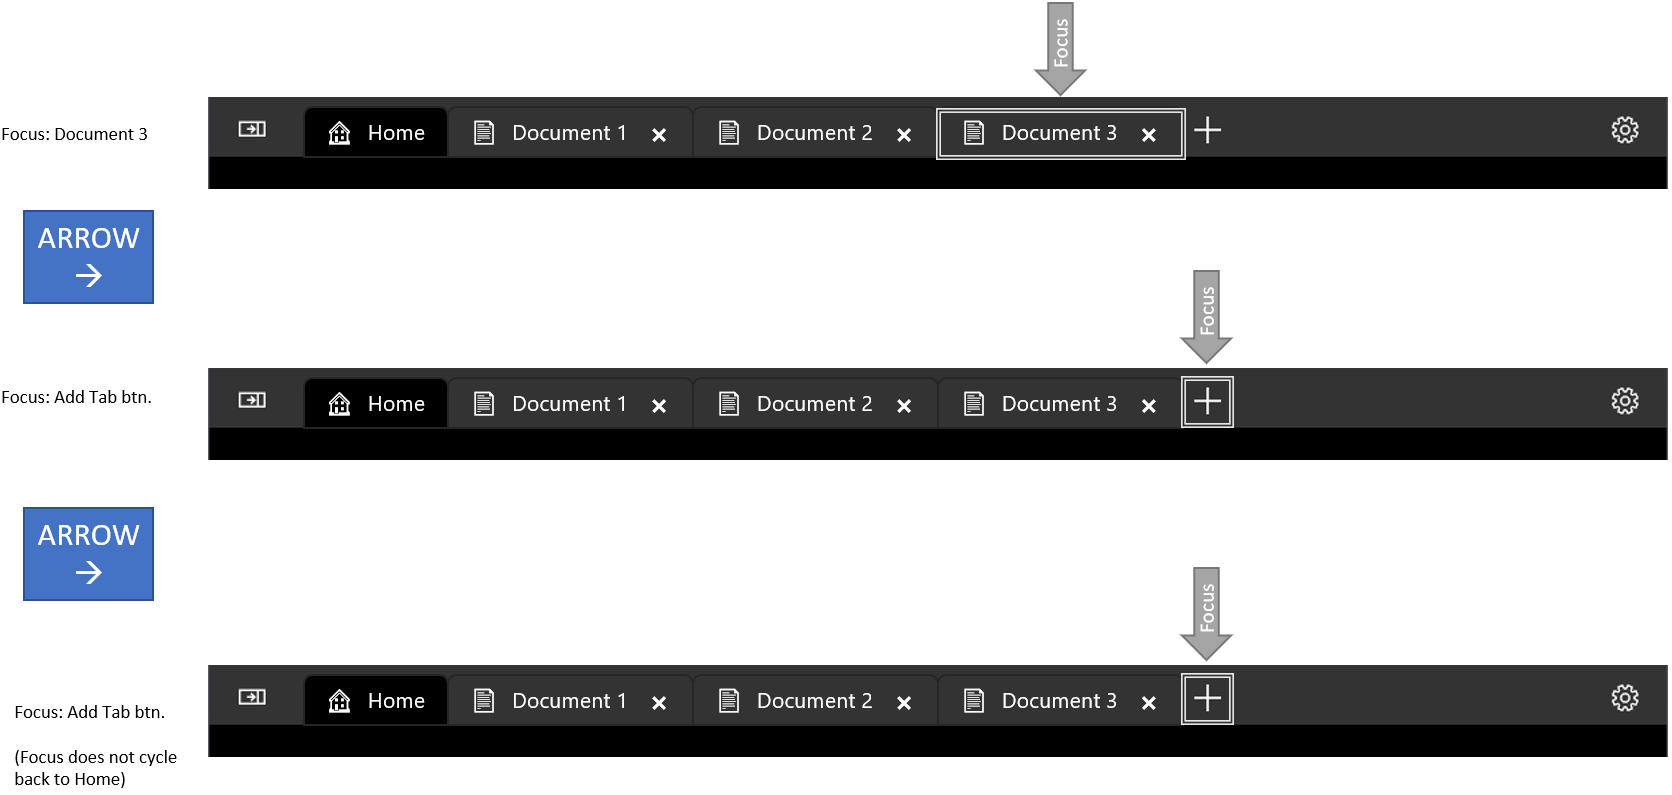
När fokus flyttas till TabStrip område, får den valda TabViewItem fokus. Användaren kan sedan använda piltangenterna Vänster och Höger för att flytta fokus (inte markering) till andra flikar på flikremsan. Pilfokus är instängt i flikremsan och knappen Lägg till flik (+) om det finns en. Om du vill flytta fokus från fliklistområdet kan användaren trycka på tangenten Tabb, vilket flyttar fokus till nästa fokuserbara element.
Flytta fokus via tabb

piltangenterna cyklar inte genom fokus

Välja en flik
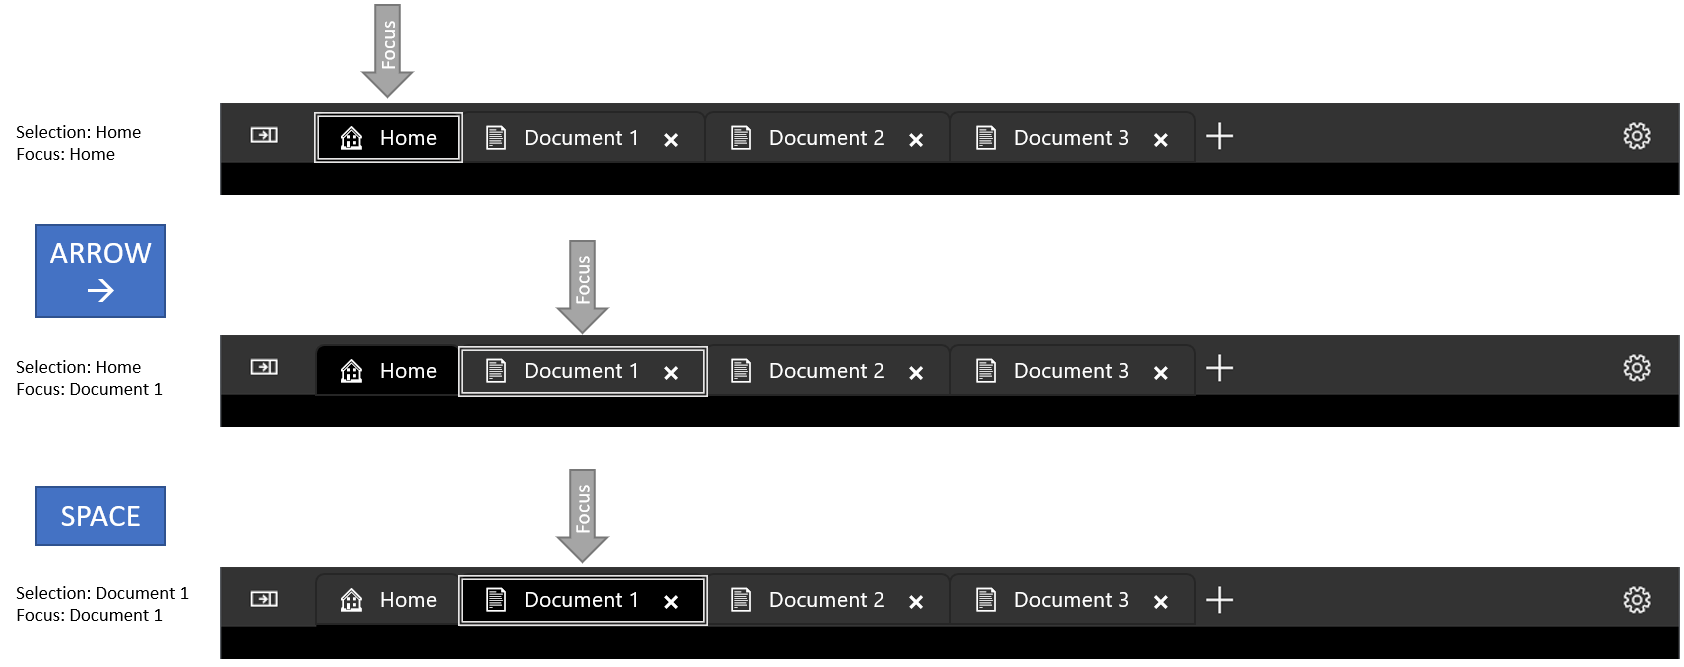
När en TabViewItem har fokus trycker du på Blanksteg eller Retur för att välja tabViewItem.
Använd piltangenterna för att flytta fokus och tryck sedan på Blanksteg för att välja flik.

Genvägar för att välja intilliggande flikar
Tryck på Ctrl+Tabb för att välja nästa TabViewItem. Tryck på Ctrl+Skift+Tabb för att välja föregående TabViewItem. För dessa ändamål är fliklistan "loopad", så om du väljer nästa flik medan den sista fliken är markerad blir den första fliken markerad.
Stänga en flik
Tryck på Ctrl + F4 för att utlösa TabCloseRequested-händelsen. Hantera händelsen och stäng fliken om det är lämpligt.
Tips
Mer information finns i Tangentbordsvägledning för utvecklare senare i den här artikeln.
Skapa en flikvy
- Viktiga API:er: TabView-klass, TabViewItem-klass
WinUI 3 Gallery-appen innehåller interaktiva exempel på de flesta WinUI 3-kontroller, funktioner och funktioner. Hämta appen från Microsoft Store- eller hämta källkoden på GitHub-
Exemplen i det här avsnittet visar en mängd olika sätt att konfigurera en TabView- kontroll.
Flikvisningsobjekt
Varje flik i en TabView- representeras av en TabViewItem- kontroll, som innehåller både fliken som visas på flikremsan och innehållet som visas under flikremsan.
Konfigurera en flik
För varje TabViewItem kan du ange en rubrik och en ikon och ange om användaren kan stänga fliken.
- Egenskapen Header anges vanligtvis till ett strängvärde som ger en beskrivande etikett för fliken. Egenskapen
Headerkan dock vara vilket objekt som helst. Du kan också använda egenskapen HeaderTemplate för att ange en DataTemplate- som definierar hur bundna huvuddata ska visas. - Ange egenskapen IconSource för att ange en ikon för fliken.
- Som standard visar fliken en stängningsknapp. Du kan ange egenskapen IsClosable till
falseför att säkerställa att en användare inte kan stänga fliken.
För TabView kan du konfigurera flera alternativ som gäller för alla flikar.
- Som standard visas alltid knappen stäng (X) för stängbara flikar. Du kan ange egenskapen CloseButtonOverlayMode till
OnPointerOverför att ändra det här beteendet. I det här fallet visar den valda fliken alltid stängningsknappen om den är stängningsbar, men ovalda flikar visar stängningsknappen endast när fliken är stängningsbar och användaren har pekaren över fliken. - Du kan ange egenskapen TabWidthMode för att ändra hur flikarna är storleksanpassade. (Egenskapen
Widthignoreras påTabViewItem.) Det här är alternativen i TabViewWidthMode uppräkning:-
Equal– Varje flik har samma bredd. Det här är standardinställningen. -
SizeToContent– Varje flik justerar dess bredd till innehållet på fliken. -
Compact– Omarkerade flikar döljs för att endast visa deras ikon. Den valda fliken justeras för att visa innehållet på fliken.
-
Innehåll
Elementen som visas på den valda fliken läggs till i egenskapen Content för egenskapen TabViewItem. TabViewItem är en ContentControl-, så du kan lägga till alla typer av objekt som innehåll. Du kan också använda en DataTemplate- för egenskapen ContentTemplate. Mer information finns i klassen ContentControl.
Exemplen i den här artikeln visar ett enkelt fall av att lägga till text direkt i Content-elementet i XAML. Det verkliga användargränssnittet är dock vanligtvis mer komplext. Ett vanligt sätt att lägga till ett komplext användargränssnitt i en flik är att kapsla in det i en UserControl eller en sidaoch använda det som innehållet i TabViewItem. Det här exemplet förutsätter att din app har en XAML UserControl som heter PictureSettingsControl.
<TabViewItem>
    <TabViewItem.Content>
        <local:PictureSettingsControl/>
    </TabViewItem.Content>
</TabViewItem>
Statiska flikar
Det här exemplet visar en enkel TabView- med två statiska flikar. Båda flikobjekten läggs till i XAML som innehåll i TabView.
Om du vill göra en TabView statisk använder du följande inställningar:
- Ange egenskapen IsAddTabButtonVisible till
falseför att dölja knappen lägga till fliken och förhindra att händelsen AddTabButtonClick aktiveras. - Ange egenskapen CanReorderTabs till
falseför att förhindra att användaren drar flikar i en annan ordning. - På varje TabViewItemanger du egenskapen IsClosable false för att dölja -fliken stänga-knappen hindrar användaren från att höja TabCloseRequested händelse.
<TabView VerticalAlignment="Stretch"
         IsAddTabButtonVisible="False"
         CanReorderTabs="False">
    <TabViewItem Header="Picture" IsClosable="False">
        <TabViewItem.IconSource>
            <SymbolIconSource Symbol="Pictures"/>
        </TabViewItem.IconSource>
        <TabViewItem.Content>
            <StackPanel Padding="12">
                <TextBlock Text="Picture settings"
                    Style="{ThemeResource TitleTextBlockStyle}"/>
            </StackPanel>
        </TabViewItem.Content>
    </TabViewItem>
    <TabViewItem Header="Sound" IsClosable="False">
        <TabViewItem.IconSource>
            <SymbolIconSource Symbol="Audio"/>
        </TabViewItem.IconSource>
        <TabViewItem.Content>
            <StackPanel Padding="12">
                <TextBlock Text="Sound settings"
                    Style="{ThemeResource TitleTextBlockStyle}"/>
            </StackPanel>
        </TabViewItem.Content>
    </TabViewItem>
</TabView>
Dokumentflikar
Som standard konfigureras TabView för dokumentflikar. Användaren kan lägga till nya flikar, ordna om flikar och stänga flikar. I den här konfigurationen måste du hantera AddTabButtonClick och TabCloseRequested händelser för att aktivera funktionen.
När flikar läggs till i en TabView kan det så småningom finnas för många flikar att visa på flikremsan. I det här fallet visas rullningsbubblar som låter användaren rulla flikremsan åt vänster och höger för att få åtkomst till dolda flikar.
I det här exemplet skapas en enkel TabView- tillsammans med händelsehanterare som stöd för att öppna och stänga flikar. Händelsehanteraren TabView_AddTabButtonClick visar hur du lägger till en TabViewItem i kod.
<TabView VerticalAlignment="Stretch"
         AddTabButtonClick="TabView_AddTabButtonClick"
         TabCloseRequested="TabView_TabCloseRequested">
    <TabViewItem Header="Home" IsClosable="False">
        <TabViewItem.IconSource>
            <SymbolIconSource Symbol="Home" />
        </TabViewItem.IconSource>
        <TabViewItem.Content>
            <StackPanel Padding="12">
                <TextBlock Text="TabView content"
                           Style="{ThemeResource TitleTextBlockStyle}"/>
            </StackPanel>
        </TabViewItem.Content>
    </TabViewItem>
</TabView>
// Add a new tab to the TabView.
private void TabView_AddTabButtonClick(TabView sender, object args)
{
    var newTab = new TabViewItem();
    newTab.Header = $"New Document {sender.TabItems.Count}";
    newTab.IconSource = new SymbolIconSource() { Symbol = Symbol.Document };
    newTab.Content = new TextBlock() { Text = $"Content for new tab {sender.TabItems.Count}.",
                                       Padding = new Thickness(12) };
    sender.TabItems.Add(newTab);
    sender.SelectedItem = newTab;
}

// Remove the requested tab from the TabView.
private void TabView_TabCloseRequested(TabView sender,
                                       TabViewTabCloseRequestedEventArgs args)
{
    sender.TabItems.Remove(args.Tab);
}
Stäng fönstret när den sista fliken stängs
Om alla flikar i appen kan stängas och appfönstret ska stängas när den sista fliken stängs bör du också stänga fönstret i TabCloseRequested händelsehanterare.
I filen App.xaml.cs lägger du först till en offentlig egenskap som gör att du kan komma åt Window-instansen från Page som är värd för TabView.
public partial class App : Application
{
    // ... code removed.

    public Window? Window => m_window; // Add this.
    private Window? m_window;
}
Ändra sedan TabCloseRequested händelsehanterare för att anropa Window.Close om alla flikar har tagits bort från TabView.
// Remove the requested tab from the TabView.
// If all tabs have been removed, close the Window.
private void TabView_TabCloseRequested(TabView sender,
                                       TabViewTabCloseRequestedEventArgs args)
{
    sender.TabItems.Remove(args.Tab);

    if (sender.TabItems.Count == 0)
    {
        var window = (Application.Current as App)?.Window as MainWindow;
        window?.Close();
    }
}
Not
Det här exemplet fungerar för en app med ett enda fönster (MainWindow). Om din app har flera fönster, eller om du har aktiverat flikurdragning, måste du spåra fönstren och sedan hitta rätt fönster att stänga. Se nästa avsnitt för ett exempel på detta.
Tabb för urrullning
Flikutdrag beskriver vad som händer när en användare drar en flik från TabViews flikremsa och flyttar den till en annan TabView-kontroll, vanligtvis i ett nytt fönster.
Från och med Windows App SDK 1.6 har TabView en CanTearOutTabs egenskap som du kan ange för att ge en förbättrad upplevelse för att dra flikar ut till ett nytt fönster. När en användare drar ut en flik från flikremsan när det här alternativet är aktiverat, skapas ett nytt fönster omedelbart under dragningen, så att användaren kan dra det till kanten av skärmen för att maximera eller knäppa fönstret i en smidig rörelse. Den här implementeringen använder inte heller dra och släpp-API:er, så det påverkas inte av några begränsningar i dessa API:er.
När du anger egenskapen CanTearOutTabs till truegör det att -fliken tar bort händelser som genereras i stället för dra och släpp händelser. För att implementera flikborttagning måste du hantera följande händelser:
-
Den här händelsen inträffar när en flik först dras ut från flikremsan. Hantera det för att skapa ett nytt fönster och en ny TabView som fliken ska flyttas till.
-
Den här händelsen inträffar när ett nytt fönster har angetts. Hantera den för att flytta den utriven fliken från den ursprungliga TabView till en TabView i det nya fönstret.
ExternaUtdragnaFlikarSläppning
Den här händelsen inträffar när en utriven flik dras över en befintlig TabView. Hantera den i TabView som tar emot den utrivna fliken för att ange om fliken ska accepteras eller inte.
-
Den här händelsen inträffar när en utriven flik dras över en befintlig TabView och händelsen
ExternalTornOutTabsDroppinghar indikerat att släppet är tillåtet. Hantera den i TabView som tar emot den utrivna fliken för att ta bort fliken från den ursprungliga TabView och infoga den i den mottagande TabView på den angivna positionen.
Dessa händelser aktiveras inte när flikavlossning är aktiverad: TabDragStarting, TabStripDragOver, TabStripDrop, TabDragCompleted, TabDroppedOutside.
Försiktighet
Stöd för att dra ut flikar finns i processer som körs med förhöjda rättigheter som administratör.
I följande exempel visas hur du implementerar händelsehanterarna för att stödja flikbrytning.
Konfigurera TabView
Denna XAML anger egenskapen CanTearOutTabs till true och konfigurerar händelsehanterare för att ta bort flikar.
<TabView x:Name="tabView"
     CanTearOutTabs="True"
     TabTearOutWindowRequested="TabView_TabTearOutWindowRequested"
     TabTearOutRequested="TabView_TabTearOutRequested"
     ExternalTornOutTabsDropping="TabView_ExternalTornOutTabsDropping"
     ExternalTornOutTabsDropped="TabView_ExternalTornOutTabsDropped">
    <!-- TabView content -->
</TabView>
Skapa och spåra ett nytt fönster
Flikrivning kräver att du skapar och hanterar nya fönster i din app.
Tips
WinUI-galleriappen innehåller en WindowHelper-klass som gör det enklare att hantera fönster i din app. Du kan kopiera den från GitHub i WinUI Gallery-repositoryt: WindowHelper.cs. Vi rekommenderar den här hjälpklassen för att implementera flikrivning. Se TabViewWindowingSamplePage- på GitHub för att se hur den används.
I den här artikeln kopieras hjälpmetoder från WindowHelper.cs, men de ändras och visas inbäddade för läsbarhet.
Här skapas en lista för spårning av alla aktiva fönster i App.xaml.cs. Metoden OnLaunched uppdateras för att spåra fönstret när det har skapats. (Detta behövs inte om du använder klassen WindowHelper.)
static public List<Window> ActiveWindows = new List<Window>();

protected override void OnLaunched(Microsoft.UI.Xaml.LaunchActivatedEventArgs args)
{
    m_window = new MainWindow();
    // Track this window.
    ActiveWindows.Add(m_window);
    m_window.Activate();
}
När flikbortdragning påbörjas, begärs ett nytt fönster. Här ger variabeln tabTearOutWindow åtkomst till det nya fönstret när det har skapats. Hjälpmetoderna CreateWindow och TrackWindow skapar ett nytt fönster och lägger till det i listan över aktiva fönsterspårning.
När du har skapat det nya fönstret måste du skapa en ny sida och ange den som innehållet i fönstret. Den nya sidan måste innehålla en TabView-kontroll till vilken du flyttar den utrivna fliken i händelsehanteraren för TabTearOutRequested.
Tips
I det här exemplet skapar vi en ny MainPage-klass eftersom den endast innehåller en tom TabView (inga flikar läggs till direkt i XAML). Om MainPage innehåller andra gränssnittselement som inte ska visas i det utrivna fönstret kan du skapa en separat sida som endast innehåller element som du behöver (inklusive minst en TabView) och skapa en instans av den sidan.
Tilldela slutligen AppWindow.Id för det nya fönstret till egenskapen args.NewWindowId. Detta används i egenskapen TabViewTabTearOutRequestedEventArgs.NewWindowId så att du kan komma åt fönstret från händelsehanteraren.
private Window? tabTearOutWindow = null;

private void TabView_TabTearOutWindowRequested(TabView sender, TabViewTabTearOutWindowRequestedEventArgs args)
{
    tabTearOutWindow = CreateWindow();
    tabTearOutWindow.Content = new MainPage();
    // Optional window setup, such as setting the icon or
    // extending content into the title bar happens here.
    args.NewWindowId = tabTearOutWindow.AppWindow.Id;
}

private Window CreateWindow()
{
    Window newWindow = new Window
    {
        SystemBackdrop = new MicaBackdrop()
    };
    newWindow.Title = "Torn Out Window";
    TrackWindow(newWindow);
    return newWindow;
}

private void TrackWindow(Window window)
{
    window.Closed += (sender, args) => {
        App.ActiveWindows.Remove(window);
    };
    App.ActiveWindows.Add(window);
}
Stäng ett fönster när den sista fliken stängs
Som tidigare nämnts kanske du vill stänga fönstret när den sista fliken i en TabView stängs. Om din app har flera fönster måste du hitta rätt fönster för att stänga i listan över spårade fönster. Det här exemplet visar hur du gör det.
// Remove the requested tab from the TabView.
// If all tabs have been removed, close the Window.
private void TabView_TabCloseRequested(TabView sender, TabViewTabCloseRequestedEventArgs args)
{
    sender.TabItems.Remove(args.Tab);

    if (sender.TabItems.Count == 0)
    {
        GetWindowForElement(this)?.Close();
    }
}

public Window? GetWindowForElement(UIElement element)
{
    if (element.XamlRoot != null)
    {
        foreach (Window window in App.ActiveWindows)
        {
            if (element.XamlRoot == window.Content.XamlRoot)
            {
                return window;
            }
        }
    }
    return null;
}
Flytta fliken till det nya fönstret
När det nya fönstret har tillhandahållits måste du ta bort den utrivna fliken från sender TabView och lägga till den i TabView för det nya fönstret. I det här exemplet kan du med hjälpmetoden public AddTabToTabs komma åt TabView i den nya MainPage-instansen från den ursprungliga sidinstansen för att lägga till den utrivna fliken i den.
private void TabView_TabTearOutRequested(TabView sender, TabViewTabTearOutRequestedEventArgs args)
{
    if (tabTearOutWindow?.Content is MainPage newPage
        && args.Tabs.FirstOrDefault() is TabViewItem tab)
    {
        sender.TabItems.Remove(tab);
        newPage.AddTabToTabs(tab);
    }
}

// This method provides access to the TabView from
// another page instance so you can add the torn-out tab.
public void AddTabToTabs(TabViewItem tab)
{
    tabView.TabItems.Add(tab);
}
Dra en utriven flik till en annan TabView
När en flik har slitits ut och placerats i ett nytt fönster, som du ser i föregående steg, kan en av två saker hända:
- Användaren kan släppa fliken och den finns kvar i det nya fönstret. Uttrivningen avslutas här och inga fler händelser utlöses.
- Användaren kan fortsätta att dra tillbaka den utriven fliken till en befintlig TabView-kontroll. I det här fallet fortsätter processen och flera händelser aktiveras så att du kan ta bort fliken från den ursprungliga TabView och infoga den externa fliken i en befintlig TabView.
När fliken dras över den befintliga TabView, höjs ExternalTornOutTabsDropping-händelsen. I händelsehanteraren kan du avgöra om det är tillåtet att infoga fliken i den här TabView. I de flesta fall behöver du bara ange egenskapen args.AllowDrop till true. Men om du behöver utföra några kontroller innan du ställer in den egenskapen kan du göra det här. Om AllowDrop är inställt på false, fortsätter åtgärden att dra fliken och händelsen ExternalTornOutTabsDropped aktiveras inte.
private void TabView_ExternalTornOutTabsDropping(TabView sender,
                        TabViewExternalTornOutTabsDroppingEventArgs args)
{
    args.AllowDrop = true;
}
Om AllowDrop är inställt på true i händelsehanteraren för ExternalTornOutTabsDropping utlöses ExternalTornOutTabsDropped-händelsen omedelbart.
Anteckning
Dropped i händelsenamnet motsvarar inte direkt tanken på en åtgärd för att släppa i dra-och-släpp-API:erna. Här behöver användaren inte släppa fliken för att utföra en släppa åtgärd. Händelsen aktiveras medan fliken hålls över flikremsan och koden körs för att släppa fliken i TabView.
Händelsehanteraren ExternalTornOutTabsDropped följer samma mönster som händelsen TabTearOutRequested, men inverterad; du måste ta bort fliken från den ursprungliga TabView och infoga den i sender TabView.
sender TabView är kontrollen som fliken infogas i, så vi använder hjälpmetoden GetParentTabView för att hitta den ursprungliga fliken. Det börjar med den utrivna TabViewItem och använder VisualTreeHelper för att gå upp i det visuella trädet och hitta TabView-objektet som den tillhör. När TabView har hittats tas TabViewItem bort från den TabItems samling och infogas i sender TabViews TabItems-samling i det index som anges av args.DropIndex.
private void TabView_ExternalTornOutTabsDropped(TabView sender,
                             TabViewExternalTornOutTabsDroppedEventArgs args)
{
    if (args.Tabs.FirstOrDefault() is TabViewItem tab)
    {
        GetParentTabView(tab)?.TabItems.Remove(tab);
        sender.TabItems.Insert(args.DropIndex, tab);
    }
}

// Starting with the TabViewItem, walk up the
// visual tree until you get to the TabView.
private TabView? GetParentTabView(TabViewItem tab)
{
    DependencyObject current = tab;
    while (current != null)
    {
        if (current is TabView tabView)
        {
            return tabView;
        }
        current = VisualTreeHelper.GetParent(current);
    }
    return null;
}
Tips
Om du använder Windows Community Toolkitkan du använda hjälpmetoden FindAscendant i verktygslådans DependencyObjectExtensions i stället för GetParentTabView.
Visa TabView-flikar i ett fönsters namnlist
I stället för att ha flikar som upptar sin egen rad under ett fönsters titelrad kan du sammanfoga dessa två till samma område. Detta sparar lodrätt utrymme för ditt innehåll och ger din app en modern känsla.
Eftersom en användare kan dra ett fönster efter namnlisten för att flytta fönstret är det viktigt att namnlisten inte är helt fylld med flikar. När du visar flikar i ett namnlist måste du därför ange en del av namnlisten som ska reserveras som ett dragbart område. Om du inte anger ett drabart område kommer hela titelraden att kunna dras, vilket hindrar flikarna från att ta emot indatahändelser. Om din TabView visas i ett fönsters namnlist bör du alltid inkludera en TabStripFooter- i din TabView- och markera den som en dragbar region.
För mer information, se anpassning av titelrad

<TabView VerticalAlignment="Stretch">
    <TabViewItem Header="Home" IsClosable="False">
        <TabViewItem.IconSource>
            <SymbolIconSource Symbol="Home" />
        </TabViewItem.IconSource>
    </TabViewItem>

    <TabView.TabStripFooter>
        <Grid x:Name="CustomDragRegion" Background="Transparent" />
    </TabView.TabStripFooter>
</TabView>
private void MainPage_Loaded(object sender, RoutedEventArgs e)
{
    var currentWindow = (Application.Current as App)?.Window as MainWindow;
    currentWindow.ExtendsContentIntoTitleBar = true;
    currentWindow.SetTitleBar(CustomDragRegion);
    CustomDragRegion.MinWidth = 188;
}
Not
Hur du får en referens till fönstret (currentWindow) kan variera beroende på hur du spårar fönster i din app. Mer information finns i Stäng fönstret när den sista fliken stängs och Skapa och spåra ett nytt fönster i den här artikeln.
Tangentbordsvägledning för utvecklare
Tips
Mer information om inbyggt tangentbordsstöd finns i Tangentbordsnavigering tidigare i den här artikeln.
Vissa program kan kräva mer avancerad tangentbordskontroll. Överväg att implementera följande genvägar om de är lämpliga för din app.
Varning
Om du lägger till en TabView- till en befintlig app kanske du redan har skapat kortkommandon som mappas till tangentkombinationerna för de rekommenderade Kortkommandona i TabView. I det här fallet måste du överväga om du vill behålla dina befintliga genvägar eller erbjuda en intuitiv flikupplevelse för användaren.
- Ctrl + T bör öppna en ny flik. I allmänhet fylls den här fliken med ett fördefinierat dokument eller skapas tomt med ett enkelt sätt att välja dess innehåll. Om användaren måste välja innehåll för en ny flik kan du överväga att ge indata fokus till kontrollen för innehållsval.
- Ctrl + W ska stänga den markerade fliken. Kom ihåg att TabView väljer nästa flik automatiskt.
- Ctrl + Skift + T bör öppna nyligen stängda flikar (eller mer exakt, öppna nya flikar med samma innehåll som nyligen stängda flikar). Börja med den senast stängda fliken och flytta bakåt i tiden för varje efterföljande gång genvägen anropas. Observera att detta kräver att du har en lista över nyligen stängda flikar.
- Ctrl + 1 bör välja den första fliken i fliklistan. På samma sätt bör Ctrl + 2 välja den andra fliken, Ctrl + 3 ska välja den tredje och så vidare via Ctrl + 8.
- Ctrl + 9 bör välja den sista fliken i fliklistan, oavsett hur många flikar som finns i listan.
- Om flikar erbjuder mer än bara kommandot close (till exempel duplicera eller fästa en flik) använder du en snabbmeny för att visa alla tillgängliga åtgärder som kan utföras på en flik.
Implementera tangentbordsbeteende i webbläsarformat
Det här exemplet implementerar ett antal av ovanstående rekommendationer på en TabView-. Mer specifikt implementerar det här exemplet Ctrl + T, Ctrl + W, Ctrl + 1-8och Ctrl + 9.
<TabView>
    <!-- ... some tabs ... -->
    <TabView.KeyboardAccelerators>
        <KeyboardAccelerator Key="T" Modifiers="Control"
                             Invoked="NewTabKeyboardAccelerator_Invoked" />
        <KeyboardAccelerator Key="W" Modifiers="Control"
                             Invoked="CloseSelectedTabKeyboardAccelerator_Invoked" />
        <KeyboardAccelerator Key="Number1" Modifiers="Control"
                             Invoked="NavigateToNumberedTabKeyboardAccelerator_Invoked" />
        <KeyboardAccelerator Key="Number2" Modifiers="Control"
                             Invoked="NavigateToNumberedTabKeyboardAccelerator_Invoked" />
        <KeyboardAccelerator Key="Number3" Modifiers="Control"
                             Invoked="NavigateToNumberedTabKeyboardAccelerator_Invoked" />
        <KeyboardAccelerator Key="Number4" Modifiers="Control"
                             Invoked="NavigateToNumberedTabKeyboardAccelerator_Invoked" />
        <KeyboardAccelerator Key="Number5" Modifiers="Control"
                             Invoked="NavigateToNumberedTabKeyboardAccelerator_Invoked" />
        <KeyboardAccelerator Key="Number6" Modifiers="Control"
                             Invoked="NavigateToNumberedTabKeyboardAccelerator_Invoked" />
        <KeyboardAccelerator Key="Number7" Modifiers="Control"
                             Invoked="NavigateToNumberedTabKeyboardAccelerator_Invoked" />
        <KeyboardAccelerator Key="Number8" Modifiers="Control"
                             Invoked="NavigateToNumberedTabKeyboardAccelerator_Invoked" />
        <KeyboardAccelerator Key="Number9" Modifiers="Control"
                             Invoked="NavigateToNumberedTabKeyboardAccelerator_Invoked" />
    </TabView.KeyboardAccelerators>
</TabView>
private void NewTabKeyboardAccelerator_Invoked(KeyboardAccelerator sender,
                                      KeyboardAcceleratorInvokedEventArgs args)
{
    // Create new tab.
    TabView senderTabView = (TabView)args.Element;
    if (senderTabView != null)
    {
        // (Click handler defined in previous example.)
        TabView_AddTabButtonClick(senderTabView, new EventArgs());
    }
    args.Handled = true;
}

private void CloseSelectedTabKeyboardAccelerator_Invoked(KeyboardAccelerator sender,
                                                KeyboardAcceleratorInvokedEventArgs args)
{
    TabView tabView = (TabView)args.Element;
    TabViewItem tab = (TabViewItem)tabView.SelectedItem;
    // Only remove the selected tab if it can be closed.
    if (tabView is not null &&
        tab.IsClosable == true)
    {
        tabView.TabItems.Remove(tab);
    }
    args.Handled = true;
}

private void NavigateToNumberedTabKeyboardAccelerator_Invoked(KeyboardAccelerator sender,
                                                     KeyboardAcceleratorInvokedEventArgs args)
{
    TabView tabView = (TabView)args.Element;
    int tabToSelect = 0;

    switch (sender.Key)
    {
        case Windows.System.VirtualKey.Number1:
            tabToSelect = 0;
            break;
        case Windows.System.VirtualKey.Number2:
            tabToSelect = 1;
            break;
        case Windows.System.VirtualKey.Number3:
            tabToSelect = 2;
            break;
        case Windows.System.VirtualKey.Number4:
            tabToSelect = 3;
            break;
        case Windows.System.VirtualKey.Number5:
            tabToSelect = 4;
            break;
        case Windows.System.VirtualKey.Number6:
            tabToSelect = 5;
            break;
        case Windows.System.VirtualKey.Number7:
            tabToSelect = 6;
            break;
        case Windows.System.VirtualKey.Number8:
            tabToSelect = 7;
            break;
        case Windows.System.VirtualKey.Number9:
            // Select the last tab
            tabToSelect = tabView.TabItems.Count - 1;
            break;
    }

    // Only select the tab if it is in the list.
    if (tabToSelect < tabView.TabItems.Count)
    {
        tabView.SelectedIndex = tabToSelect;
    }
}
UWP och WinUI 2
Viktig
Informationen och exemplen i den här artikeln är optimerade för appar som använder Windows App SDK och WinUI 3, men som är allmänt tillämpliga för UWP-appar som använder WinUI 2. Se UWP API-referensen för plattformsspecifik information och exempel.
Det här avsnittet innehåller information som du behöver för att använda kontrollen i en UWP- eller WinUI 2-app.
TabView-kontrollen för UWP-appar ingår som en del av WinUI 2. Mer information, inklusive installationsanvisningar, finns i WinUI 2. API:er för den här kontrollen finns i Microsoft.UI.Xaml.Controls namnrymd.
Flik-utdrags-API ingår inte i WinUI 2-versionen av TabView.
- WinUI 2 Apis:TabView-klass, TabViewItem-klass
- Öppna WinUI 2-galleriappen och se TabView i praktiken. WinUI 2 Gallery-appen innehåller interaktiva exempel på de flesta WinUI 2-kontroller, funktioner och funktioner. Hämta appen från Microsoft Store- eller hämta källkoden på GitHub-.
Vi rekommenderar att du använder den senaste WinUI 2- för att få de senaste formaten, mallarna och funktionerna för alla kontroller. WinUI 2.2 eller senare innehåller en ny mall för den här kontrollen som använder rundade hörn. För mer information, se hörnradie.
Om du vill använda koden i den här artikeln med WinUI 2 använder du ett alias i XAML (vi använder muxc) för att representera Api:erna för Windows UI-bibliotek som ingår i projektet. Mer information finns i Komma igång med WinUI 2.
xmlns:muxc="using:Microsoft.UI.Xaml.Controls"

<muxc:TabView />
Relaterade artiklar
Windows developer
