403.7 and 500 Client Certificate Authentication Errors-IIS
During the course of my work i have observed that troubleshooting client certificate authentication seems bit challenging as there is not much tools to collect appropriate data for it. However i am correlating a list of check points which has always helped me.
When you have enabled client certificate authentication either using AD client certificate authentication or IIS client certificate mapping authentication you can follow the below steps in general.
The most common error or status code you would face with respect to client certificate authentication is 403.7 which means the server is expecting a client certificate but the client is not sending it.
Follow the steps in order to check what the issue might be
1) Make sure you have set Require for client certificate in SSL settings in IIS
2) When using IIS client certificate mapping we either use one to one mapping where we map individual certificate to an user or many to one mapping where we map all the certificates matching a criteria to a single user. The one to one mapping or the many to one mapping should be created at the site level. The most common mistake, I have seen is if people want to use client certificate authentication to a specific application under a site, they create the mappings at the application level which is wrong. You will have to create the mappings at the site level and enable client certificate authentication at the required level. The mappings will only be read at the site level and any mapping at the application level will be ignored. This is not mentioned in most of the internet articles.
3) On the client machine in IE make sure you go to Internet Options->Security->Intranet or Internet(Based on the type of site)->Miscellaneous->Don't prompt for client certificate when only one certificate is disabled. We need to make sure it is disabled so that at least we get to know if we get a prompt for certificate selection and if this fails out after clicking on certificate or without even sending a certificate.
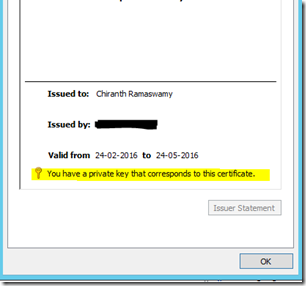
4) In the client machine, confirm that the client certificate has a private key. You can check this by going to mmc->Add or remove snapin->Certificates(My User Account)->Personal->Certificates and then select the client certificate which you have installed for authentication. If the certificate is proper then you should be able to see the private key as below. ALso you can run the below command to check the validity of the certificate
certutil –verifystore my <Thumbprint of the certificate>
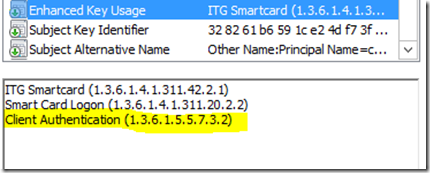
5) Also go to details tab of the certificate and click on Enhanced Key usage where you should see that this certificate is intended for client certificate authentication which also validates the certificate to be a genuine client certificate.
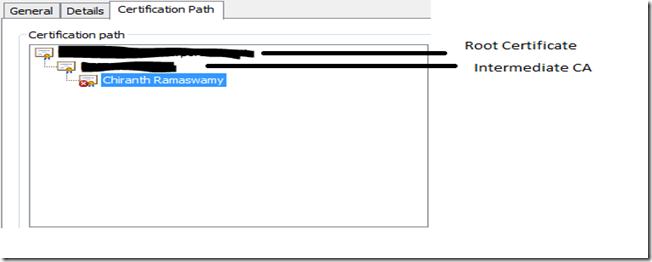
6) If you go to the Certification Path tab in the certificate, you will be able to see the certificate chain. Double Click on each certificate in the chain and make a note of it.
7) In the certification path the certificate at the top is called the Root Certificate and the certificates in between the Root CA and the actual certificate in the chain are called Intermediate CA’s. In the above image there is a single intermediary CA but there can be more than one intermediary CA as well. In the server machine and as well as the client machine go to mmc->Add or Remove Snapin->Certificates Local Computer->Trusted Root Certification Authorities->Certificates, make sure the Root CA is present in this location. Next go to Intermediate Certification Authorities->Certificates and make sure the Intermediate CA’s are present there. This step is important because during SSL handshake when the server requests for the client certificate it sends the list of Trusted Issuer List which will contain the list of the Trusted Root CA’s installed on the server to the client and based on the that the client certificate to be sent is chosen.
| Note: By default as mentioned above the Trusted issuer list is sent along with the certificate request during SSL handshake but this behaviour changed from windows 2012 or IIS 8 and onwards. In IIS 8 and onwards by default we don’t send any Trusted Issuer list. If we don't send any Trusted Issuer List then the client has the freedom of selecting any client certificate in its store. |
8) The feature of sending the CTL or trusted list can also be controlled by setting the below registry key which can be used from windows 2008 and onwards. If the value is set to 1 then the list is send and if the value is 0 then the list will not be sent. In windows 2012 and onwards the default value is 0 and in the lower versions the default value is 1 if the key is not present.
HKEY_LOCAL_MACHINE\SYSTEM\CurrentControlSet\Control\SecurityProviders\SCHANNEL Value name: SendTrustedIssuerListValue type: REG_DWORDValue data: 0 (False) or 1(True) |
9) There is one more thing you need to cross check if this is a windows 2012 (IIS 8) and higher machine. By default the CTL is off, if the CTL is on and if in the server mmc->Add or Remove Snapin->Certificates Local Computer->Trusted Root Certification Authorities->Certificates you have a non-self signed certificate then you might receive a 403.7 error as well. More details on the issue is logged in the below kb. The solution is to delete the non-self signed certificate from the Trusted Root Certification Authority
https://support.microsoft.com/en-in/kb/2802568
| Note: A self-signed certificate is a certificate where the issuer and issued to fields will be same. A root certificate authority will always have a self signed certificate and hence if there are non-self signed certificates in the Trusted Root Certificate Store then that certificate is not a valid Root CA. |
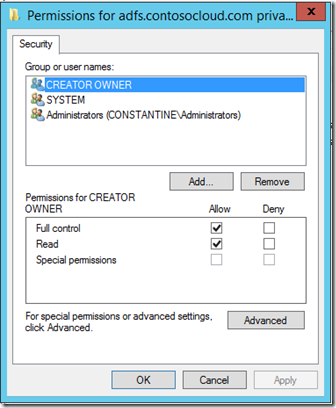
10) Thanks to Daniel Stolt, i had missed out a point. If the client is a web application or a web service and you are sending the client certificate from the code then the additional thing you will have to check is if the identity of the client application has permissions on the machine key for the client certificate. There are 2 ways you can do it.
Method A: Go to mmc->Add or Remove Snapin->Certificates Local Computer or Current User->Personal->Certificates. Right Click on the correct client certificate->Manage Private Keys and give permissions to the identity or user under which the client application is running.
Method B: This is bit complicated but interesting method. In this method we find out the machine key linked with the client certificate and then give the proper permissions required.
a. Download and install "find private key" application
https://blog.rhysgoodwin.com/windows-admin/findprivatekey-exe-pre-compiled/
b. Find the Thumbprint of the client certificate
Run -> MMC -> File-> ADD or REMOVE SNAP IN->certificates-> Local Computer or Current User->Ok
Expand Personal->Certificates->Choose the appropriate certificate and open it
In the certificate->details tab->Thumbprint->Copy it
c. find the private key path for the certificate suing the thumbprint copied
Syntax:
FindprivateKey.exe My LocalMachine -t "THumbprint of the certificate"
Example:FindprivateKey.exe trustedPeople LocalMachine -t "46 96 43 58 73 0b e9 4c 89 6f 5b ee fb c2 d7 08 03 6e 28 0b"C:\Temp>FindprivateKey.exe My LocalMachine -t "46 96 43 58 73 0b e9 4c 89 6f 5b ee fb c2 d7 08 03 6e 28 0b"Private key directory:C:\ProgramData\Microsoft\Crypto\RSA\MachineKeysPrivate key file name:7a1fb2a3cb309c7af2d6fe47e8394f24_032abc89-fbae-4ac1-aab5-6c22351edcee |
d. Next, we need to provide permissions to application pool account to certificate
syntax (account to use : app pool identity - in our case it is NetworkService):
icacls "private key file path" /grant "Account":R
example:icacls C:\ProgramData\Microsoft\Crypto\RSA\MachineKeys\7a1fb2a3cb309c7af2d6fe47e8394f24_032abc89-fbae-4ac1-aab5-6c22351edcee /grant "NT AUTHORITY\NetworkService":R |
11) Also several times i have seen that 403.7 is just masking the actual error. On the client you get a 403.7 but there might be a different error before that. For this please check the logs. One common scenario i have seen is as below. We see a 500 just before the 403.7 error and this is visible in logs as below
| 2015-09-06 15:46:29 W3SVC1 - GET / – 443 – 10.10.10.100 Mozilla/5.0+(compatible;+MSIE+10.0;+Windows+NT+6.1;+WOW64;+Trident/6.0) – - chiranth.com 500 0 64 0 |
If we take Failed request traces for the 500 we see below
MODULE_SET_RESPONSE_ERROR_STATUSWarning ModuleName="IIS Web Core", Notification="BEGIN_REQUEST", HttpStatus="500", HttpReason="Internal Server Error", HttpSubStatus="0", ErrorCode="The I/O operation has been aborted because of either a thread exit or an application request. (0x800703e3)", ConfigExceptionInfo="" |
In this scenario normally you would have got a prompt for the certificate in IE but you end you getting 403.7 still in the end because the certificate was not read completely. Normally when we just set certificate to Require in SSL settings, the client certificate negotiation happens in later part of the request. To avoid the above error we have to enable clientcertificatenegotiation so that the negotiation happens during ssl handshake during the server hello is sent. To enable client cert negotiation you can follow the below blog
https://blogs.iis.net/rickbarber/require-client-certificates-in-iis-7-5
The blog talks on how to enable by deleting and recreating the bindings from command prompt. There is also a hack which we can follow as below.
For example if you have a SSL binding for IP: PORT 10.10.10.10:443 then traverse to the registry path HKEY_LOCAL_MACHINE\SYSTEM\CurrentControlSet\Services\HTTP\Parameters\SslBindingInfo\10.10.10.10:443
Create a DWORD called DefaultFlags and set the value to 2. The commands mentioned in the blog also does the same
The above changes require a machine reboot to take effect.
12) The above steps sums up the configuration part from the client and server perspective. But i have seen 403.7 error pop because of network issues as well. I have seen the issue happen If there is some intermediary device or firewall or proxy which doesn’t support client certificate authentication or negotiation. If we have set clientcertificatenegotitation as above then we will be able to see the client certificate request in the earlier stage of the handshake itself as below
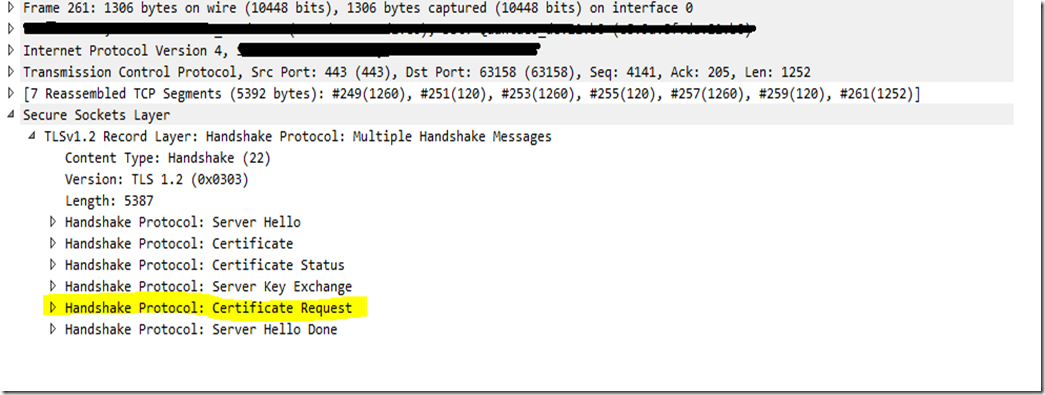 |
if we don’t have clientcertificatenegotiation then we might not be able to see the certificate request(Server Hello) in the handshake as it might happen later and it will be encrypted.
If you have the setting enabled and you still don’t see the client certificate request and see something like below then this is a possible issue with a network device
As one more final step you can also try enabling SCHANNEL logging. Steps are in the below link
| Note: If you are enabling client certificate authentication for a WCF service then by design along with client certificate authentication you also need anonymous authentication enabledhttps://blogs.msdn.microsoft.com/dsnotes/2012/11/23/wcf-transport-layer-security-with-client-certificates/ |
Hope this helps ![]()
Comments
- Anonymous
July 14, 2016
One more thing I would add to your list:Make sure the client has permissions to access the private key of the client certificate. This is very easy to overlook, and I've seen people tripped up by this so many times, especially in cases where the client process is executing as a service account or different account than used to install the client cert.- Anonymous
July 14, 2016
@Daniel: Thanks for pointing it out. i will update it out. Its a very good point and i have seen this when the client is a web service or a windows application running with a specific account. i will add the command to find out the private key of the certificate and to provide specific permissions to the file tomorrow once i am in office
- Anonymous

