.NET .NET Aspire kurulum ve donanımları
.NET .NET Aspire, bulutta yerel uygulamalar oluşturmanıza ve yapılandırmanıza yardımcı olacak araçlar içerir. Araçlar, .NET Aspire, Visual Studiove CLI iş akışları için Visual Studio Code kullanmaya başlamayı kolaylaştırmak için yararlı başlangıç proje şablonları ve diğer özellikleri içerir. Sonraki bölümlerde, .NET.NET Aspire araçlarıyla çalışmayı ve aşağıdaki görevleri keşfetmeyi öğreneceksiniz:
- .NET .NET Aspire ve bağımlılıklarını yükleyin
- Visual Studio, Visual Studio Codeveya .NET CLI kullanarak başlangıç projesi şablonları oluşturma
- .NET .NET Aspire tümleştirmelerini yükleme
- .NET .NET Aspire panosuyla çalışma
Yükle .NET.NET Aspire
.NET .NET Aspireile çalışmak için aşağıdakilerin yerel olarak yüklenmesi gerekir:
- .NET 8.0 veya .NET 9.0.
- OCI uyumlu bir kapsayıcı çalışma ortamı, örneğin:
- Docker Masaüstü veya Podman. Daha fazla bilgi için bkz. Container runtime.
- Tümleşik Geliştirici Ortamı (IDE) veya kod düzenleyicisi, örneğin:
- Visual Studio 2022 sürüm 17.9 veya üzeri (İsteğe bağlı)
-
Visual Studio Code (İsteğe bağlı)
- C# Dev Kit: Uzantı (İsteğe bağlı)
- JetBrains Rider ile .NET.NET Aspire eklenti (İsteğe bağlı)
Visual Studio 2022 17.9 veya üzeri, Web & Cloud iş yükünü yüklediğinizde varsayılan olarak en son .NET.NET Aspire SDK içerir. Visual Studio 2022'nin önceki bir sürümüne sahipseniz, Visual Studio 2022 17.9 sürümüne yükseltebilir veya aşağıdaki adımları kullanarak .NET Aspire SDK'sını yükleyebilirsiniz:
.NET Aspire 2022'de Visual Studio iş yükünü yüklemek için Visual Studio yükleyicisini kullanın.
Kapsayıcı yürütme ortamı
.NET
.NET Aspire projeleri kapsayıcılarda çalışacak şekilde tasarlanmıştır. Kapsayıcı çalışma zamanı olarak Docker Desktop veya Podman kullanabilirsiniz.
Docker Desktop en yaygın kapsayıcı çalışma zamanıdır.
Podman, Open Container Initiative (OCI) kapsayıcıları oluşturup çalıştırabilen Dockeriçin açık kaynak bir daemonless alternatifidir. Konak ortamınızda hem Docker hem de Podman yüklüyse, .NET Aspire varsayılan olarak Dockerkullanır.
.NET Aspire ortam değişkenini Podmanolarak ayarlayarak DOTNET_ASPIRE_CONTAINER_RUNTIMEpodman kullanmasını sağlayabilirsiniz:
export DOTNET_ASPIRE_CONTAINER_RUNTIME=podman
Daha fazla bilgi için bkz: Podman yükleme Linux.
şablonları .NET.NET Aspire
.NET
.NET Aspire bir dizi çözüm ve proje şablonu sağlar. Bu şablonlar, sık kullandığınız .NET geliştirici tümleşik ortamında kullanılabilir. Bu şablonları kullanarak tam .NET Aspire çözümleri oluşturabilir veya mevcut .NET Aspire çözümlerine tek tek projeler ekleyebilirsiniz. Daha fazla bilgi için bkz.
.NET .NET Aspire panosu
.NET projesini kullanıma sunan .NET Aspire şablonları, ayrıca, uygulamanızın günlükler, izlemeler ve ortam yapılandırmaları gibi çeşitli yönlerini izlemek ve incelemek için kullanılan geliştirici için yararlı bir kontrol paneli de içerir. Bu pano, yerel geliştirme deneyimini geliştirmek için tasarlanmıştır ve uygulamanızın genel durumuna ve yapısına genel bir bakış sağlar.
.NET
.NET Aspire panosu yalnızca uygulama çalışırken görünür ve *.AppHost projesini başlattığınızda otomatik olarak başlar.
Visual Studio ve Visual Studio Code hem uygulamanızı hem de .NET Aspire panosunu tarayıcınızda otomatik olarak başlatır. Uygulamayı
Sol gezinti, her biri aşağıdaki bölümlerde inceleyebileceğiniz panonun farklı bölümlerine bağlantılar sağlar.
.NET .NET Aspire panosu tek başına modda da kullanılabilir. Daha fazla bilgi için bağımsız .NET.NET Aspire gösterge panosu'ye bakın.
Visual Studio araçları
Visual Studio, .NET Aspire tümleştirmeleri ve Uygulama Konağı düzenleyici projesiyle çalışmaya yönelik ek özellikler sağlar. Bu özelliklerin tümü şu anda Visual Studio Code veya CLI aracılığıyla kullanılamamaktadır.
Tümleştirme paketi ekleme
.NET Aspirekullanarak diğer tüm NuGet paketleri gibi uygulamanıza Visual Studio tümleştirmeleri eklersiniz. Ancak Visual Studio doğrudan .NET Aspire tümleştirmeleri eklemek için kullanıcı arabirimi seçenekleri de sağlar.
Visual Studio'de, .NET Aspire tümleştirmesi eklemek istediğiniz projeye sağ tıklayın ve >.NET.NET Aspire paketiniekle'yi seçin.
Paket yöneticisi, .NET.NET Aspire tümleştirmeleri için önceden yapılandırılmış (filtre ölçütlerini dolduran) arama sonuçlarıyla açılır ve istediğiniz tümleştirmeye kolayca göz atmanıza ve seçmenize olanak sağlar.
Barındırma paketleri ekleme
.NET .NET Aspire barındırma paketleri, bir uygulamanın bağımlı olabileceği veya kullanabileceği çeşitli kaynakları ve bağımlılıkları yapılandırmak için kullanılır. Barındırma paketleri, diğer tümleştirme paketlerinden, *.AppHost projesine eklendikleri için farklıdır. Uygulamanıza barındırma paketi eklemek için şu adımları izleyin:
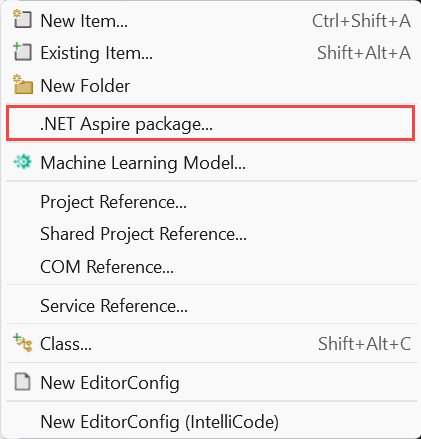
Visual Studiobölümünde, üzerine sağ tıklayın. projeyi AppHost seçin ve Ekle>.NET.NET Aspire paketi...ekleyin.
Paket yöneticisi, .NET.NET Aspire barındırma paketleri için önceden yapılandırılmış arama sonuçlarıyla (filtre ölçütlerini doldurma) açılır ve istediğiniz pakete kolayca göz atmanızı ve seçmenizi sağlar.
Orkestrasyon projeleri ekleme
Aşağıdaki adımları kullanarak mevcut bir uygulamaya .NET.NET Aspire düzenleme projeleri ekleyebilirsiniz:
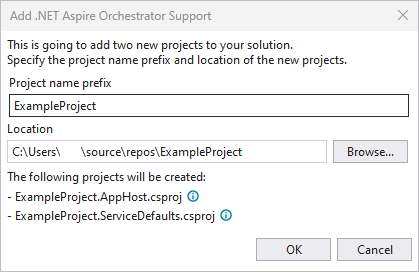
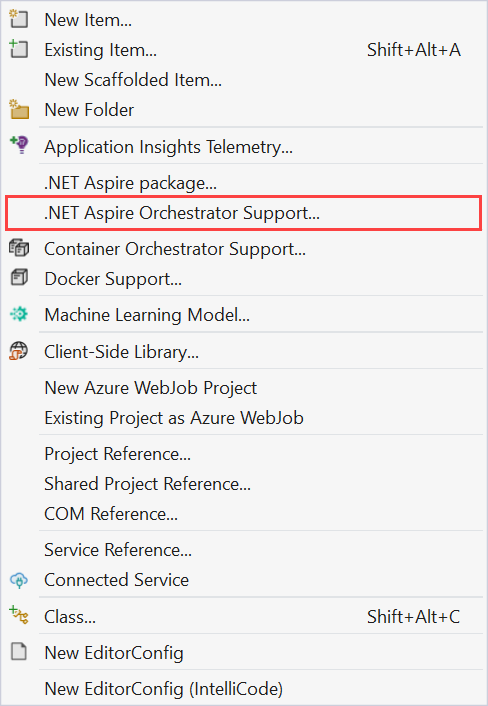
Visual Studio'da mevcut bir proje üzerinde sağ tıklayın ve >.NET.NET Aspire Orchestrator Desteği Ekle... seçin..
* özetini içeren bir iletişim kutusu penceresi açılır. AppHost ve *. ServiceDefaults, çözümünüze eklenen projeleri.

OK seçin ve aşağıdaki değişiklikler uygulanır:
- *. AppHost ve *. ServiceDefaults düzenleme projeleri çözümünüze eklenir.
- özgün projenizin
builder.AddServiceDefaultsdosyasına Program.cs çağrısı eklenir. - Özgün projenize bir referans, Program.cs projesinin dosyasına eklenecektir.
.NET .NET Aspire düzenleme hakkında daha fazla bilgi için bkz. .NET.NET Aspire düzenlemeye genel bakış.
Orkestrasyon işlemine kaydol
Test projesi oluşturma
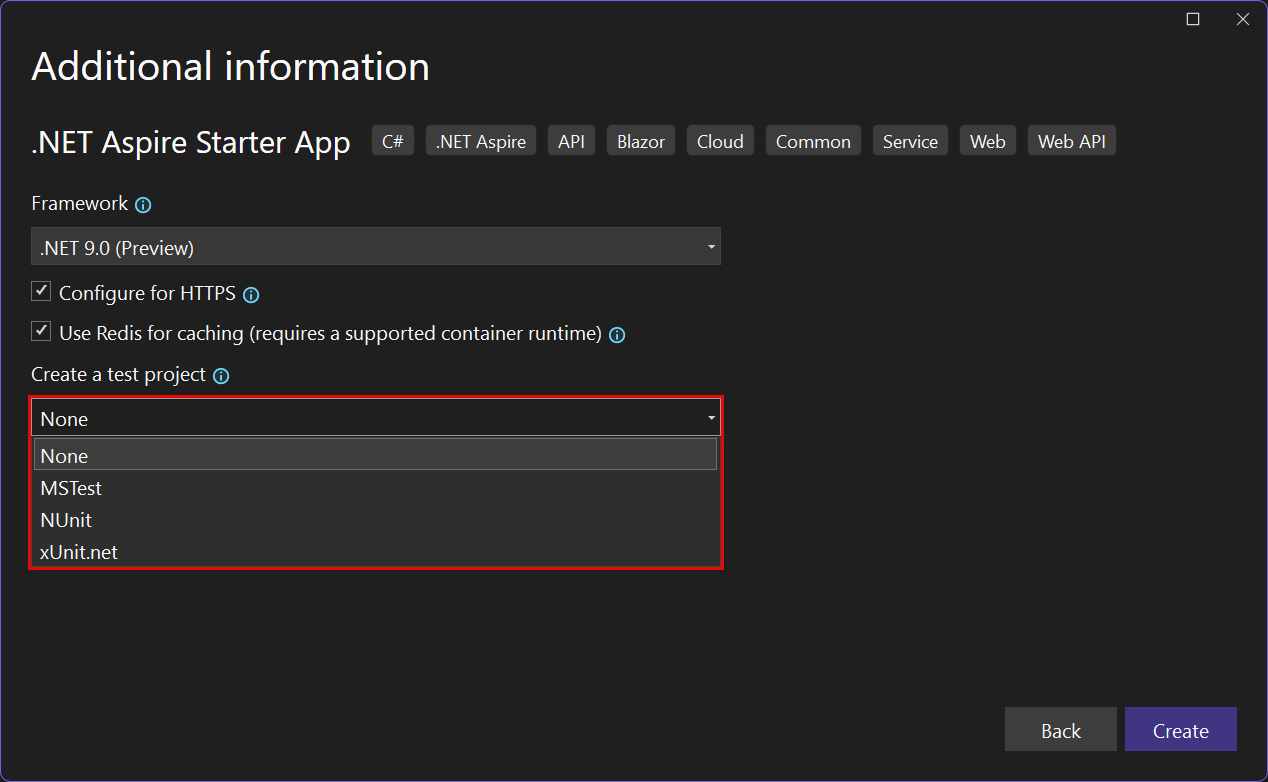
Visual Studiokullanırken .NET.NET Aspire Uygulamayı Başlat şablonunu seçtiğinizde, bir test projesi ekleme seçeneğiniz vardır. Bu test projesi, testleriniz için başlangıç noktası olarak kullanabileceğiniz bir örnek test içeren bir xUnit projesidir.
Daha fazla bilgi için bkz. İlk .NET.NET Aspire testinizi yazın.
Visual Studio Code araçları
Visual Studio Code
C# Dev Kit projeleri oluşturmak ve geliştirmek için ile .NETkullanabilirsiniz.
Yeni bir .NET Aspire projesi oluşturduktan sonra, Visual Studio Code hata ayıklayıcısını kullanarak uygulamayı çalıştırıp hatalarını ayıklar, kesme noktalarında ilerleyip değişkenleri incelersiniz:
Ayrıca bkz.
- .NET .NET Aspire iş yükü yüklenemiyor
- .NET .NET Aspire proje ile Geliştirme Proxy'si kullanma
.NET Aspire


