Announcing Office 365 API Tools for Visual Studio — Preview
UPDATE 5/12/2014 - A new preview is available. You can now access the Office 365 APIs using client libraries available for .NET and JavaScript. See: .NET and JavaScript libraries for Office 365 APIs
Office 365 APIs enable developers to integrate Office resources (such as calendars, contacts, mail, files, and profile information) directly into their custom applications. For example, with Office 365 APIs, a native WinRT application could add calendar appointments directly into a user's Exchange calendar or send mail on behalf of the user. Similarly, a web application with export functionality could now offer a "Save to OneDrive" option, saving a user's files directly to their SharePoint "My Documents" folder.
We are excited about the new scenarios that Office 365 APIs will enable, and are committed to making it easy for every developer to try out these new platform capabilities. With today’s release of our "Office 365 API Tools - Preview" for Visual Studio 2013, adding and using Office 365 APIs is literally a few clicks away. Our tool will:
- Register and configure your app to consume Office 365 Services.
- Add helper classes for authentication, caching, and error-handling.
- Add the necessary libraries (Active Directory Authentication Library and Json.NET) from NuGet, to ensure that the helper classes and sample code work right away.
- Add sample code that uses Office 365 APIs and demonstrates common patterns and best-practices.
Best of all, our tool:
- Is available for both MVC Web Applications and Windows 8.1 apps. In fact, with the help of our helper classes, the code you'll write for MVC apps can be almost identical to what you'd write in a Windows 8.1 app, and vice-versa.
- Is available for both C# and VB.NET projects.
- Is explicitly designed for adding Office 365 APIs to existing applications, and for adding and configure new services at any time: not just on initial project creation. This means you can try out the new Office 365 APIs on real-world scenarios without needing to start a new project. Better yet, you can start small and then iteratively expand on the Office 365 services that you use.
The walkthrough below will guide you through adding Office 365 APIs to a web application. You can also view a Channel 9 interview/demo, which demonstrates adding Office 365 to an existing Windows 8.1 app.

Video: Adding Exchange and SharePoint to an existing Windows 8.1 app
Getting Started
You can get started by downloading our tool from the Visual Studio Gallery. Close Visual Studio 2013, then choose the .VSIX file and begin setup. A few moments later, the extension will be installed. Now, just open Visual Studio, and follow along in the walkthrough below.
Adding Office 365 Services to your project
Once you download and install our tool, open (or create) a project that you want to add Office 365 APIs to. The project must be either an MVC web application or a Windows 8.1 app, targeting .NET Framework 4.5 or 4.5.1. We support both C# and VB.NET projects.
In the Solution Explorer, choose the project and then choose Add > Connected Service (Figure 1).

Figure 1. Add Connected Service
A Services Manager dialog box will appear (Figure 2). Depending on your project, you may see a number of tabs on the left pane. Choose Office 365 > Sign in.
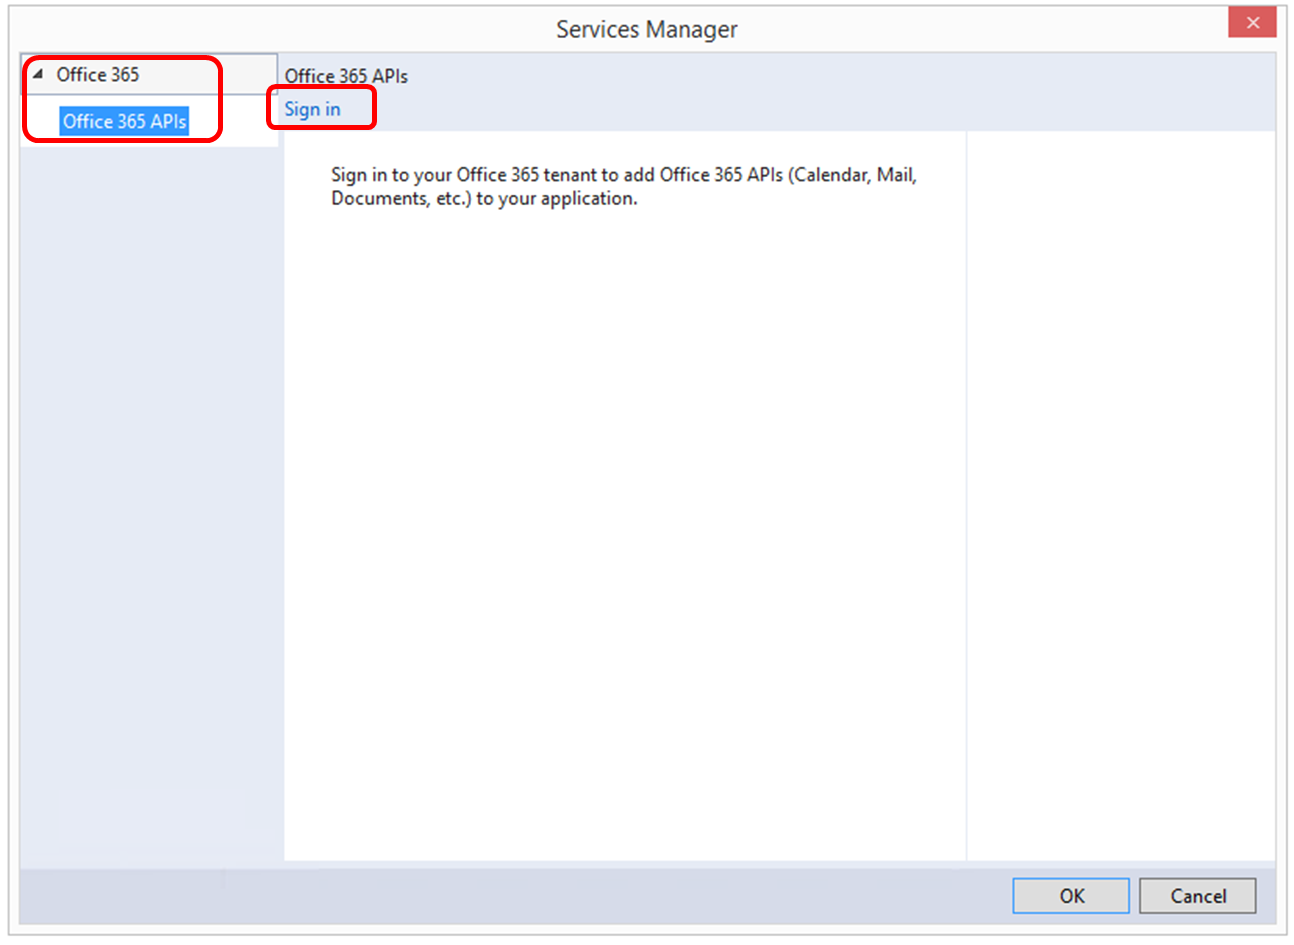
Figure 2. Services Manager
On the sign-in dialog box, enter the username and password for your Office 365 tenant (Figure 3). We recommend that you use your Office 365 Developer Site. Often, this user name will follow the pattern
<your-name>@<tenant-name>.onmicrosoft.com.
If you do not have a developer site, you can get a free Developer Site as part of your MSDN Benefits, or sign up for a free trial. Be aware that the user must be an admin user—but for tenants created as part of an Office 365 Developer Site, this is likely to be the case already.
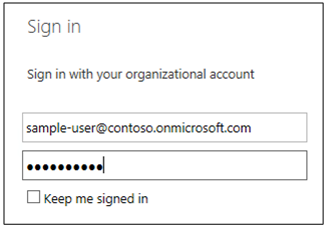
Figure 3. Sign-in dialog box
After you're signed in, you will see a list of three services: Active Directory Graph, Exchange, and SharePoint. Initially, the Permissions column to the right of each service will be empty—after all, you have not registered your app to consume any services yet. Choose one of the services (for example, Exchange) from the list and choose OK (Figure 4).
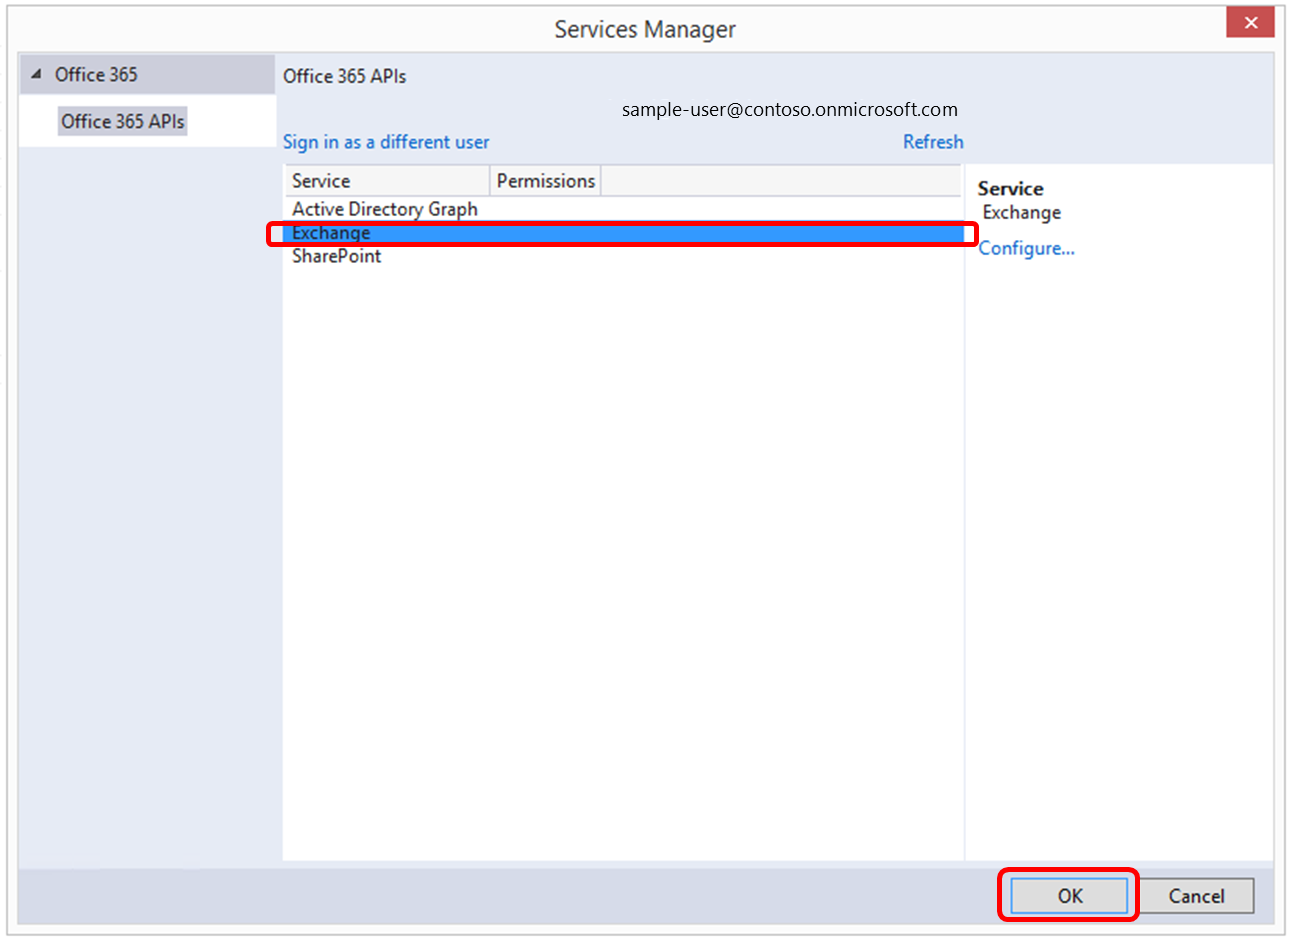
Figure 4. Adding an Office 365 Service
Choosing OK will:
- Register the app with Windows Azure Active Directory, which serves as the authentication authority for Office 365 APIs.
- Add the common Office 365 helper classes and the accompanying NuGet libraries.
- Add sample code for the selected service (in the example above, for Exchange).
Because no permissions are configured, the tool will also prompt a dialog box to configure permissions (Figure 5). Note that you can return to this same dialog even after the application has been registered, re-opening the Services Manager dialog box and using the Configure… link to the right of the services grid to modify permissions.
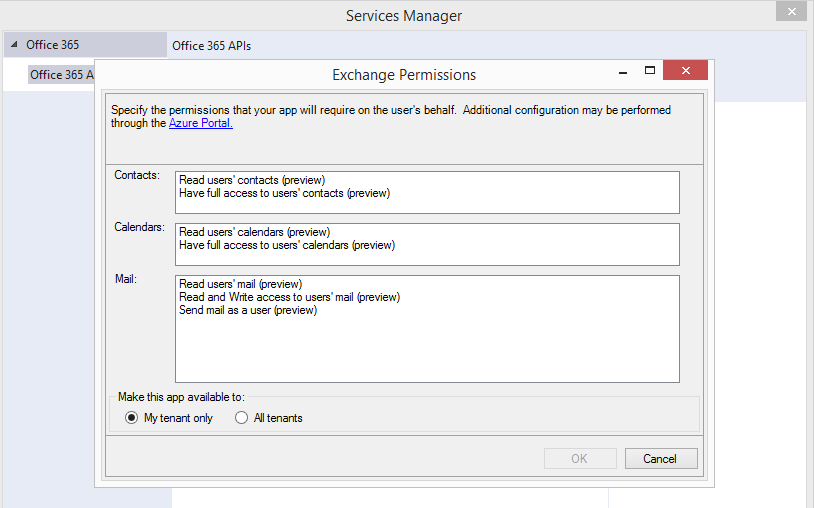
Figure 5. Permissions dialog box. Note that the Make this app available to option is only available for Web applications, not for Windows 8.1 apps.
The permissions dialog box is different for each of the services. It is also subtly different for web applications versus native Windows 8.1 apps: The Make this app available to … my tenant only option is only available for Web apps. Native client apps (such as Windows 8.1 apps) don't need this distinction, and can be used on any tenant where the user has granted consent to the app.
Choose one or more permissions to proceed with adding the service. For purposes of running the sample code, choose a Read (or higher) permission for each of the services. Be aware that you can choose multiple permissions at the same time: for example, if I want to both read users' mail and send mail on behalf of users, I will need to select both permissions (Figure 6). For other permissions, something like Have full access to the users' calendars already encapsulates the Read users' calendars permission—but when in doubt, choose both permissions.
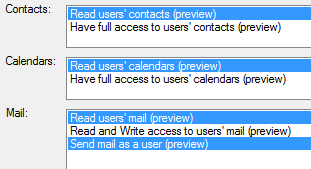
Figure 6. Selecting multiple permissions within the same category, such as read users' mail, and send mail as a user.
After you select the permissions and choose "OK", give our tool a few moments to register your app and add the necessary files and NuGet packages. Now it's time to explore the new files that were added or modified.
Exploring the project structure
Once the Service Manager is done adding files, let's look at the Solution Explorer to see which files got added or modified.
While the project structure between MVC Web Applications and Window 8.1 apps is quite different (see Figures 7 and 8), the pattern of which files get added or modified stays the same. Our tool:
- Adds NuGet packages for Active Directory Authentication Library and Json.NET.
- Adds a set of common helper files (that is, files whose names start with "Office365*", such as "Office365ServiceInfo") that are common across different services. These files get added regardless of whether you chose Exchange, SharePoint, or Active Directory, since they are used for all three cases. We expect that you will keep these files in your project, as they will be valuable for your own apps.
- Adds a set of service-specific sample files (for example, ExchangeSampleController and its accompanying view folder for an MVC web application, or ExchangeSamplePage.xaml and its accompanying code-behind for a Windows 8.1 app). These files are intended to show how each individual service is used, and to provide a compelling experience when you first try to run the service. Once you have ran the sample and copied any relevant functionality into your own code, you can delete these files.
- Modifies Web.config or App.xaml to include the Client ID (and, in the case of web apps the Password) for the app. These values are obtained from the Windows Azure Active Directory, which serves as the authentication authority for Office 365 APIs. Those credentials act as a "link" between the entry in Active Directory and your project within Visual Studio. The Client ID is used both at runtime (for authentication), and by our tool itself (that way, when you return to the Service Manager, we know whether we've already registered your app, and can add or modify services and permissions)
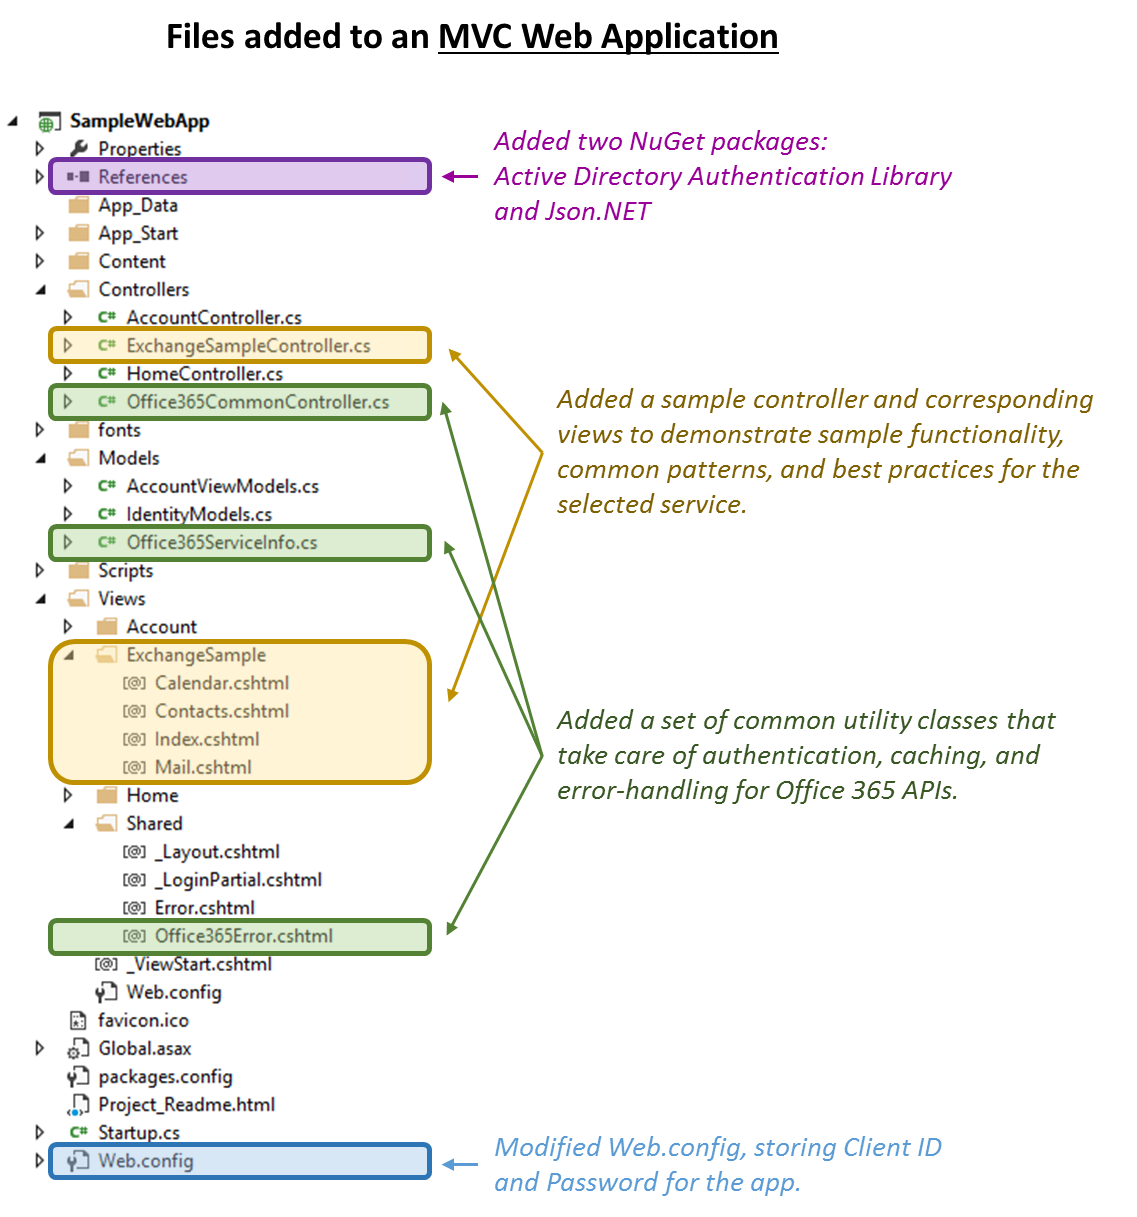
Figure 7. Files added to an MVC Web Application
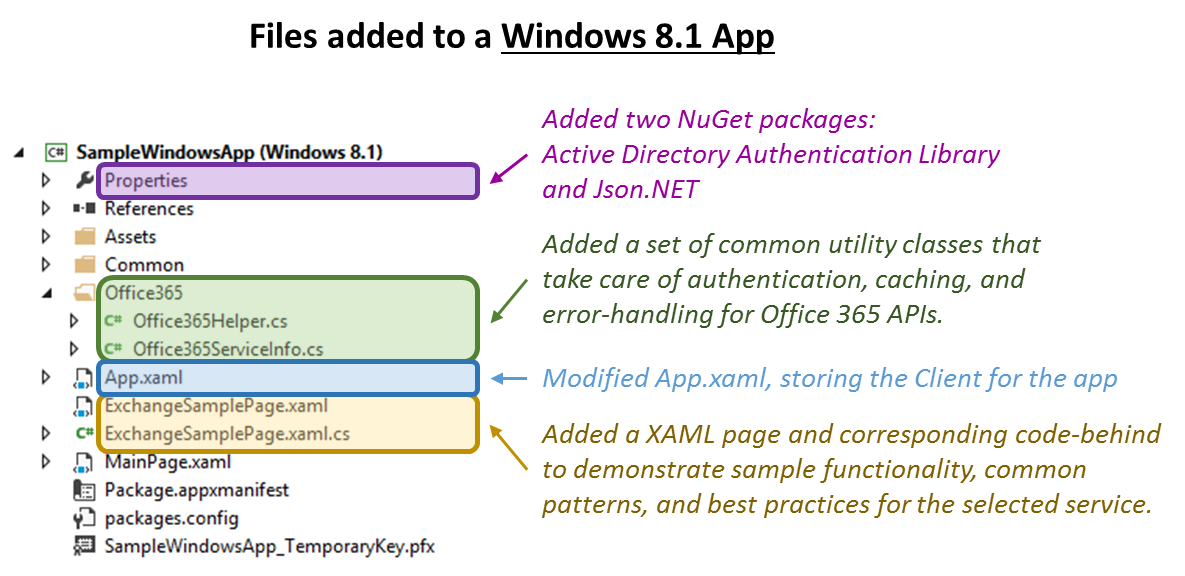
Figure 8. Files added to a Windows 8.1 App
Note: For Windows 8.1 apps, the sample code relies on a set of Windows 8.1 common classes (NavigationHelper, ObservableDictionary, and so on) that are included automatically for non-blank Windows 8.1 apps. The files are found inside of a Common folder at the root of the project. If your project does not contain these files, simply choose Add > New Item > Basic Page (or any other non-Blank page), and add the page to your app. Choose Yes when prompted to add the missing files—this will ensure that the Common folder is added. After that, you can either delete the new page, or keep it for your own use.
Running the sample code
For the Web Application project, choose Debug (or press F5) to run the app. Depending on your web project settings and what file you have open in Visual Studio (our tool automatically opens the controller and the view for the newly-added Office 365 service), your browser may open to the right view by itself. If not, and if it goes to something like "https://localhost:10247/", just append "/<Service-Name>Sample/" to the URL: for example, "https://localhost:10247/ExchangeSample/".
Exchange offers several different samples, so going to the Exchange view will give you three buttons to choose from (Figure 9). For this example, I will choose Contacts. In the case of SharePoint and Active Directory, you would be taken directly to the sample.
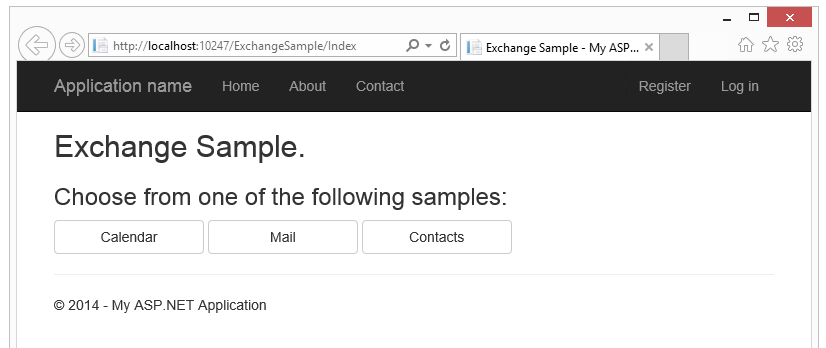
Figure 9. Running the Exchange sample in a Web application
When the app is first run (and on any subsequent closing and re-opening of the browser), the app will have no access tokens or refresh tokens that are necessary for communicating with Office 365 APIs. As such, you will be directed to a login screen (Figure 10). You can enter the same credentials as you used for registering the app—or you can log in as a different user (or even as a different user on a different tenant, if you had enabled the Make this app available to… all tenants in the permissions dialog box (Figure 5)). For tenants other than the ones used to register the app, you will also see a consent dialog box after the login screen.
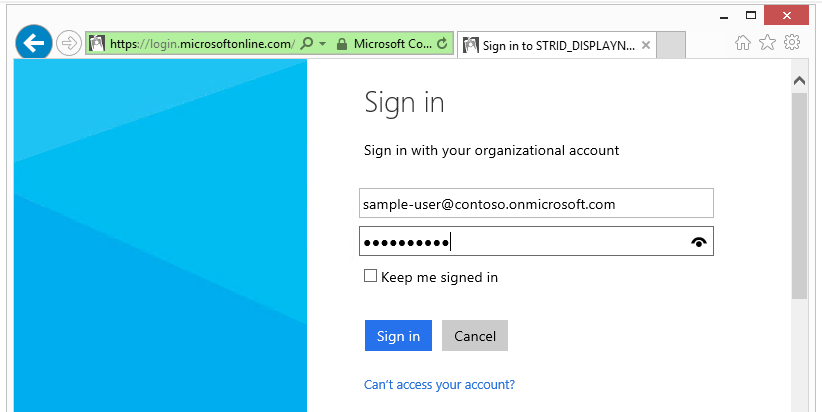
Figure 10. An automatic redirect to log in at https://login.microsoftonline.com
After authentication is complete, the browser will redirect you back to your app. You may briefly see something like "https://localhost:10247/Office365Common" in the address bar, along with some long query parameters. The common controller will handle authentication, will cache the access token and refresh token, and then redirect you back to the page where you came from (for example, "https://localhost:10247/ExchangeSample/Contacts"). Now that that page has an access token, it will be able to process the request. For example, you might see something like this (Figure 11).
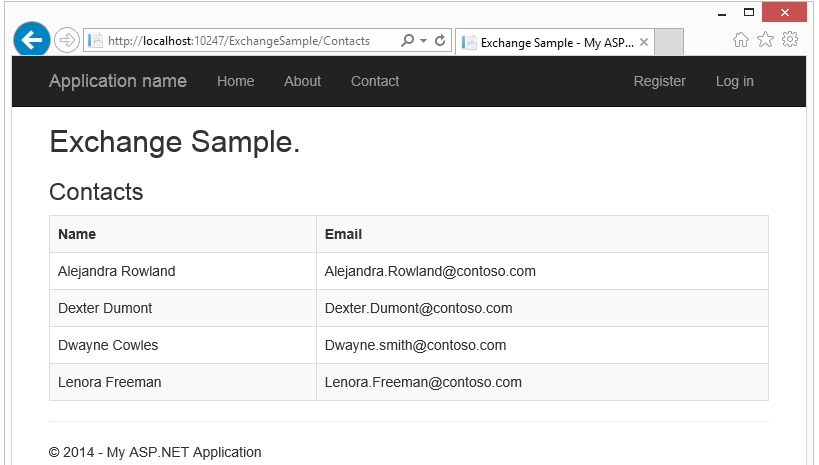
Figure 11. Running the Exchange Contacts sample in a Web application
Within a given session, access tokens and refresh tokens are cached—so you will not need to log in again, even when switching among service, until you close and re-open the browser (or until the session expires due to inactivity). To cache the access tokens and refresh tokens beyond the confines of a session, you can persist them more permanently in a database—see the comments in the Office365CommonController class.
Windows 8.1 apps:
For Windows 8.1 apps, there is no address bar where you can navigate straight to a particular page. Instead, you will need to add code for an action to take you to the new sample page. For example, you might add a button to your main page.
<Button Content="Exchange Sample" Click="ExchangeSampleButton_Click" />
Then, in the code-behind, simply do:
private void ExchangeSampleButton_Click(object sender, RoutedEventArgs e)
{
this.Frame.Navigate(typeof(ExchangeSamplePage));
}
Having done this, choose Debug (or press F5) to run the app. Be aware that you can run either in full-screen mode on the local machine, or in a Simulator (Figure 12).

Figure 12. Simulator vs. Local Machine dropdown for Windows 8.1 apps
When you run the app, choose the button to navigate to the sample page. Again, you will either have a choice of samples for Exchange (I will choose Contacts for the example below), or a single sample for Active Directory and SharePoint. In either case, if you are not already signed in with the app, you will be prompted with a login and consent dialog box (Figures 13 and 14).
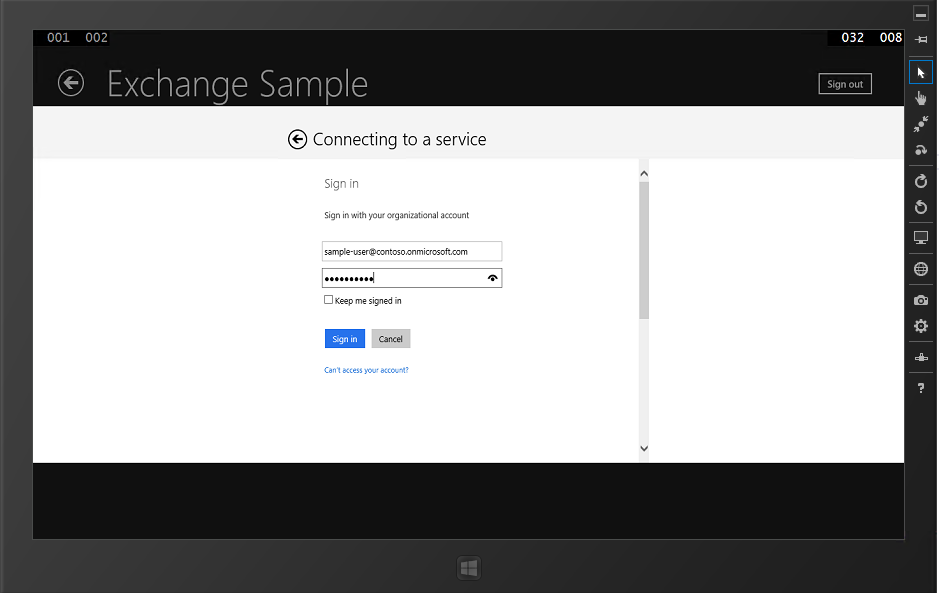
Figure 13. Windows 8.1 login dialog box
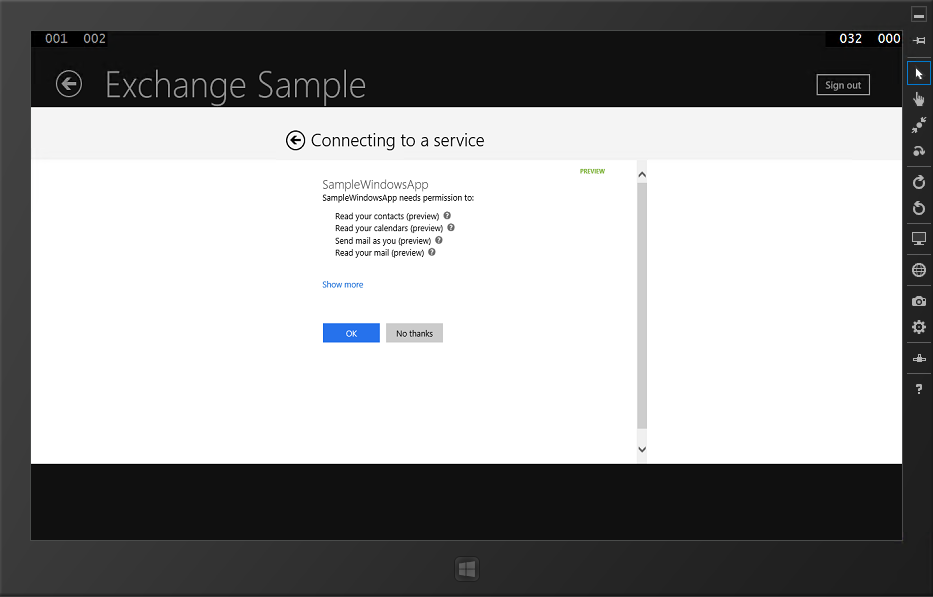
Figure 14. Windows 8.1 consent dialog box
Once your app is authenticated and consented, you will see the example functionality (Figure 15).
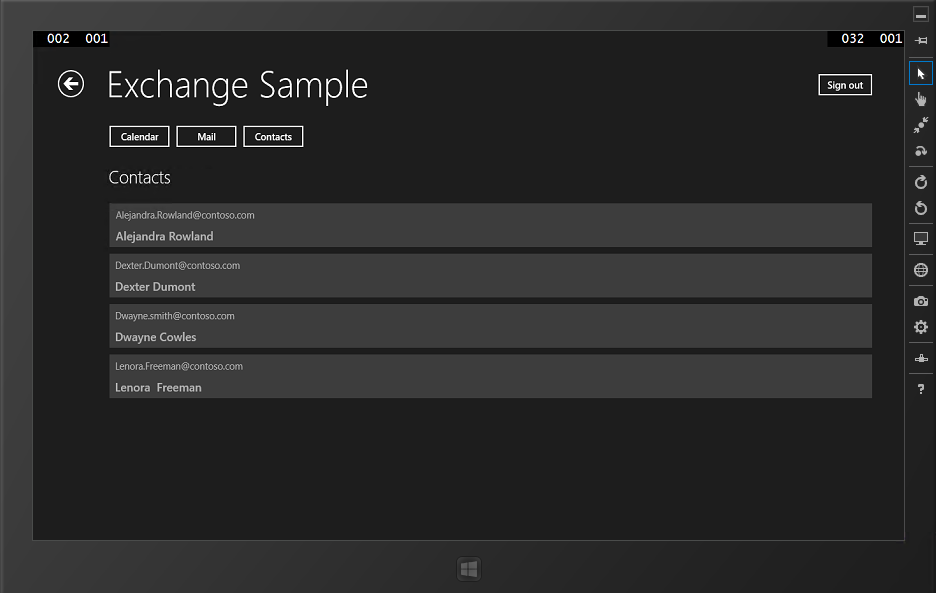
Figure 15. Running the Exchange Contacts sample in a Windows 8.1 app
What's Next?
This post showed how to obtain the Office 365 API Tools, register an app for Office 365 APIs, and run the sample code. However, this was just the initial setup: the interesting part is once you start authoring your own code to use Office 365 APIs within your Web applications or Windows 8.1 apps.
Stay tuned for a follow-up post where we will explore the sample code that the tool generates, and use that as a building block for writing custom code (for example, to send mail on behalf of a user). For now, take a look at ExchangeSampleController/ExchangeSamplePage (and the analogous Active Directory and SharePoint files) to start looking at the code—and of course, the Office 365 APIs documentation. If you have any questions or feedback, the team is monitoring StackOverflow. Tag your questions [Office365APIs].
~ This post was brought to you by Michael Zlatkovsky, a Program Manager on the Office Developer Tools team at Microsoft.
Comments
Anonymous
March 12, 2014
Great Job MS Team. Office 365 Platform is the Future and Microsoft Is doing the Right thing by Investing Hugely in this Platform.Anonymous
March 12, 2014
I just added the API Tools to a new VS2013 install and the "Connect Service" option is not showing for me. dl.dropboxusercontent.com/.../365APITools.png system and VS info: dl.dropboxusercontent.com/.../sysinfo.txt Any help is appreciated.Anonymous
March 13, 2014
Did you update Visual Studio 2013? I didn't see this option until after I updated it.Anonymous
March 13, 2014
@Robin, sorry to hear that the Connected Service is not showing up for you. Could you check what happens when you create a Windows 8.1 (Windows Store) project? Does the "Connected Service" menu item show up for you there? And if so, once it opens the Services Manager dialog -- do you see the Office 365 node in there? Also, just in case: could you restart Visual Studio (or even Windows) just to be sure? Thanks,
- Michael
Anonymous
March 13, 2014
@Micheal I cannot create a Windows Store project since I am running Windows 7 and not 8.1. Is Windows 8.1 a requirement for the API Tools? Because I do not see it mentioned anywhere. Doing a reboot and creating a new project also did not work. Thanks, RobinAnonymous
March 13, 2014
Hi, I also don't see the "Connected Service"... I have Windows 8.0 installed not 8.1 Kind Regards VandeputAnonymous
March 14, 2014
@Robin & Vanderput, I have contacted some folks to try to investigate the cause of the problem. We'll get back to you as soon as we have news, thanks for your patience.Anonymous
March 15, 2014
I had the same issue with "Connected Service" not being available on the Add-menu. Clean install of Win 8.1 and Visual Studio 2013 Premium. "Connected Service" showed up for Windows Store apps, but not Web Apps. Apparently I hadn't fully patched the Windows install. Did everything Windows Update offered, rebooted, and after a reinstall of the extension it appeared where it should. (I initially got some unhelpful error messages in VS about extensions having been changed and to inspect log files)... Could of course have been coincidences, but certainly seems it possible to run into instances where it's not properly registered. Now to see what I can do with the APIs :)Anonymous
March 15, 2014
The comment has been removedAnonymous
March 17, 2014
After choose one of the services (for example, Exchange) from the list and choose OK, I always get error:Adding 'SharePoint' to the project failed: 0x80004003 . Why?Anonymous
March 18, 2014
The comment has been removedAnonymous
March 18, 2014
@Leon: Sorry to hear about the issue. For the account that you're using to sign-in, can you verify that it's an organizational / O365 account (e.g., user@tenant.onmicrosoft.com, not a live ID) -- and that the user is an Admin?Anonymous
March 19, 2014
This has become VERY typical of Microsoft products of late, especially those aimed at developers. "Here's a simple step-by-step tutorial..." then step 2 doesn't work and no one knows why. Meanwhile there's very little you can do because all of the other documentation says "just follow this simple tutorial at <insert link to broken tutorial>." MS development tools have become the ultimate feature creep product fiasco.Anonymous
March 19, 2014
@Rob, sorry to hear you're having trouble, and rest assured we're here to help. We have seen a few isolated reports where, on certain configurations, the Connected Services context menu item does not show up. Is that what you mean by "step 2"? If so, could you please try the workaround described on visualstudiogallery.msdn.microsoft.com/.../Discussions, under the heading '"Connect Service" not showing'? If the does not help or is not the issue you're seeing, we need to understand a little more about what exactly did not work for you. Feel free to start a new discussion on visualstudiogallery.msdn.microsoft.com/.../Discussions, and we'll do what we can to help get you unblocked. I look forward to hearing from you,
- Michael Zlatkovsky, Program Manager on Office Developer Tools
Anonymous
March 19, 2014
Hi , how can I change share permission of a file using the API ? ( 4.5 C# MVC )Anonymous
March 26, 2014
Great start of a new era, Office365 is just a perfect collection of tools available on all locations. Just wishing for Word/Excel API’s to be released to do the ‘real’ thing and cloudify our addins. That would enable us to move the Enterprise productivity tools into the Cloud and actually do some real work in the Cloud.Anonymous
March 26, 2014
Hi Maarten, Thanks for the praise! Happy to hear that you think we are heading in the right direction. Are there any specific APIs that would help you move your addins to the cloud? If so, please let us know via our Office/SP Dev UserVoice (officespdev.uservoice.com). Thanks! Dorrene Brown, Program Manager on the Office Developer Platform TeamAnonymous
March 27, 2014
I cannot find a relevant forum in MSDN forums. I notice dev.office.com recommends stackoverflow, but there's zero activity there. No answers and only 3 views after 9 hours is rather underwhelming compared to MSDN in my experience. stackoverflow.com/.../office365-api-app-only-elevated-permissions Can someone point me in the right direction to user support forums for office developer tools? TIA, JoshAnonymous
April 02, 2014
Hi, I would like to know if I could get the shared calendar events in my O365 Calendar. Is there a way I could get this? I tried it by changing the API URL. But no luck. Any help on this is appreciated.Anonymous
April 08, 2014
Is there any support for WebForms Applications? or a work-around? I just really want to integrate an existing mature webforms app with an office 365 calendar and dont; really want to have to rewrite the whole application jsut to get this functionality. I've integrated WebAPI with Webforms before so it would seem that there should be a fairly straightforward way.... Thanks in advance. JonathanAnonymous
April 08, 2014
@Jonathan - Can you please expand your scenario a bit? Are you trying to access Office 365 API in the Web API method that is exposed to client(s) in a Web Forms application? Thanks, Chaks Program ManagerAnonymous
April 10, 2014
Hi @Chakkaradeep, The project templates for integrating the Office 365 API only mention MVC projects and Windows 8.1 Projects: "Is available for both MVC Web Applications and Windows 8.1 apps." I'm just wondering if the API can be used in a WebForms project? Cheers JonathanAnonymous
April 13, 2014
Michael, I can't find the Connected Service option when I'm trying to add that to a MVC Web Application, Although I can see it when I create a Windows Store App, but I can't see the Office 365 Node in the Service Manager Window, Thanks, VarunAnonymous
April 14, 2014
Note: for issues of the Connected Services / Office 365 node not showing up, the discussion is being held in a "Q and A" section on visualstudiogallery.msdn.microsoft.com/.../DiscussionsAnonymous
April 14, 2014
Hi, When can we expect next/final release of the API?Anonymous
April 20, 2014
Hi All, I am using office 365 API tool with VS 2013 and working on file system method for download the content of word file from onedrive so I am getting response but not in well format plz help me on this....... get: ( "h@ < o> y}~Y n/)e yӂ ~ 0q? rqO{ % G (+>K b #9 ɗI S 4`T A) need: (its text content)Anonymous
May 10, 2014
Hey, I have used O365 API in provider hosted app for SP. I deployed it to azure web site but when I access the app from SP it gives bad request error. /Office365Common is not valid.. Any idea?Anonymous
May 21, 2014
Michael and Chaks, StackOverflow isn't working out. We need a proper MS forum for Office365API support. I've seen 3 different tags suggested, the most common of which has no questions. The only questions that do exist are all first timers some of which are answered by first timers on behalf of MS as well (evidence that both your users and employees aren't on SO) Also check out this yes/no question that was closed unanswered as 'too broad' by rouge moderators. stackoverflow.com/.../questions-about-office-365-preview-apis Maybe instead of providing support in blog comments, gallery discussions and twitter it would help to use a proper msdn forum. That might also make some of the many SP MVPs aware of the new API as a bonus like this one: social.msdn.microsoft.com/.../office-365-api Most answers come from the community, where there is no community, there will be no questions or answers.Anonymous
July 06, 2014
When i check this option now, i don't get these three options with connected services, rather options like Mail, MyFiles etc. I assumed the tooling has changed? And with the current options, there is no views/controllers being added but only one sample class. Is this expected or its only me? Thanks SanjayAnonymous
July 11, 2014
I followed the instruction on this page and added permissions for Calendar service. I do see my web.config modified with the ClientID and password. But I do not see the Calendar.cshtml file added to the project. I do see the file CalendarAPISample.cs but that file is not called from anywhere. Anyone else facing this issue?Anonymous
July 15, 2014
Sanjay and Amol, These instructions are superseded by the new preview release. Here's the new blog post blogs.msdn.com/.../new-preview-of-office-365-api-tools-for-visual-studio.aspx.Anonymous
August 28, 2014
Is this API able to create mailboxes on O365? ThanksAnonymous
January 07, 2015
Can i know why the service doesn't add any fail to my project structure?Anonymous
January 27, 2015
@michal Hi everything is visible and i'm following the same procedure for adding the connected service in my web application. the app is created inside windows azure subscription with office 365 calendar permissions. But when ever i tried to create a OutlookServiceClient Object for accessing the api and it needs DiscoveryClient object like DiscoveryClient discoveryClient = new DiscoveryClient(async () => await GetTokenHelperAsync(_authenticationContext, DiscoveryResourceId)); CapabilityDiscoveryResult result = await discoveryClient.DiscoverCapabilityAsync("Calendar"); so when i tried to get DiscoveryCapability it always return Error=Unauthorized. i'm using this CommonAuthority = "login.windows.net/Common but somewhere i read that using tenant id in place of Common will help. but i'm confused where to get Tenant id.. is my client id is tenant id? or my subscription id is tenant id ? or the id shown in the endpoint section is tenant id ? Please help me to get rid of this... Thanks in advanceAnonymous
February 03, 2015
I am by no means an expert in this but you might be looking for: public const string DiscoveryResourceId = "api.office.com/.../"; source: msdn.microsoft.com/.../common-file-tasks-client-libraryAnonymous
July 07, 2015
I came across a question that I have add the connected service but I can't see any files added to the project except the references.Tools' version is the newest. I'm quite confused.Anonymous
July 08, 2015
@v-zhwe: The latest Office 365 API Tools doesn't add new code files into the projects anymore, because those files are purely for demonstration purpose. If you want to learn how to set up the project to make the first call, you can either download sample projects from http://github.com/officedev, or follow the getting started document.Anonymous
July 08, 2015
@XiaoYing Guo: Many Thanks. Because I need to use it in China, so I have to modify some endpoint and I have to know the files or configuration which have been changed. Do you have any suggestions?Anonymous
July 08, 2015
@v-zhwe: The only file that the tooling updates is the config file of your project. To see more details what changes are made in the project after running the wizard, you can check the Output window.Anonymous
July 08, 2015
@Xiaoying Guo: Thanks. ^_^