向空的或现有的 Web 窗体项目添加 ASP.NET Identity
本教程介绍如何 将 ASP.NET Identity (用于 ASP.NET) 的新成员身份系统添加到 ASP.NET 应用程序。
使用个人帐户在 Visual Studio 2017 RTM 中创建新的 Web Forms 或 MVC 项目时,Visual Studio 将安装所有必需的包并添加所有必要的类。 本教程将说明向现有Web Forms项目或新的空项目添加 ASP.NET 标识支持的步骤。 我将概述需要安装的所有 NuGet 包以及需要添加的类。 我将介绍注册新用户和登录的示例Web Forms,同时重点介绍用于用户管理和身份验证的所有main入口点 API。 此示例将使用基于实体框架构建的 SQL 数据存储 ASP.NET 标识默认实现。 本教程将为 SQL 数据库使用 LocalDB。
ASP.NET 标识入门
首先安装和运行 Visual Studio 2017。
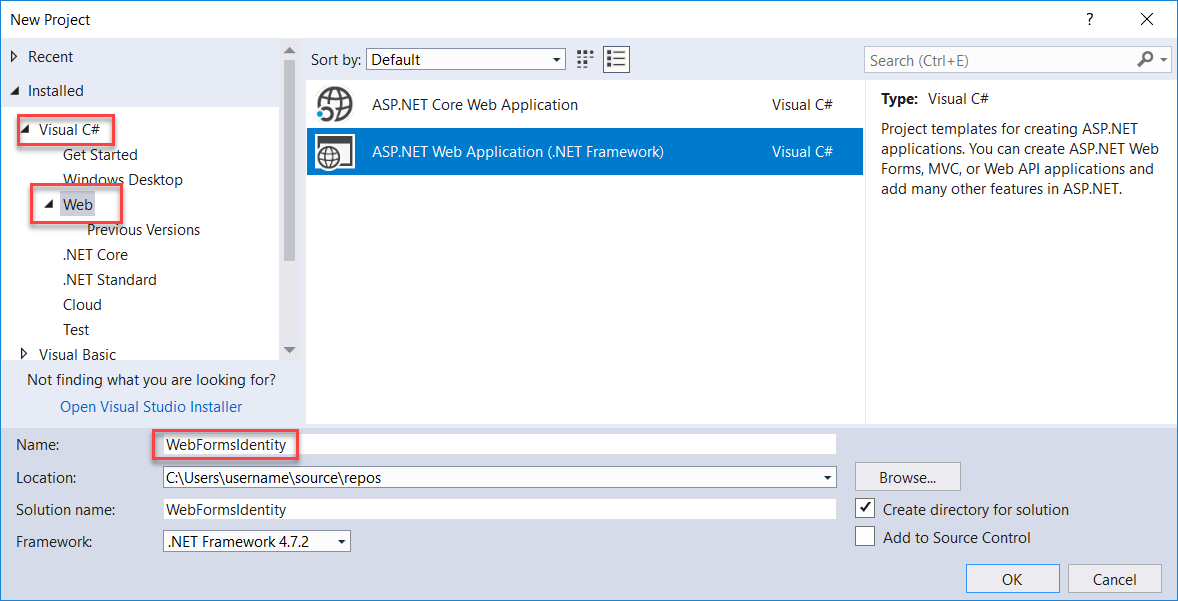
从“开始”页中选择“ 新建项目 ”,也可以使用菜单并选择“ 文件”,然后选择“ 新建项目”。
在左窗格中,展开 “Visual C#”,然后选择“ Web”,然后选择 “ASP.NET Web 应用程序 ” (.Net Framework) 。 将项目命名为“WebFormsIdentity”,然后选择“ 确定”。
在 “新建 ASP.NET 项目 ”对话框中,选择“ 空 ”模板。
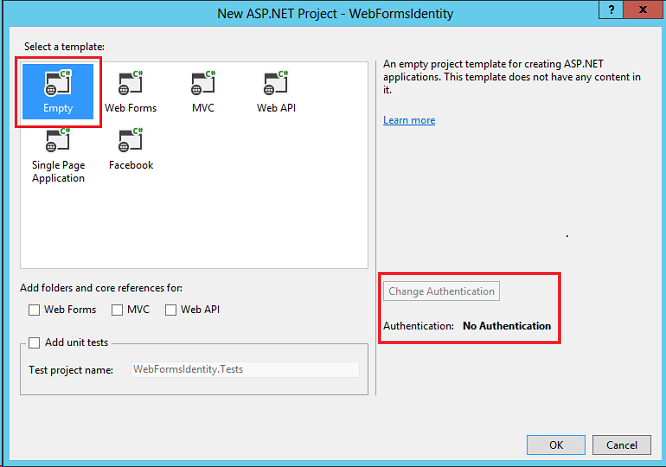
请注意,“ 更改身份验证 ”按钮已禁用,并且此模板中未提供身份验证支持。 Web Forms、MVC 和 Web API 模板允许你选择身份验证方法。
将标识包添加到应用
在“解决方案资源管理器”中,右键单击项目并选择“管理 NuGet 包”。 搜索并安装 Microsoft.AspNet.Identity.EntityFramework 包。
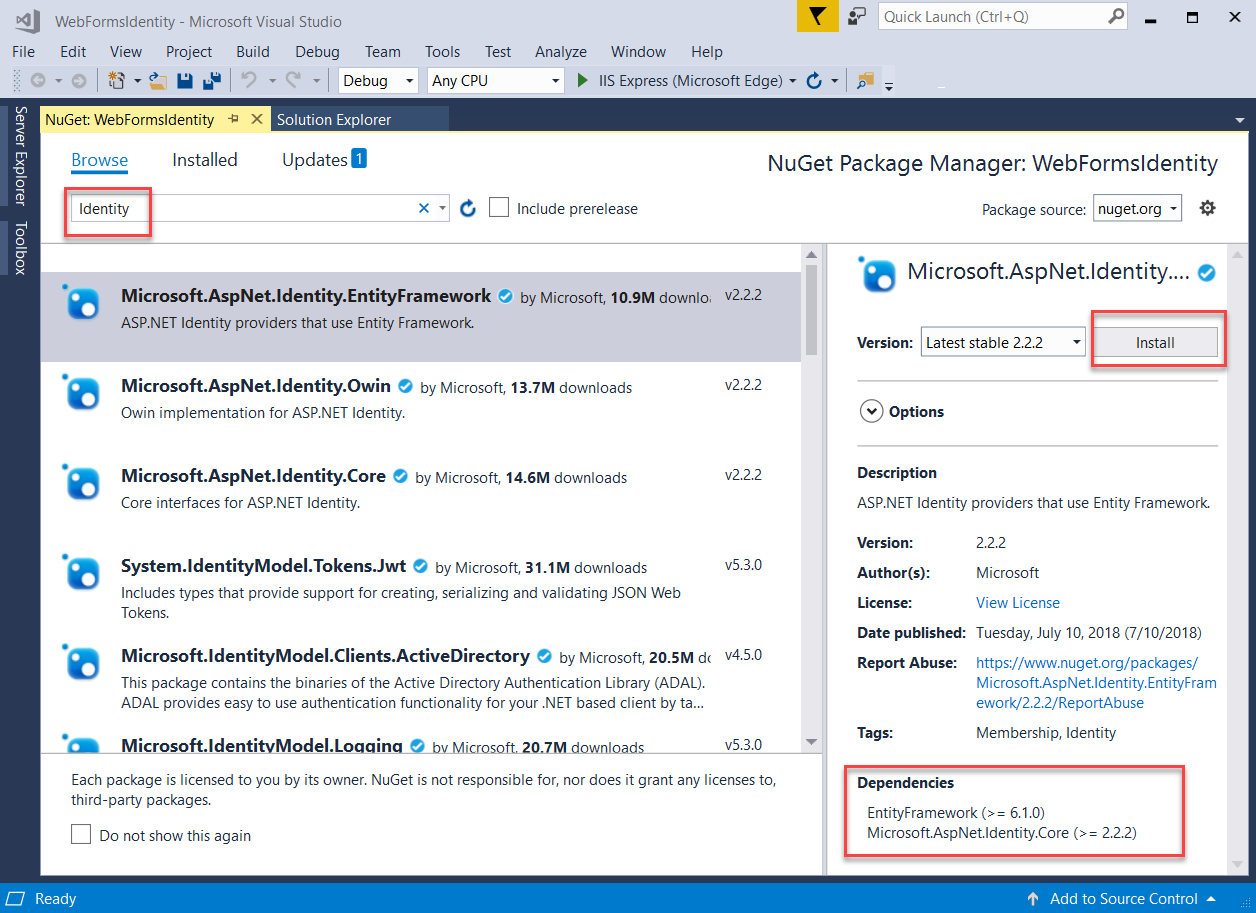
请注意,此包将安装依赖项包: EntityFramework 和 Microsoft ASP.NET Identity Core。
添加 Web 窗体以注册用户
在“解决方案资源管理器”中,右键单击项目并选择“添加”,然后选择“Web 窗体”。
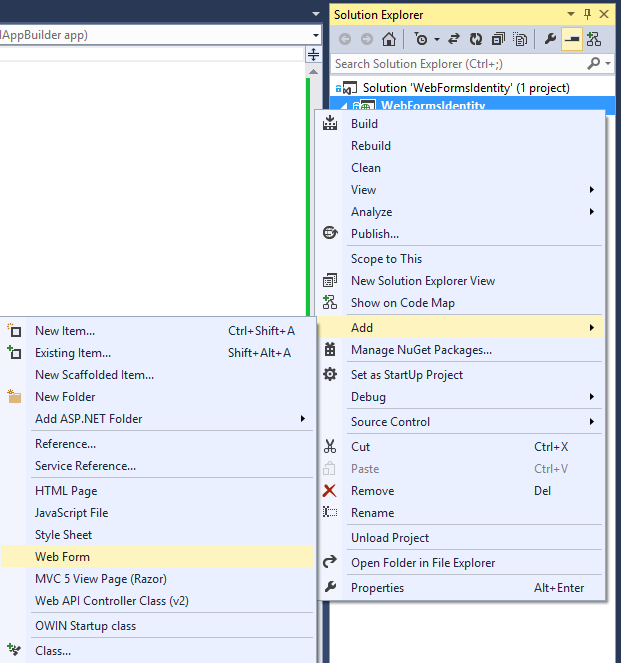
在 “指定项的名称 ”对话框中,将新 Web 窗体命名为 Register,然后选择“ 确定”
将生成的 Register.aspx 文件中的标记替换为以下代码。 代码所作更改为突出显示状态。
<%@ Page Language="C#" AutoEventWireup="true" CodeBehind="Register.aspx.cs" Inherits="WebFormsIdentity.Register" %>

<!DOCTYPE html>

<html xmlns="http://www.w3.org/1999/xhtml">
<head runat="server">
    <title></title>
</head>
<body style="font-family: Arial, Helvetica, sans-serif; font-size: small">
    <form id="form1" runat="server">
    <div>
        <h4 style="font-size: medium">Register a new user</h4>
        <hr />
        <p>
            <asp:Literal runat="server" ID="StatusMessage" />
        </p>
        <div style="margin-bottom:10px">
            <asp:Label runat="server" AssociatedControlID="UserName">User name</asp:Label>
            <div>
                <asp:TextBox runat="server" ID="UserName" />
            </div>
        </div>
        <div style="margin-bottom:10px">
            <asp:Label runat="server" AssociatedControlID="Password">Password</asp:Label>
            <div>
                <asp:TextBox runat="server" ID="Password" TextMode="Password" />
            </div>
        </div>
        <div style="margin-bottom:10px">
            <asp:Label runat="server" AssociatedControlID="ConfirmPassword">Confirm password</asp:Label>
            <div>
                <asp:TextBox runat="server" ID="ConfirmPassword" TextMode="Password" />
            </div>
        </div>
        <div>
            <div>
                <asp:Button runat="server" OnClick="CreateUser_Click" Text="Register" />
            </div>
        </div>
    </div>
    </form>
</body>
</html>
注意
这只是在创建新的 ASP.NET Web Forms 项目时创建的 Register.aspx 文件的简化版本。 上述标记添加表单域和用于注册新用户的按钮。
打开 Register.aspx.cs 文件,将文件的内容替换为以下代码:
using Microsoft.AspNet.Identity;
using Microsoft.AspNet.Identity.EntityFramework;
using System;
using System.Linq;

namespace WebFormsIdentity
{
   public partial class Register : System.Web.UI.Page
   {
      protected void CreateUser_Click(object sender, EventArgs e)
      {
         // Default UserStore constructor uses the default connection string named: DefaultConnection
         var userStore = new UserStore<IdentityUser>();
         var manager = new UserManager<IdentityUser>(userStore);

         var user = new IdentityUser() { UserName = UserName.Text };
         IdentityResult result = manager.Create(user, Password.Text);

         if (result.Succeeded)
         {
            StatusMessage.Text = string.Format("User {0} was created successfully!", user.UserName);
         }
         else
         {
            StatusMessage.Text = result.Errors.FirstOrDefault();
         }
      }
   }
}
注意
- 上面的代码是创建新 ASP.NET Web Forms 项目时创建的 Register.aspx.cs 文件的简化版本。
- IdentityUser 类是 IUser 接口的默认 EntityFramework 实现。 IUser 接口是 ASP.NET Identity Core 上的用户的最低接口。
- UserStore 类是用户存储的默认 EntityFramework 实现。 此类实现 ASP.NET Identity Core 的最小接口: IUserStore、 IUserLoginStore、 IUserClaimStore 和 IUserRoleStore。
- UserManager 类公开与用户相关的 API,这些 API 会自动将更改保存到 UserStore。
- IdentityResult 类表示标识操作的结果。
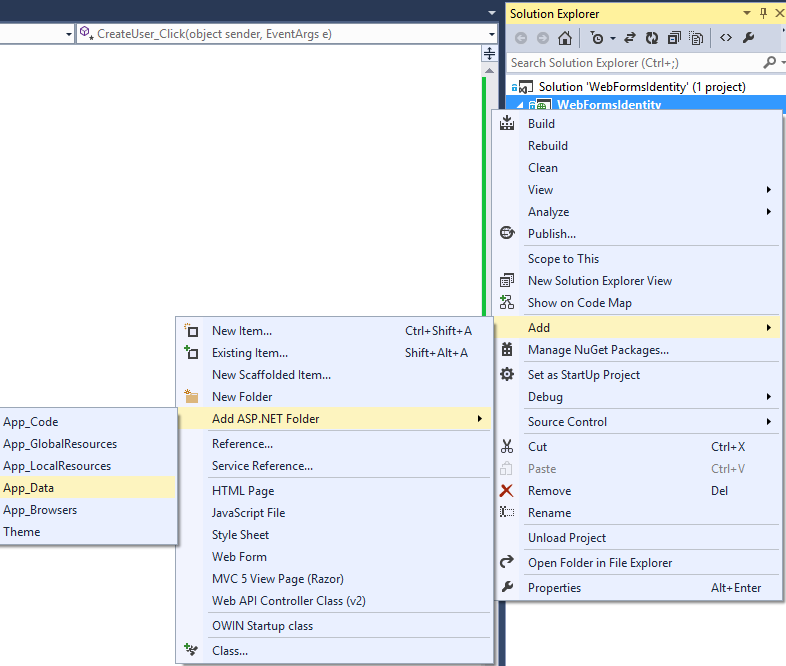
在“解决方案资源管理器”中,右键单击项目,依次选择“添加”、“添加 ASP.NET 文件夹”和“App_Data”。
打开 Web.config 文件,并为用于存储用户信息的数据库添加连接字符串条目。 数据库将在运行时由 EntityFramework 为标识实体创建。 连接字符串类似于在创建新的Web Forms项目时为你创建的连接字符串。 突出显示的代码显示应添加的标记:
<?xml version="1.0" encoding="utf-8"?>
<!--
  For more information on how to configure your ASP.NET application, please visit
  https://go.microsoft.com/fwlink/?LinkId=169433
  -->
<configuration>
  <configSections>
    <!-- For more information on Entity Framework configuration, visit https://go.microsoft.com/fwlink/?LinkID=237468 -->
    <section name="entityFramework" type="System.Data.Entity.Internal.ConfigFile.EntityFrameworkSection, EntityFramework, Version=6.0.0.0, Culture=neutral, PublicKeyToken=b77a5c561934e089" requirePermission="false" />
  </configSections>
   <connectionStrings>
      <add name="DefaultConnection" connectionString="Data Source=(LocalDb)\v11.0;AttachDbFilename=|DataDirectory|\WebFormsIdentity.mdf;Initial Catalog=WebFormsIdentity;Integrated Security=True"
            providerName="System.Data.SqlClient" />
   </connectionStrings>
  <system.web>
    <compilation debug="true" targetFramework="4.5" />
    <httpRuntime targetFramework="4.5" />
  </system.web>
  <entityFramework>
    <defaultConnectionFactory type="System.Data.Entity.Infrastructure.LocalDbConnectionFactory, EntityFramework">
      <parameters>
        <parameter value="v11.0" />
      </parameters>
    </defaultConnectionFactory>
    <providers>
      <provider invariantName="System.Data.SqlClient" type="System.Data.Entity.SqlServer.SqlProviderServices, EntityFramework.SqlServer" />
    </providers>
  </entityFramework>
</configuration>
注意
对于 Visual Studio 2015 或更高版本,请将 连接字符串中的 替换为
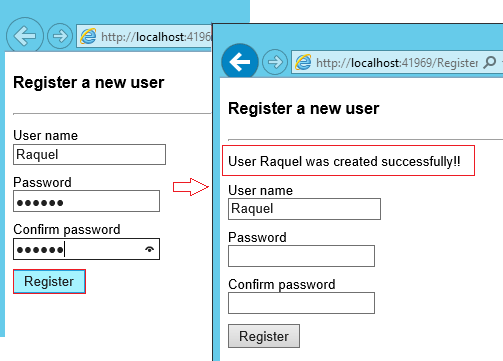
(localdb)\v11.0(localdb)\MSSQLLocalDB。右键单击项目中的文件 Register.aspx ,然后选择“ 设为起始页”。 按“Ctrl + F5”生成并运行 Web 应用程序。 输入新的用户名和密码,然后选择“ 注册”。
注意
ASP.NET Identity 支持验证,在此示例中,可以验证来自 Identity Core 包的用户和密码验证程序的默认行为。 用户 (
UserValidator) 的默认验证程序具有默认值设置为true的属性AllowOnlyAlphanumericUserNames。 密码 (MinimumLengthValidator的默认验证程序) 确保密码至少包含 6 个字符。 这些验证程序是 上的UserManager属性,如果要进行自定义验证,则可以重写这些验证程序,
验证 Entity Framework 生成的 LocalDb 标识数据库和表
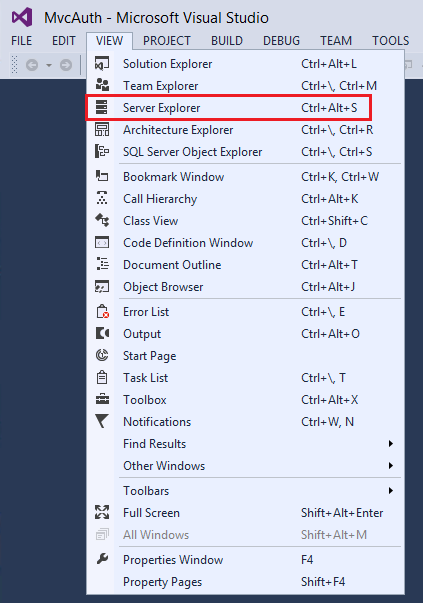
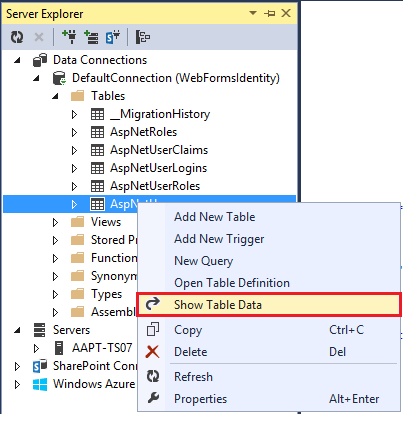
在“ 视图 ”菜单中,选择“ 服务器资源管理器”。
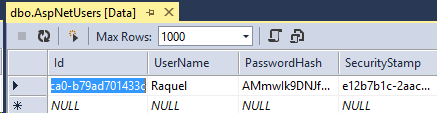
展开 “DefaultConnection (WebFormsIdentity) ”,展开“ 表”,右键单击“ AspNetUsers ”,然后选择“ 显示表数据”。
为应用程序配置 OWIN 身份验证
目前,我们只添加了对创建用户的支持。 现在,我们将演示如何添加身份验证来登录用户。 ASP.NET 标识使用 Microsoft OWIN 身份验证中间件进行表单身份验证。 OWIN Cookie 身份验证是基于 Cookie 和声明的身份验证机制,可由 OWIN 或 IIS 上托管的任何框架使用。 使用此模型,可以在多个框架(包括 ASP.NET MVC 和 Web Forms)之间使用相同的身份验证包。 有关项目 Katana 以及如何在与主机无关的情况下运行中间件的详细信息,请参阅使用 Katana 项目入门。
将身份验证包安装到应用程序
在“解决方案资源管理器”中,右键单击项目并选择“管理 NuGet 包”。 搜索并安装 Microsoft.AspNet.Identity.Owin 包。
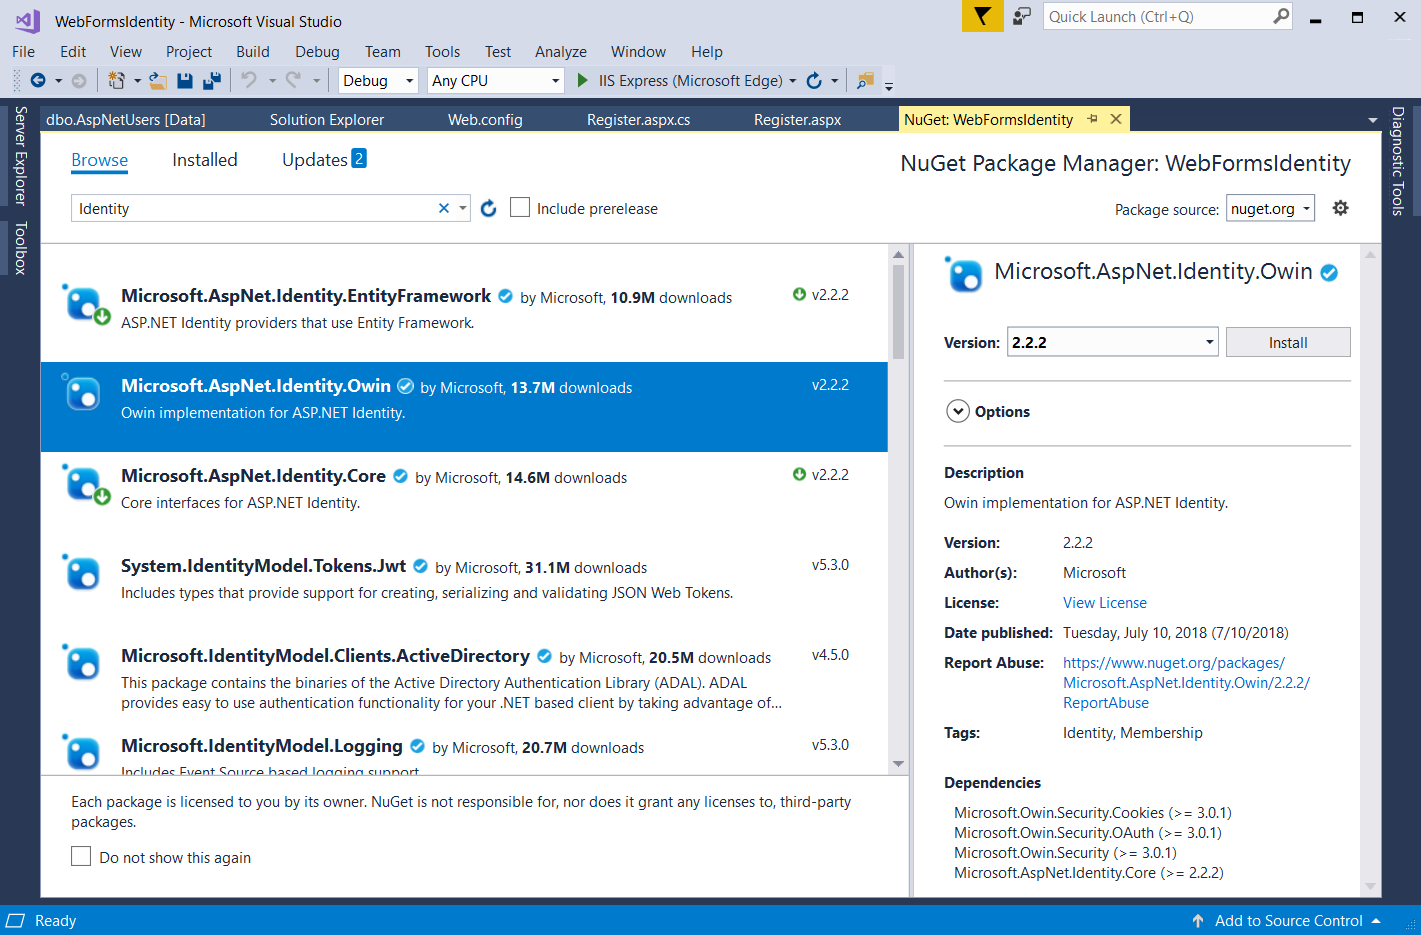
搜索并安装 Microsoft.Owin.Host.SystemWeb 包。
注意
Microsoft.Aspnet.Identity.Owin 包包含一组 OWIN 扩展类,用于管理和配置要由 ASP.NET Identity Core 包使用的 OWIN 身份验证中间件。 Microsoft.Owin.Host.SystemWeb 包包含一个 OWIN 服务器,使基于 OWIN 的应用程序能够使用 ASP.NET 请求管道在 IIS 上运行。 有关详细信息,请参阅 IIS 集成管道中的 OWIN 中间件。
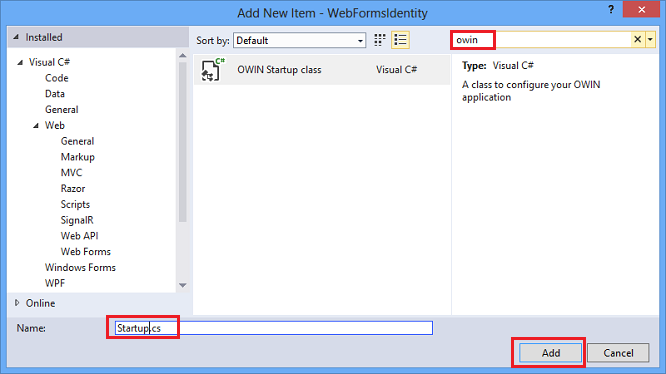
添加 OWIN 启动和身份验证配置类
在“解决方案资源管理器”中,右键单击项目,选择“添加”,然后选择“添加新项”。 在搜索文本框对话框中,键入“owin”。 将类命名为“Startup”,然后选择“ 添加”。
在 Startup.cs 文件中,添加下面显示的突出显示的代码以配置 OWIN Cookie 身份验证。
using Microsoft.AspNet.Identity;
using Microsoft.Owin;
using Microsoft.Owin.Security.Cookies;
using Owin;

[assembly: OwinStartup(typeof(WebFormsIdentity.Startup))]

namespace WebFormsIdentity
{
   public class Startup
   {
      public void Configuration(IAppBuilder app)
      {
         // For more information on how to configure your application, visit https://go.microsoft.com/fwlink/?LinkID=316888
         app.UseCookieAuthentication(new CookieAuthenticationOptions
         {
            AuthenticationType = DefaultAuthenticationTypes.ApplicationCookie,
            LoginPath = new PathString("/Login")
         });
      }
   }
}
注意
此类包含
OwinStartup用于指定 OWIN 启动类的 属性。 每个 OWIN 应用程序都有一个启动类,可在其中指定应用程序管道的组件。 有关此模型的详细信息,请参阅 OWIN 启动类检测 。
添加用于注册和登录用户的 Web 表单
打开 Register.aspx.cs 文件并添加以下代码,用于在注册成功时登录用户。
using Microsoft.AspNet.Identity;
using Microsoft.AspNet.Identity.EntityFramework;
using Microsoft.Owin.Security;
using System;
using System.Linq;
using System.Web;

namespace WebFormsIdentity
{
   public partial class Register : System.Web.UI.Page
   {
      protected void CreateUser_Click(object sender, EventArgs e)
      {
         // Default UserStore constructor uses the default connection string named: DefaultConnection
         var userStore = new UserStore<IdentityUser>();
         var manager = new UserManager<IdentityUser>(userStore);
         var user = new IdentityUser() { UserName = UserName.Text };

         IdentityResult result = manager.Create(user, Password.Text);

         if (result.Succeeded)
         {
            var authenticationManager = HttpContext.Current.GetOwinContext().Authentication;
            var userIdentity = manager.CreateIdentity(user, DefaultAuthenticationTypes.ApplicationCookie);
            authenticationManager.SignIn(new AuthenticationProperties() { }, userIdentity);
            Response.Redirect("~/Login.aspx");
         }
         else
         {
            StatusMessage.Text = result.Errors.FirstOrDefault();
         }
      }
   }
}
注意
- 由于 ASP.NET 标识和 OWIN Cookie 身份验证是基于声明的系统,框架要求应用开发人员为用户生成 ClaimsIdentity 。 ClaimsIdentity 包含有关用户的所有声明的信息,例如用户所属的角色。 在此阶段,还可以为用户添加更多声明。
- 可以使用 OWIN 中的 AuthenticationManager 并调用
SignIn并传入 ClaimsIdentity 来登录用户,如上所示。 此代码将让用户登录并生成 Cookie。 此调用类似于 FormsAuthentication 模块使用的 FormAuthentication.SetAuthCookie。
在“解决方案资源管理器”中,右键单击项目,选择“添加”,然后选择“Web 窗体”。 将 Web 窗体命名 为 Login。

将 Login.aspx 文件的内容替换为以下代码:
<%@ Page Language="C#" AutoEventWireup="true" CodeBehind="Login.aspx.cs" Inherits="WebFormsIdentity.Login" %>

<!DOCTYPE html>

<html xmlns="http://www.w3.org/1999/xhtml">
<head runat="server">
   <title></title>
</head>
<body style="font-family: Arial, Helvetica, sans-serif; font-size: small">
   <form id="form1" runat="server">
      <div>
         <h4 style="font-size: medium">Log In</h4>
         <hr />
         <asp:PlaceHolder runat="server" ID="LoginStatus" Visible="false">
            <p>
               <asp:Literal runat="server" ID="StatusText" />
            </p>
         </asp:PlaceHolder>
         <asp:PlaceHolder runat="server" ID="LoginForm" Visible="false">
            <div style="margin-bottom: 10px">
               <asp:Label runat="server" AssociatedControlID="UserName">User name</asp:Label>
               <div>
                  <asp:TextBox runat="server" ID="UserName" />
               </div>
            </div>
            <div style="margin-bottom: 10px">
               <asp:Label runat="server" AssociatedControlID="Password">Password</asp:Label>
               <div>
                  <asp:TextBox runat="server" ID="Password" TextMode="Password" />
               </div>
            </div>
            <div style="margin-bottom: 10px">
               <div>
                  <asp:Button runat="server" OnClick="SignIn" Text="Log in" />
               </div>
            </div>
         </asp:PlaceHolder>
         <asp:PlaceHolder runat="server" ID="LogoutButton" Visible="false">
            <div>
               <div>
                  <asp:Button runat="server" OnClick="SignOut" Text="Log out" />
               </div>
            </div>
         </asp:PlaceHolder>
      </div>
   </form>
</body>
</html>
将 Login.aspx.cs 文件的内容替换为以下内容:
using Microsoft.AspNet.Identity;
using Microsoft.AspNet.Identity.EntityFramework;
using Microsoft.Owin.Security;
using System;
using System.Web;
using System.Web.UI.WebControls;

namespace WebFormsIdentity
{
   public partial class Login : System.Web.UI.Page
   {
      protected void Page_Load(object sender, EventArgs e)
      {
         if (!IsPostBack)
         {
            if (User.Identity.IsAuthenticated)
            {
               StatusText.Text = string.Format("Hello {0}!!", User.Identity.GetUserName());
               LoginStatus.Visible = true;
               LogoutButton.Visible = true;
            }
            else
            {
               LoginForm.Visible = true;
            }
         }
      }

      protected void SignIn(object sender, EventArgs e)
      {
         var userStore = new UserStore<IdentityUser>();
         var userManager = new UserManager<IdentityUser>(userStore);
         var user = userManager.Find(UserName.Text, Password.Text);

         if (user != null)
         {
            var authenticationManager = HttpContext.Current.GetOwinContext().Authentication;
            var userIdentity = userManager.CreateIdentity(user, DefaultAuthenticationTypes.ApplicationCookie);

            authenticationManager.SignIn(new AuthenticationProperties() { IsPersistent = false }, userIdentity);
            Response.Redirect("~/Login.aspx");
         }
         else
         {
            StatusText.Text = "Invalid username or password.";
            LoginStatus.Visible = true;
         }
      }

      protected void SignOut(object sender, EventArgs e)
      {
         var authenticationManager = HttpContext.Current.GetOwinContext().Authentication;
         authenticationManager.SignOut();
         Response.Redirect("~/Login.aspx");
      }
   }
}
注意
- 现在检查
Page_Load当前用户的状态,并根据其Context.User.Identity.IsAuthenticated状态执行操作。 显示已登录用户名 :Microsoft ASP.NET Identity Framework 在 System.Security.Principal.IIdentity 上添加了扩展方法,可用于获取UserName已登录用户的 和UserId。 这些扩展方法在程序集中Microsoft.AspNet.Identity.Core定义。 这些扩展方法是 HttpContext.User.Identity.Name 的替代方法。 - SignIn 方法:
This方法替换此示例中以前的CreateUser_Click方法,现在在成功创建用户后登录用户。
Microsoft OWIN Framework 在 上System.Web.HttpContext添加了扩展方法,可用于获取对 的IOwinContext引用。 这些扩展方法在程序集中Microsoft.Owin.Host.SystemWeb定义。 类OwinContext公开一个IAuthenticationManager属性,该属性表示当前请求上可用的身份验证中间件功能。 可以使用 OWIN 中的 并调用SignIn并传入 来登录用户AuthenticationManager,ClaimsIdentity如上所示。 由于 ASP.NET 标识和 OWIN Cookie 身份验证都是基于声明的系统,因此框架要求应用为用户生成ClaimsIdentity。ClaimsIdentity包含有关用户的所有声明的信息,例如用户所属的角色。 还可以在此阶段为用户添加更多声明。此代码将让用户登录并生成 Cookie。 此调用类似于 FormsAuthentication 模块使用的 FormAuthentication.SetAuthCookie。 SignOut方法:从 OWIN 获取对AuthenticationManager的引用并调用SignOut。 这类似于 FormsAuthentication 模块使用的 FormsAuthentication.SignOut 方法。
- 现在检查
按 Ctrl + F5 生成并运行 Web 应用程序。 输入新的用户名和密码,然后选择“ 注册”。
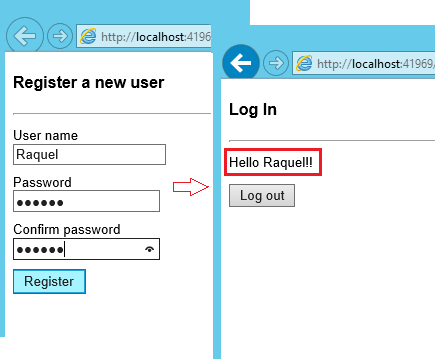
注意:此时,新用户已创建并登录。选择“ 注销 ”按钮。 将重定向到“登录”窗体。
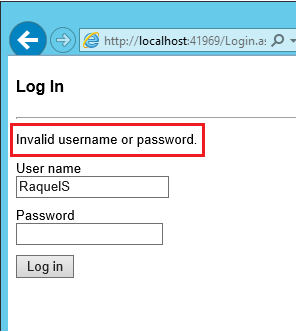
输入无效的用户名或密码,然后选择“ 登录 ”按钮。 方法
UserManager.Find将返回 null,并显示错误消息:“ 用户名或密码无效 ”。