创建具有登录、电子邮件确认和密码重置功能的安全 ASP.NET MVC 5 Web 应用 (C#)
作者: 里克·安德森
本教程介绍如何使用 ASP.NET 标识成员身份系统生成具有电子邮件确认和密码重置的 ASP.NET MVC 5 Web 应用。
有关使用 .NET Core 的本教程的更新版本,请参阅 ASP.NET Core 中的帐户确认和密码恢复。
创建 ASP.NET MVC 应用
首先安装并运行 Visual Studio Express 2013 for Web 或 Visual Studio 2013。 安装 Visual Studio 2013 Update 3 或更高版本。
注意
警告:必须安装 Visual Studio 2013 Update 3 或更高版本才能完成本教程。
创建新的 ASP.NET Web 项目并选择 MVC 模板。 Web 窗体还支持 ASP.NET 标识,因此可以在 Web 窗体应用中执行类似的步骤。
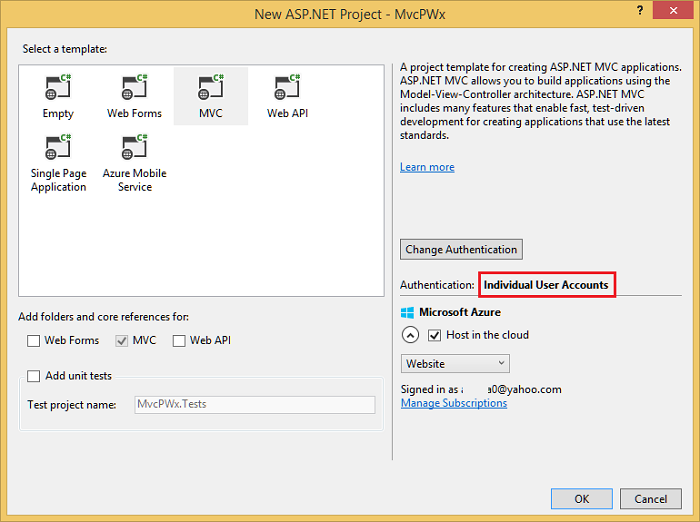
将默认身份验证保留为 单个用户帐户。 若要在 Azure 中托管应用,请选中复选框。 在本教程的后面部分,我们将部署到 Azure。 可以 免费打开 Azure 帐户。
将 项目设置为使用 SSL。
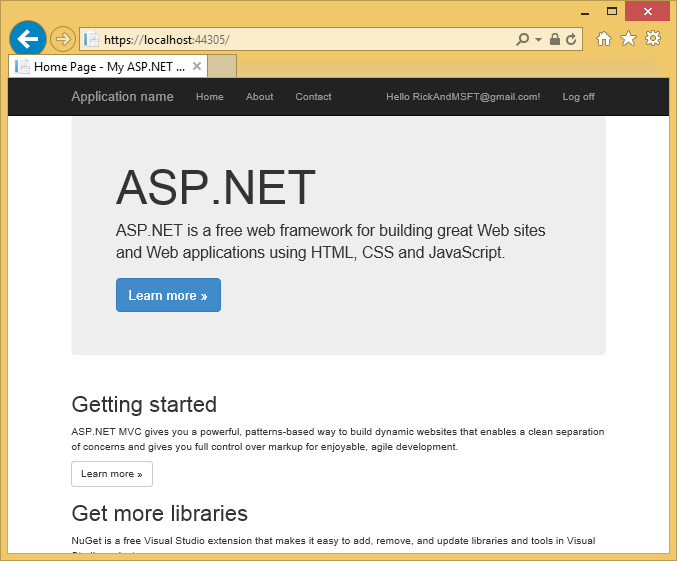
运行应用,单击“注册”链接并注册用户。 此时,电子邮件的唯一验证是具有 [EmailAddress] 属性。
在服务器资源管理器中,导航到 数据连接\DefaultConnection\Tables\AspNetUsers,右键单击并选择“ 打开表定义”。
下图显示了
AspNetUsers架构: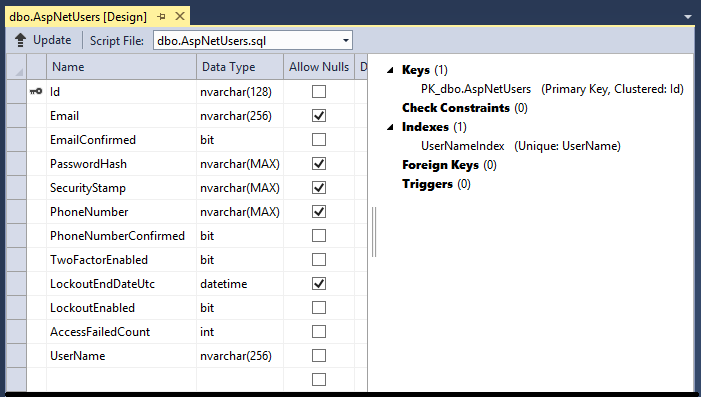
右键单击 AspNetUsers 表,然后选择“ 显示表数据”。
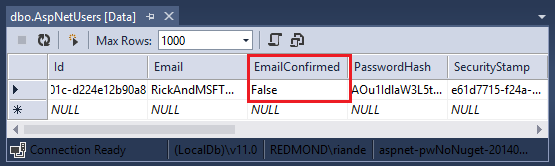
此时尚未确认电子邮件。单击该行并选择“删除”。 在下一步中再次添加此电子邮件,并发送确认电子邮件。
电子邮件确认
最佳做法是确认新用户注册的电子邮件,以验证他们是否不模拟其他人(也就是说,他们尚未向其他人的电子邮件注册)。 假设你有一个讨论论坛,你想阻止 "bob@example.com" 注册为 "joe@contoso.com"。 如果没有电子邮件确认, "joe@contoso.com" 可能会从应用收到不需要的电子邮件。 假设 Bob 意外注册为 "bib@example.com" 并且没有注意到它,他将无法使用密码恢复,因为应用没有他正确的电子邮件。 电子邮件确认仅提供对机器人的有限保护,并且不提供来自确定垃圾邮件发送者的保护,他们有许多可用于注册的工作电子邮件别名。
通常,你希望阻止新用户在通过电子邮件、短信或其他机制确认之前将任何数据发布到网站。 在以下部分中,我们将启用电子邮件确认并修改代码,以防止新注册的用户登录,直到其电子邮件得到确认。
挂钩 SendGrid
本部分中的说明不是最新的。 有关更新的说明,请参阅 配置 SendGrid 电子邮件提供程序 。
虽然本教程仅演示如何通过 SendGrid 添加电子邮件通知,但可以使用 SMTP 和其他机制发送电子邮件(请参阅 其他资源)。
在“包管理器控制台”中,输入以下命令:
Install-Package SendGrid转到 Azure SendGrid 注册页 并注册免费的 SendGrid 帐户。 通过在 App_Start/IdentityConfig.cs 中添加类似于以下内容的代码来配置 SendGrid:
public class EmailService : IIdentityMessageService
{
   public async Task SendAsync(IdentityMessage message)
   {
      await configSendGridasync(message);
   }

   // Use NuGet to install SendGrid (Basic C# client lib)
   private async Task configSendGridasync(IdentityMessage message)
   {
      var myMessage = new SendGridMessage();
      myMessage.AddTo(message.Destination);
      myMessage.From = new System.Net.Mail.MailAddress(
                          "Joe@contoso.com", "Joe S.");
      myMessage.Subject = message.Subject;
      myMessage.Text = message.Body;
      myMessage.Html = message.Body;

      var credentials = new NetworkCredential(
                 ConfigurationManager.AppSettings["mailAccount"],
                 ConfigurationManager.AppSettings["mailPassword"]
                 );

      // Create a Web transport for sending email.
      var transportWeb = new Web(credentials);

      // Send the email.
      if (transportWeb != null)
      {
         await transportWeb.DeliverAsync(myMessage);
      }
      else
      {
         Trace.TraceError("Failed to create Web transport.");
         await Task.FromResult(0);
      }
   }
}
需要添加以下内容:
using SendGrid;
using System.Net;
using System.Configuration;
using System.Diagnostics;
为了保持此示例简单,我们将应用设置 存储在 web.config 文件中:
</connectionStrings>
   <appSettings>
      <add key="webpages:Version" value="3.0.0.0" />
      <!-- Markup removed for clarity. -->

      <add key="mailAccount" value="xyz" />
      <add key="mailPassword" value="password" />
   </appSettings>
  <system.web>
警告
安全性 - 从不将敏感数据存储在源代码中。 帐户和凭据存储在 appSetting 中。 在 Azure 上,可以在Azure 门户的“配置”选项卡上安全地存储这些值。 请参阅 有关将密码和其他敏感数据部署到 ASP.NET 和 Azure 的最佳做法。
在帐户控制器中启用电子邮件确认
//
// POST: /Account/Register
[HttpPost]
[AllowAnonymous]
[ValidateAntiForgeryToken]
public async Task<ActionResult> Register(RegisterViewModel model)
{
    if (ModelState.IsValid)
    {
        var user = new ApplicationUser { UserName = model.Email, Email = model.Email };
        var result = await UserManager.CreateAsync(user, model.Password);
        if (result.Succeeded)
        {
            await SignInManager.SignInAsync(user, isPersistent:false, rememberBrowser:false);

            string code = await UserManager.GenerateEmailConfirmationTokenAsync(user.Id);
            var callbackUrl = Url.Action("ConfirmEmail", "Account",
               new { userId = user.Id, code = code }, protocol: Request.Url.Scheme);
            await UserManager.SendEmailAsync(user.Id,
               "Confirm your account", "Please confirm your account by clicking <a href=\""
               + callbackUrl + "\">here</a>");

            return RedirectToAction("Index", "Home");
        }
        AddErrors(result);
    }

    // If we got this far, something failed, redisplay form
    return View(model);
}
验证 Views\Account\ConfirmEmail.cshtml 文件是否具有正确的 razor 语法。 (第一行中的 @ 字符可能缺失。
@{
    ViewBag.Title = "Confirm Email";
}

<h2>@ViewBag.Title.</h2>
<div>
    <p>
        Thank you for confirming your email. Please @Html.ActionLink("Click here to Log in", "Login", "Account", routeValues: null, htmlAttributes: new { id = "loginLink" })
    </p>
</div>
运行应用并单击“注册”链接。 提交注册表单后,将登录。
检查电子邮件帐户,然后单击链接以确认电子邮件。
登录前需要电子邮件确认
用户当前完成注册表单后,他们就会登录。 你通常希望在登录之前确认其电子邮件。 在以下部分中,我们将修改代码,要求新用户在登录之前拥有确认的电子邮件(经过身份验证)。 使用以下 HttpPost Register 突出显示的更改更新方法:
//
// POST: /Account/Register
[HttpPost]
[AllowAnonymous]
[ValidateAntiForgeryToken]
public async Task<ActionResult> Register(RegisterViewModel model)
{
   if (ModelState.IsValid)
   {
      var user = new ApplicationUser { UserName = model.Email, Email = model.Email };
      var result = await UserManager.CreateAsync(user, model.Password);
      if (result.Succeeded)
      {
         //  Comment the following line to prevent log in until the user is confirmed.
         //  await SignInManager.SignInAsync(user, isPersistent:false, rememberBrowser:false);

         string code = await UserManager.GenerateEmailConfirmationTokenAsync(user.Id);
         var callbackUrl = Url.Action("ConfirmEmail", "Account",
            new { userId = user.Id, code = code }, protocol: Request.Url.Scheme);
         await UserManager.SendEmailAsync(user.Id, "Confirm your account",
            "Please confirm your account by clicking <a href=\"" + callbackUrl + "\">here</a>");

         // Uncomment to debug locally
         // TempData["ViewBagLink"] = callbackUrl;

         ViewBag.Message = "Check your email and confirm your account, you must be confirmed "
                         + "before you can log in.";

         return View("Info");
         //return RedirectToAction("Index", "Home");
      }
      AddErrors(result);
   }

   // If we got this far, something failed, redisplay form
   return View(model);
}
通过注释掉 SignInAsync 该方法,用户将不会通过注册登录。 该 TempData["ViewBagLink"] = callbackUrl; 行可用于 调试应用 和测试注册,而无需发送电子邮件。 ViewBag.Message 用于显示确认说明。 下载 示例 包含用于测试电子邮件确认而无需设置电子邮件的代码,还可用于调试应用程序。
创建 Views\Shared\Info.cshtml 文件并添加以下 razor 标记:
@{
   ViewBag.Title = "Info";
}
<h2>@ViewBag.Title.</h2>
<h3>@ViewBag.Message</h3>
将 Authorize 属性 添加到 Contact 主控制器的操作方法。 可以单击“联系人”链接来验证匿名用户没有访问权限,并且经过身份验证的用户确实具有访问权限。
[Authorize]
public ActionResult Contact()
{
   ViewBag.Message = "Your contact page.";

   return View();
}
还必须更新 HttpPost Login 操作方法:
//
// POST: /Account/Login
[HttpPost]
[AllowAnonymous]
[ValidateAntiForgeryToken]
public async Task<ActionResult> Login(LoginViewModel model, string returnUrl)
{
    if (!ModelState.IsValid)
    {
        return View(model);
    }

    // Require the user to have a confirmed email before they can log on.
    var user = await UserManager.FindByNameAsync(model.Email);
    if (user != null)
    {
       if (!await UserManager.IsEmailConfirmedAsync(user.Id))
       {
          ViewBag.errorMessage = "You must have a confirmed email to log on.";
          return View("Error");
       }
    }

    // This doesn't count login failures towards account lockout
    // To enable password failures to trigger account lockout, change to shouldLockout: true
    var result = await SignInManager.PasswordSignInAsync(model.Email, model.Password, model.RememberMe, shouldLockout: false);
    switch (result)
    {
        case SignInStatus.Success:
            return RedirectToLocal(returnUrl);
        case SignInStatus.LockedOut:
            return View("Lockout");
        case SignInStatus.RequiresVerification:
            return RedirectToAction("SendCode", new { ReturnUrl = returnUrl, RememberMe = model.RememberMe });
        case SignInStatus.Failure:
        default:
            ModelState.AddModelError("", "Invalid login attempt.");
            return View(model);
    }
}
更新 Views\Shared\Error.cshtml 视图以显示错误消息:
@model System.Web.Mvc.HandleErrorInfo

@{
    ViewBag.Title = "Error";
}

<h1 class="text-danger">Error.</h1>
@{
   if (String.IsNullOrEmpty(ViewBag.errorMessage))
   {
      <h2 class="text-danger">An error occurred while processing your request.</h2>
   }
   else
   {
      <h2 class="text-danger">@ViewBag.errorMessage</h2>
   }
}
删除 AspNetUsers 表中包含要测试的电子邮件别名的任何帐户。 运行应用并验证在确认电子邮件地址之前无法登录。 确认电子邮件地址后,单击“ 联系人” 链接。
密码恢复/重置
从 HttpPost ForgotPassword 帐户控制器中的操作方法中删除注释字符:
//
// POST: /Account/ForgotPassword
[HttpPost]
[AllowAnonymous]
[ValidateAntiForgeryToken]
public async Task<ActionResult> ForgotPassword(ForgotPasswordViewModel model)
{
    if (ModelState.IsValid)
    {
        var user = await UserManager.FindByNameAsync(model.Email);
        if (user == null || !(await UserManager.IsEmailConfirmedAsync(user.Id)))
        {
            // Don't reveal that the user does not exist or is not confirmed
            return View("ForgotPasswordConfirmation");
        }

        string code = await UserManager.GeneratePasswordResetTokenAsync(user.Id);
        var callbackUrl = Url.Action("ResetPassword", "Account", new { userId = user.Id, code = code }, protocol: Request.Url.Scheme);
        await UserManager.SendEmailAsync(user.Id, "Reset Password", "Please reset your password by clicking <a href=\"" + callbackUrl + "\">here</a>");
        return RedirectToAction("ForgotPasswordConfirmation", "Account");
    }

    // If we got this far, something failed, redisplay form
    return View(model);
}
从 Views\Account\Login.cshtml razor 视图文件中的 ForgotPassword ActionLink 中删除注释字符:
@using MvcPWy.Models
@model LoginViewModel
@{
   ViewBag.Title = "Log in";
}

<h2>@ViewBag.Title.</h2>
<div class="row">
   <div class="col-md-8">
      <section id="loginForm">
         @using (Html.BeginForm("Login", "Account", new { ReturnUrl = ViewBag.ReturnUrl }, FormMethod.Post, new { @class = "form-horizontal", role = "form" }))
         {
            @Html.AntiForgeryToken()
            <h4>Use a local account to log in.</h4>
            <hr />
            @Html.ValidationSummary(true, "", new { @class = "text-danger" })
            <div class="form-group">
               @Html.LabelFor(m => m.Email, new { @class = "col-md-2 control-label" })
               <div class="col-md-10">
                  @Html.TextBoxFor(m => m.Email, new { @class = "form-control" })
                  @Html.ValidationMessageFor(m => m.Email, "", new { @class = "text-danger" })
               </div>
            </div>
            <div class="form-group">
               @Html.LabelFor(m => m.Password, new { @class = "col-md-2 control-label" })
               <div class="col-md-10">
                  @Html.PasswordFor(m => m.Password, new { @class = "form-control" })
                  @Html.ValidationMessageFor(m => m.Password, "", new { @class = "text-danger" })
               </div>
            </div>
            <div class="form-group">
               <div class="col-md-offset-2 col-md-10">
                  <div class="checkbox">
                     @Html.CheckBoxFor(m => m.RememberMe)
                     @Html.LabelFor(m => m.RememberMe)
                  </div>
               </div>
            </div>
            <div class="form-group">
               <div class="col-md-offset-2 col-md-10">
                  <input type="submit" value="Log in" class="btn btn-default" />
               </div>
            </div>
            <p>
               @Html.ActionLink("Register as a new user", "Register")
            </p>
            @* Enable this once you have account confirmation enabled for password reset functionality *@
            <p>
               @Html.ActionLink("Forgot your password?", "ForgotPassword")
            </p>
         }
      </section>
   </div>
   <div class="col-md-4">
      <section id="socialLoginForm">
         @Html.Partial("_ExternalLoginsListPartial", new ExternalLoginListViewModel { ReturnUrl = ViewBag.ReturnUrl })
      </section>
   </div>
</div>

@section Scripts {
   @Scripts.Render("~/bundles/jqueryval")
}
“登录”页现在将显示用于重置密码的链接。
重新发送电子邮件确认链接
用户创建新的本地帐户后,系统会通过电子邮件发送确认链接,要求他们在登录之前使用。 如果用户意外删除了确认电子邮件,或者电子邮件永远不会到达,他们将需要再次发送确认链接。 以下代码更改演示如何启用此功能。
将以下帮助程序方法添加到 Controllers\AccountController.cs 文件的底部:
private async Task<string> SendEmailConfirmationTokenAsync(string userID, string subject)
{
   string code = await UserManager.GenerateEmailConfirmationTokenAsync(userID);
   var callbackUrl = Url.Action("ConfirmEmail", "Account",
      new { userId = userID, code = code }, protocol: Request.Url.Scheme);
   await UserManager.SendEmailAsync(userID, subject,
      "Please confirm your account by clicking <a href=\"" + callbackUrl + "\">here</a>");

   return callbackUrl;
}
更新 Register 方法以使用新的帮助程序:
//
// POST: /Account/Register
[HttpPost]
[AllowAnonymous]
[ValidateAntiForgeryToken]
public async Task<ActionResult> Register(RegisterViewModel model)
{
   if (ModelState.IsValid)
   {
      var user = new ApplicationUser { UserName = model.Email, Email = model.Email };
      var result = await UserManager.CreateAsync(user, model.Password);
      if (result.Succeeded)
      {
         //  Comment the following line to prevent log in until the user is confirmed.
         //  await SignInManager.SignInAsync(user, isPersistent:false, rememberBrowser:false);

         string callbackUrl = await SendEmailConfirmationTokenAsync(user.Id, "Confirm your account");

         ViewBag.Message = "Check your email and confirm your account, you must be confirmed "
                         + "before you can log in.";

         return View("Info");
         //return RedirectToAction("Index", "Home");
      }
      AddErrors(result);
   }

   // If we got this far, something failed, redisplay form
   return View(model);
}
如果尚未确认用户帐户,请更新 Login 方法以重新发送密码:
//
// POST: /Account/Login
[HttpPost]
[AllowAnonymous]
[ValidateAntiForgeryToken]
public async Task<ActionResult> Login(LoginViewModel model, string returnUrl)
{
   if (!ModelState.IsValid)
   {
      return View(model);
   }

   // Require the user to have a confirmed email before they can log on.
  // var user = await UserManager.FindByNameAsync(model.Email);
   var user =  UserManager.Find(model.Email, model.Password);
   if (user != null)
   {
      if (!await UserManager.IsEmailConfirmedAsync(user.Id))
      {
         string callbackUrl = await SendEmailConfirmationTokenAsync(user.Id, "Confirm your account-Resend");

          // Uncomment to debug locally
          // ViewBag.Link = callbackUrl;
         ViewBag.errorMessage = "You must have a confirmed email to log on. "
                              + "The confirmation token has been resent to your email account.";
         return View("Error");
      }
   }

   // This doesn't count login failures towards account lockout
   // To enable password failures to trigger account lockout, change to shouldLockout: true
   var result = await SignInManager.PasswordSignInAsync(model.Email, model.Password, model.RememberMe, shouldLockout: false);
   switch (result)
   {
      case SignInStatus.Success:
         return RedirectToLocal(returnUrl);
      case SignInStatus.LockedOut:
         return View("Lockout");
      case SignInStatus.RequiresVerification:
         return RedirectToAction("SendCode", new { ReturnUrl = returnUrl, RememberMe = model.RememberMe });
      case SignInStatus.Failure:
      default:
         ModelState.AddModelError("", "Invalid login attempt.");
         return View(model);
   }
}
合并社交和本地登录帐户
可通过单击电子邮件链接来合并本地帐户和社交帐户。 在以下序列 RickAndMSFT@gmail.com 中,首先创建为本地登录名,但首先可以将帐户创建为社交日志,然后添加本地登录名。
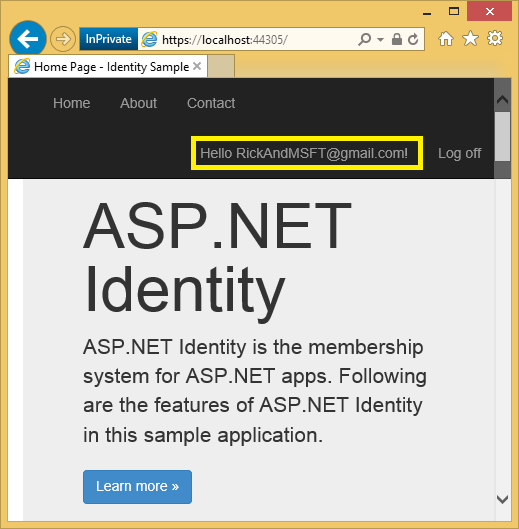
单击“管理”链接。 请注意外部 登录名:0 与此帐户关联。
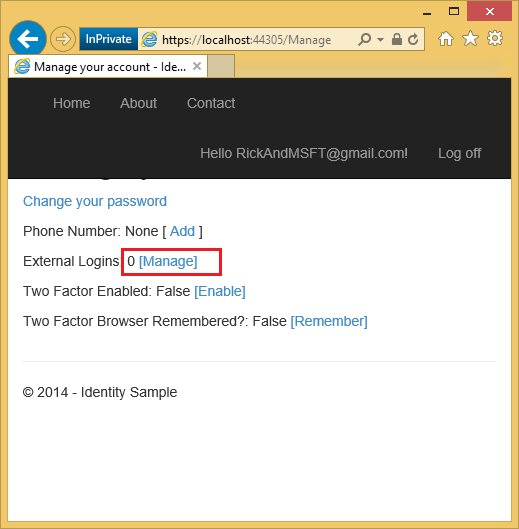
单击指向另一个登录服务的链接并接受应用请求。 这两个帐户已合并,可以使用任一帐户登录。 你可能希望你的用户添加本地帐户,以防他们的社交登录身份验证服务关闭,或者他们更有可能失去对其社交帐户的访问权限。
在下图中,Tom 是一个社交登录(可从外部登录名中看到 :页面上显示的 1 个)。
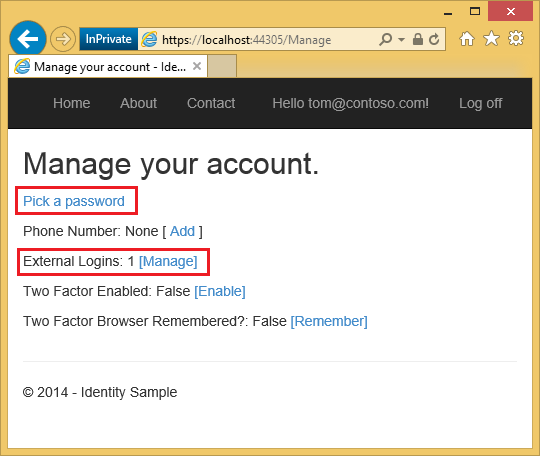
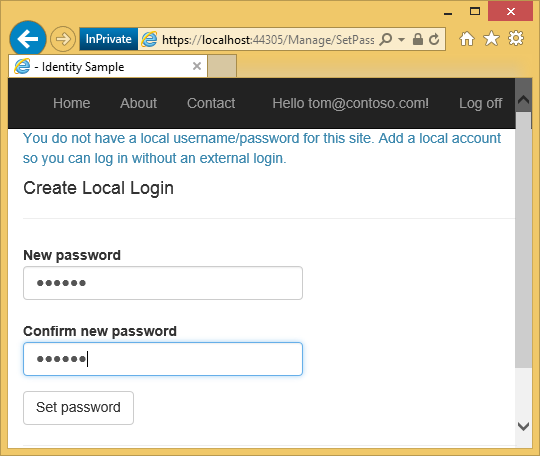
单击“ 选取密码 ”可以添加与同一帐户关联的本地登录。
更深入地确认电子邮件
我的教程 “帐户确认”和“密码恢复”ASP.NET 标识 将转到本主题,其中包含更多详细信息。
调试应用
如果未收到包含链接的电子邮件:
- 检查垃圾邮件文件夹。
- 登录到 SendGrid 帐户,然后单击“电子邮件活动” 链接。
若要在不发送电子邮件的情况下测试验证链接,请下载 已完成的示例。 确认链接和确认代码将显示在页面上。
其他资源
- 指向 ASP.NET 标识推荐资源的链接
- ASP.NET 标识 的帐户确认和密码恢复更详细地介绍密码恢复和帐户确认。
- 使用 Facebook、Twitter、LinkedIn和 Google OAuth2 登录 的 MVC 5 应用本教程介绍如何编写具有 Facebook 和 Google OAuth 2 授权的 ASP.NET MVC 5 应用。 它还演示如何向标识数据库添加其他数据。
- 将成员身份、OAuth 和SQL 数据库的安全 ASP.NET MVC 应用部署到 Azure。 本教程将添加 Azure 部署、如何使用角色保护应用、如何使用成员身份 API 添加用户和角色以及其他安全功能。
- 为 OAuth 2 创建 Google 应用并将应用连接到项目
- 在 Facebook 中创建应用并将应用连接到项目
- 在项目中设置 SSL