使用 Entity Framework 4.0 Database First 和 ASP.NET 4 Web Forms 入门 - 第 4 部分
作者 :Tom Dykstra
Contoso University 示例 Web 应用程序演示如何使用 Entity Framework 4.0 和 Visual Studio 2010 创建 ASP.NET Web Forms应用程序。 有关教程系列的信息,请参阅 系列中的第一个教程
使用相关数据
在上一教程中,你使用了 控件 EntityDataSource 来筛选、排序和分组数据。 在本教程中,你将显示和更新相关数据。
你将创建显示讲师列表的“讲师”页面。 选择讲师时,会看到该讲师教授的课程列表。 选择课程时,你将看到该课程的详细信息以及已注册该课程的学生列表。 可以编辑讲师姓名、雇用日期和办公室分配。 办公室分配是通过导航属性访问的单独实体集。
可以将主数据链接到标记或代码中的详细信息数据。 在本教程的这一部分,你将使用这两种方法。
显示和更新 GridView 控件中的相关实体
创建一个名为 Instructors.aspx 的新网页,该网页使用 Site.Master 母版页,并将以下标记添加到名为 的ContentContent2控件:
<h2>Instructors</h2>
    <div>
        <asp:EntityDataSource ID="InstructorsEntityDataSource" runat="server"
            ContextTypeName="ContosoUniversity.DAL.SchoolEntities" EnableFlattening="False"
            EntitySetName="People"
            Where="it.HireDate is not null" Include="OfficeAssignment" EnableUpdate="True">
        </asp:EntityDataSource>
    </div>
此标记创建一个 EntityDataSource 控件,用于选择讲师并启用更新。 元素 div 将标记配置为在左侧呈现,以便稍后可以在右侧添加列。
在 EntityDataSource 标记和结束 </div> 标记之间,添加以下标记,用于创建 GridView 控件和 Label 用于错误消息的控件:
<asp:GridView ID="InstructorsGridView" runat="server" AllowPaging="True" AllowSorting="True"
            AutoGenerateColumns="False" DataKeyNames="PersonID" DataSourceID="InstructorsEntityDataSource"
            OnSelectedIndexChanged="InstructorsGridView_SelectedIndexChanged"
            SelectedRowStyle-BackColor="LightGray"
            onrowupdating="InstructorsGridView_RowUpdating">
            <Columns>
                <asp:CommandField ShowSelectButton="True" ShowEditButton="True" />
                <asp:TemplateField HeaderText="Name" SortExpression="LastName">
                    <ItemTemplate>
                        <asp:Label ID="InstructorLastNameLabel" runat="server" Text='<%# Eval("LastName") %>'></asp:Label>,
                        <asp:Label ID="InstructorFirstNameLabel" runat="server" Text='<%# Eval("FirstMidName") %>'></asp:Label>
                    </ItemTemplate>
                    <EditItemTemplate>
                        <asp:TextBox ID="InstructorLastNameTextBox" runat="server" Text='<%# Bind("FirstMidName") %>' Width="7em"></asp:TextBox>
                        <asp:TextBox ID="InstructorFirstNameTextBox" runat="server" Text='<%# Bind("LastName") %>' Width="7em"></asp:TextBox>
                    </EditItemTemplate>
                </asp:TemplateField>
                <asp:TemplateField HeaderText="Hire Date" SortExpression="HireDate">
                    <ItemTemplate>
                        <asp:Label ID="InstructorHireDateLabel" runat="server" Text='<%# Eval("HireDate", "{0:d}") %>'></asp:Label>
                    </ItemTemplate>
                    <EditItemTemplate>
                        <asp:TextBox ID="InstructorHireDateTextBox" runat="server" Text='<%# Bind("HireDate", "{0:d}") %>' Width="7em"></asp:TextBox>
                    </EditItemTemplate>
                </asp:TemplateField>
                <asp:TemplateField HeaderText="Office Assignment" SortExpression="OfficeAssignment.Location">
                    <ItemTemplate>
                        <asp:Label ID="InstructorOfficeLabel" runat="server" Text='<%# Eval("OfficeAssignment.Location") %>'></asp:Label>
                    </ItemTemplate>
                    <EditItemTemplate>
                        <asp:TextBox ID="InstructorOfficeTextBox" runat="server"
                        Text='<%# Eval("OfficeAssignment.Location") %>' Width="7em"
                        oninit="InstructorOfficeTextBox_Init"></asp:TextBox>
                    </EditItemTemplate>
                </asp:TemplateField>
            </Columns>
            <SelectedRowStyle BackColor="LightGray"></SelectedRowStyle>
        </asp:GridView>
        <asp:Label ID="ErrorMessageLabel" runat="server" Text="" Visible="false" ViewStateMode="Disabled"></asp:Label>
此 GridView 控件启用行选择,突出显示浅灰色背景色的选定行,并指定处理程序 (稍后将创建 SelectedIndexChanged) 和 Updating 事件。 它还指定 PersonIDDataKeyNames 属性,以便可以将所选行的键值传递给稍后要添加的另一个控件。
最后一列包含讲师的办公室分配,该作业存储在实体的导航属性中 Person ,因为它来自关联的实体。 请注意, EditItemTemplate 元素指定 Eval 而不是 Bind,因为 GridView 控件无法直接绑定到导航属性以更新它们。 你将在代码中更新办公室分配。 为此,你需要一个对 控件的TextBox引用,并且你将获取并将其保存在控件的事件Init中TextBox。
控件后面的 GridView 是 Label 用于错误消息的控件。 控件的 Visible 属性为 false,并且视图状态处于关闭状态,因此仅当代码使其可见以响应错误时,标签才会显示。
打开 Instructors.aspx.cs 文件并添加以下 using 语句:
using ContosoUniversity.DAL;
紧接在分部类名称声明后面添加一个私有类字段,以保存对 office 分配文本框的引用。
private TextBox instructorOfficeTextBox;
为事件处理程序添加存根, SelectedIndexChanged 稍后将添加代码。 此外,为 Office 工作分配 TextBox 控件的事件 Init 添加处理程序,以便可以存储对控件的 TextBox 引用。 你将使用此引用获取用户输入的值,以便更新与导航属性关联的实体。
protected void InstructorsGridView_SelectedIndexChanged(object sender, EventArgs e)
{
}

protected void InstructorOfficeTextBox_Init(object sender, EventArgs e)
{
    instructorOfficeTextBox = sender as TextBox;
}
你将使用 GridView 控件的 Updating 事件更新 Location 关联 OfficeAssignment 实体的 属性。 为 Updating 事件添加以下处理程序:
protected void InstructorsGridView_RowUpdating(object sender, GridViewUpdateEventArgs e)
{
    using (var context = new SchoolEntities())
    {
        var instructorBeingUpdated = Convert.ToInt32(e.Keys[0]);
        var officeAssignment = (from o in context.OfficeAssignments
                                where o.InstructorID == instructorBeingUpdated
                                select o).FirstOrDefault();

        try
        {
            if (String.IsNullOrWhiteSpace(instructorOfficeTextBox.Text) == false)
            {
                if (officeAssignment == null)
                {
                    context.OfficeAssignments.AddObject(OfficeAssignment.CreateOfficeAssignment(instructorBeingUpdated, instructorOfficeTextBox.Text, null));
                }
                else
                {
                    officeAssignment.Location = instructorOfficeTextBox.Text;
                }
            }
            else
            {
                if (officeAssignment != null)
                {
                    context.DeleteObject(officeAssignment);
                }
            }
            context.SaveChanges();
        }
        catch (Exception)
        {
            e.Cancel = true;
            ErrorMessageLabel.Visible = true;
            ErrorMessageLabel.Text = "Update failed.";
            //Add code to log the error.
        }
    }
}
当用户在一GridView行中单击“更新”时,将运行此代码。 代码使用 LINQ to Entities 检索 OfficeAssignment 与当前 Person 实体关联的实体,并使用 PersonID 事件参数中所选行的 。
然后,代码根据控件中的 InstructorOfficeTextBox 值执行以下操作之一:
- 如果文本框具有值,并且没有
OfficeAssignment实体要更新,则会创建一个实体。 - 如果文本框具有值并且存在
OfficeAssignment实体,则会更新Location属性值。 - 如果文本框为空且
OfficeAssignment实体存在,则会删除该实体。
之后,它会将更改保存到数据库。 如果发生异常,则显示一条错误消息。
运行页面。

单击 “编辑” ,所有字段将更改为文本框。
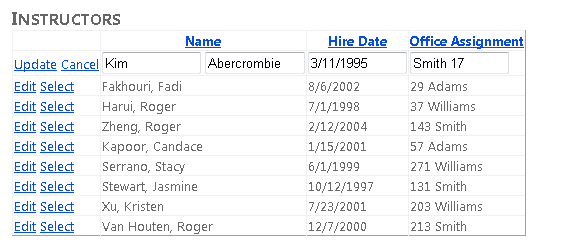
更改这些值中的任何一个,包括 Office 分配。 单击“ 更新 ”,你将看到列表中反映的更改。
在单独的控件中显示相关实体
每个讲师可以教授一个或多个课程,因此你将添加一个 EntityDataSource 控件和一个 GridView 控件,以列出与讲师控件中选择 GridView 的讲师关联的课程。 若要为课程实体创建标题和 EntityDataSource 控件,请在错误消息 Label 控件和结束 </div> 标记之间添加以下标记:
<h3>Courses Taught</h3>
        <asp:EntityDataSource ID="CoursesEntityDataSource" runat="server"
            ContextTypeName="ContosoUniversity.DAL.SchoolEntities" EnableFlattening="False"
            EntitySetName="Courses"
            Where="@PersonID IN (SELECT VALUE instructor.PersonID FROM it.People AS instructor)">
            <WhereParameters>
                <asp:ControlParameter ControlID="InstructorsGridView" Type="Int32" Name="PersonID" PropertyName="SelectedValue" />
            </WhereParameters>
        </asp:EntityDataSource>
Where参数包含在 控件中选择InstructorsGridView行的讲师的值PersonID。 属性Where包含一个子选择命令,该命令从实体的People导航属性获取所有关联的Person实体,并且仅当其中一个Course关联的Person实体包含所选PersonID值时才选择Course该实体。
若要创建GridView控件,请在结束</div>标记) 前紧跟CoursesEntityDataSource控件 (添加以下标记:
<asp:GridView ID="CoursesGridView" runat="server"
            DataSourceID="CoursesEntityDataSource"
            AllowSorting="True" AutoGenerateColumns="False"
            SelectedRowStyle-BackColor="LightGray"
            DataKeyNames="CourseID">
            <EmptyDataTemplate>
                <p>No courses found.</p>
            </EmptyDataTemplate>
            <Columns>
                <asp:CommandField ShowSelectButton="True" />
                <asp:BoundField DataField="CourseID" HeaderText="ID" ReadOnly="True" SortExpression="CourseID" />
                <asp:BoundField DataField="Title" HeaderText="Title" SortExpression="Title" />
                <asp:TemplateField HeaderText="Department" SortExpression="DepartmentID">
                    <ItemTemplate>
                        <asp:Label ID="GridViewDepartmentLabel" runat="server" Text='<%# Eval("Department.Name") %>'></asp:Label>
                    </ItemTemplate>
                </asp:TemplateField>
            </Columns>
        </asp:GridView>
由于如果未选择讲师,则不会显示任何课程,因此会包含元素 EmptyDataTemplate 。
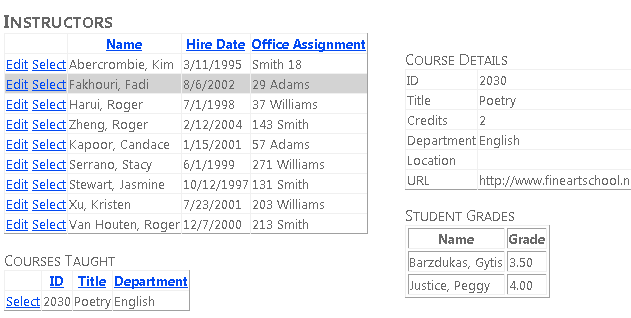
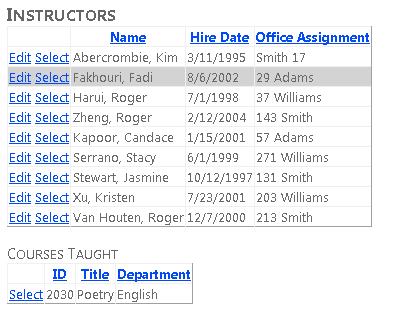
运行页面。

选择分配了一个或多个课程的讲师,课程或课程将显示在列表中。 (注意:尽管数据库架构允许多个课程,但在随数据库一起提供的测试数据中,没有讲师实际上有多个课程。可以使用 “服务器资源管理器” 窗口或 “CoursesAdd.aspx ”页自行将课程添加到数据库,稍后将在教程中添加此课程。)
控件 CoursesGridView 仅显示几个课程字段。 若要显示课程的所有详细信息,你将对用户选择的课程使用 DetailsView 控件。 在 Instructors.aspx 中,在结束 </div> 标记后添加以下标记 (请确保将此标记放在结束 div 标记 之后 ,而不是放在其) 之前:
<div>
        <h3>Course Details</h3>
        <asp:EntityDataSource ID="CourseDetailsEntityDataSource" runat="server"
            ContextTypeName="ContosoUniversity.DAL.SchoolEntities" EnableFlattening="False"
            EntitySetName="Courses"
            AutoGenerateWhereClause="False" Where="it.CourseID = @CourseID" Include="Department,OnlineCourse,OnsiteCourse,StudentGrades.Person"
            OnSelected="CourseDetailsEntityDataSource_Selected">
            <WhereParameters>
                <asp:ControlParameter ControlID="CoursesGridView" Type="Int32" Name="CourseID" PropertyName="SelectedValue" />
            </WhereParameters>
        </asp:EntityDataSource>
        <asp:DetailsView ID="CourseDetailsView" runat="server" AutoGenerateRows="False"
            DataSourceID="CourseDetailsEntityDataSource">
            <EmptyDataTemplate>
                <p>
                    No course selected.</p>
            </EmptyDataTemplate>
            <Fields>
                <asp:BoundField DataField="CourseID" HeaderText="ID" ReadOnly="True" SortExpression="CourseID" />
                <asp:BoundField DataField="Title" HeaderText="Title" SortExpression="Title" />
                <asp:BoundField DataField="Credits" HeaderText="Credits" SortExpression="Credits" />
                <asp:TemplateField HeaderText="Department">
                    <ItemTemplate>
                        <asp:Label ID="DetailsViewDepartmentLabel" runat="server" Text='<%# Eval("Department.Name") %>'></asp:Label>
                    </ItemTemplate>
                </asp:TemplateField>
                <asp:TemplateField HeaderText="Location">
                    <ItemTemplate>
                        <asp:Label ID="LocationLabel" runat="server" Text='<%# Eval("OnsiteCourse.Location") %>'></asp:Label>
                    </ItemTemplate>
                </asp:TemplateField>
                <asp:TemplateField HeaderText="URL">
                    <ItemTemplate>
                        <asp:Label ID="URLLabel" runat="server" Text='<%# Eval("OnlineCourse.URL") %>'></asp:Label>
                    </ItemTemplate>
                </asp:TemplateField>
            </Fields>
        </asp:DetailsView>
    </div>
此标记创建绑定到EntityDataSourceCourses实体集的控件。 属性 Where 使用 CourseID 课程控件中所选行的值选择课程 GridView 。 标记指定事件的处理程序,稍后将使用该处理程序 Selected 显示学生成绩,这是层次结构中较低级别的另一个级别。
在 Instructors.aspx.cs 中,为 CourseDetailsEntityDataSource_Selected 方法创建以下存根。 (稍后将在本教程中填写此存根;现在,你需要它,以便页面将编译和运行。)
protected void CourseDetailsEntityDataSource_Selected(object sender, EntityDataSourceSelectedEventArgs e)
{
}
运行页面。

最初没有课程详细信息,因为未选择课程。 选择分配了课程的讲师,然后选择一个课程以查看详细信息。

使用 EntityDataSource“Selected”事件显示相关数据
最后,你想要显示所有已注册的学生及其所选课程的成绩。 为此,你将使用Selected绑定到课程 DetailsView的 EntityDataSource 控件的 事件。
在 Instructors.aspx 中,在 控件后面 DetailsView 添加以下标记:
<h3>Student Grades</h3>
        <asp:ListView ID="GradesListView" runat="server">
            <EmptyDataTemplate>
                <p>No student grades found.</p>
            </EmptyDataTemplate>
            <LayoutTemplate>
                <table border="1" runat="server" id="itemPlaceholderContainer">
                    <tr runat="server">
                        <th runat="server">
                            Name
                        </th>
                        <th runat="server">
                            Grade
                        </th>
                    </tr>
                    <tr id="itemPlaceholder" runat="server">
                    </tr>
                </table>
            </LayoutTemplate>
            <ItemTemplate>
                <tr>
                    <td>
                        <asp:Label ID="StudentLastNameLabel" runat="server" Text='<%# Eval("Person.LastName") %>' />,
                        <asp:Label ID="StudentFirstNameLabel" runat="server" Text='<%# Eval("Person.FirstMidName") %>' />
                    </td>
                    <td>
                        <asp:Label ID="StudentGradeLabel" runat="server" Text='<%# Eval("Grade") %>' />
                    </td>
                </tr>
            </ItemTemplate>
        </asp:ListView>
此标记创建一个 ListView 控件,用于显示所选课程的学生及其成绩的列表。 未指定数据源,因为你将在代码中对控件进行数据绑定。 元素 EmptyDataTemplate 提供在未选择课程时显示的消息,在这种情况下,没有要显示的学生。 元素 LayoutTemplate 创建一个 HTML 表来显示列表,并 ItemTemplate 指定要显示的列。 学生 ID 和学生成绩来自 StudentGrade 实体,学生名称来自Person实体框架在实体的PersonStudentGrade导航属性中提供的实体。
在 Instructors.aspx.cs 中,将 stubbed-out CourseDetailsEntityDataSource_Selected 方法替换为以下代码:
protected void CourseDetailsEntityDataSource_Selected(object sender, EntityDataSourceSelectedEventArgs e)
{
    var course = e.Results.Cast<Course>().FirstOrDefault();
    if (course != null)
    {
        var studentGrades = course.StudentGrades.ToList();
        GradesListView.DataSource = studentGrades;
        GradesListView.DataBind();
    }
}
此事件的事件参数以集合的形式提供所选数据,如果未选择任何内容,则该集合将具有零项;如果选择了实体,则为一项 Course 。 如果选择实体 Course ,代码将使用 First 方法将集合转换为单个对象。 然后,它从导航属性获取 StudentGrade 实体,将其转换为集合,并将控件 GradesListView 绑定到集合。
这足以显示成绩,但你想要确保在首次显示页面时以及未选择课程时显示空数据模板中的消息。 为此,请创建以下方法,你将从两个位置调用该方法:
private void ClearStudentGradesDataSource()
{
    var emptyStudentGradesList = new List<StudentGrade>();
    GradesListView.DataSource = emptyStudentGradesList;
    GradesListView.DataBind();
}
从 Page_Load 方法调用此新方法,以在首次显示页面时显示空数据模板。 并从 InstructorsGridView_SelectedIndexChanged 方法调用它,因为选择讲师时会引发该事件,这意味着新课程将加载到课程 GridView 控件中,但尚未选择任何课程。 下面是两个调用:
protected void Page_Load(object sender, EventArgs e)
{
    if (!IsPostBack)
    {
        ClearStudentGradesDataSource();
    }
}
protected void InstructorsGridView_SelectedIndexChanged(object sender, EventArgs e)
{
    ClearStudentGradesDataSource();
}
运行页面。

选择分配了课程的讲师,然后选择该课程。

现在,你已了解了几种处理相关数据的方法。 在以下教程中,你将了解如何在现有实体之间添加关系、如何删除关系,以及如何添加与现有实体有关系的新实体。