你当前正在访问 Microsoft Azure Global Edition 技术文档网站。 如果需要访问由世纪互联运营的 Microsoft Azure 中国技术文档网站,请访问 https://docs.azure.cn。
在 Azure 机密账本中管理基于 Microsoft Entra 令牌的用户
基于 Microsoft Entra ID 的用户由其 Microsoft Entra 对象 ID 标识。
具有管理员权限的用户可以管理机密账本的用户。 可用角色包括读者(只读)、参与者(读取和写入)和管理员(读取、写入和管理用户)。
登录 Azure
使用 Azure CLI az login 命令或 Azure PowerShell Connect-AzAccount cmdlet 登录到 Azure。
az login
如果 CLI 或 PowerShell 可以打开默认浏览器,它将这样做并加载 Azure 登录页。 否则,请访问 https://aka.ms/devicelogin,然后输入终端中显示的授权代码。
如果出现提示,则在浏览器中使用帐户凭据登录。
从 Azure 门户获取机密账本的名称和标识服务 URI,因为需要它来创建客户端以管理用户。 此图显示了 Azure 门户中的相应属性。

将以下代码片段中 contoso 和 https://contoso.confidential-ledger.azure.com 的实例替换为 Azure 门户中的相应值。
Python 客户端库
安装包
pip install azure-identity azure-confidentialledger
创建机密账本客户端
from azure.identity import DefaultAzureCredential
from azure.confidentialledger import ConfidentialLedgerClient
from azure.confidentialledger.identity_service import ConfidentialLedgerIdentityServiceClient
from azure.confidentialledger import LedgerUserRole

identity_client = ConfidentialLedgerCertificateClient()
network_identity = identity_client.get_ledger_identity(
    ledger_id="contoso"
)

ledger_tls_cert_file_name = "ledger_certificate.pem"
with open(ledger_tls_cert_file_name, "w") as cert_file:
    cert_file.write(network_identity["ledgerTlsCertificate"])

# The DefaultAzureCredential will use the current Azure context to authenticate to Azure
credential = DefaultAzureCredential()

ledger_client = ConfidentialLedgerClient(
    endpoint="https://contoso.confidential-ledger.azure.com",
    credential=credential,
    ledger_certificate_path=ledger_tls_cert_file_name
)

# Add a user with the contributor role
# Other supported roles are Contributor and Administrator
user_id = "Azure AD object id of the user"
user = ledger_client.create_or_update_user(
    user_id, {"assignedRole": "Contributor"}
)

# Get the user and check their properties
user = ledger_client.get_user(user_id)
assert user["userId"] == user_id
assert user["assignedRole"] == "Contributor"

# Delete the user
ledger_client.delete_user(user_id)
登录 Azure
使用 Azure CLI az login 命令或 Azure PowerShell Connect-AzAccount cmdlet 登录到 Azure。
az login
如果 CLI 或 PowerShell 可以打开默认浏览器,它将这样做并加载 Azure 登录页。 否则,请访问 https://aka.ms/devicelogin,然后输入终端中显示的授权代码。
如果出现提示,则在浏览器中使用帐户凭据登录。
从 Azure 门户获取机密账本的名称和标识服务 URI,因为需要它来创建客户端以管理用户。 此图显示了 Azure 门户中的相应属性。
将以下代码片段中 contoso 和 https://contoso.confidential-ledger.azure.com 的实例替换为 Azure 门户中的相应值。
.NET 客户端库
安装包
dotnet add package Azure.Security.ConfidentialLedger
dotnet add package Azure.Identity
dotnet add Azure.Security
创建客户端并管理用户
using Azure.Core;
using Azure.Identity;
using Azure.Security.ConfidentialLedger;

internal class ACLUserManagement
{
    static void Main(string[] args)
    {
      // Create a ConfidentialLedgerClient instance
      // The DefaultAzureCredential will use the current Azure context to authenticate to Azure
      var ledgerClient = new ConfidentialLedgerClient(new Uri("https://contoso.confidential-ledger.azure.com"), new DefaultAzureCredential());

      string userId = "Azure AD object id of the user";

      // Add the user with the Reader role
      // Other supported roles are Contributor and Administrator
      ledgerClient.CreateOrUpdateUser(
         userId,
         RequestContent.Create(new { assignedRole = "Reader" }));

      // Get the user and print their properties
      Azure.Response response = ledgerClient.GetUser(userId);
      var aclUser = System.Text.Json.JsonDocument.Parse(response.Content.ToString());

      Console.WriteLine($"Assigned Role is = {aclUser.RootElement.GetProperty("assignedRole").ToString()}");
      Console.WriteLine($"User id is = {aclUser.RootElement.GetProperty("userId").ToString()}");

      // Delete the user
      ledgerClient.DeleteUser(userId);
    }
}
登录 Azure
使用 Azure CLI az login 命令或 Azure PowerShell Connect-AzAccount cmdlet 登录到 Azure。
az login
如果 CLI 或 PowerShell 可以打开默认浏览器,它将这样做并加载 Azure 登录页。 否则,请访问 https://aka.ms/devicelogin,然后输入终端中显示的授权代码。
如果出现提示,则在浏览器中使用帐户凭据登录。
从 Azure 门户获取机密账本的名称和标识服务 URI,因为需要它来创建客户端以管理用户。 此图显示了 Azure 门户中的相应属性。
将以下代码片段中 contoso 和 https://contoso.confidential-ledger.azure.com 的实例替换为 Azure 门户中的相应值。
Java 客户端库
安装包
<!-- https://mvnrepository.com/artifact/com.azure/azure-security-confidentialledger -->
<dependency>
	<groupId>com.azure</groupId>
	<artifactId>azure-security-confidentialledger</artifactId>
	<version>1.0.6</version>
</dependency>
<!-- https://mvnrepository.com/artifact/com.azure/azure-identity -->
<dependency>
	<groupId>com.azure</groupId>
	<artifactId>azure-identity</artifactId>
	<version>1.8.0</version>
</dependency>
<!-- https://mvnrepository.com/artifact/com.azure/azure-core -->
<dependency>
	<groupId>com.azure</groupId>
	<artifactId>azure-core</artifactId>
	<version>1.36.0</version>
</dependency>
创建客户端并管理用户
   import java.io.IOException;
import com.azure.core.http.HttpClient;
import java.io.ByteArrayInputStream;
import java.nio.charset.StandardCharsets;

import com.azure.security.confidentialledger.*;
import com.azure.core.http.rest.RequestOptions;
import com.azure.core.http.netty.NettyAsyncHttpClientBuilder;
import com.azure.core.http.rest.Response;
import com.azure.core.util.BinaryData;
import com.azure.identity.DefaultAzureCredentialBuilder;
import com.fasterxml.jackson.databind.JsonNode;
import com.fasterxml.jackson.databind.ObjectMapper;
import com.azure.security.confidentialledger.certificate.ConfidentialLedgerCertificateClient;
import com.azure.security.confidentialledger.certificate.ConfidentialLedgerCertificateClientBuilder;

import io.netty.handler.ssl.SslContext;
import io.netty.handler.ssl.SslContextBuilder;

public class CreateOrUpdateUserSample {
	public static void main(String[] args) {
		try {
         	// Download the service identity certificate of the ledger from the well-known identity service endpoint.
         	// Do not change the identity endpoint.
			ConfidentialLedgerCertificateClientBuilder confidentialLedgerCertificateClientbuilder = new ConfidentialLedgerCertificateClientBuilder()
					.certificateEndpoint("https://identity.confidential-ledger.core.azure.com")
					.credential(new DefaultAzureCredentialBuilder().build()).httpClient(HttpClient.createDefault());

			ConfidentialLedgerCertificateClient confidentialLedgerCertificateClient = confidentialLedgerCertificateClientbuilder
					.buildClient();

			String ledgerId = "contoso";
			Response<BinaryData> ledgerCertificateWithResponse = confidentialLedgerCertificateClient
					.getLedgerIdentityWithResponse(ledgerId, null);
			BinaryData certificateResponse = ledgerCertificateWithResponse.getValue();
			ObjectMapper mapper = new ObjectMapper();
			JsonNode jsonNode = mapper.readTree(certificateResponse.toBytes());
			String ledgerTlsCertificate = jsonNode.get("ledgerTlsCertificate").asText();

			SslContext sslContext = SslContextBuilder.forClient()
					.trustManager(new ByteArrayInputStream(ledgerTlsCertificate.getBytes(StandardCharsets.UTF_8)))
					.build();
			reactor.netty.http.client.HttpClient reactorClient = reactor.netty.http.client.HttpClient.create()
					.secure(sslContextSpec -> sslContextSpec.sslContext(sslContext));
			HttpClient httpClient = new NettyAsyncHttpClientBuilder(reactorClient).wiretap(true).build();

         	// The DefaultAzureCredentialBuilder will use the current Azure context to authenticate to Azure
			ConfidentialLedgerClient confidentialLedgerClient = new ConfidentialLedgerClientBuilder()
					.credential(new DefaultAzureCredentialBuilder().build()).httpClient(httpClient)
					.ledgerEndpoint("https://contoso.confidential-ledger.azure.com").buildClient();

			// Add a user
			// Other supported roles are Contributor and Administrator
			BinaryData userDetails = BinaryData.fromString("{\"assignedRole\":\"Reader\"}");
			RequestOptions requestOptions = new RequestOptions();
			String userId = "Azure AD object id of the user";
			Response<BinaryData> response = confidentialLedgerClient.createOrUpdateUserWithResponse(userId,
					userDetails, requestOptions);

			BinaryData parsedResponse = response.getValue();

			ObjectMapper objectMapper = new ObjectMapper();
			JsonNode responseBodyJson = null;

			try {
				responseBodyJson = objectMapper.readTree(parsedResponse.toBytes());
			} catch (IOException e) {
				e.printStackTrace();
			}

			System.out.println("Assigned role for user is " + responseBodyJson.get("assignedRole"));

			// Get the user and print the details
			response = confidentialLedgerClient.getUserWithResponse(userId, requestOptions);

			parsedResponse = response.getValue();

			try {
				responseBodyJson = objectMapper.readTree(parsedResponse.toBytes());
			} catch (IOException e) {
				e.printStackTrace();
			}

			System.out.println("Assigned role for user is " + responseBodyJson.get("assignedRole"));

			// Delete the user
			confidentialLedgerClient.deleteUserWithResponse(userId, requestOptions);
		} catch (Exception ex) {
			System.out.println("Caught exception" + ex);
		}
	}
}
登录 Azure
使用 Azure CLI az login 命令或 Azure PowerShell Connect-AzAccount cmdlet 登录到 Azure。
az login
如果 CLI 或 PowerShell 可以打开默认浏览器,它将这样做并加载 Azure 登录页。 否则,请访问 https://aka.ms/devicelogin,然后输入终端中显示的授权代码。
如果出现提示,则在浏览器中使用帐户凭据登录。
从 Azure 门户获取机密账本的名称和标识服务 URI,因为需要它来创建客户端以管理用户。 此图显示了 Azure 门户中的相应属性。
将以下代码片段中 contoso 和 https://contoso.confidential-ledger.azure.com 的实例替换为 Azure 门户中的相应值。
TypeScript 客户端库
安装包
 "dependencies": {
    "@azure-rest/confidential-ledger": "^1.0.0",
    "@azure/identity": "^3.1.3",
    "typescript": "^4.9.5"
  }
创建客户端并管理用户
import ConfidentialLedger, { getLedgerIdentity } from "@azure-rest/confidential-ledger";
import { DefaultAzureCredential } from "@azure/identity";

export async function main() {
  // Get the signing certificate from the confidential ledger Identity Service
  const ledgerIdentity = await getLedgerIdentity("contoso");

  // Create the confidential ledger Client
  const confidentialLedger = ConfidentialLedger(
    "https://contoso.confidential-ledger.azure.com",
    ledgerIdentity.ledgerIdentityCertificate,
    new DefaultAzureCredential()
  );

  // Azure AD object id of the user
  const userId = "Azure AD Object id"

  // Other supported roles are Reader and Contributor
  const createUserParams: CreateOrUpdateUserParameters = {
    contentType: "application/merge-patch+json",
    body: {
        assignedRole: "Contributor",
        userId: `${userId}`
      }
  }

  // Add the user
  var response = await confidentialLedger.path("/app/users/{userId}", userId).patch(createUserParams)

  // Check for a non-success response
  if (response.status !== "200") {
    throw response.body.error;
  }

  // Print the response
  console.log(response.body);

  // Get the user
  response = await confidentialLedger.path("/app/users/{userId}", userId).get()

  // Check for a non-success response
  if (response.status !== "200") {
    throw response.body.error;
  }

  // Print the response
  console.log(response.body);

  // Set the user role to Reader
  const updateUserParams: CreateOrUpdateUserParameters = {
    contentType: "application/merge-patch+json",
    body: {
        assignedRole: "Reader",
        userId: `${userId}`
      }
  }

  // Update the user
  response = await confidentialLedger.path("/app/users/{userId}", userId).patch(updateUserParams)

  // Check for a non-success response
  if (response.status !== "200") {
    throw response.body.error;
  }

  // Print the response
  console.log(response.body);

  // Delete the user
  await confidentialLedger.path("/app/users/{userId}", userId).delete()

  // Get the user to make sure it is deleted
  response = await confidentialLedger.path("/app/users/{userId}", userId).get()

  // Check for a non-success response
  if (response.status !== "200") {
    throw response.body.error;
  }
}

main().catch((err) => {
  console.error(err);
});
Azure 门户
导航到 Azure 门户并访问 Manage users 边栏选项卡。 可以从此边栏选项卡中添加、更新和删除用户。
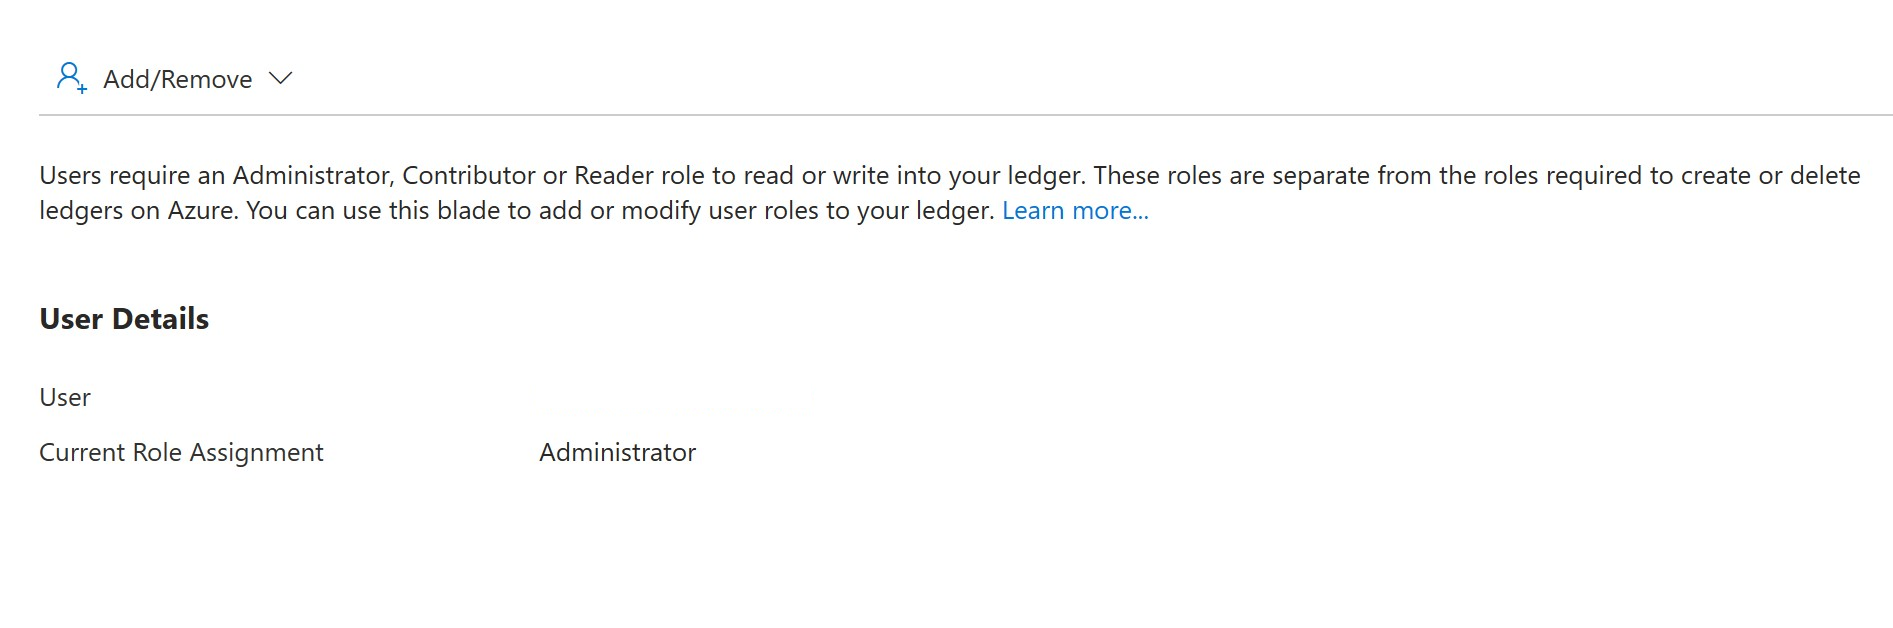
若要添加用户,请单击 Add/Remove 按钮,选取一名用户并选择该用户的角色,然后 Apply 更改。 该用户将被添加到具有所选角色的用户列表中。
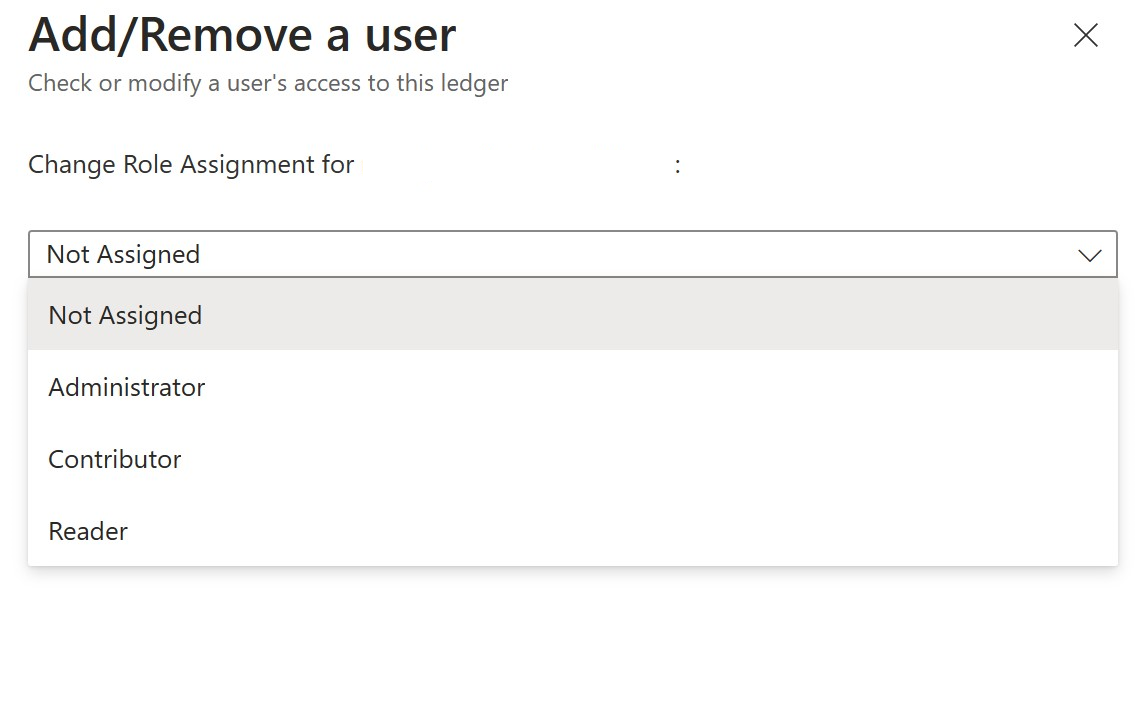
若要从账本中移除用户,请选择 Not Assigned 角色,然后单击 Apply 按钮。 该用户将会从用户列表中移除。