你当前正在访问 Microsoft Azure Global Edition 技术文档网站。 如果需要访问由世纪互联运营的 Microsoft Azure 中国技术文档网站,请访问 https://docs.azure.cn。
在 Azure Stack Edge Pro 上使用 GPU 共享部署 IoT Edge 工作负载
本文介绍容器化工作负载如何在 Azure Stack Edge Pro GPU 设备上共享 GPU。 方法涉及启用多进程服务 (MPS) 然后通过 IoT Edge 部署指定 GPU 工作负载。
先决条件
在开始之前,请确保:
可以访问已激活并配置了计算的 Azure Stack Edge Pro GPU 设备。 你具有 Kubernetes API 终结点,并且已将此终结点添加到要访问设备的客户端上的
hosts文件。你可以使用受支持的操作系统访问客户端系统。 如果使用 Windows 客户端,则系统应运行 PowerShell 5.0 或更高版本来访问设备。
在本地系统上保存以下部署
json文件。 你将使用此文件中的信息来运行 IoT Edge 部署。 此部署基于 Nvidia 公开提供的简单 CUDA 容器。{ "modulesContent": { "$edgeAgent": { "properties.desired": { "modules": { "cuda-sample1": { "settings": { "image": "nvidia/samples:nbody", "createOptions": "{\"Entrypoint\":[\"/bin/sh\"],\"Cmd\":[\"-c\",\"/tmp/nbody -benchmark -i=1000; while true; do echo no-op; sleep 10000;done\"],\"HostConfig\":{\"IpcMode\":\"host\",\"PidMode\":\"host\"}}" }, "type": "docker", "version": "1.0", "env": { "NVIDIA_VISIBLE_DEVICES": { "value": "0" } }, "status": "running", "restartPolicy": "never" }, "cuda-sample2": { "settings": { "image": "nvidia/samples:nbody", "createOptions": "{\"Entrypoint\":[\"/bin/sh\"],\"Cmd\":[\"-c\",\"/tmp/nbody -benchmark -i=1000; while true; do echo no-op; sleep 10000;done\"],\"HostConfig\":{\"IpcMode\":\"host\",\"PidMode\":\"host\"}}" }, "type": "docker", "version": "1.0", "env": { "NVIDIA_VISIBLE_DEVICES": { "value": "0" } }, "status": "running", "restartPolicy": "never" } }, "runtime": { "settings": { "minDockerVersion": "v1.25" }, "type": "docker" }, "schemaVersion": "1.1", "systemModules": { "edgeAgent": { "settings": { "image": "mcr.microsoft.com/azureiotedge-agent:1.0", "createOptions": "" }, "type": "docker" }, "edgeHub": { "settings": { "image": "mcr.microsoft.com/azureiotedge-hub:1.0", "createOptions": "{\"HostConfig\":{\"PortBindings\":{\"443/tcp\":[{\"HostPort\":\"443\"}],\"5671/tcp\":[{\"HostPort\":\"5671\"}],\"8883/tcp\":[{\"HostPort\":\"8883\"}]}}}" }, "type": "docker", "status": "running", "restartPolicy": "always" } } } }, "$edgeHub": { "properties.desired": { "routes": { "route": "FROM /messages/* INTO $upstream" }, "schemaVersion": "1.1", "storeAndForwardConfiguration": { "timeToLiveSecs": 7200 } } }, "cuda-sample1": { "properties.desired": {} }, "cuda-sample2": { "properties.desired": {} } } }
验证 GPU 驱动程序、CUDA 版本
第一步是验证设备是否正在运行所需的 GPU 驱动程序和 CUDA 版本。
运行以下命令:
Get-HcsGpuNvidiaSmi在 Nvidia smi 输出中,记下设备上的 GPU 版本和 CUDA 版本。 如果正在运行 Azure Stack Edge 2102 软件,此版本将与以下驱动程序版本相对应:
- GPU 驱动程序版本:460.32.03
- CUDA 版本:11.2
下面是示例输出:
[10.100.10.10]: PS>Get-HcsGpuNvidiaSmi
K8S-1HXQG13CL-1HXQG13:

Tue Feb 23 10:34:01 2021
+-----------------------------------------------------------------------------+
| NVIDIA-SMI 460.32.03    Driver Version: 460.32.03    CUDA Version: 11.2     |
|-------------------------------+----------------------+----------------------+
| GPU  Name        Persistence-M| Bus-Id        Disp.A | Volatile Uncorr. ECC |
| Fan  Temp  Perf  Pwr:Usage/Cap|         Memory-Usage | GPU-Util  Compute M. |
|                               |                      |               MIG M. |
|===============================+======================+======================|
|   0  Tesla T4            On   | 0000041F:00:00.0 Off |                    0 |
| N/A   40C    P8    15W /  70W |      0MiB / 15109MiB |      0%      Default |
|                               |                      |                  N/A |
+-------------------------------+----------------------+----------------------+

+-----------------------------------------------------------------------------+
| Processes:                                                                  |
|  GPU   GI   CI        PID   Type   Process name                  GPU Memory |
|        ID   ID                                                   Usage      |
|=============================================================================|
|  No running processes found                                                 |
+-----------------------------------------------------------------------------+
[10.100.10.10]: PS>
使此会话保持打开状态,因为你在本文中将使用它来查看 Nvidia smi 输出。
不含上下文共享的部署
现在,当多进程服务未运行且没有上下文共享时,可以在设备上部署应用程序。 通过 Azure 门户,在存在于设备上的 iotedge 命名空间中部署。
在 IoT Edge 命名空间中创建用户
首先,要创建一个连接到 iotedge 命名空间的用户。 IoT Edge 模块部署在 iotedge 命名空间中。 有关详细信息,请参阅设备上的 Kubernetes 命名空间。
按照以下步骤创建用户,并向用户授予对 iotedge 命名空间的访问权限。
在
iotedge命名空间中创建新用户。 运行以下命令:New-HcsKubernetesUser -UserName <user name>下面是示例输出:
[10.100.10.10]: PS>New-HcsKubernetesUser -UserName iotedgeuser
apiVersion: v1
clusters:
- cluster:
    certificate-authority-data:
===========================//snipped //======================// snipped //=============================
    server: https://compute.myasegpudev.wdshcsso.com:6443
  name: kubernetes
contexts:
- context:
    cluster: kubernetes
    user: iotedgeuser
  name: iotedgeuser@kubernetes
current-context: iotedgeuser@kubernetes
kind: Config
preferences: {}
users:
- name: iotedgeuser
  user:
    client-certificate-data:
===========================//snipped //======================// snipped //=============================
    client-key-data:
===========================//snipped //======================// snipped ============================
PQotLS0tLUVORCBSU0EgUFJJVkFURSBLRVktLS0tLQo=
复制以纯文本格式显示的输出。 在本地计算机上用户配置文件的
.kube文件夹(例如C:\Users\<username>\.kube)中,将输出另存为 config 文件(不含扩展名)。授权你创建的用户访问
iotedge命名空间。 运行以下命令:Grant-HcsKubernetesNamespaceAccess -Namespace iotedge -UserName <user name>下面是示例输出:
[10.100.10.10]: PS>Grant-HcsKubernetesNamespaceAccess -Namespace iotedge -UserName iotedgeuser
[10.100.10.10]: PS>
有关详细说明,请参阅通过 kubectl 在 Azure Stack Edge Pro GPU 设备上连接并管理 Kubernetes 群集。
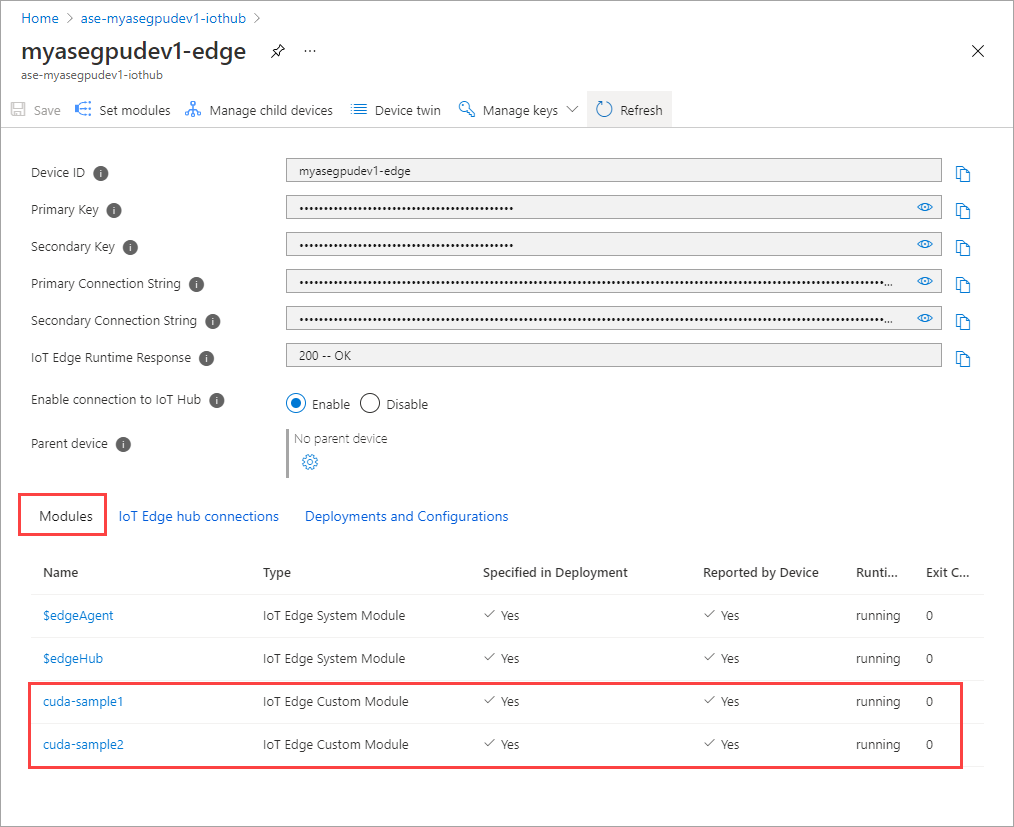
通过门户部署模块
通过 Azure 门户部署 IoT Edge 模块。 你将部署用于运行 n-body 模拟的公开提供的 Nvidia CUDA 示例模块。
确保 IoT Edge 服务在设备上运行。
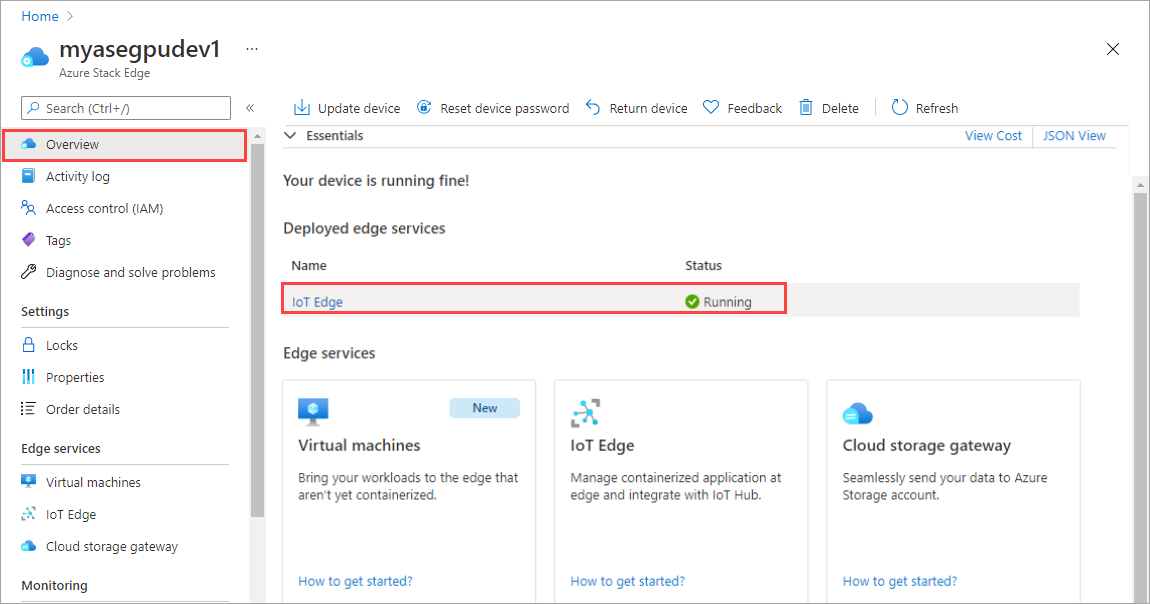
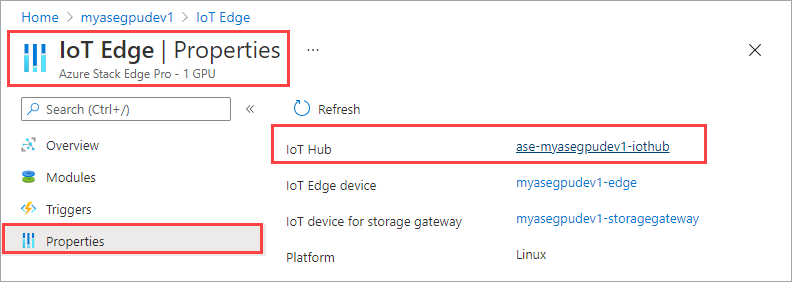
在右窗格中,选择“IoT Edge”磁贴。 转到“IoT Edge”>“属性”。 在右窗格中,选择与你的设备关联的 IoT 中心资源。
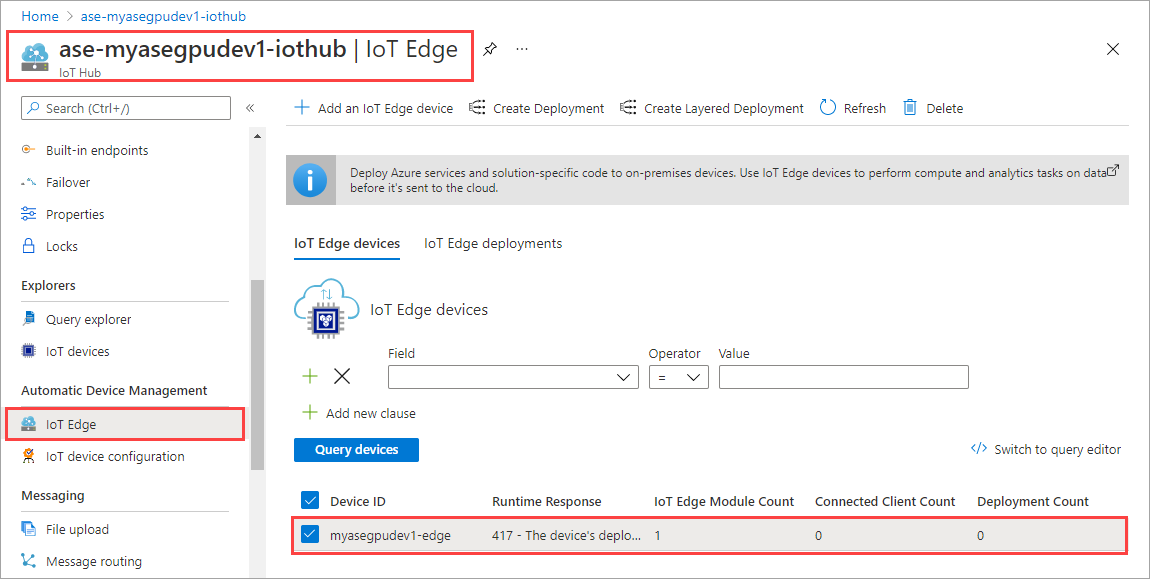
在 IoT 中心资源中,转到“自动设备管理”>“IoT Edge”。 在右窗格中,选择与你的设备关联的 IoT Edge 设备。
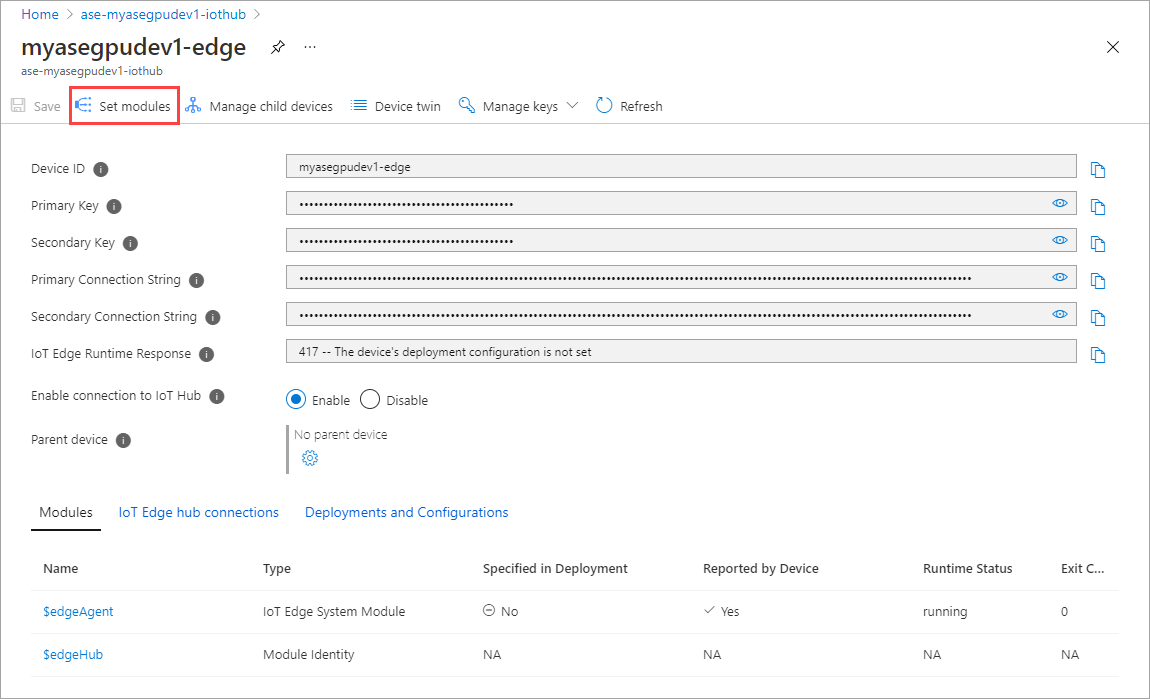
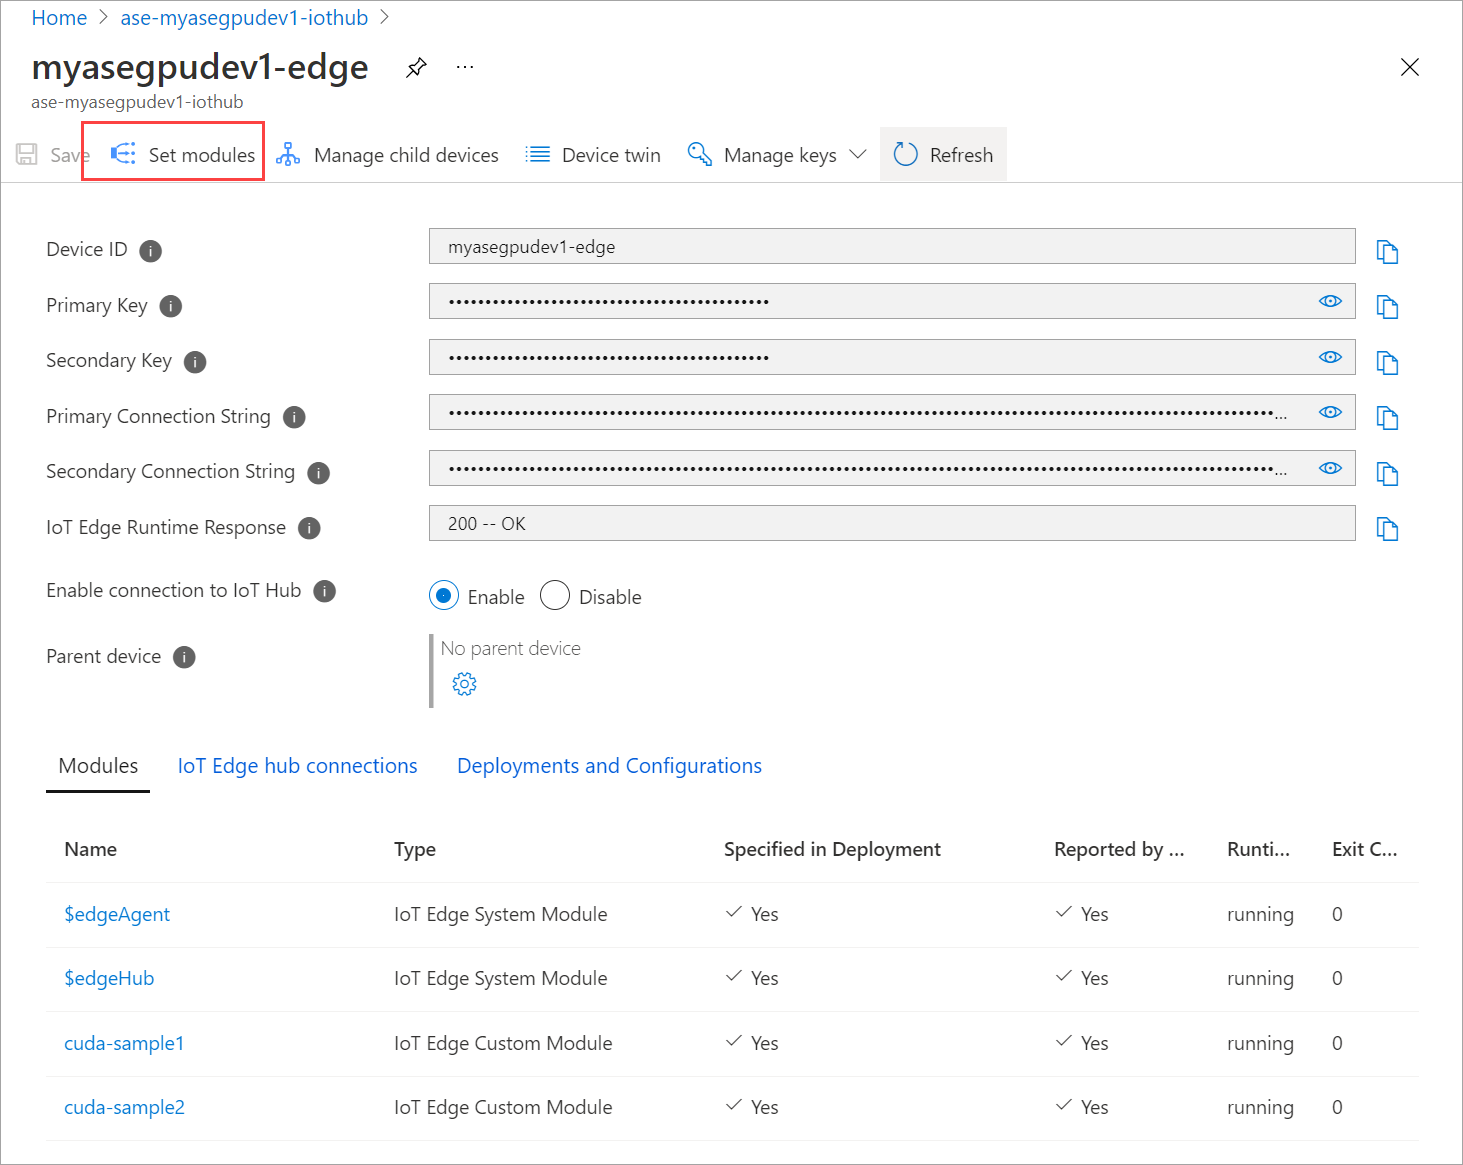
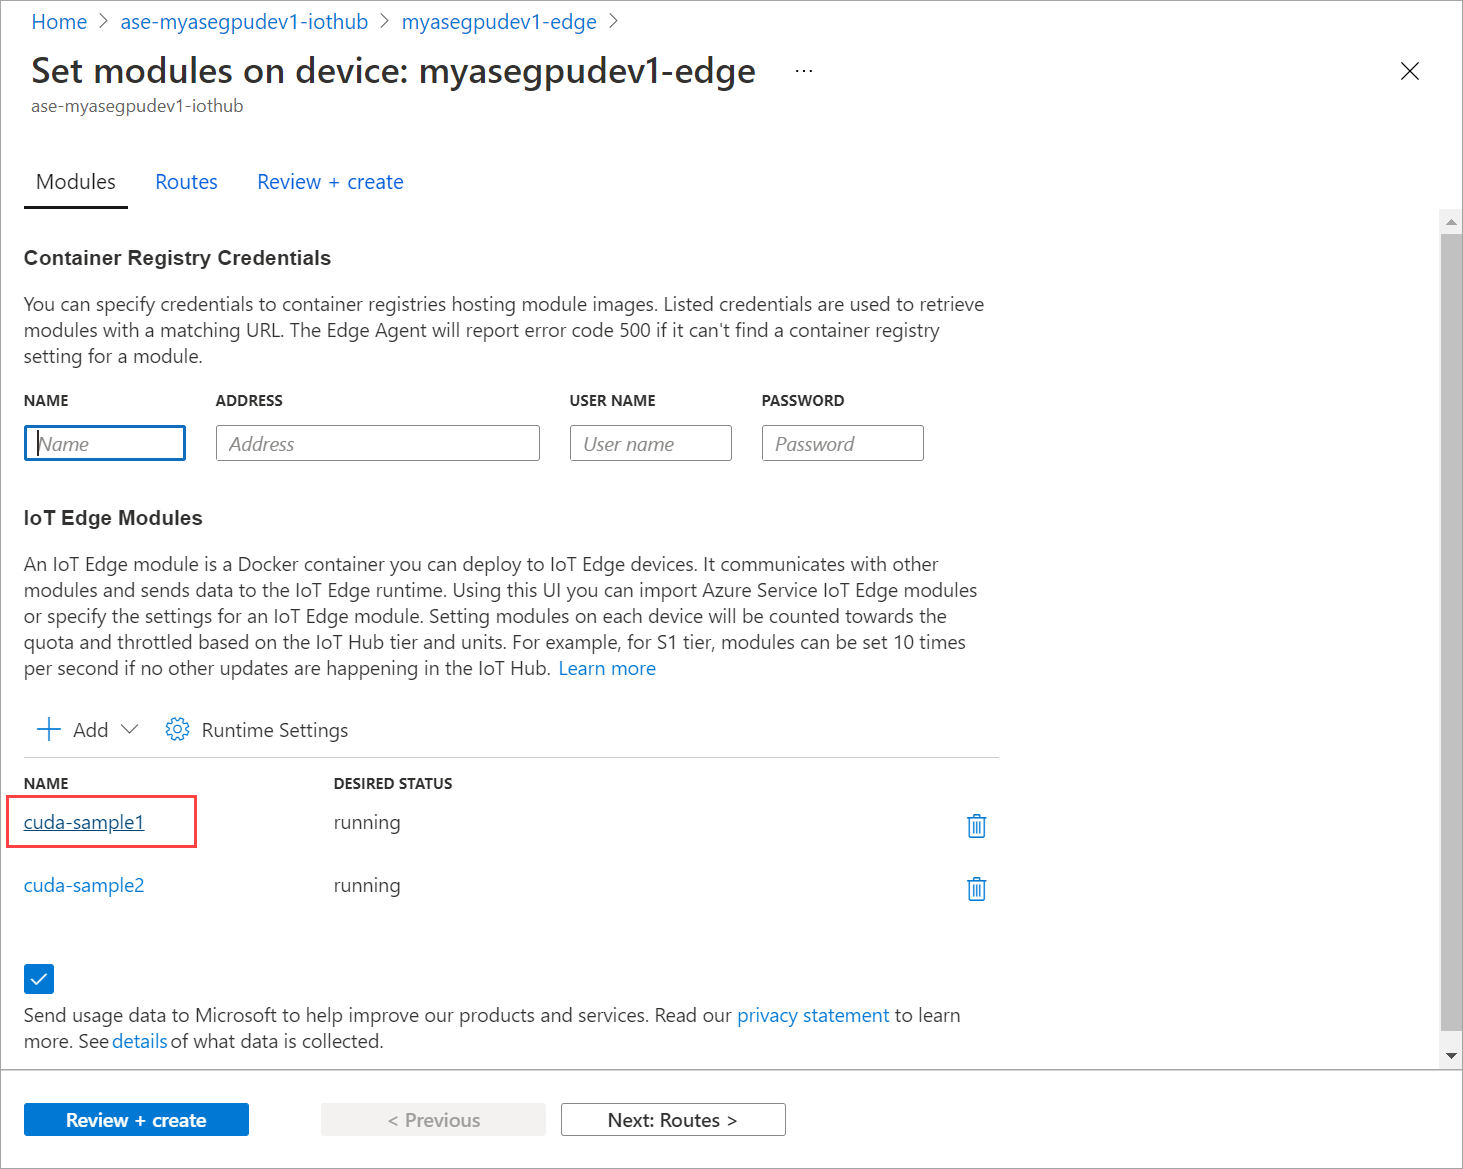
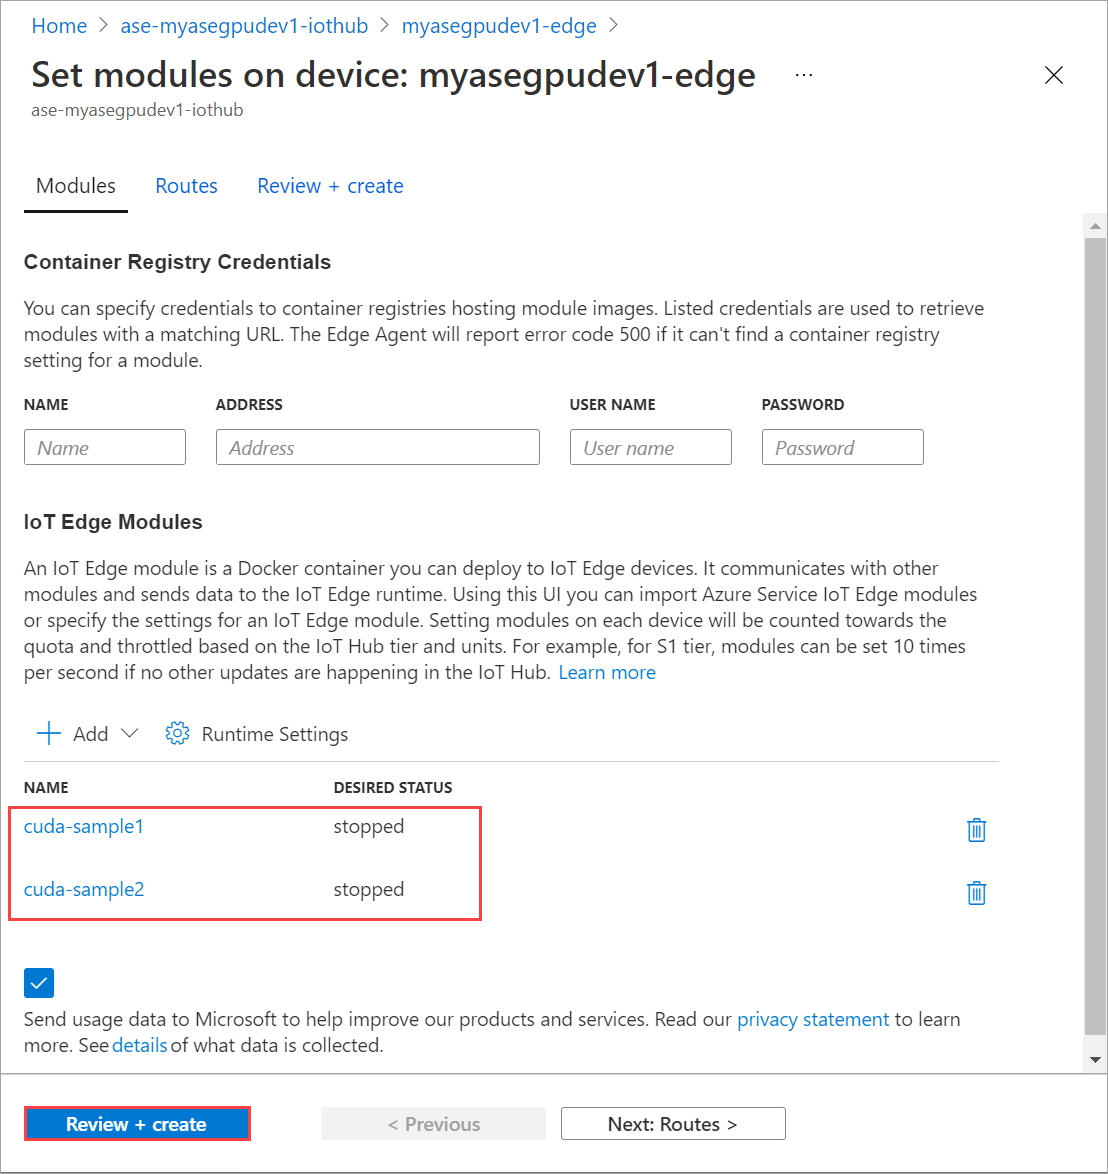
选择“设置模块”。
选择“+ 添加”>“IoT Edge 模块”。
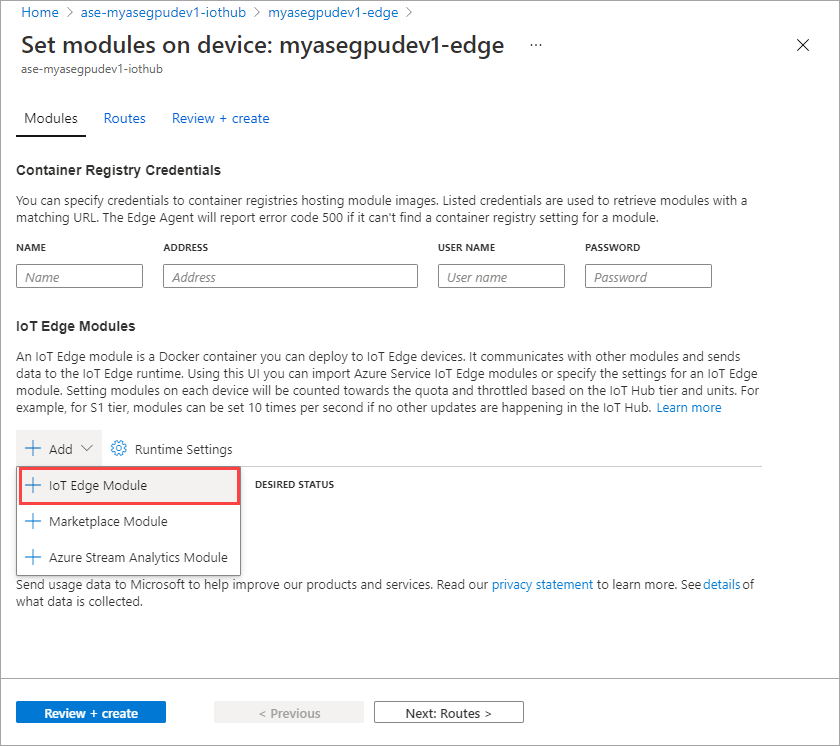
在“模块设置”选项卡上,提供 IoT Edge 模块名称和映像 URI。 将“映像请求策略”设置为“创建时”。

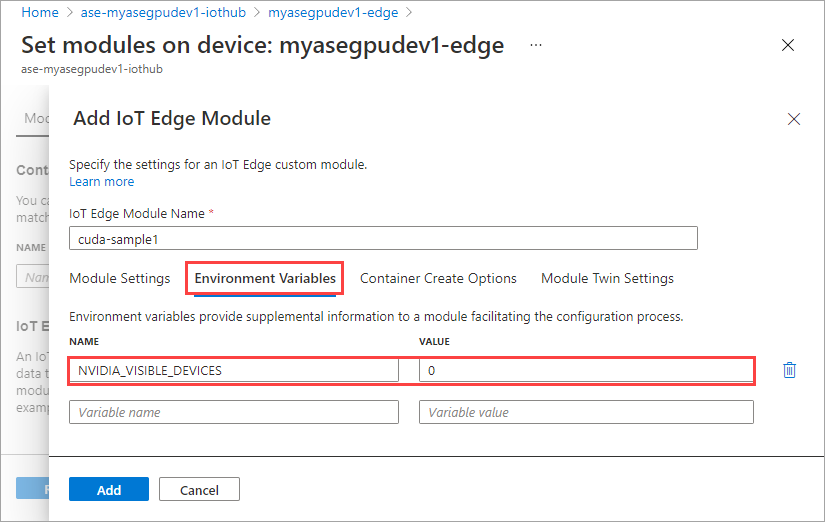
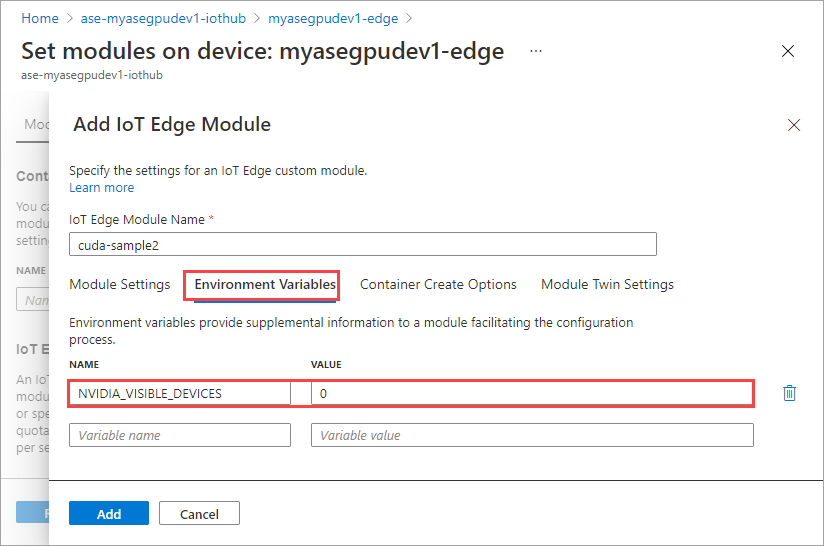
在“环境变量”选项卡上,将“NVIDIA_VISIBLE_DEVICES”指定为“0”。
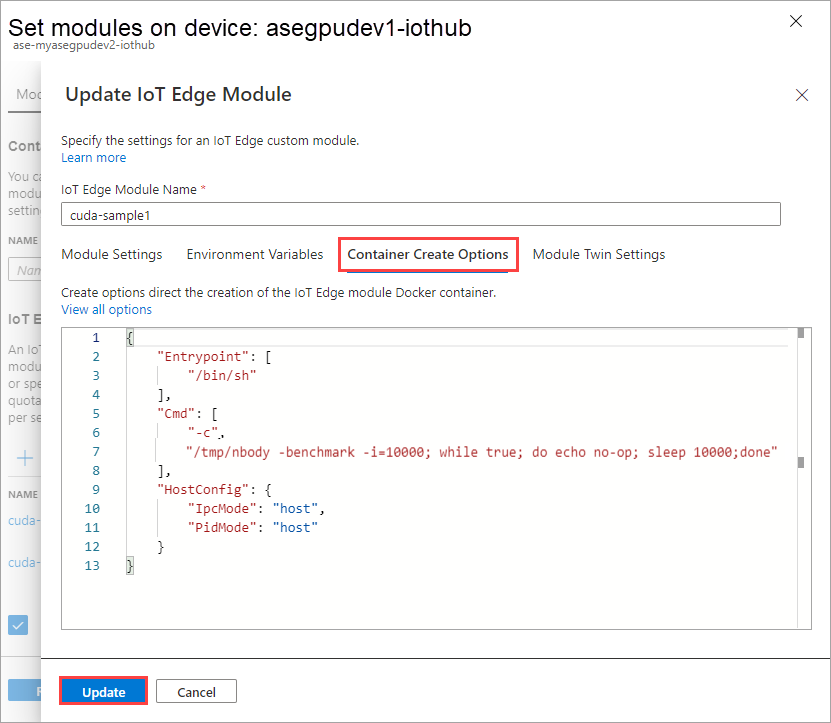
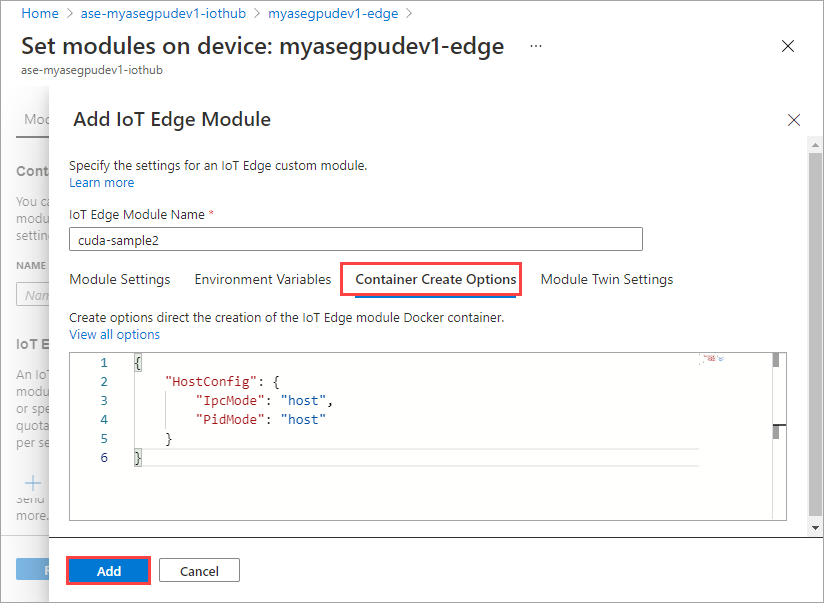
在“容器创建选项”选项卡上,提供以下选项:
{
    "Entrypoint": [
        "/bin/sh"
    ],
    "Cmd": [
        "-c",
        "/tmp/nbody -benchmark -i=1000; while true; do echo no-op; sleep 10000;done"
    ],
    "HostConfig": {
        "IpcMode": "host",
        "PidMode": "host"
    }
}
选项如下所示:
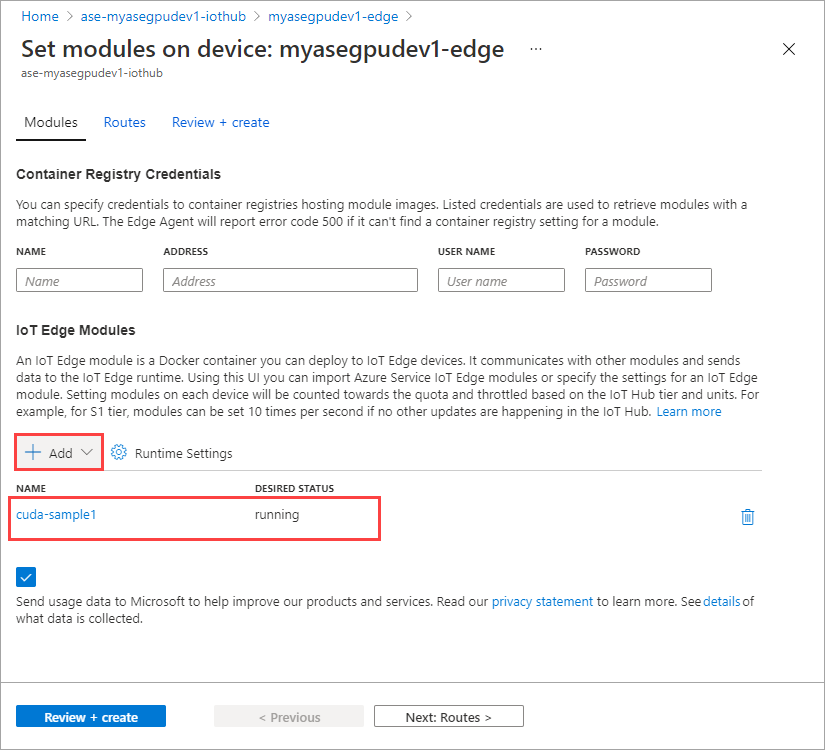
选择添加。
添加的模块应显示为“正在运行”。
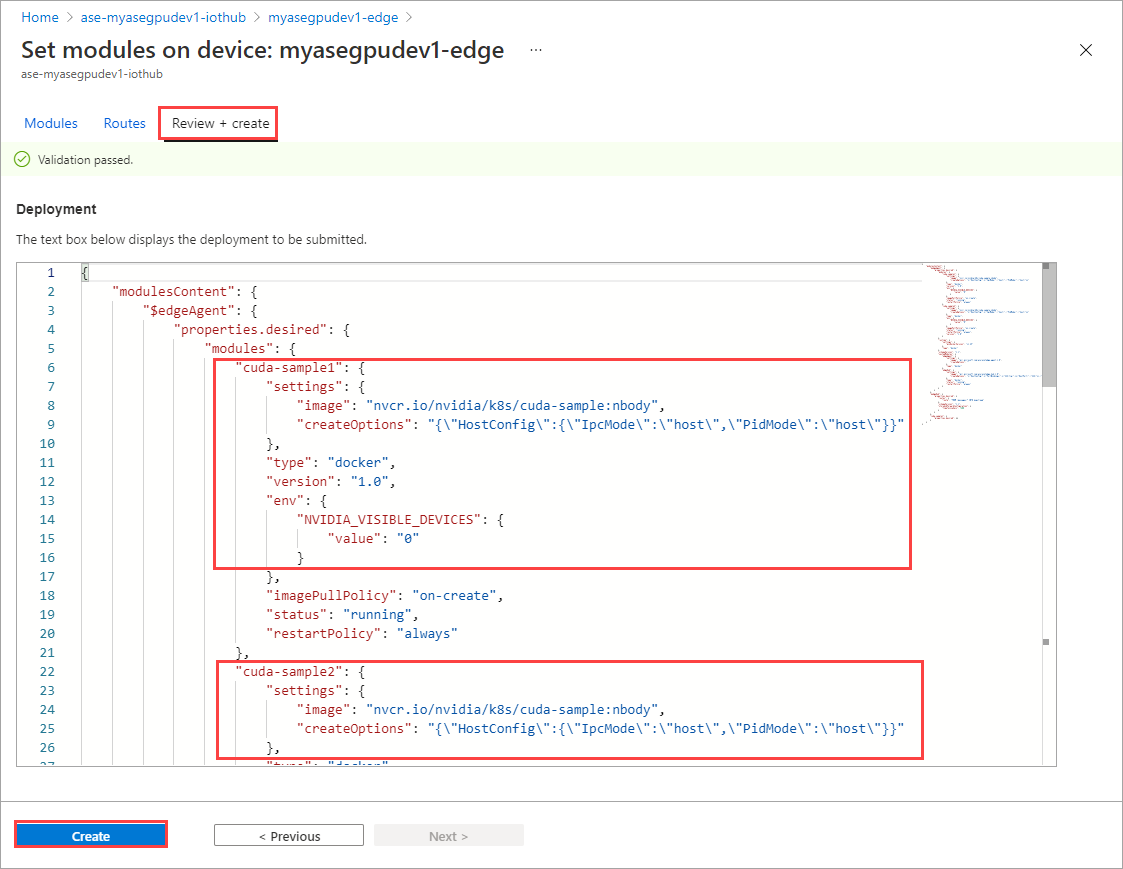
重复添加第一个模块时所遵循的所有步骤,以添加模块。 在此示例中,提供
cuda-sample2作为模块的名称。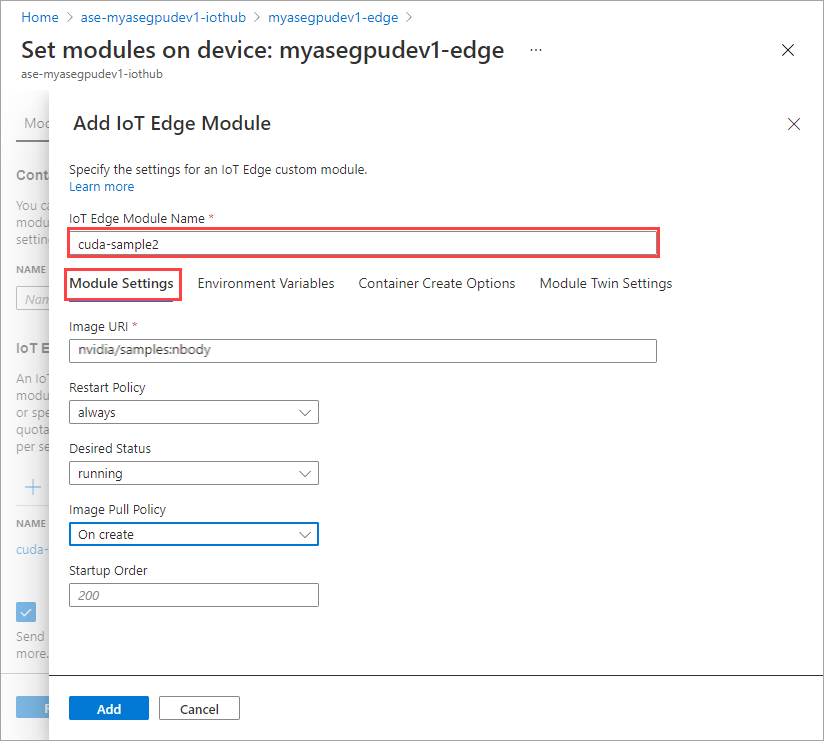
使用相同的环境变量,因为这两个模块将共享同一个 GPU。
使用为第一个模块提供的相同容器创建选项,然后选择“添加”。
在“设置模块”页上,选择“查看 + 创建”,然后选择“创建”。
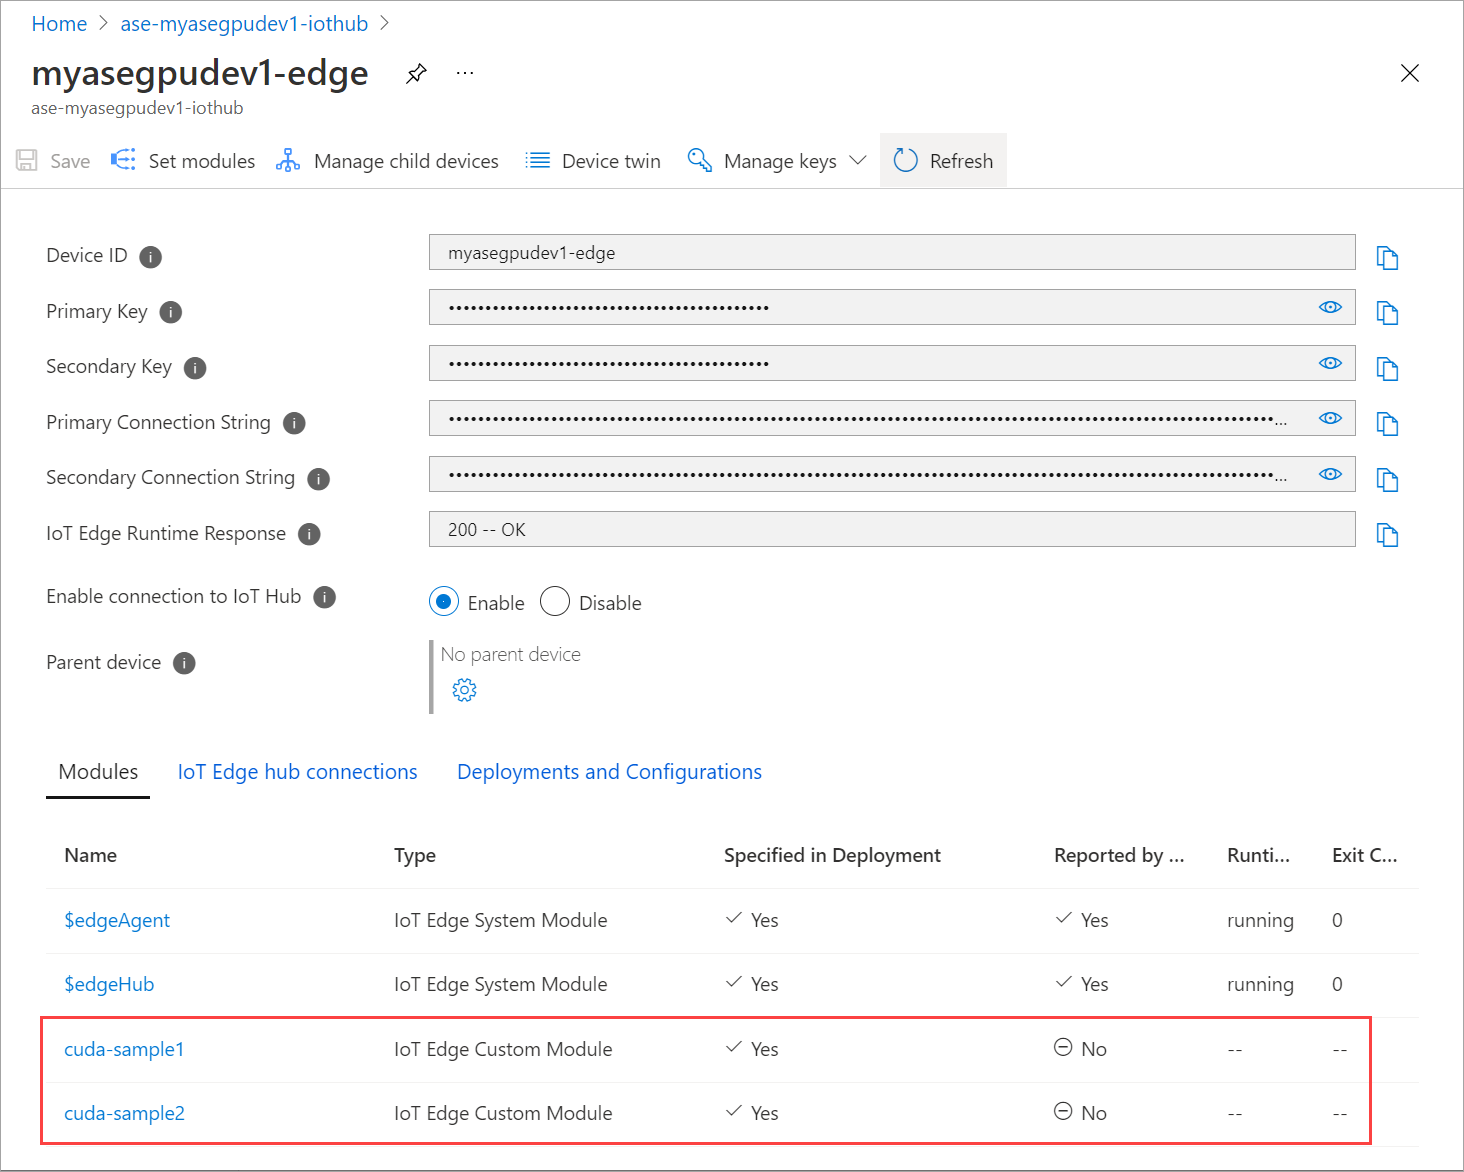
这两个模块的“运行时状态”现在应显示为“正在运行”。
监视工作负载部署
打开新的 PowerShell 会话。
列出在
iotedge命名空间中运行的 pod。 运行以下命令:kubectl get pods -n iotedge下面是示例输出:
PS C:\WINDOWS\system32> kubectl get pods -n iotedge --kubeconfig C:\GPU-sharing\kubeconfigs\configiotuser1
NAME                            READY   STATUS    RESTARTS   AGE
cuda-sample1-869989578c-ssng8   2/2     Running   0          5s
cuda-sample2-6db6d98689-d74kb   2/2     Running   0          4s
edgeagent-79f988968b-7p2tv      2/2     Running   0          6d21h
edgehub-d6c764847-l8v4m         2/2     Running   0          24h
iotedged-55fdb7b5c6-l9zn8       1/1     Running   1          6d21h
PS C:\WINDOWS\system32>
设备上有两个 pod(
cuda-sample1-97c494d7f-lnmns和cuda-sample2-d9f6c4688-2rld9)在设备上运行。尽管两个容器都运行 n-body 模拟,但请查看 Nvidia smi 输出中的 GPU 利用率。 转到设备的 PowerShell 界面并运行
Get-HcsGpuNvidiaSmi。下面是两个容器都运行 n-body 模拟时的示例输出:
[10.100.10.10]: PS>Get-HcsGpuNvidiaSmi
K8S-1HXQG13CL-1HXQG13:

Fri Mar  5 13:31:16 2021
+-----------------------------------------------------------------------------+
| NVIDIA-SMI 460.32.03    Driver Version: 460.32.03    CUDA Version: 11.2     |
|-------------------------------+----------------------+----------------------+
| GPU  Name        Persistence-M| Bus-Id        Disp.A | Volatile Uncorr. ECC |
| Fan  Temp  Perf  Pwr:Usage/Cap|         Memory-Usage | GPU-Util  Compute M. |
|                               |                      |               MIG M. |
|===============================+======================+======================|
|   0  Tesla T4            On   | 00002C74:00:00.0 Off |                    0 |
| N/A   52C    P0    69W /  70W |    221MiB / 15109MiB |    100%      Default |
|                               |                      |                  N/A |
+-------------------------------+----------------------+----------------------+

+-----------------------------------------------------------------------------+
| Processes:                                                                  |
|  GPU   GI   CI        PID   Type   Process name                  GPU Memory |
|        ID   ID                                                   Usage      |
|=============================================================================|
|    0   N/A  N/A    188342      C   /tmp/nbody                        109MiB |
|    0   N/A  N/A    188413      C   /tmp/nbody                        109MiB |
+-----------------------------------------------------------------------------+
[10.100.10.10]: PS>
可以看到,GPU 0 上有两个容器在 n-body 模拟下运行。 你还可以查看其相应的内存使用情况。
完成模拟后,Nvidia smi 输出会显示设备上没有正在运行的进程。
[10.100.10.10]: PS>Get-HcsGpuNvidiaSmi
K8S-1HXQG13CL-1HXQG13:

Fri Mar  5 13:54:48 2021
+-----------------------------------------------------------------------------+
| NVIDIA-SMI 460.32.03    Driver Version: 460.32.03    CUDA Version: 11.2     |
|-------------------------------+----------------------+----------------------+
| GPU  Name        Persistence-M| Bus-Id        Disp.A | Volatile Uncorr. ECC |
| Fan  Temp  Perf  Pwr:Usage/Cap|         Memory-Usage | GPU-Util  Compute M. |
|                               |                      |               MIG M. |
|===============================+======================+======================|
|   0  Tesla T4            On   | 00002C74:00:00.0 Off |                    0 |
| N/A   34C    P8     9W /  70W |      0MiB / 15109MiB |      0%      Default |
|                               |                      |                  N/A |
+-------------------------------+----------------------+----------------------+

+-----------------------------------------------------------------------------+
| Processes:                                                                  |
|  GPU   GI   CI        PID   Type   Process name                  GPU Memory |
|        ID   ID                                                   Usage      |
|=============================================================================|
|  No running processes found                                                 |
+-----------------------------------------------------------------------------+
[10.100.10.10]: PS>
在 n-body 模拟完成后,请查看日志以了解部署的详细信息以及完成模拟所需的时间。
下面是第一个容器的示例输出:
PS C:\WINDOWS\system32> kubectl -n iotedge  --kubeconfig C:\GPU-sharing\kubeconfigs\configiotuser1 logs cuda-sample1-869989578c-ssng8 cuda-sample1
Run "nbody -benchmark [-numbodies=<numBodies>]" to measure performance.
==============// snipped //===================//  snipped  //=============
> Windowed mode
> Simulation data stored in video memory
> Single precision floating point simulation
> 1 Devices used for simulation
GPU Device 0: "Turing" with compute capability 7.5

> Compute 7.5 CUDA device: [Tesla T4]
40960 bodies, total time for 10000 iterations: 170171.531 ms
= 98.590 billion interactions per second
= 1971.801 single-precision GFLOP/s at 20 flops per interaction
no-op
PS C:\WINDOWS\system32>
下面是第二个容器的示例输出:
PS C:\WINDOWS\system32> kubectl -n iotedge  --kubeconfig C:\GPU-sharing\kubeconfigs\configiotuser1 logs cuda-sample2-6db6d98689-d74kb cuda-sample2
Run "nbody -benchmark [-numbodies=<numBodies>]" to measure performance.
==============// snipped //===================//  snipped  //=============
> Windowed mode
> Simulation data stored in video memory
> Single precision floating point simulation
> 1 Devices used for simulation
GPU Device 0: "Turing" with compute capability 7.5

> Compute 7.5 CUDA device: [Tesla T4]
40960 bodies, total time for 10000 iterations: 170054.969 ms
= 98.658 billion interactions per second
= 1973.152 single-precision GFLOP/s at 20 flops per interaction
no-op
PS C:\WINDOWS\system32>
停止模块部署。 在设备的 IoT 中心资源中:
转到“自动设备部署”>“IoT Edge”。 选择对应于你的设备的 IoT Edge 设备。
转到“设置模块”并选择模块。
在“设置模块”选项卡上选择模块。
在“模块设置”选项卡上,将“所需状态”设置为“已停止”。 选择更新。
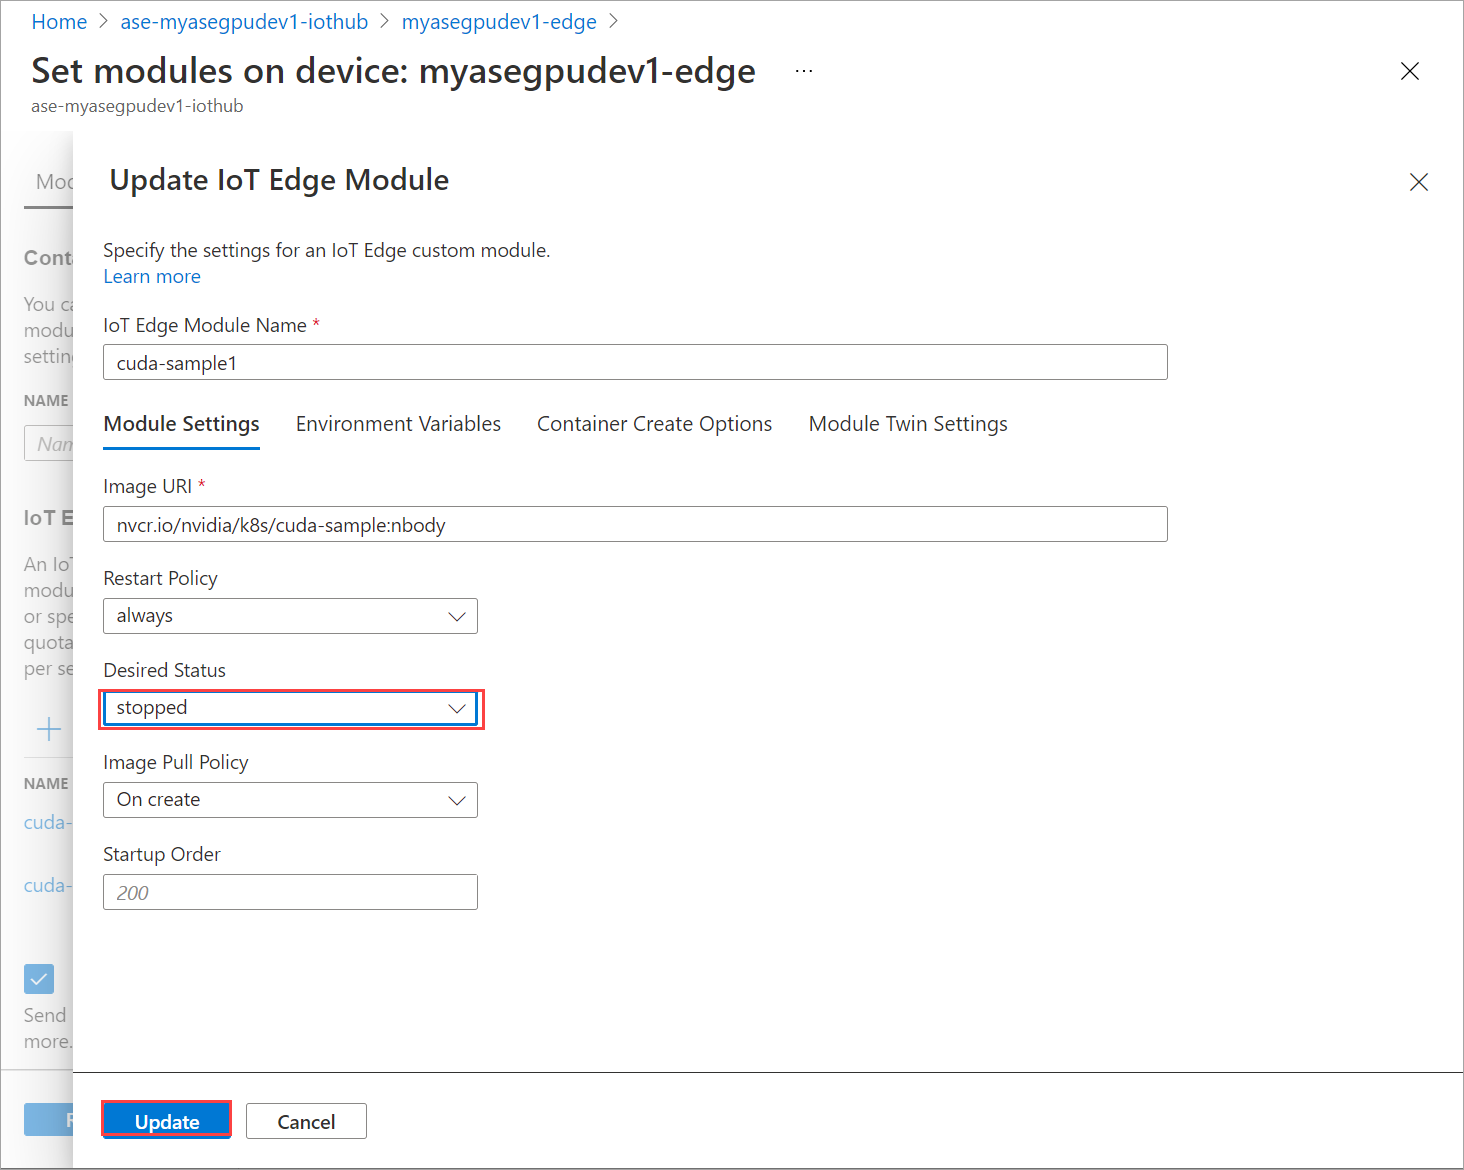
重复上述步骤,停止在设备上部署的第二个模块。 选择“查看 + 创建”,然后选择“创建”。 这应会更新部署。
多次刷新“设置模块”页。 直到模块“运行时状态”显示为“已停止”。
通过上下文共享部署
现在,当 MPS 在设备上运行时,可以在两个 CUDA 容器上部署 n-body 模拟。 首先,在设备上启用 MPS。
若要在设备上启用 MPS,请运行
Start-HcsGpuMPS命令。[10.100.10.10]: PS>Start-HcsGpuMPS K8S-1HXQG13CL-1HXQG13: Set compute mode to EXCLUSIVE_PROCESS for GPU 0000191E:00:00.0. All done. Created nvidia-mps.service [10.100.10.10]: PS>从设备的 PowerShell 接口获取 Nvidia smi 输出。 可以看到
nvidia-cuda-mps-server进程或 MPS 服务正在设备上运行。下面是示例输出:
[10.100.10.10]: PS>Get-HcsGpuNvidiaSmi
K8S-1HXQG13CL-1HXQG13:

Thu Mar  4 12:37:39 2021
+-----------------------------------------------------------------------------+
| NVIDIA-SMI 460.32.03    Driver Version: 460.32.03    CUDA Version: 11.2     |
|-------------------------------+----------------------+----------------------+
| GPU  Name        Persistence-M| Bus-Id        Disp.A | Volatile Uncorr. ECC |
| Fan  Temp  Perf  Pwr:Usage/Cap|         Memory-Usage | GPU-Util  Compute M. |
|                               |                      |               MIG M. |
|===============================+======================+======================|
|   0  Tesla T4            On   | 00002C74:00:00.0 Off |                    0 |
| N/A   36C    P8     9W /  70W |     28MiB / 15109MiB |      0%   E. Process |
|                               |                      |                  N/A |
+-------------------------------+----------------------+----------------------+

+-----------------------------------------------------------------------------+
| Processes:                                                                  |
|  GPU   GI   CI        PID   Type   Process name                  GPU Memory |
|        ID   ID                                                   Usage      |
|=============================================================================|
|    0   N/A  N/A    122792      C   nvidia-cuda-mps-server             25MiB |
+-----------------------------------------------------------------------------+
[10.100.10.10]: PS>Get-HcsGpuNvidiaSmi
部署之前停止的模块。 通过“设置模块”将“所需状态”设置为“正在运行”。
下面是示例输出:
PS C:\WINDOWS\system32> kubectl get pods -n iotedge --kubeconfig C:\GPU-sharing\kubeconfigs\configiotuser1
NAME                            READY   STATUS    RESTARTS   AGE
cuda-sample1-869989578c-2zxh6   2/2     Running   0          44s
cuda-sample2-6db6d98689-fn7mx   2/2     Running   0          44s
edgeagent-79f988968b-7p2tv      2/2     Running   0          5d20h
edgehub-d6c764847-l8v4m         2/2     Running   0          27m
iotedged-55fdb7b5c6-l9zn8       1/1     Running   1          5d20h
PS C:\WINDOWS\system32>
可以看到,已在设备上部署并运行模块。
部署模块后,n-body 模拟也会开始在这两个容器上运行。 下面是在第一个容器上完成模拟后的示例输出:
PS C:\WINDOWS\system32> kubectl -n iotedge logs cuda-sample1-869989578c-2zxh6 cuda-sample1
Run "nbody -benchmark [-numbodies=<numBodies>]" to measure performance.
==============// snipped //===================//  snipped  //=============

> Windowed mode
> Simulation data stored in video memory
> Single precision floating point simulation
> 1 Devices used for simulation
GPU Device 0: "Turing" with compute capability 7.5

> Compute 7.5 CUDA device: [Tesla T4]
40960 bodies, total time for 10000 iterations: 155256.062 ms
= 108.062 billion interactions per second
= 2161.232 single-precision GFLOP/s at 20 flops per interaction
no-op
PS C:\WINDOWS\system32>
下面是在第二个容器上完成模拟后的示例输出:
PS C:\WINDOWS\system32> kubectl -n iotedge  --kubeconfig C:\GPU-sharing\kubeconfigs\configiotuser1 logs cuda-sample2-6db6d98689-fn7mx cuda-sample2
Run "nbody -benchmark [-numbodies=<numBodies>]" to measure performance.
==============// snipped //===================//  snipped  //=============

> Windowed mode
> Simulation data stored in video memory
> Single precision floating point simulation
> 1 Devices used for simulation
GPU Device 0: "Turing" with compute capability 7.5

> Compute 7.5 CUDA device: [Tesla T4]
40960 bodies, total time for 10000 iterations: 155366.359 ms
= 107.985 billion interactions per second
= 2159.697 single-precision GFLOP/s at 20 flops per interaction
no-op
PS C:\WINDOWS\system32>
当两个容器都运行 n-body 模拟时,从设备的 PowerShell 接口获取 Nvidia smi 输出。 下面是示例输出。 有三个进程,
nvidia-cuda-mps-server进程(C 类型)对应于 MPS 服务,/tmp/nbody进程(M + C 类型)对应于模块部署的 n-body 工作负载。[10.100.10.10]: PS>Get-HcsGpuNvidiaSmi K8S-1HXQG13CL-1HXQG13: Thu Mar 4 12:59:44 2021 +-----------------------------------------------------------------------------+ | NVIDIA-SMI 460.32.03 Driver Version: 460.32.03 CUDA Version: 11.2 | |-------------------------------+----------------------+----------------------+ | GPU Name Persistence-M| Bus-Id Disp.A | Volatile Uncorr. ECC | | Fan Temp Perf Pwr:Usage/Cap| Memory-Usage | GPU-Util Compute M. | | | | MIG M. | |===============================+======================+======================| | 0 Tesla T4 On | 00002C74:00:00.0 Off | 0 | | N/A 54C P0 69W / 70W | 242MiB / 15109MiB | 100% E. Process | | | | N/A | +-------------------------------+----------------------+----------------------+ +-----------------------------------------------------------------------------+ | Processes: | | GPU GI CI PID Type Process name GPU Memory | | ID ID Usage | |=============================================================================| | 0 N/A N/A 56832 M+C /tmp/nbody 107MiB | | 0 N/A N/A 56900 M+C /tmp/nbody 107MiB | | 0 N/A N/A 122792 C nvidia-cuda-mps-server 25MiB | +-----------------------------------------------------------------------------+ [10.100.10.10]: PS>Get-HcsGpuNvidiaSmi