你当前正在访问 Microsoft Azure Global Edition 技术文档网站。 如果需要访问由世纪互联运营的 Microsoft Azure 中国技术文档网站,请访问 https://docs.azure.cn。
如何使用设备 IoT Central REST API 控制设备
通过 IoT Central REST API,你可以开发与 IoT Central 应用程序集成的客户端应用程序。 可以使用 REST API 控制 IoT Central 应用程序中的设备。 你可以使用 REST API 达到以下目的:
- 从设备读取上一个已知遥测值。
- 从设备读取属性值。
- 设置设备上的可写属性。
- 在设备上调用命令。
本文介绍如何使用 /devices/{device_id} API 控制单个设备。 你还可以使用作业批量控制设备。
设备可以将其支持的属性、遥测数据和命令按组件和模块进行分组。
每个 IoT Central REST API 调用都需要授权标头。 有关详细信息,请参阅如何对 IoT Central REST API 调用进行身份验证和授权。
有关 IoT Central REST API 的参考文档,请参阅 Azure IoT Central REST API 参考。
若要了解如何使用 IoT Central UI 控制设备,请参阅
组件和模块
可以通过组件对设备功能进行分组和重用。 若要详细了解组件和设备模型,请参阅 IoT 即插即用建模指南。
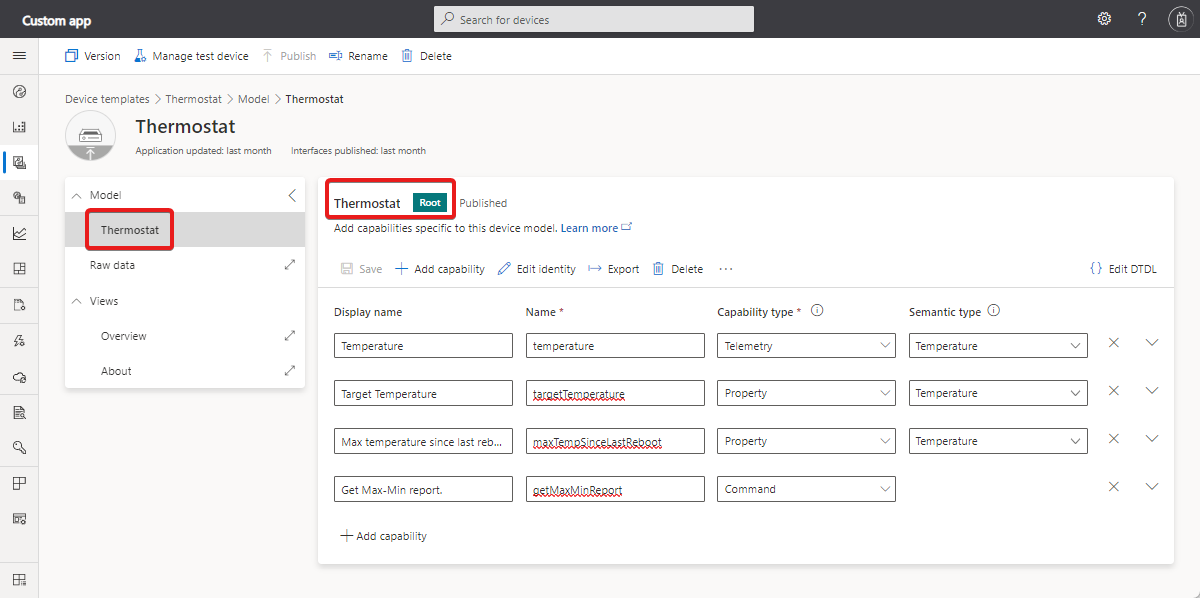
并非所有设备模板都会使用组件。 下方屏幕截图显示了简单恒温器的设备模板,其中所有功能都在名为“根组件”的单一界面中定义:
下方屏幕截图显示了使用组件的温度控制器设备模板。 温度控制器具有两个恒温器组件和一个设备信息组件:
在 IoT Central 中,模块指在已连接 IoT Edge 设备上运行的 IoT Edge 模块。 模块可以使用简单模型,例如不使用组件的恒温器。 模块还可以使用组件来整理更复杂的功能集。 下方屏幕截图显示了使用模块的设备模板示例。 环境传感器设备具有名为 SimulatedTemperatureSensor 模块和名为 management 的继承接口:
获取设备组件
使用以下请求从名为 temperature-controller-01 的设备检索组件:
GET https://{your app subdomain}.azureiotcentral.com/api/devices/temperature-controller-01/components?api-version=2022-07-31
对此请求的响应如下方示例所示。 value 数组包含每个设备组件的详细信息:
{
  "value": [
    {
      "@type": "Component",
      "name": "thermostat1",
      "displayName": "Thermostat One",
      "description": "Thermostat One of Two."
    },
    {
      "@type": "Component",
      "name": "thermostat2",
      "displayName": "Thermostat Two",
      "description": "Thermostat Two of Two."
    },
    {
      "@type": "Component",
      "name": "deviceInformation",
      "displayName": "Device Information interface",
      "description": "Optional interface with basic device hardware information."
    }
  ]
}
获取设备模块
使用以下请求检索在名为 environmental-sensor-01 的已连接 IoT Edge 设备上运行的模块列表:
GET https://{your app subdomain}.azureiotcentral.com/api/devices/environmental-sensor-01/modules?api-version=2022-07-31
对此请求的响应如下方示例所示。 模块数组仅包含在 IoT Edge 设备上运行的自定义模块,而不包含内置 $edgeAgent 和 $edgeHub 模块:
{
  "value": [
    {
      "@type": [
        "Relationship",
        "EdgeModule"
      ],
      "name": "SimulatedTemperatureSensor",
      "displayName": "SimulatedTemperatureSensor"
    }
  ]
}
使用以下请求检索名为 SimulatedTemperatureSensor 的模块中的组件列表:
GET https://{your app subdomain}.azureiotcentral.com/api/devices/environmental-sensor-01/modules?api-version=2022-07-31
读取遥测数据
使用以下请求从不使用组件的设备检索上一个已知遥测值。 此示例中,设备名为 thermostat-01,遥测值名为 temperature:
GET https://{your app subdomain}.azureiotcentral.com/api/devices/thermostat-01/telemetry/temperature?api-version=2022-07-31
对此请求的响应如以下示例所示:
{
  "timestamp": "2021-03-24T12:33:15.223Z",
  "value": 40.10993804456927
}
使用以下请求从使用组件的设备检索上一个已知遥测值。 此示例中,设备名为 temperature-controller-01,组件名为 thermostat2,遥测值名为 temperature:
GET https://{your app subdomain}.azureiotcentral.com/api/devices/temperature-controller-01/components/thermostat2/telemetry/temperature?api-version=2022-07-31
对此请求的响应如以下示例所示:
{
  "timestamp": "2021-03-24T12:43:44.968Z",
  "value": 70.29168040339141
}
若为 IoT Edge 设备,请使用以下请求从模块检索上一个已知遥测值。 此示例使用的设备名为 environmental-sensor-01,其模块名为 SimulatedTemperatureSensor,遥测值名为 ambient。 ambient 遥测类型包含温度和湿度值:
GET https://{your app subdomain}.azureiotcentral.com/api/devices/environmental-sensor-01/modules/SimulatedTemperatureSensor/telemetry/ambient?api-version=2022-07-31
对此请求的响应如以下示例所示:
{
  "timestamp": "2021-03-25T15:44:34.955Z",
  "value": {
    "temperature": 21.18032378129676,
    "humidity": 25
  }
}
提示
若要从模块组件中访问遥测数据,请使用 /api/devices/{deviceId}/modules/{moduleName}/components/{componentName}/telemetry/{telemetryName}。
读取属性
使用以下请求从不使用组件的设备检索属性值。 此示例中,设备名为 thermostat-01:
GET https://{your app subdomain}.azureiotcentral.com/api/devices/thermostat-01/properties?api-version=2022-07-31
对此请求的响应如下方示例所示。 其中显示设备正在报告单个属性值:
{
  "maxTempSinceLastReboot": 93.95907131817654,
  "$metadata": {
    "maxTempSinceLastReboot": {
      "lastUpdateTime": "2021-03-24T12:47:46.7571438Z"
    }
  }
}
使用以下请求从所有组件检索属性值。 此示例中,设备名为 temperature-controller-01:
GET https://{your app subdomain}.azureiotcentral.com/api/devices/temperature-controller-01/properties?api-version=2022-07-31
对此请求的响应如以下示例所示:
{
  "serialNumber": "Explicabo animi nihil qui facere sit explicabo nisi.",
  "$metadata": {
    "serialNumber": {
      "lastUpdateTime": "2021-03-24T13:58:52.5999859Z"
    }
  },
  "thermostat1": {
    "maxTempSinceLastReboot": 79.7290121339184,
    "$metadata": {
      "maxTempSinceLastReboot": {
        "lastUpdateTime": "2021-03-24T13:58:52.5999859Z"
      }
    }
  },
  "thermostat2": {
    "maxTempSinceLastReboot": 54.214860556320424,
    "$metadata": {
      "maxTempSinceLastReboot": {
        "lastUpdateTime": "2021-03-24T13:58:52.5999859Z"
      }
    }
  },
  "deviceInformation": {
    "manufacturer": "Eveniet culpa sed sit omnis.",
    "$metadata": {
      "manufacturer": {
        "lastUpdateTime": "2021-03-24T13:58:52.5999859Z"
      },
      "model": {
        "lastUpdateTime": "2021-03-24T13:58:52.5999859Z"
      },
      "swVersion": {
        "lastUpdateTime": "2021-03-24T13:58:52.5999859Z"
      },
      "osName": {
        "lastUpdateTime": "2021-03-24T13:58:52.5999859Z"
      },
      "processorArchitecture": {
        "lastUpdateTime": "2021-03-24T13:58:52.5999859Z"
      },
      "processorManufacturer": {
        "lastUpdateTime": "2021-03-24T13:58:52.5999859Z"
      },
      "totalStorage": {
        "lastUpdateTime": "2021-03-24T13:58:52.5999859Z"
      },
      "totalMemory": {
        "lastUpdateTime": "2021-03-24T13:58:52.5999859Z"
      }
    },
    "model": "Necessitatibus id ab dolores vel eligendi fuga.",
    "swVersion": "Ut minus ipsum ut omnis est asperiores harum.",
    "osName": "Atque sit omnis eum sapiente eum tenetur est dolor.",
    "processorArchitecture": "Ratione enim dolor iste iure.",
    "processorManufacturer": "Aliquam eligendi sit ipsa.",
    "totalStorage": 36.02825898541592,
    "totalMemory": 55.442695395750505
  }
}
使用以下请求从单个组件检索属性值。 此示例中,设备名为 temperature-controller-01,组件名为 thermostat2:
GET https://{your app subdomain}.azureiotcentral.com/api/devices/temperature-controller-01/components/thermostat2/properties?api-version=2022-07-31
对此请求的响应如以下示例所示:
{
  "maxTempSinceLastReboot": 24.445128131004935,
  "$metadata": {
    "maxTempSinceLastReboot": {
      "lastUpdateTime": "2021-03-24T14:03:53.787491Z"
    }
  }
}
若为 IoT Edge 设备,请使用以下请求从模块检索属性值。 此示例使用名为 environmental-sensor-01 的设备,其模块名为 SimulatedTemperatureSensor:
GET https://{your app subdomain}.azureiotcentral.com/api/devices/environmental-sensor-01/modules/SimulatedTemperatureSensor/properties?api-version=2022-07-31
对此请求的响应如以下示例所示:
{
  "$metadata": {
    "SendData": {
      "desiredValue": true,
      "desiredVersion": 1
    },
    "SendInterval": {
      "desiredValue": 10,
      "desiredVersion": 1
    }
  }
}
提示
若要从模块组件中访问属性,请使用 /devices/{deviceId}/modules/{moduleName}/components/{componentName}/properties。
写入属性
有些属性是可写入的。 在恒温器模型的例子中,targetTemperature 属性即为可写属性。
使用以下请求将单个属性值写入不使用组件的设备。 此示例中,设备名为 thermostat-01:
PATCH https://{your app subdomain}.azureiotcentral.com/api/devices/thermostat-01/properties?api-version=2022-07-31
请求正文如下方示例所示:
{
  "targetTemperature": 65.5
}
对此请求的响应如以下示例所示:
{
  "$metadata": {
    "targetTemperature": {
      "desiredValue": 65.5
    }
  }
}
提示
若要更新设备上的所有属性,请使用 PUT,而不是 PATCH。
使用以下请求将单个属性值写入使用组件的设备。 此示例中,设备名为 temperature-controller-01,组件名为 thermostat2:
PATCH https://{your app subdomain}.azureiotcentral.com/api/devices/temperature-controller-01/components/thermostat2/properties?api-version=2022-07-31
请求正文如下方示例所示:
{
  "targetTemperature": 65.5
}
对此请求的响应如以下示例所示:
{
  "$metadata": {
    "targetTemperature": {
      "desiredValue": 65.5
    }
  }
}
提示
若要更新组件上的所有属性,请使用 PUT,而不是 PATCH。
若为 IoT Edge 设备,请使用以下请求将单个属性值写入模块。 此示例使用名为 environmental-sensor-01 的设备、名为 SimulatedTemperatureSensor 的模块以及名为 SendInterval 的属性:
PUT https://{your app subdomain}.azureiotcentral.com/api/devices/environmental-sensor-01/modules/SimulatedTemperatureSensor/properties?api-version=2022-07-31
请求正文如下方示例所示:
{
  "SendInterval": 20
}
对此请求的响应如以下示例所示:
{
  "$metadata": {
    "SendInterval": {
      "desiredValue": 20
    }
  }
}
提示
若要更新模块上的所有属性,请使用 PUT,而不是 PATCH。
更新模块属性
若使用的是 IoT Edge 设备,请使用以下请求从模块检索属性值:
GET https://{your app subdomain}.azureiotcentral.com/api/devices/{deviceId}/modules/{moduleName}/properties?api-version=2022-07-31
若使用的是 IoT Edge 设备,请使用以下请求从模块组件检索属性值:
GET https://{your app subdomain}.azureiotcentral.com/api/devices/{deviceId}/modules/{moduleName}/components/{componentName}/properties?api-version=2022-07-31
调用命令
可以使用 REST API 调用设备命令并检索命令历史记录。
使用以下请求在不使用组件的设备上调用命令。 此示例中,设备名为 thermostat-01,命令名为 getMaxMinReport:
POST https://{your app subdomain}.azureiotcentral.com/api/devices/thermostat-01/commands/getMaxMinReport?api-version=2022-07-31
请求正文如下方示例所示:
{
  "request": "2021-03-24T12:55:20.789Z"
}
对此请求的响应如以下示例所示:
{
  "response": {
    "maxTemp": 21.002000799562367,
    "minTemp": 73.09674605264892,
    "avgTemp": 59.54553991653756,
    "startTime": "2022-02-28T15:02:56.789Z",
    "endTime": "2021-05-05T03:50:56.412Z"
  },
  "responseCode": 200
}
若要查看此命令的历史记录,请使用以下请求:
GET https://{your app subdomain}.azureiotcentral.com/api/devices/thermostat-01/commands/getMaxMinReport?api-version=2022-07-31
对此请求的响应如以下示例所示:
{
  "value": [
    {
      "response": {
        "maxTemp": 71.43744908819954,
        "minTemp": 51.29986610160005,
        "avgTemp": 39.577384387771744,
        "startTime": "2021-06-20T00:38:17.620Z",
        "endTime": "2022-01-07T22:30:41.104Z"
      },
      "responseCode": 200
    }
  ]
}
使用以下请求在使用组件的设备上调用命令。 此示例中,设备名为 temperature-controller-01,组件名为 thermostat2,命令名为 getMaxMinReport:
POST https://{your app subdomain}.azureiotcentral.com/api/devices/temperature-controller-01/components/thermostat2/commands/getMaxMinReport?api-version=2022-07-31
请求有效负载及响应的格式与不使用组件的设备的格式完全相同。
若要查看此命令的历史记录,请使用以下请求:
GET https://{your app subdomain}.azureiotcentral.com/api/devices/temperature-controller-01/components/thermostat2/commands/getMaxMinReport?api-version=2022-07-31
提示
若要在模块组件中调用命令,请使用 /devices/{deviceId}/modules/{moduleName}/components/{componentName}/commands/{commandName}。
后续步骤
现在你已经了解了如何使用 REST API 控制设备,建议的下一步是学习如何使用 IoT Central REST API 创建和管理作业。


