你当前正在访问 Microsoft Azure Global Edition 技术文档网站。 如果需要访问由世纪互联运营的 Microsoft Azure 中国技术文档网站,请访问 https://docs.azure.cn。
教程:使用 Azure 通知中心向特定的 Android 应用发送推送通知
注意
有关 Firebase Cloud Messaging 弃用和迁移步骤的信息,请参阅 Google Firebase Cloud Messaging 迁移。
本教程说明如何使用 Azure 通知中心将推送通知发送到特定设备上的特定应用程序用户。 ASP.NET WebAPI 后端用于对客户端进行身份验证并生成通知,如指南文章从应用后端注册中所述。 本教程基于在教程:使用 Azure 通知中心和 Firebase Cloud Messaging 将通知推送到 Android 设备。
在本教程中,我们将执行以下步骤:
- 创建用于用户身份验证的后端 Web API 项目。
- 更新 Android 应用程序。
- 测试应用程序
先决条件
在开始本教程之前完成教程:使用 Azure 通知中心和 Firebase Cloud Messaging 将通知推送到 Android 设备。
创建 WebAPI 项目
后续部分讨论如何创建新的 ASP.NET WebAPI 后端。 此过程有三个主要目的:
- 对客户端进行身份验证:添加消息处理程序,以便对客户端请求进行身份验证,并将用户与请求相关联。
- 使用 WebAPI 后端注册通知:添加一个控制器来处理新的注册,使客户端设备能够接收通知。 经过身份验证的用户名将作为标记自动添加到注册。
- 将通知发送到客户端:添加一个控制器,以便用户触发安全推送到与标记关联的设备和客户端。
通过执行以下操作创建新的 ASP.NET Core 6.0 Web API 后端:
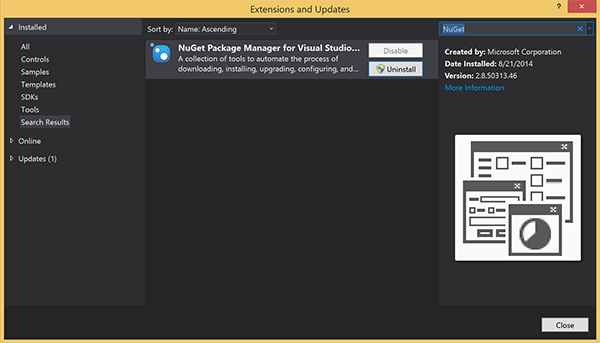
若要进行检查,请启动 Visual Studio。 在“工具” 菜单上,选择“扩展和更新” 。 在你的 Visual Studio 版本中搜索“NuGet 包管理器”,确保你的版本为最新 。 如果你的版本不是最新版本,请卸载它,然后重新安装 NuGet 包管理器。
注意
请确保已安装 Visual Studio Azure SDK 以便进行网站部署。
启动 Visual Studio 或 Visual Studio Express。
选择“服务器资源管理器”并登录到 Azure 帐户。 若要在帐户中创建网站资源,必须先登录。
在 Visual Studio 的“文件”菜单中,选择“新建”>“项目”。
在搜索框中输入“Web API”。
选择“ASP.NET Core Web API”项目模板,然后选择“下一步”。
在“配置新项目”对话框中,将项目命名为“AppBackend”,然后选择“下一步”。
在“其他信息”对话框中:
- 确认“框架”为“.NET 6.0 (长期支持)”。
- 确认已选中“使用控制器(取消选中以使用最小 API)”。
- 取消选中“启用 OpenAPI 支持”。
- 选择“创建”。
删除 WeatherForecast 模板文件
- 从新的 AppBackend 项目中删除 WeatherForecast.cs 和 Controllers/WeatherForecastController.cs 示例文件。
- 打开 Properties\launchSettings.json。
- 将 launchUrl 属性从 weatherforcast 更改为 appbackend。
在“配置 Microsoft Azure Web 应用”窗口中,选择一个订阅,然后在“应用服务计划”列表中,执行以下任一操作:
- 选择已创建的 Azure 应用服务计划。
- 选择“创建新的应用服务计划”,然后新建一个应用服务计划。
在本教程中,不需要使用数据库。 选择应用服务计划后,选择“确定”以创建项目。
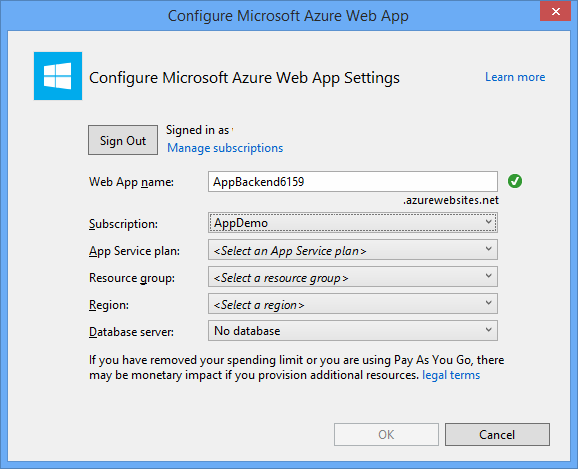
如果没有看到用于配置应用服务计划的此页面,请继续学习本教程。 可以在稍后发布应用时对其进行配置。
在 WebAPI 后端对客户端进行身份验证
在本部分中,将为新的后端创建名为“AuthenticationTestHandler”的新消息处理程序类。 此类派生自 DelegatingHandler 并已添加为消息处理程序,使它可以处理传入后端的所有请求。
在“解决方案资源管理器”中,右键单击“AppBackend”项目,依次选择“添加”、“类”。
将新类命名为 AuthenticationTestHandler.cs,并选择“添加”生成该类。 为简单起见,此类将通过使用基本身份验证对用户进行身份验证。 请注意,应用可以使用任何身份验证方案。
在 AuthenticationTestHandler.cs 中,添加以下
using语句:using System.Net.Http; using System.Threading; using System.Security.Principal; using System.Net; using System.Text; using System.Threading.Tasks;在 AuthenticationTestHandler.cs 中,将
AuthenticationTestHandler类定义替换为以下代码:当以下三个条件都成立时,此处理程序授权请求:
- 请求包含 Authorization 标头。
- 请求使用基本身份验证。
- 用户名字符串和密码字符串是相同的字符串。
否则,会拒绝该请求。 此身份验证不是真正的身份验证和授权方法。 它只是本教程中一个简单的示例。
如果请求消息已经过
AuthenticationTestHandler的身份验证和授权,则基本身份验证用户将附加到 HttpContext 上的当前请求。 稍后,另一个控制器 (RegisterController) 会使用 HttpContext 中的用户信息,将标记添加到通知注册请求。public class AuthenticationTestHandler : DelegatingHandler { protected override Task<HttpResponseMessage> SendAsync( HttpRequestMessage request, CancellationToken cancellationToken) { var authorizationHeader = request.Headers.GetValues("Authorization").First(); if (authorizationHeader != null && authorizationHeader .StartsWith("Basic ", StringComparison.InvariantCultureIgnoreCase)) { string authorizationUserAndPwdBase64 = authorizationHeader.Substring("Basic ".Length); string authorizationUserAndPwd = Encoding.Default .GetString(Convert.FromBase64String(authorizationUserAndPwdBase64)); string user = authorizationUserAndPwd.Split(':')[0]; string password = authorizationUserAndPwd.Split(':')[1]; if (VerifyUserAndPwd(user, password)) { // Attach the new principal object to the current HttpContext object HttpContext.Current.User = new GenericPrincipal(new GenericIdentity(user), new string[0]); System.Threading.Thread.CurrentPrincipal = System.Web.HttpContext.Current.User; } else return Unauthorized(); } else return Unauthorized(); return base.SendAsync(request, cancellationToken); } private bool VerifyUserAndPwd(string user, string password) { // This is not a real authentication scheme. return user == password; } private Task<HttpResponseMessage> Unauthorized() { var response = new HttpResponseMessage(HttpStatusCode.Forbidden); var tsc = new TaskCompletionSource<HttpResponseMessage>(); tsc.SetResult(response); return tsc.Task; } }注意
安全说明:
AuthenticationTestHandler类不提供真正的身份验证。 它仅用于模拟基本身份验证并且是不安全的。 必须在生产应用程序和服务中实现安全的身份验证机制。若要注册消息处理程序,请在 Program.cs 文件中
Register方法的末尾添加以下代码:config.MessageHandlers.Add(new AuthenticationTestHandler());保存所做更改。
使用 WebAPI 后端注册通知
在本部分中,要将新的控制器添加到 WebAPI 后端来处理请求,以使用通知中心的客户端库为用户和设备注册通知。 控制器将为已由 AuthenticationTestHandler 验证并附加到 HttpContext 的用户添加用户标记。 该标记采用以下字符串格式:"username:<actual username>"。
在“解决方案资源管理器”中,右键单击“AppBackend”项目,并选择“管理 NuGet 包”。
在左窗格中,选择“联机”,然后在“搜索”框中,键入 Microsoft.Azure.NotificationHubs。
在结果列表中,选择“Microsoft Azure 通知中心”,然后选择“安装”。 完成安装后,关闭“NuGet 程序包管理器”窗口。
此操作会使用 Microsoft.Azure.Notification Hubs NuGet 包添加对 Azure 通知中心 SDK 的引用。
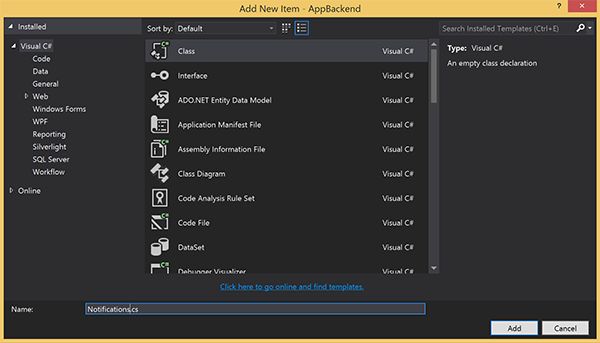
创建新的类文件,以表示与用于发送通知的通知中心的连接。 在“解决方案资源管理器”中,右键单击“模型”文件夹,选择“添加”,并选择“类”。 将新类命名为 Notifications.cs,并选择“添加”生成该类。
在 Notifications.cs 中,在文件顶部添加以下
using语句:using Microsoft.Azure.NotificationHubs;将
Notifications类定义替换为以下代码,并将两个占位符替换为通知中心的连接字符串(具有完全访问权限)和中心名称(可在 Azure 门户中找到):public class Notifications { public static Notifications Instance = new Notifications(); public NotificationHubClient Hub { get; set; } private Notifications() { Hub = NotificationHubClient.CreateClientFromConnectionString("<your hub's DefaultFullSharedAccessSignature>", "<hub name>"); } }重要
输入中心的名称和 DefaultFullSharedAccessSignature,然后继续。
接下来将创建一个名为 RegisterController 的新控制器。 在“解决方案资源管理器”中,右键单击“控制器”文件夹,选择“添加”,并选择“控制器”。
选择“API 控制器 - 空”,并选择“添加”。
在“控制器名称”框中,键入 RegisterController 以命名新类,并选择“添加”。

在 RegisterController.cs 中,添加以下
using语句:using Microsoft.Azure.NotificationHubs; using Microsoft.Azure.NotificationHubs.Messaging; using AppBackend.Models; using System.Threading.Tasks; using System.Web;在
RegisterController类定义中添加以下代码。 在此代码中,将为已附加到 HttpContext 的用户添加用户标记。 添加的消息筛选器AuthenticationTestHandler将对该用户进行身份验证并将其附加到 HttpContext。 还可以通过添加可选复选框来验证用户是否有权注册以获取请求标记。private NotificationHubClient hub; public RegisterController() { hub = Notifications.Instance.Hub; } public class DeviceRegistration { public string Platform { get; set; } public string Handle { get; set; } public string[] Tags { get; set; } } // POST api/register // This creates a registration id public async Task<string> Post(string handle = null) { string newRegistrationId = null; // make sure there are no existing registrations for this push handle (used for iOS and Android) if (handle != null) { var registrations = await hub.GetRegistrationsByChannelAsync(handle, 100); foreach (RegistrationDescription registration in registrations) { if (newRegistrationId == null) { newRegistrationId = registration.RegistrationId; } else { await hub.DeleteRegistrationAsync(registration); } } } if (newRegistrationId == null) newRegistrationId = await hub.CreateRegistrationIdAsync(); return newRegistrationId; } // PUT api/register/5 // This creates or updates a registration (with provided channelURI) at the specified id public async Task<HttpResponseMessage> Put(string id, DeviceRegistration deviceUpdate) { RegistrationDescription registration = null; switch (deviceUpdate.Platform) { case "mpns": registration = new MpnsRegistrationDescription(deviceUpdate.Handle); break; case "wns": registration = new WindowsRegistrationDescription(deviceUpdate.Handle); break; case "apns": registration = new AppleRegistrationDescription(deviceUpdate.Handle); break; case "fcm": registration = new FcmRegistrationDescription(deviceUpdate.Handle); break; default: throw new HttpResponseException(HttpStatusCode.BadRequest); } registration.RegistrationId = id; var username = HttpContext.Current.User.Identity.Name; // add check if user is allowed to add these tags registration.Tags = new HashSet<string>(deviceUpdate.Tags); registration.Tags.Add("username:" + username); try { await hub.CreateOrUpdateRegistrationAsync(registration); } catch (MessagingException e) { ReturnGoneIfHubResponseIsGone(e); } return Request.CreateResponse(HttpStatusCode.OK); } // DELETE api/register/5 public async Task<HttpResponseMessage> Delete(string id) { await hub.DeleteRegistrationAsync(id); return Request.CreateResponse(HttpStatusCode.OK); } private static void ReturnGoneIfHubResponseIsGone(MessagingException e) { var webex = e.InnerException as WebException; if (webex.Status == WebExceptionStatus.ProtocolError) { var response = (HttpWebResponse)webex.Response; if (response.StatusCode == HttpStatusCode.Gone) throw new HttpRequestException(HttpStatusCode.Gone.ToString()); } }保存所做更改。

从 WebAPI 后端发送通知
在本部分中,添加一个新的控制器,使客户端设备可以发送通知。 通知基于在 ASP.NET WebAPI 后端中使用 Azure 通知中心 .NET 库的用户名标记。
以在前面的部分中创建 RegisterController 的相同方式创建另一个名为 NotificationsController 的新控制器。
在 NotificationsController.cs 中,添加以下
using语句:using AppBackend.Models; using System.Threading.Tasks; using System.Web;在 NotificationsController 类中添加以下方法:
此代码会发送基于平台通知服务 (PNS)
pns参数的通知类型。to_tag的值用于设置消息中的 username 标记。 此标记必须与活动的通知中心注册的用户名标记相匹配。 将从 POST 请求正文提取通知消息,并根据目标 PNS 将其格式化。通知受多种格式支持,具体取决于受支持设备用来接收通知的 PNS。 例如,在 Windows 设备上,可能会将 toast 通知与其他 PNS 不直接支持的 WNS 配合使用。 在这种情况下,后端需要将通知格式化为打算使用的设备 PNS 所支持的通知。 然后针对 NotificationHubClient 类使用相应的发送 API。
public async Task<HttpResponseMessage> Post(string pns, [FromBody]string message, string to_tag)
{
    var user = HttpContext.Current.User.Identity.Name;
    string[] userTag = new string[2];
    userTag[0] = "username:" + to_tag;
    userTag[1] = "from:" + user;

    Microsoft.Azure.NotificationHubs.NotificationOutcome outcome = null;
    HttpStatusCode ret = HttpStatusCode.InternalServerError;

    switch (pns.ToLower())
    {
        case "wns":
            // Windows 8.1 / Windows Phone 8.1
            var toast = @"<toast><visual><binding template=""ToastText01""><text id=""1"">" +
                        "From " + user + ": " + message + "</text></binding></visual></toast>";
            outcome = await Notifications.Instance.Hub.SendWindowsNativeNotificationAsync(toast, userTag);
            break;
        case "apns":
            // iOS
            var alert = "{\"aps\":{\"alert\":\"" + "From " + user + ": " + message + "\"}}";
            outcome = await Notifications.Instance.Hub.SendAppleNativeNotificationAsync(alert, userTag);
            break;
        case "fcm":
            // Android
            var notif = "{ \"data\" : {\"message\":\"" + "From " + user + ": " + message + "\"}}";
            outcome = await Notifications.Instance.Hub.SendFcmNativeNotificationAsync(notif, userTag);
            break;
    }

    if (outcome != null)
    {
        if (!((outcome.State == Microsoft.Azure.NotificationHubs.NotificationOutcomeState.Abandoned) ||
            (outcome.State == Microsoft.Azure.NotificationHubs.NotificationOutcomeState.Unknown)))
        {
            ret = HttpStatusCode.OK;
        }
    }

    return Request.CreateResponse(ret);
}
若要运行应用程序并确保到目前为止操作的准确性,请选择 F5 键。 应用将打开 Web 浏览器,并且将显示在 ASP.NET 主页上。
发布新的 WebAPI 后端
接下来会将此应用部署到 Azure 网站,以便可以从任意设备访问它。
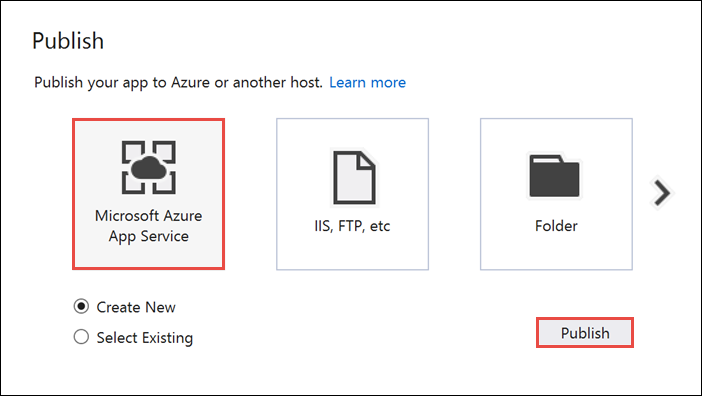
右键单击 AppBackend 项目,并选择“发布”。
选择“Microsoft Azure 应用服务”作为发布目标,然后选择“发布”。 “创建应用服务”窗口将打开。 可以在这里创建在 Azure 中运行 ASP.NET Web 应用所需的全部 Azure 资源。
在“创建应用服务”窗口中,选择 Azure 帐户。 选择“更改类型”>“Web 应用”。 保留默认的“Web 应用名称”,然后依次选择“订阅”、“资源组”和“应用服务计划”。
选择“创建”。
记下“摘要”部分的“站点 URL”属性。 此 URL 是本教程中稍后提到的后端终结点。
选择“发布”。
完成向导后,它会将 ASP.NET Web 应用发布到 Azure,然后在默认浏览器中打开该应用。 可以在 Azure 应用服务中查看应用程序。
URL 使用前面指定的 Web 应用名称,其格式为 http://<app_name>.azurewebsites.net。
创建 Android 项目
下一步是更新在教程:使用 Azure 通知中心和 Firebase Cloud Messaging 将通知推送到 Android 设备。
打开
res/layout/activity_main.xml文件,替换以下内容定义:它会添加新的 EditText 控件,方便你以用户身份登录。 此外还会添加一个字段用作要发送的通知的一部分的用户名标记:
<RelativeLayout xmlns:android="http://schemas.android.com/apk/res/android"
xmlns:tools="http://schemas.android.com/tools" android:layout_width="match_parent"
android:layout_height="match_parent"
tools:context=".MainActivity">

<EditText
    android:id="@+id/usernameText"
    android:layout_width="match_parent"
    android:layout_height="wrap_content"
    android:ems="10"
    android:hint="@string/usernameHint"
    android:layout_above="@+id/passwordText"
    android:layout_alignParentEnd="true" />
<EditText
    android:id="@+id/passwordText"
    android:layout_width="match_parent"
    android:layout_height="wrap_content"
    android:ems="10"
    android:hint="@string/passwordHint"
    android:inputType="textPassword"
    android:layout_above="@+id/buttonLogin"
    android:layout_alignParentEnd="true" />
<Button
    android:id="@+id/buttonLogin"
    android:layout_width="wrap_content"
    android:layout_height="wrap_content"
    android:text="@string/loginButton"
    android:onClick="login"
    android:layout_above="@+id/toggleButtonFCM"
    android:layout_centerHorizontal="true"
    android:layout_marginBottom="24dp" />
<ToggleButton
    android:layout_width="wrap_content"
    android:layout_height="wrap_content"
    android:textOn="WNS on"
    android:textOff="WNS off"
    android:id="@+id/toggleButtonWNS"
    android:layout_toLeftOf="@id/toggleButtonFCM"
    android:layout_centerVertical="true" />
<ToggleButton
    android:layout_width="wrap_content"
    android:layout_height="wrap_content"
    android:textOn="FCM on"
    android:textOff="FCM off"
    android:id="@+id/toggleButtonFCM"
    android:checked="true"
    android:layout_centerHorizontal="true"
    android:layout_centerVertical="true" />
<ToggleButton
    android:layout_width="wrap_content"
    android:layout_height="wrap_content"
    android:textOn="APNS on"
    android:textOff="APNS off"
    android:id="@+id/toggleButtonAPNS"
    android:layout_toRightOf="@id/toggleButtonFCM"
    android:layout_centerVertical="true" />
<EditText
    android:layout_width="match_parent"
    android:layout_height="wrap_content"
    android:id="@+id/editTextNotificationMessageTag"
    android:layout_below="@id/toggleButtonFCM"
    android:layout_centerHorizontal="true"
    android:hint="@string/notification_message_tag_hint" />
<EditText
    android:layout_width="match_parent"
    android:layout_height="wrap_content"
    android:id="@+id/editTextNotificationMessage"
    android:layout_below="@+id/editTextNotificationMessageTag"
    android:layout_centerHorizontal="true"
    android:hint="@string/notification_message_hint" />
<Button
    android:layout_width="wrap_content"
    android:layout_height="wrap_content"
    android:text="@string/send_button"
    android:id="@+id/sendbutton"
    android:onClick="sendNotificationButtonOnClick"
    android:layout_below="@+id/editTextNotificationMessage"
    android:layout_centerHorizontal="true" />
<TextView
    android:layout_width="wrap_content"
    android:layout_height="wrap_content"
    android:text="Hello World!"
    android:id="@+id/text_hello"
    />
</RelativeLayout>
打开
res/values/strings.xml文件并将send_button定义替换为以下行,以重新定义send_button的字符串并为其他控件添加字符串:<string name="usernameHint">Username</string> <string name="passwordHint">Password</string> <string name="loginButton">1. Sign in</string> <string name="send_button">2. Send Notification</string> <string name="notification_message_hint">Notification message</string> <string name="notification_message_tag_hint">Recipient username</string>main_activity.xml的图形布局现在应如下图所示: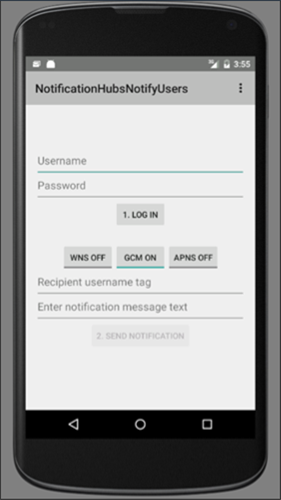
在
MainActivity类所在的包中创建一个名为RegisterClient的新类。 将以下代码用于新的类文件。import java.io.IOException; import java.io.UnsupportedEncodingException; import java.util.Set; import org.apache.http.HttpResponse; import org.apache.http.HttpStatus; import org.apache.http.client.ClientProtocolException; import org.apache.http.client.HttpClient; import org.apache.http.client.methods.HttpPost; import org.apache.http.client.methods.HttpPut; import org.apache.http.client.methods.HttpUriRequest; import org.apache.http.entity.StringEntity; import org.apache.http.impl.client.DefaultHttpClient; import org.apache.http.util.EntityUtils; import org.json.JSONArray; import org.json.JSONException; import org.json.JSONObject; import android.content.Context; import android.content.SharedPreferences; import android.util.Log; public class RegisterClient { private static final String PREFS_NAME = "ANHSettings"; private static final String REGID_SETTING_NAME = "ANHRegistrationId"; private String Backend_Endpoint; SharedPreferences settings; protected HttpClient httpClient; private String authorizationHeader; public RegisterClient(Context context, String backendEndpoint) { super(); this.settings = context.getSharedPreferences(PREFS_NAME, 0); httpClient = new DefaultHttpClient(); Backend_Endpoint = backendEndpoint + "/api/register"; } public String getAuthorizationHeader() { return authorizationHeader; } public void setAuthorizationHeader(String authorizationHeader) { this.authorizationHeader = authorizationHeader; } public void register(String handle, Set<String> tags) throws ClientProtocolException, IOException, JSONException { String registrationId = retrieveRegistrationIdOrRequestNewOne(handle); JSONObject deviceInfo = new JSONObject(); deviceInfo.put("Platform", "fcm"); deviceInfo.put("Handle", handle); deviceInfo.put("Tags", new JSONArray(tags)); int statusCode = upsertRegistration(registrationId, deviceInfo); if (statusCode == HttpStatus.SC_OK) { return; } else if (statusCode == HttpStatus.SC_GONE){ settings.edit().remove(REGID_SETTING_NAME).commit(); registrationId = retrieveRegistrationIdOrRequestNewOne(handle); statusCode = upsertRegistration(registrationId, deviceInfo); if (statusCode != HttpStatus.SC_OK) { Log.e("RegisterClient", "Error upserting registration: " + statusCode); throw new RuntimeException("Error upserting registration"); } } else { Log.e("RegisterClient", "Error upserting registration: " + statusCode); throw new RuntimeException("Error upserting registration"); } } private int upsertRegistration(String registrationId, JSONObject deviceInfo) throws UnsupportedEncodingException, IOException, ClientProtocolException { HttpPut request = new HttpPut(Backend_Endpoint+"/"+registrationId); request.setEntity(new StringEntity(deviceInfo.toString())); request.addHeader("Authorization", "Basic "+authorizationHeader); request.addHeader("Content-Type", "application/json"); HttpResponse response = httpClient.execute(request); int statusCode = response.getStatusLine().getStatusCode(); return statusCode; } private String retrieveRegistrationIdOrRequestNewOne(String handle) throws ClientProtocolException, IOException { if (settings.contains(REGID_SETTING_NAME)) return settings.getString(REGID_SETTING_NAME, null); HttpUriRequest request = new HttpPost(Backend_Endpoint+"?handle="+handle); request.addHeader("Authorization", "Basic "+authorizationHeader); HttpResponse response = httpClient.execute(request); if (response.getStatusLine().getStatusCode() != HttpStatus.SC_OK) { Log.e("RegisterClient", "Error creating registrationId: " + response.getStatusLine().getStatusCode()); throw new RuntimeException("Error creating Notification Hubs registrationId"); } String registrationId = EntityUtils.toString(response.getEntity()); registrationId = registrationId.substring(1, registrationId.length()-1); settings.edit().putString(REGID_SETTING_NAME, registrationId).commit(); return registrationId; } }此组件将实现所需的 REST 调用,以便能够联系应用后端来注册推送通知。 它还会在本地存储通知中心创建的 registrationIds,如从应用后端注册中所述。 它使用你在单击“登录”按钮时存储在本地存储中的授权令牌。
在
MainActivity类中,添加一个用于RegisterClient类的字段和一个用于 ASP.NET 后端终结点的字符串。 确保使用前面获取的实际后端终结点来替换<Enter Your Backend Endpoint>。 例如,http://mybackend.azurewebsites.net。private RegisterClient registerClient; private static final String BACKEND_ENDPOINT = "<Enter Your Backend Endpoint>"; FirebaseInstanceId fcm; String FCM_token = null;在
MainActivity类的onCreate方法中,删除或注释掉hub字段的初始化以及对registerWithNotificationHubs方法的调用。 然后,添加代码来初始化RegisterClient类的实例。 该方法应包含以下行:@Override protected void onCreate(Bundle savedInstanceState) { super.onCreate(savedInstanceState); mainActivity = this; FirebaseService.createChannelAndHandleNotifications(getApplicationContext()); fcm = FirebaseInstanceId.getInstance(); registerClient = new RegisterClient(this, BACKEND_ENDPOINT); setContentView(R.layout.activity_main); }向
MainActivity.java文件添加以下import语句。import android.util.Base64; import android.view.View; import android.widget.EditText; import android.widget.Button; import android.widget.ToggleButton; import java.io.UnsupportedEncodingException; import android.content.Context; import java.util.HashSet; import android.widget.Toast; import org.apache.http.client.ClientProtocolException; import java.io.IOException; import org.apache.http.HttpStatus; import android.os.AsyncTask; import org.apache.http.HttpResponse; import org.apache.http.client.methods.HttpPost; import org.apache.http.entity.StringEntity; import org.apache.http.impl.client.DefaultHttpClient; import android.app.AlertDialog; import android.content.DialogInterface; import com.google.firebase.iid.FirebaseInstanceId; import com.google.firebase.iid.InstanceIdResult; import com.google.android.gms.tasks.OnSuccessListener; import java.util.concurrent.TimeUnit;将 onStart 方法的代码替换为以下代码:
super.onStart();
Button sendPush = (Button) findViewById(R.id.sendbutton);
sendPush.setEnabled(false);
然后,添加以下方法,处理“登录”按钮的单击事件,并发送推送通知。
public void login(View view) throws UnsupportedEncodingException {
    this.registerClient.setAuthorizationHeader(getAuthorizationHeader());

    final Context context = this;
    new AsyncTask<Object, Object, Object>() {
        @Override
        protected Object doInBackground(Object... params) {
            try {

                FirebaseInstanceId.getInstance().getInstanceId().addOnSuccessListener(new OnSuccessListener<InstanceIdResult>() {
                    @Override
                    public void onSuccess(InstanceIdResult instanceIdResult) {
                        FCM_token = instanceIdResult.getToken();
                        Log.d(TAG, "FCM Registration Token: " + FCM_token);
                    }
                });
                TimeUnit.SECONDS.sleep(1);
                registerClient.register(FCM_token, new HashSet<String>());
            } catch (Exception e) {
                DialogNotify("MainActivity - Failed to register", e.getMessage());
                return e;
            }
            return null;
        }

        protected void onPostExecute(Object result) {
            Button sendPush = (Button) findViewById(R.id.sendbutton);
            sendPush.setEnabled(true);
            Toast.makeText(context, "Signed in and registered.",
                    Toast.LENGTH_LONG).show();
        }
    }.execute(null, null, null);
}

private String getAuthorizationHeader() throws UnsupportedEncodingException {
    EditText username = (EditText) findViewById(R.id.usernameText);
    EditText password = (EditText) findViewById(R.id.passwordText);
    String basicAuthHeader = username.getText().toString()+":"+password.getText().toString();
    basicAuthHeader = Base64.encodeToString(basicAuthHeader.getBytes("UTF-8"), Base64.NO_WRAP);
    return basicAuthHeader;
}

/**
    * This method calls the ASP.NET WebAPI backend to send the notification message
    * to the platform notification service based on the pns parameter.
    *
    * @param pns     The platform notification service to send the notification message to. Must
    *                be one of the following ("wns", "fcm", "apns").
    * @param userTag The tag for the user who will receive the notification message. This string
    *                must not contain spaces or special characters.
    * @param message The notification message string. This string must include the double quotes
    *                to be used as JSON content.
    */
public void sendPush(final String pns, final String userTag, final String message)
        throws ClientProtocolException, IOException {
    new AsyncTask<Object, Object, Object>() {
        @Override
        protected Object doInBackground(Object... params) {
            try {

                String uri = BACKEND_ENDPOINT + "/api/notifications";
                uri += "?pns=" + pns;
                uri += "&to_tag=" + userTag;

                HttpPost request = new HttpPost(uri);
                request.addHeader("Authorization", "Basic "+ getAuthorizationHeader());
                request.setEntity(new StringEntity(message));
                request.addHeader("Content-Type", "application/json");

                HttpResponse response = new DefaultHttpClient().execute(request);

                if (response.getStatusLine().getStatusCode() != HttpStatus.SC_OK) {
                    DialogNotify("MainActivity - Error sending " + pns + " notification",
                            response.getStatusLine().toString());
                    throw new RuntimeException("Error sending notification");
                }
            } catch (Exception e) {
                DialogNotify("MainActivity - Failed to send " + pns + " notification ", e.getMessage());
                return e;
            }

            return null;
        }
    }.execute(null, null, null);
}
“登录”按钮的
login处理程序生成在输入的用户名和密码上使用的基本身份验证令牌(代表身份验证方案使用的任何令牌),然后使用RegisterClient调用后端来注册。sendPush方法调用后端来触发根据用户标记向用户发送安全通知。sendPush针对的平台通知服务取决于传入的pns字符串。将下面的
DialogNotify方法添加到MainActivity类。protected void DialogNotify(String title, String message) { AlertDialog alertDialog = new AlertDialog.Builder(MainActivity.this).create(); alertDialog.setTitle(title); alertDialog.setMessage(message); alertDialog.setButton(AlertDialog.BUTTON_NEUTRAL, "OK", new DialogInterface.OnClickListener() { public void onClick(DialogInterface dialog, int which) { dialog.dismiss(); } }); alertDialog.show(); }在
MainActivity类中,更新sendNotificationButtonOnClick方法以使用用户选择的平台通知服务调用sendPush方法,如下所示。/** * Send Notification button click handler. This method sends the push notification * message to each platform selected. * * @param v The view */ public void sendNotificationButtonOnClick(View v) throws ClientProtocolException, IOException { String nhMessageTag = ((EditText) findViewById(R.id.editTextNotificationMessageTag)) .getText().toString(); String nhMessage = ((EditText) findViewById(R.id.editTextNotificationMessage)) .getText().toString(); // JSON String nhMessage = "\"" + nhMessage + "\""; if (((ToggleButton)findViewById(R.id.toggleButtonWNS)).isChecked()) { sendPush("wns", nhMessageTag, nhMessage); } if (((ToggleButton)findViewById(R.id.toggleButtonFCM)).isChecked()) { sendPush("fcm", nhMessageTag, nhMessage); } if (((ToggleButton)findViewById(R.id.toggleButtonAPNS)).isChecked()) { sendPush("apns", nhMessageTag, nhMessage); } }在
build.gradle文件中,将以下行添加到buildTypes节后的android节。useLibrary 'org.apache.http.legacy'如果你的应用面向 API 级别 28 (Android 9.0) 或更高版本,请在
AndroidManifest.xml的<application>元素中包含以下声明。<uses-library android:name="org.apache.http.legacy" android:required="false" />生成项目。
测试应用程序
在设备或模拟器上使用 Android Studio 运行该应用程序。
在 Android 应用中,输入用户名和密码。 它们必须都是相同的字符串值,并且不能包含空格或特殊字符。
在 Android 应用中,单击“登录”。 等待指示“已登录并已注册”的 toast 消息。 它启用“发送通知”按钮。
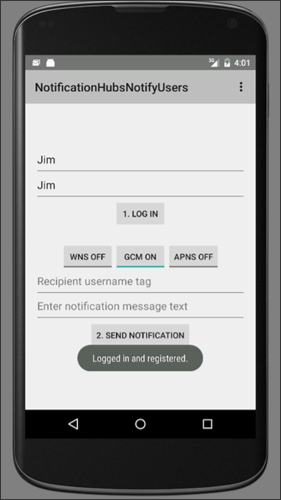
单击切换按钮,以启用已在其中运行该应用并已注册用户的所有平台。
输入接收通知消息的用户的名称。 必须已在目标设备上为通知注册该用户。
为用户输入要接收为推送通知的消息。
单击“发送通知”。 已使用匹配的用户名标记注册的每个设备都会收到该推送通知。
后续步骤
本教程介绍了如何向其标记与注册相关联的特定用户推送通知。 若要了解如何推送基于位置的通知,请转到以下教程: