你当前正在访问 Microsoft Azure Global Edition 技术文档网站。 如果需要访问由世纪互联运营的 Microsoft Azure 中国技术文档网站,请访问 https://docs.azure.cn。
在 Linux 客户端上装载 SMB Azure 文件共享
可以使用 SMB 内核客户端在 Linux 分发版中装载 Azure 文件共享。
在 Linux 上装载 Azure 文件共享的建议方法是使用 SMB 3.1.1。 默认情况下,Azure 文件存储要求进行传输中加密,而只有 SMB 3.0+ 支持传输中加密。 Azure 文件存储也支持 SMB 2.1(后者不支持传输中加密),但出于安全原因,你无法使用 SMB 2.1 从另一 Azure 区域或本地装载 Azure 文件共享。 除非应用程序专门需要用到 SMB 2.1,否则请使用 SMB 3.1.1。 SMB 2.1 支持已添加到 Linux 内核版本 3.7,因此,如果在 3.7 之后的版本使用 Linux 内核版本,则应支持 SMB 2.1。
| 分发 | SMB 3.1.1(推荐) | SMB 3.0 |
|---|---|---|
| Linux 内核版本 |
|
|
| Ubuntu | AES-128-GCM 加密:18.04.5 LTS+ | AES-128-CCM 加密:16.04.4 LTS+ |
| Red Hat Enterprise Linux (RHEL) |
|
7.5+ |
| Debian | 基本:10+ | AES-128-CCM 加密:10+ |
| SUSE Linux Enterprise Server | AES-128-GCM 加密:15 SP2+ | AES-128-CCM 加密:12 SP2+ |
如果上表中未列出你的 Linux 发行版,可以使用 uname 命令检查 Linux 内核版本:
uname -r
注意
本文中的所有装载脚本都将使用默认的 0755 Linux 文件和文件夹权限装载 SMB 文件共享。 这意味着为文件/目录所有者读取、写入和执行、为所有者组中的用户读取和执行,以及为其他用户读取和执行。 根据组织的安全策略,可能需要在装载选项中设置备用 uid/gid 或 dir_mode 和 file_mode 权限。 若要详细了解如何设置权限,请参阅 UNIX 数值表示法。
适用于
| 文件共享类型 | SMB | NFS |
|---|---|---|
| 标准文件共享 (GPv2)、LRS/ZRS | ||
| 标准文件共享 (GPv2)、GRS/GZRS | ||
| 高级文件共享 (FileStorage)、LRS/ZRS |
先决条件
在其他分发版上,请使用相应的包管理器,或从源编译。
最新版本的 Azure 命令行接口 (CLI)。 若要详细了解如何安装 Azure CLI,请参阅安装 Azure CLI 并选择操作系统。 如果你想要在 PowerShell 6+ 中使用 Azure PowerShell 模块,也可使用;不过,本文中的说明适用于 Azure CLI。
确保已打开端口 445:SMB 通过 TCP 端口 445 通信 - 请确保防火墙或 ISP 未阻止 TCP 端口 445 与客户端计算机通信。 替换
<your-resource-group>和<your-storage-account>,然后运行以下脚本:RESOURCE_GROUP_NAME="<your-resource-group>" STORAGE_ACCOUNT_NAME="<your-storage-account>" # This command assumes you have logged in with az login HTTP_ENDPOINT=$(az storage account show \ --resource-group $RESOURCE_GROUP_NAME \ --name $STORAGE_ACCOUNT_NAME \ --query "primaryEndpoints.file" --output tsv | tr -d '"') SMBPATH=$(echo $HTTP_ENDPOINT | cut -c7-${#HTTP_ENDPOINT}) FILE_HOST=$(echo $SMBPATH | tr -d "/") nc -zvw3 $FILE_HOST 445如果连接成功,应会看到如下所示的输出:
Connection to <your-storage-account> 445 port [tcp/microsoft-ds] succeeded!如果无法在企业网络中打开端口 445,或者 ISP 阻止此类操作,可以使用 VPN 连接或 ExpressRoute 来解决端口 445 的相关问题。 有关详细信息,请参阅直接访问 Azure 文件共享时的网络注意事项。
使用 mount 按需装载 Azure 文件共享
在 Linux OS 上装载文件共享时,远程文件共享将在本地文件系统中以文件夹的形式表示。 可将文件共享装载到系统上的任何位置。 以下示例将文件共享装载到 /media 路径下。 可以通过修改 $MNT_ROOT 变量将此路径更改为所需的首选路径。
请将 <resource-group-name>、<storage-account-name> 和 <file-share-name> 替换为适合你的环境的信息。
RESOURCE_GROUP_NAME="<resource-group-name>"
STORAGE_ACCOUNT_NAME="<storage-account-name>"
FILE_SHARE_NAME="<file-share-name>"

MNT_ROOT="/media"
MNT_PATH="$MNT_ROOT/$STORAGE_ACCOUNT_NAME/$FILE_SHARE_NAME"

sudo mkdir -p $MNT_PATH
接下来,运行以下脚本来初始化凭据文件。
# Create a folder to store the credentials for this storage account and
# any other that you might set up.
CREDENTIAL_ROOT="/etc/smbcredentials"
sudo mkdir -p "/etc/smbcredentials"

# Get the storage account key for the indicated storage account.
# You must be logged in with az login and your user identity must have
# permissions to list the storage account keys for this command to work.
STORAGE_ACCOUNT_KEY=$(az storage account keys list \
    --resource-group $RESOURCE_GROUP_NAME \
    --account-name $STORAGE_ACCOUNT_NAME \
    --query "[0].value" --output tsv | tr -d '"')

# Create the credential file for this individual storage account
SMB_CREDENTIAL_FILE="$CREDENTIAL_ROOT/$STORAGE_ACCOUNT_NAME.cred"
if [ ! -f $SMB_CREDENTIAL_FILE ]; then
    echo "username=$STORAGE_ACCOUNT_NAME" | sudo tee $SMB_CREDENTIAL_FILE > /dev/null
    echo "password=$STORAGE_ACCOUNT_KEY" | sudo tee -a $SMB_CREDENTIAL_FILE > /dev/null
else
    echo "The credential file $SMB_CREDENTIAL_FILE already exists, and was not modified."
fi

# Change permissions on the credential file so only root can read or modify the password file.
sudo chmod 600 $SMB_CREDENTIAL_FILE
现在,可以使用凭据文件通过 mount 命令装载文件共享。 在以下示例中,使用存储帐户文件终结点的完全限定域名填充了 $SMB_PATH 命令。
注意
从 Linux 内核版本 5.0 开始,SMB 3.1.1 是默认的协商协议。 如果使用的 Linux 内核版本低于 5.0,请在装载选项列表中指定 vers=3.1.1。
# This command assumes you have logged in with az login
HTTP_ENDPOINT=$(az storage account show \
    --resource-group $RESOURCE_GROUP_NAME \
    --name $STORAGE_ACCOUNT_NAME \
    --query "primaryEndpoints.file" --output tsv | tr -d '"')
SMB_PATH=$(echo $HTTP_ENDPOINT | cut -c7-${#HTTP_ENDPOINT})$FILE_SHARE_NAME

STORAGE_ACCOUNT_KEY=$(az storage account keys list \
    --resource-group $RESOURCE_GROUP_NAME \
    --account-name $STORAGE_ACCOUNT_NAME \
    --query "[0].value" --output tsv | tr -d '"')

sudo mount -t cifs $SMB_PATH $MNT_PATH -o credentials=$SMB_CREDENTIAL_FILE,serverino,nosharesock,actimeo=30,mfsymlinks
如果需要,还可将同一个 Azure 文件共享装载到多个装入点。 使用完 Azure 文件共享后,请使用 sudo umount $mntPath 卸载共享。
自动装载文件共享
在 Linux OS 上装载文件共享时,远程文件共享将在本地文件系统中以文件夹的形式表示。 可将文件共享装载到系统上的任何位置。 以下示例将文件共享装载到 /media 路径下。 可以通过修改 $MNT_ROOT 变量将此路径更改为所需的首选路径。
MNT_ROOT="/media"
sudo mkdir -p $MNT_ROOT
若要在 Linux 上装载 Azure 文件共享,请使用存储帐户名称作为文件共享的用户名,并使用存储帐户密钥作为密码。 因为存储帐户凭据可随时更改,所以应将存储帐户的凭据与装载配置分开存储。
以下示例演示如何创建一个用于存储凭据的文件。 请记得将 <resource-group-name> 和 <storage-account-name> 替换为适合你的环境的信息。
RESOURCE_GROUP_NAME="<resource-group-name>"
STORAGE_ACCOUNT_NAME="<storage-account-name>"

# Create a folder to store the credentials for this storage account and
# any other that you might set up.
CREDENTIAL_ROOT="/etc/smbcredentials"
sudo mkdir -p "/etc/smbcredentials"

# Get the storage account key for the indicated storage account.
# You must be logged in with az login and your user identity must have
# permissions to list the storage account keys for this command to work.
STORAGE_ACCOUNT_KEY=$(az storage account keys list \
    --resource-group $RESOURCE_GROUP_NAME \
    --account-name $STORAGE_ACCOUNT_NAME \
    --query "[0].value" --output tsv | tr -d '"')

# Create the credential file for this individual storage account
SMB_CREDENTIAL_FILE="$CREDENTIAL_ROOT/$STORAGE_ACCOUNT_NAME.cred"
if [ ! -f $SMB_CREDENTIAL_FILE ]; then
    echo "username=$STORAGE_ACCOUNT_NAME" | sudo tee $SMB_CREDENTIAL_FILE > /dev/null
    echo "password=$STORAGE_ACCOUNT_KEY" | sudo tee -a $SMB_CREDENTIAL_FILE > /dev/null
else
    echo "The credential file $SMB_CREDENTIAL_FILE already exists, and was not modified."
fi

# Change permissions on the credential file so only root can read or modify the password file.
sudo chmod 600 $SMB_CREDENTIAL_FILE
若要自动装载文件共享,可以选择通过 /etc/fstab 实用工具使用静态装载,或者通过 autofs 实用工具使用动态装载。
通过 /etc/fstab 进行静态装载
沿用前面所述的环境,在装载文件夹下为存储帐户/文件共享创建一个文件夹。 请将 <file-share-name> 替换为你的 Azure 文件共享的相应名称。
FILE_SHARE_NAME="<file-share-name>"

MNT_PATH="$MNT_ROOT/$STORAGE_ACCOUNT_NAME/$FILE_SHARE_NAME"
sudo mkdir -p $MNT_PATH
最后,在 /etc/fstab 文件中为 Azure 文件共享创建一条记录。 在以下命令中,使用了默认的 0755 Linux 文件和文件夹权限,这表示所有者拥有读取、写入和执行权限(基于文件/目录 Linux 所有者),所有者组中的用户拥有读取和执行权限,系统中的其他用户拥有读取和执行权限。 对于装载,可以根据需要设置备用的 uid 和 gid 或者 dir_mode 和 file_mode 权限。 若要详细了解如何设置权限,请参阅 UNIX 数值表示法。
提示
如果希望运行 .NET Core 应用程序的 Docker 容器能够写入 Azure 文件共享,请在 SMB 装载选项中包含 nobrl,以避免将字节范围锁定请求发送到服务器。
HTTP_ENDPOINT=$(az storage account show \
    --resource-group $RESOURCE_GROUP_NAME \
    --name $STORAGE_ACCOUNT_NAME \
    --query "primaryEndpoints.file" --output tsv | tr -d '"')
SMB_PATH=$(echo $HTTP_ENDPOINT | cut -c7-${#HTTP_ENDPOINT})$FILE_SHARE_NAME

if [ -z "$(grep $SMB_PATH\ $MNT_PATH /etc/fstab)" ]; then
    echo "$SMB_PATH $MNT_PATH cifs _netdev,nofail,credentials=$SMB_CREDENTIAL_FILE,serverino,nosharesock,actimeo=30,mfsymlinks" | sudo tee -a /etc/fstab > /dev/null
else
    echo "/etc/fstab was not modified to avoid conflicting entries as this Azure file share was already present. You might want to double check /etc/fstab to ensure the configuration is as desired."
fi

sudo mount -a
注意
从 Linux 内核版本 5.0 开始,SMB 3.1.1 是默认的协商协议。 可以使用 vers 装载选项指定备用协议版本(协议版本为 3.1.1、3.0 和 2.1)。
通过 autofs 进行动态装载
若要使用 autofs 实用工具动态装载文件共享,请在你选择的 Linux 发行版上使用包管理器安装该实用工具。
接下来,更新 autofs 配置文件。
FILE_SHARE_NAME="<file-share-name>"

HTTP_ENDPOINT=$(az storage account show \
    --resource-group $RESOURCE_GROUP_NAME \
    --name $STORAGE_ACCOUNT_NAME \
    --query "primaryEndpoints.file" --output tsv | tr -d '"')
SMB_PATH=$(echo $HTTP_ENDPOINT | cut -c7-$(expr length $HTTP_ENDPOINT))$FILE_SHARE_NAME

echo "$FILE_SHARE_NAME -fstype=cifs,credentials=$SMB_CREDENTIAL_FILE,serverino,nosharesock,actimeo=30,mfsymlinks :$SMB_PATH" > /etc/auto.fileshares

echo "/fileshares /etc/auto.fileshares --timeout=60" > /etc/auto.master
最后一步是重启 autofs 服务。
sudo systemctl restart autofs
装载文件共享快照
如果要装载 SMB Azure 文件共享的特定快照,则必须在 mount 命令中提供 snapshot 选项,其中 snapshot 是以某种格式创建特定快照的时间(例如 @GMT-2023.01.05-00.08.20)。 从版本 4.19 起,Linux 内核中已支持 snapshot 选项。
创建文件共享快照后,请按照这些说明来装载它。
在 Azure 门户中,导航到要装载快照的文件共享所在的存储帐户。
选择“数据存储”>“文件共享”,然后选择文件共享。
选择“操作”>“快照”并记下要装载的快照的名称。 快照名称将为 GMT 时间戳,如下面的屏幕截图所示。
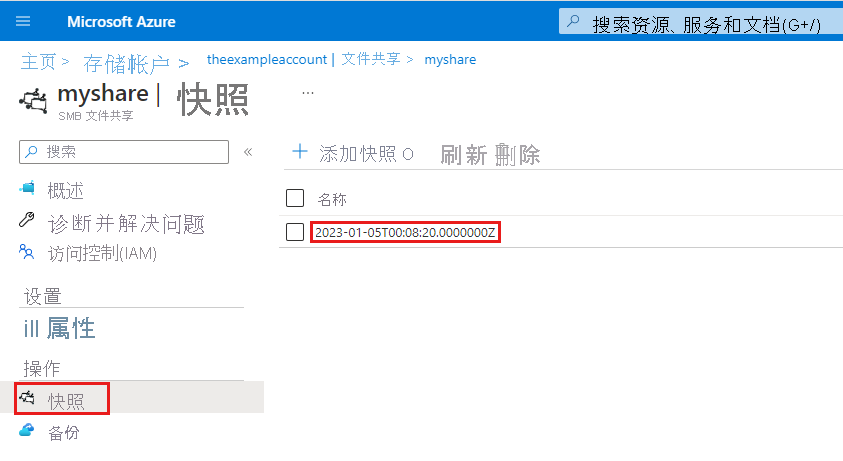
将时间戳转换为
mount命令所需的格式,即 @GMT-year.month.day-hour.minutes.seconds。 在此示例中,你将 2023-01-05T00:08:20.0000000Z 转换成了 @GMT-2023.01.05-00.08.20。运行
mount命令并使用 GMT 时间以指定snapshot值。 请务必将<storage-account-name>、<file-share-name>和 GMT 时间戳替换为你的值。 .cred 文件包含要用来装载共享的凭据(请参阅自动装载文件共享)。sudo mount -t cifs //<storage-account-name>.file.core.windows.net/<file-share-name> /media/<file-share-name>/snapshot1 -o credentials=/etc/smbcredentials/snapshottestlinux.cred,snapshot=@GMT-2023.01.05-00.08.20如果你能够在路径
/media/<file-share-name>/snapshot1下找到该快照,则装载成功。
如果装载失败,请参阅排查 Azure 文件存储连接和访问问题 (SMB)。
后续步骤
请参阅以下链接,获取有关 Azure 文件的更多信息: