生成第一个 PowerPoint 内容加载项
在本文中,你将演练使用 Visual Studio 生成 PowerPoint 内容加载项 的过程。
创建加载项
先决条件
已安装 Office/SharePoint 开发 工作负载的 Visual Studio 2019 或更高版本。
注意
如果之前已安装 Visual Studio,请 使用 Visual Studio 安装程序,以确保安装 Office/SharePoint 开发 工作负载。
已连接到 Microsoft 365 订阅的 Office (包括 Office 网页版)。
创建加载项项目
在 Visual Studio 中,选择“新建项目”。
使用搜索框,输入“加载项”。 选择“PowerPoint 外接程序”,然后选择“下一步”。
对项目命名,然后选择“创建”。
在 “创建 Office 外接程序 ”对话框窗口中,选择“ 将内容插入 PowerPoint 幻灯片”,然后选择“ 完成” 以创建项目。
此时,Visual Studio 创建解决方案,且它的两个项目显示在“解决方案资源管理器”中。 Home.html 文件将在 Visual Studio 中打开。
浏览 Visual Studio 解决方案
在用户完成向导后,Visual Studio 会创建一个包含两个项目的解决方案。
| Project | 说明 |
|---|---|
| 加载项项目 | 仅包含 XML 格式的仅外接程序清单文件,其中包含描述加载项的所有设置。 这些设置有助于 Office 应用程序确定应在何时激活加载项,以及应在哪里显示加载项。 Visual Studio 生成了此文件的内容,以便于用户能够立即运行项目并使用外接程序。 通过修改 XML 文件随时更改这些设置。 |
| Web 应用项目 | 包含加载项的内容页,包括开发 Office 感知 HTML 和 JavaScript 页面所需的全部文件和文件引用。 开发加载项时,Visual Studio 在本地 IIS 服务器上托管 Web 应用。 准备好发布加载项后,需要将此 Web 应用项目部署到 Web 服务器。 |
更新代码
Home.html 指定在加载项的任务窗格中呈现的 HTML。 在 Home.html中,找到
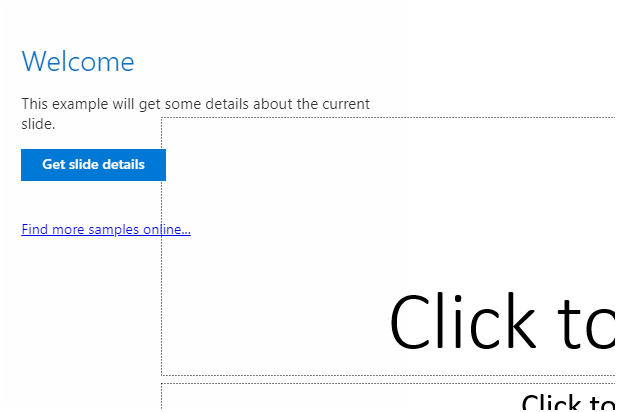
<p>包含文本“此示例将读取当前文档所选内容”的元素,以及<button>其中id为“get-data-from-selection”的元素。 将整个元素替换为以下标记,然后保存文件。<p class="ms-font-m-plus">This example will get some details about the current slide.</p> <button class="Button Button--primary" id="get-data-from-selection"> <span class="Button-icon"><i class="ms-Icon ms-Icon--plus"></i></span> <span class="Button-label">Get slide details</span> <span class="Button-description">Gets and displays the current slide's details.</span> </button>打开 Web 应用项目根目录中的文件“Home.js”。 此文件指定的是加载项脚本。 找到 函数
getDataFromSelection,并将整个函数替换为以下代码,然后保存文件。// Gets some details about the current slide and displays them in a notification. function getDataFromSelection() { if (Office.context.document.getSelectedDataAsync) { Office.context.document.getSelectedDataAsync(Office.CoercionType.SlideRange, function (result) { if (result.status === Office.AsyncResultStatus.Succeeded) { showNotification('Some slide details are:', '"' + JSON.stringify(result.value) + '"'); } else { showNotification('Error:', result.error.message); } } ); } else { app.showNotification('Error:', 'Reading selection data is not supported by this host application.'); } }
更新清单
在外接程序项目中打开仅外接程序清单文件。 此文件定义的是加载项设置和功能。
ProviderName元素具有占位符值。 将其替换为你的姓名。DisplayName元素的DefaultValue属性有占位符。 将它替换为“My Office Add-in”。Description元素的DefaultValue属性有占位符。 将其替换为 PowerPoint 的内容加载项。保存文件。 更新后的行应如下面的代码示例所示。
...
<ProviderName>John Doe</ProviderName>
<DefaultLocale>en-US</DefaultLocale>
<!-- The display name of your add-in. Used on the store and various places of the Office UI such as the add-ins dialog. -->
<DisplayName DefaultValue="My Office Add-in" />
<Description DefaultValue="A content add-in for PowerPoint."/>
...
试用
使用 Visual Studio,通过按 F5 或选择“ 开始” 按钮启动 PowerPoint,以在幻灯片上显示的内容加载项来测试新创建的 PowerPoint 加载项。
在 PowerPoint 中,选择内容加载项中的“ 获取幻灯片详细信息 ”按钮,获取有关当前幻灯片的详细信息。
注意
若要查看 console.log 输出,需要一组用于 JavaScript 控制台的单独开发人员工具。 若要详细了解 F12 工具和 Microsoft Edge DevTools,请访问使用 Internet Explorer 的开发人员工具调试外接程序,使用 Edge 旧版的开发人员工具调试外接程序,或 使用 Microsoft Edge 中的开发人员工具调试外接程序(基于 Chromium)。
后续步骤
恭喜,已成功创建 PowerPoint 内容加载项! 接下来,了解有关使用 Visual Studio 开发 Office 加载项的详细信息。