将通用化 VHD 上传到 Azure,创建新 VM
本主题介绍如何将通用化非托管磁盘上传到存储帐户,然后使用上传的磁盘创建新 VM。 通用 VHD 映像包含使用 Sysprep 删除的所有个人帐户信息。
如果要基于存储帐户中的专用 VHD 创建 VM,请参阅从专用 VHD 创建 VM。
本主题介绍如何使用存储帐户,但建议客户改用托管磁盘。 有关如何使用托管磁盘准备、上传和创建新 VM 的完整演练,请参阅使用托管磁盘从上传到 Azure 的通用化 VHD 中创建新的 VM。
准备 VM
通用 VHD 已使用 Sysprep 删除了所有个人帐户信息。 如果想要使用 VHD 作为映像来创建新的 VM,应该:
- 准备好要上传到 Azure 的 Windows VHD。
- 使用 Sysprep 将虚拟机通用化
使用 Sysprep 通用化 Windows 虚拟机
本部分说明如何通用化可用作映像的 Windows 虚拟机。 Sysprep 将删除所有个人帐户信息及其他某些数据,并准备好要用作映像的计算机。 有关 Sysprep 的详细信息,请参阅如何使用 Sysprep:简介。
确保 Sysprep 支持计算机上运行的服务器角色。 有关详细信息,请参阅 Sysprep 对服务器角色的支持
重要
如果在首次将 VHD 上传到 Azure 之前运行 Sysprep,请确保先准备好 VM,然后再运行 Sysprep。
登录到 Windows 虚拟机。
以管理员身份打开“命令提示符”窗口。 将目录切换到 %windir%\system32\sysprep,然后运行
sysprep.exe。在“系统准备工具”对话框中,选择“进入系统全新体验(OOBE)”,确保已选中“通用化”复选框。
在“关机选项”中选择“关机”。
单击“确定”。
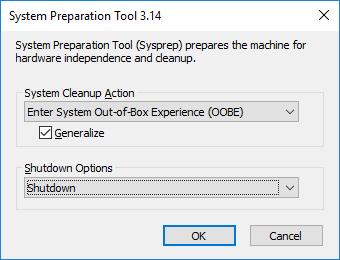
Sysprep 在完成运行后会关闭虚拟机。
重要
将 VHD 上传到 Azure 或从 VM 创建映像完成之前不要重启 VM。 如果 VM 意外重启,请运行 Sysprep 将其再次通用化。
上传 VHD
将 VHD 上传到 Azure 存储帐户。
登录 Azure
如果尚未安装 Azure PowerShell 1.4 或更高版本,请阅读 How to install and configure Azure PowerShell(如何安装和配置 Azure PowerShell)。
打开 Azure PowerShell 并登录到 Azure 帐户。 此时会打开一个弹出窗口让输入 Azure 帐户凭据。
Connect-AzAccount获取可用订阅的订阅 ID。
Get-AzSubscription使用订阅 ID 设置正确的订阅。 将
<subscriptionID>替换为适当订阅的 ID。Select-AzSubscription -SubscriptionId "<subscriptionID>"
获取存储帐户
需要在 Azure 中创建一个存储帐户用于存储上传的 VM 映像。 可以使用现有存储帐户,也可以创建新的存储帐户。
若要显示可用的存储帐户,请键入:
Get-AzStorageAccount
如果要使用现有存储帐户,请转到“上传 VM 映像”部分。
如果需要创建存储帐户,请执行以下步骤:
需要使用要在其中创建存储帐户的资源组的名称。 若要找出订阅中的所有资源组,请键入:
Get-AzResourceGroup若要在美国西部区域创建一个名为 myResourceGroup 的资源组,请键入:
New-AzResourceGroup -Name myResourceGroup -Location "West US"使用 New-AzStorageAccount cmdlet 在此资源组中创建名为 mystorageaccount 的存储帐户:
New-AzStorageAccount -ResourceGroupName myResourceGroup -Name mystorageaccount -Location "West US" `
    -SkuName "Standard_LRS" -Kind "Storage"
开始上传
使用 Add-AzVhd cmdlet 将映像上传到存储帐户中的容器。 本示例将文件 myVHD.vhd 从 "C:\Users\Public\Documents\Virtual hard disks\" 上传到 myResourceGroup 资源组中名为 mystorageaccount 的存储帐户。 该文件将放入名为 mycontainer 的容器,新文件名为 myUploadedVHD.vhd。
$rgName = "myResourceGroup"
$urlOfUploadedImageVhd = "https://mystorageaccount.blob.core.windows.net/mycontainer/myUploadedVHD.vhd"
Add-AzVhd -ResourceGroupName $rgName -Destination $urlOfUploadedImageVhd `
    -LocalFilePath "C:\Users\Public\Documents\Virtual hard disks\myVHD.vhd"
如果成功,会显示类似于下面的响应:
MD5 hash is being calculated for the file C:\Users\Public\Documents\Virtual hard disks\myVHD.vhd.
MD5 hash calculation is completed.
Elapsed time for the operation: 00:03:35
Creating new page blob of size 53687091712...
Elapsed time for upload: 01:12:49

LocalFilePath           DestinationUri
-------------           --------------
C:\Users\Public\Doc...  https://mystorageaccount.blob.core.windows.net/mycontainer/myUploadedVHD.vhd
根据网络连接速度和 VHD 文件的大小,可能需要一段时间才能完成此命令。
创建新 VM
现在可使用上传的 VHD 创建新 VM。
设置 VHD 的 URI
VHD 使用的 URI 采用以下格式: https://mystorageaccount.blob.core.windows.net/mycontainer/MyVhdName.vhd。 在此示例中,名为 myVHD 的 VHD 位于存储帐户 mystorageaccount 的 mycontainer 容器中。
$imageURI = "https://mystorageaccount.blob.core.windows.net/mycontainer/myVhd.vhd"
创建虚拟网络
创建虚拟网络的 vNet 和子网。
创建子网。 以下示例在资源组 myResourceGroup 中创建具有 10.0.0.0/24 地址前缀的、名为 mySubnet 的子网。
$rgName = "myResourceGroup"
$subnetName = "mySubnet"
$singleSubnet = New-AzVirtualNetworkSubnetConfig -Name $subnetName -AddressPrefix 10.0.0.0/24
创建虚拟网络。 以下示例在美国西部位置创建具有 10.0.0.0/16 地址前缀的、名为 myVnet 的虚拟网络。
$location = "WestUS"
$vnetName = "myVnet"
$vnet = New-AzVirtualNetwork -Name $vnetName -ResourceGroupName $rgName -Location $location `
    -AddressPrefix 10.0.0.0/16 -Subnet $singleSubnet
创建公共 IP 地址和网络接口
若要与虚拟网络中的虚拟机通信,需要一个 公共 IP 地址 和网络接口。
创建公共 IP 地址。 此示例创建名为 myPip 的公共 IP 地址。
$ipName = "myPip"
$pip = New-AzPublicIpAddress -Name $ipName -ResourceGroupName $rgName -Location $location `
    -AllocationMethod Dynamic
创建 NIC。 此示例创建名为 myNic 的 NIC。
$nicName = "myNic"
$nic = New-AzNetworkInterface -Name $nicName -ResourceGroupName $rgName -Location $location `
    -SubnetId $vnet.Subnets[0].Id -PublicIpAddressId $pip.Id
创建网络安全组和 RDP 规则
若要使用 RDP 登录到 VM,需要创建一个允许在端口 3389 上进行 RDP 访问的安全规则。
此示例创建名为 myNsg 的 NSG,其中包含一个允许通过端口 3389 传输 RDP 流量的、名为 myRdpRule 的规则。 有关 NSG 的详细信息,请参阅 Opening ports to a VM in Azure using PowerShell(使用 PowerShell 在 Azure 中打开 VM 端口)。
$nsgName = "myNsg"

$rdpRule = New-AzNetworkSecurityRuleConfig -Name myRdpRule -Description "Allow RDP" `
    -Access Allow -Protocol Tcp -Direction Inbound -Priority 110 `
    -SourceAddressPrefix Internet -SourcePortRange * `
    -DestinationAddressPrefix * -DestinationPortRange 3389

$nsg = New-AzNetworkSecurityGroup -ResourceGroupName $rgName -Location $location `
    -Name $nsgName -SecurityRules $rdpRule
为虚拟网络创建变量
为完成的虚拟网络创建变量。
$vnet = Get-AzVirtualNetwork -ResourceGroupName $rgName -Name $vnetName
创建 VM
以下 PowerShell 脚本演示如何设置虚拟机配置和使用已上传的 VM 映像作为新安装的源。
# Enter a new user name and password to use as the local administrator account
    # for remotely accessing the VM.
    $cred = Get-Credential

    # Name of the storage account where the VHD is located. This example sets the
    # storage account name as "myStorageAccount"
    $storageAccName = "myStorageAccount"

    # Name of the virtual machine. This example sets the VM name as "myVM".
    $vmName = "myVM"

    # Size of the virtual machine. This example creates "Standard_D2_v2" sized VM.
    # See the VM sizes documentation for more information:
    # https://azure.microsoft.com/documentation/articles/virtual-machines-windows-sizes/
    $vmSize = "Standard_D2_v2"

    # Computer name for the VM. This examples sets the computer name as "myComputer".
    $computerName = "myComputer"

    # Name of the disk that holds the OS. This example sets the
    # OS disk name as "myOsDisk"
    $osDiskName = "myOsDisk"

    # Assign a SKU name. This example sets the SKU name as "Standard_LRS"
    # Valid values for -SkuName are: Standard_LRS - locally redundant storage, Standard_ZRS - zone redundant
    # storage, Standard_GRS - geo redundant storage, Standard_RAGRS - read access geo redundant storage,
    # Premium_LRS - premium locally redundant storage.
    $skuName = "Standard_LRS"

    # Get the storage account where the uploaded image is stored
    $storageAcc = Get-AzStorageAccount -ResourceGroupName $rgName -AccountName $storageAccName

    # Set the VM name and size
    $vmConfig = New-AzVMConfig -VMName $vmName -VMSize $vmSize

    #Set the Windows operating system configuration and add the NIC
    $vm = Set-AzVMOperatingSystem -VM $vmConfig -Windows -ComputerName $computerName `
        -Credential $cred -ProvisionVMAgent -EnableAutoUpdate
    $vm = Add-AzVMNetworkInterface -VM $vm -Id $nic.Id

    # Create the OS disk URI
    $osDiskUri = '{0}vhds/{1}-{2}.vhd' `
        -f $storageAcc.PrimaryEndpoints.Blob.ToString(), $vmName.ToLower(), $osDiskName

    # Configure the OS disk to be created from the existing VHD image (-CreateOption fromImage).
    $vm = Set-AzVMOSDisk -VM $vm -Name $osDiskName -VhdUri $osDiskUri `
        -CreateOption fromImage -SourceImageUri $imageURI -Windows

    # Create the new VM
    New-AzVM -ResourceGroupName $rgName -Location $location -VM $vm
验证是否已创建 VM
完成后,应会在 Azure 门户的“浏览”>“虚拟机”下看到新建的 VM,也可以使用以下 PowerShell 命令查看该 VM:
    $vmList = Get-AzVM -ResourceGroupName $rgName
    $vmList.Name
后续步骤
若要使用 Azure PowerShell 管理新虚拟机,请参阅使用 Azure 资源管理器与 PowerShell 来管理虚拟机。