Xamarin.iOS 中的 Core Graphics
本文讨论 Core Graphics iOS 框架。 它演示如何使用 Core Graphics 绘制几何图形、图像和 PDF。
iOS 包含 Core Graphics 框架,用于提供低级别绘图支持。 这些框架在 UIKit 中实现了丰富的图形功能。
Core Graphics 是一个低级别 2D 图形框架,支持绘制独立于设备的图形。 UIKit 中的所有 2D 绘图都在内部使用 Core Graphics。
Core Graphics 支持在多种场景中绘图,其中包括:
- 通过
UIView在屏幕上绘制。 - 在内存中或屏幕上绘制图像。
- 创建和绘制到 PDF。
- 读取和绘制现有 PDF。
几何空间
无论场景如何,使用 Core Graphics 进行的所有绘制都是在几何空间中完成的,这意味着它在抽象点中而不是像素中工作。 根据几何形状和绘图状态(例如颜色、线条样式等)描述你想要绘制的内容,Core Graphics 会负责将所有内容转换为像素。 这种状态将添加到图形上下文中,你可以将它想象成画家的画布。
此方法有一些好处:
- 绘图代码变成动态的,并且可以随后在运行时修改图形。
- 减少应用程序捆绑包中对静态图像的需求可以减少应用程序的大小。
- 对于不同设备间的分辨率变化,图形会变得更加灵活。
在 UIView 子类中绘制
每个 UIView 都有一个 Draw 方法,在需要绘制时由系统调用。 要将绘图代码添加到视图,请将 UIView 子类化并重写 Draw:
public class TriangleView : UIView
{
    public override void Draw (CGRect rect)
    {
        base.Draw (rect);
    }
}
永远不得直接调用绘图。 它在运行循环处理过程中由系统调用。 在将视图添加到视图层次结构后,第一次通过运行循环调用其 Draw 方法。 当视图被标记为需要通过在视图上调用 SetNeedsDisplay 或 SetNeedsDisplayInRect 来绘制时,将发生对 Draw 的后续调用。
图形代码模式
Draw 实现中的代码应描述它想要绘制的内容。 绘图代码遵循一种模式,在该模式中设置一些绘制状态并调用方法来请求绘制它。 可将此模式通用化,如下所示:
获取图形上下文。
设置绘图属性。
从绘图基元创建一些几何图形。
调用 Draw 或 Stroke 方法。
基本绘图示例
以下面的代码片段为例:
//get graphics context
using (CGContext g = UIGraphics.GetCurrentContext ()) {

    //set up drawing attributes
    g.SetLineWidth (10);
    UIColor.Blue.SetFill ();
    UIColor.Red.SetStroke ();

    //create geometry
    var path = new CGPath ();

    path.AddLines (new CGPoint[]{
    new CGPoint (100, 200),
    new CGPoint (160, 100),
    new CGPoint (220, 200)});

    path.CloseSubpath ();

    //add geometry to graphics context and draw it
    g.AddPath (path);
    g.DrawPath (CGPathDrawingMode.FillStroke);
}
让我们分析以下代码:
using (CGContext g = UIGraphics.GetCurrentContext ()) {
...
}
通过这行代码,它首先获取用于绘图的当前图形上下文。 可将图形上下文视为进行绘图的画布,其中包含绘图的所有相关状态(例如笔划和填充颜色)和要绘制的几何图形。
g.SetLineWidth (10);
UIColor.Blue.SetFill ();
UIColor.Red.SetStroke ();
获取图形上下文后,代码会设置在绘图时要使用的一些属性,如上所示。 在本例中,将设置线条宽度、笔划和填充颜色。 然后,任何后续绘图都将使用这些属性,因为它们保留在图形上下文的状态中。
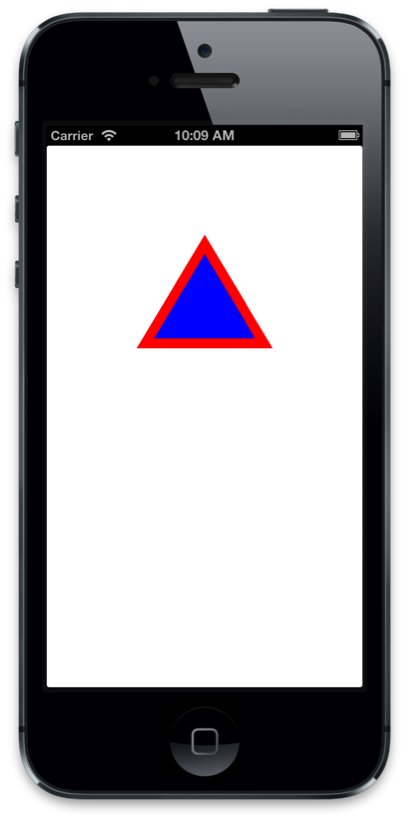
为了创建几何图形,代码使用 CGPath,它允许从线条和曲线描述图形路径。 在这种情况下,路径会添加连接一系列点的线条来构成一个三角形。 如下所示,Core Graphics 使用坐标系进行视图绘制,其中原点在左上角,正 X 轴向右,正 Y 轴向下:
var path = new CGPath ();

path.AddLines (new CGPoint[]{
new CGPoint (100, 200),
new CGPoint (160, 100),
new CGPoint (220, 200)});

path.CloseSubpath ();
一旦路径被创建,就会添加到图形上下文中,这样分别调用 AddPath 和 DrawPath 就可绘制它。
生成的视图如下所示:
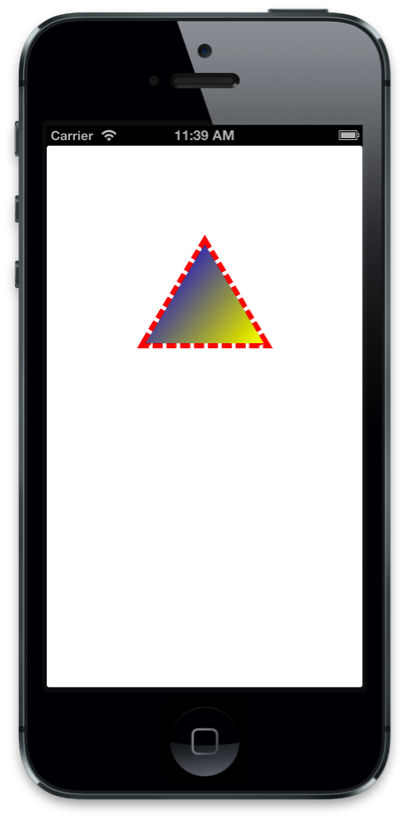
创建渐变填充
还提供了更丰富的绘图形式。 例如,Core Graphics 支持创建渐变填充并应用剪切路径。 若要在上一示例中的路径内绘制渐变填充,首先需要将路径设置为剪切路径:
// add the path back to the graphics context so that it is the current path
g.AddPath (path);
// set the current path to be the clipping path
g.Clip ();
将当前路径设置为剪切路径会限制路径几何图形中的所有后续绘图,例如以下代码,它用于绘制线性渐变:
// the color space determines how Core Graphics interprets color information
    using (CGColorSpace rgb = CGColorSpace.CreateDeviceRGB()) {
        CGGradient gradient = new CGGradient (rgb, new CGColor[] {
        UIColor.Blue.CGColor,
        UIColor.Yellow.CGColor
    });

// draw a linear gradient
    g.DrawLinearGradient (
        gradient,
        new CGPoint (path.BoundingBox.Left, path.BoundingBox.Top),
        new CGPoint (path.BoundingBox.Right, path.BoundingBox.Bottom),
        CGGradientDrawingOptions.DrawsBeforeStartLocation);
    }
这些更改会生成渐变填充,如下所示:

修改线条模式
还可使用 Core Graphics 修改线条的绘图属性。 这包括更改线条宽度和笔划颜色以及线条图案本身,如以下代码所示:
//use a dashed line
g.SetLineDash (0, new nfloat[] { 10, 4 * (nfloat)Math.PI });
在任何绘图操作之前添加此代码会导致短划线的长度为 10 个单位,短划线之间的间距为 4 个单位,如下所示:
请注意,在 Xamarin.iOS 中使用 Unified API 时,数组类型需要是一个 nfloat,还需要显式强制转换为 Math.PI。
绘制图像和文本
除了在视图的图形上下文中绘制路径外,Core Graphics 还支持绘制图像和文本。 若要绘制图像,只需创建一个 CGImage 并将其传递给 DrawImage 调用:
public override void Draw (CGRect rect)
{
    base.Draw (rect);

    using(CGContext g = UIGraphics.GetCurrentContext ()){
        g.DrawImage (rect, UIImage.FromFile ("MyImage.png").CGImage);
    }
}
但是,这会生成倒置绘制的图像,如下所示:
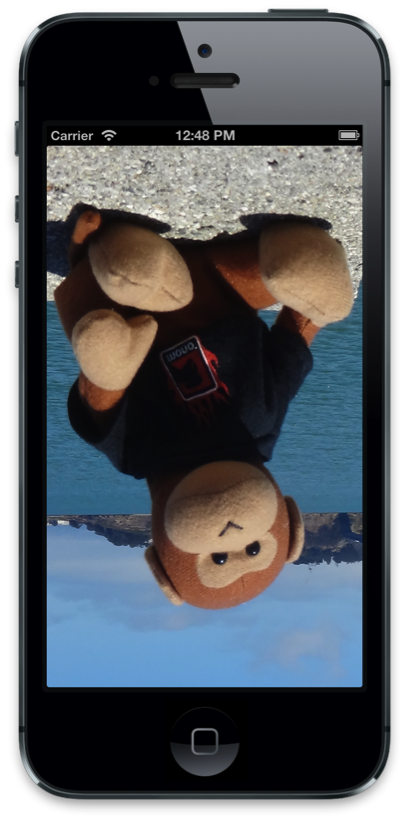
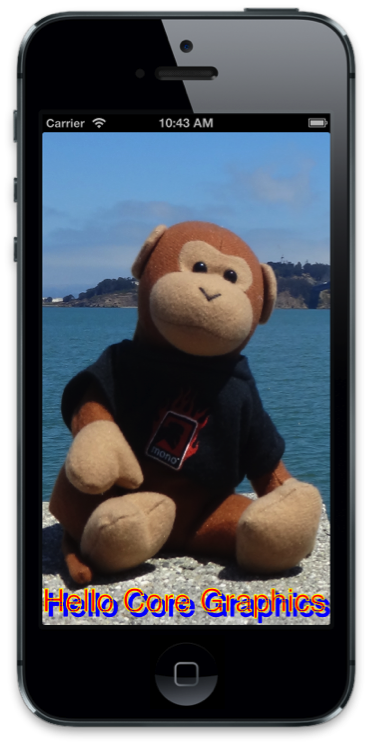
这是因为图像绘制的 Core Graphics 原点位于左下角,而视图的原点在左上角。 因此,为了正确显示图像,需要修改原点,这可通过修改当前转换矩阵 (CTM) 来实现。 CTM 定义点所在的位置,也称为用户空间。 通过在 Y 方向反转 CTM 并按负 Y 方向的边界高度移动 CTM,可以翻转图像。
图形上下文具有用于转换 CTM 的帮助程序方法。 在这种情况下,ScaleCTM 将绘图“翻转”,并且 TranslateCTM 将其移动到左上角,如下所示:
public override void Draw (CGRect rect)
{
    base.Draw (rect);

    using (CGContext g = UIGraphics.GetCurrentContext ()) {

        // scale and translate the CTM so the image appears upright
        g.ScaleCTM (1, -1);
        g.TranslateCTM (0, -Bounds.Height);
        g.DrawImage (rect, UIImage.FromFile ("MyImage.png").CGImage);
}
然后,生成的图像将直立显示:

重要
对图形上下文的更改适用于所有后续绘图操作。 因此,当 CTM 转换时,它将影响其他所有绘图。 例如,如果在 CTM 转换后绘制了三角形,它将倒置显示。
向图像添加文本
与路径和图像一样,使用 Core Graphics 绘制文本涉及到设置某些图形状态和调用绘制方法的相同基本模式。 对于文本,使用 ShowText 方法来显示文本。 添加到图像绘图示例时,以下代码使用 Core Graphics 绘制一些文本:
public override void Draw (RectangleF rect)
{
    base.Draw (rect);

    // image drawing code omitted for brevity ...

    // translate the CTM by the font size so it displays on screen
    float fontSize = 35f;
    g.TranslateCTM (0, fontSize);

    // set general-purpose graphics state
    g.SetLineWidth (1.0f);
    g.SetStrokeColor (UIColor.Yellow.CGColor);
    g.SetFillColor (UIColor.Red.CGColor);
    g.SetShadow (new CGSize (5, 5), 0, UIColor.Blue.CGColor);

    // set text specific graphics state
    g.SetTextDrawingMode (CGTextDrawingMode.FillStroke);
    g.SelectFont ("Helvetica", fontSize, CGTextEncoding.MacRoman);

    // show the text
    g.ShowText ("Hello Core Graphics");
}
可以看到,设置文本绘图的图形状态类似于绘图几何图形。 但是,对于文本绘图,还会应用文本绘制模式和字体。 在这种情况下,也会应用阴影,尽管应用阴影对路径绘制来说工作方式相同。
生成的文本与图像一起显示,如下所示:
内存支持的图像
除了绘制到视图的图形上下文之外,Core Graphics 还支持绘制内存支持的图像,也称为屏幕外绘图。 这样做需要:
- 创建由内存位图支持的图形上下文
- 设置绘图状态并发出绘图命令
- 从上下文中获取图像
- 删除上下文
在 Draw 方法中,上下文由视图提供。与该方法不同,在这种情况下,可通过下面两种方式之一创建上下文:
通过调用
UIGraphics.BeginImageContext(或BeginImageContextWithOptions)通过创建新的
CGBitmapContextInstance
当你直接使用图像位时(例如,在使用自定义图像操作算法的情况中),CGBitmapContextInstance 非常有用。 在所有其他情况下,应使用 BeginImageContext 或 BeginImageContextWithOptions。
获得图像上下文后,就像在 UIView 子类中一样添加绘图代码。 例如,前面用于绘制三角形的代码示例可用于在内存中而不是在 UIView 中绘制图像,如下所示:
UIImage DrawTriangle ()
{
    UIImage triangleImage;

    //push a memory backed bitmap context on the context stack
    UIGraphics.BeginImageContext (new CGSize (200.0f, 200.0f));

    //get graphics context
    using(CGContext g = UIGraphics.GetCurrentContext ()){

        //set up drawing attributes
        g.SetLineWidth(4);
        UIColor.Purple.SetFill ();
        UIColor.Black.SetStroke ();

        //create geometry
        path = new CGPath ();

        path.AddLines(new CGPoint[]{
            new CGPoint(100,200),
            new CGPoint(160,100),
            new CGPoint(220,200)});

        path.CloseSubpath();

        //add geometry to graphics context and draw it
        g.AddPath(path);
        g.DrawPath(CGPathDrawingMode.FillStroke);

        //get a UIImage from the context
        triangleImage = UIGraphics.GetImageFromCurrentImageContext ();
    }

    return triangleImage;
}
绘制到内存支持的位图的常见用途是从任何 UIView 中捕获图像。 例如,以下代码将视图的层呈现到位图上下文,并从中创建 UIImage:
UIGraphics.BeginImageContext (cellView.Frame.Size);

//render the view's layer in the current context
anyView.Layer.RenderInContext (UIGraphics.GetCurrentContext ());

//get a UIImage from the context
UIImage anyViewImage = UIGraphics.GetImageFromCurrentImageContext ();
UIGraphics.EndImageContext ();
绘图 PDF
除了图像,Core Graphics 还支持 PDF 绘图。 与图像一样,你可以在内存中呈现 PDF,也可以读取 PDF 以在 UIView 中呈现。
UIView 中的 PDF
Core Graphics 还支持从文件中读取 PDF,并使用 CGPDFDocument 类在视图中呈现它。 CGPDFDocument 类表示代码中的 PDF,可用于读取和绘制页面。
例如,UIView 子类中的以下代码将 PDF 从文件读取到 CGPDFDocument:
public class PDFView : UIView
{
    CGPDFDocument pdfDoc;

    public PDFView ()
    {
        //create a CGPDFDocument from file.pdf included in the main bundle
        pdfDoc = CGPDFDocument.FromFile ("file.pdf");
    }

     public override void Draw (Rectangle rect)
    {
        ...
    }
}
然后,Draw 方法可使用 CGPDFDocument 将页面读取到 CGPDFPage,并通过调用 DrawPDFPage 来呈现它,如下所示:
public override void Draw (CGRect rect)
{
    base.Draw (rect);

    //flip the CTM so the PDF will be drawn upright
    using (CGContext g = UIGraphics.GetCurrentContext ()) {
        g.TranslateCTM (0, Bounds.Height);
        g.ScaleCTM (1, -1);

        // render the first page of the PDF
        using (CGPDFPage pdfPage = pdfDoc.GetPage (1)) {

        //get the affine transform that defines where the PDF is drawn
        CGAffineTransform t = pdfPage.GetDrawingTransform (CGPDFBox.Crop, rect, 0, true);

        //concatenate the pdf transform with the CTM for display in the view
        g.ConcatCTM (t);

        //draw the pdf page
        g.DrawPDFPage (pdfPage);
        }
    }
}
内存支持的 PDF
对于内存中 PDF,需要通过调用 BeginPDFContext 来创建 PDF 上下文。 绘图到 PDF 是细化到页面的。 每个页面都是通过调用 BeginPDFPage 来开始,并通过调用 EndPDFContent 完成,中间使用图形代码。 此外,与图像绘图一样,内存支持的 PDF 绘图使用左下角的原点,可通过修改 CTM 来考虑到这一点(就像使用图像一样)。
以下代码演示如何将文本绘制到 PDF:
//data buffer to hold the PDF
NSMutableData data = new NSMutableData ();

//create a PDF with empty rectangle, which will configure it for 8.5x11 inches
UIGraphics.BeginPDFContext (data, CGRect.Empty, null);

//start a PDF page
UIGraphics.BeginPDFPage ();

using (CGContext g = UIGraphics.GetCurrentContext ()) {
    g.ScaleCTM (1, -1);
    g.TranslateCTM (0, -25);
    g.SelectFont ("Helvetica", 25, CGTextEncoding.MacRoman);
    g.ShowText ("Hello Core Graphics");
    }

//complete a PDF page
UIGraphics.EndPDFContent ();
生成的文本将绘制到 PDF 中,然后包含在 NSData 中,可对该数据进行保存、上传、通过电子邮件发送等。
总结
本文介绍了通过 Core Graphics 框架提供的图形功能。 我们了解了如何使用 Core Graphics 在 UIView, 上下文中和内存支持的图形上下文中绘制几何图形、图像和 PDF。