Xamarin.iOS 中的高级用户通知
iOS 10 的新功能“用户通知”框架允许发送和处理本地和远程通知。 使用此框架,应用或应用扩展可以通过指定一组条件(例如位置或时刻)来计划本地通知的发送。
关于用户通知
新的用户通知框架允许发送和处理本地和远程通知。 使用此框架,应用和应用扩展可以通过指定一组条件(例如位置或时刻)来计划本地通知的发送。
此外,应用或扩展可以在本地和远程通知传递给用户的 iOS 设备时接收(并可能修改)这些通知。
新的用户通知 UI 框架允许应用或应用扩展自定义本地和远程通知呈现给用户时的外观。
此框架提供了应用向用户发送通知的以下方式:
- 视觉警报 - 通知作为横幅从屏幕顶部向下滚动。
- 声音和振动 - 可与通知相关联。
- 应用图标锁屏提醒 - 应用的图标会在此处显示一个显示新内容可用的锁屏提醒。 例如未读电子邮件的数量。
此外,根据用户的当前上下文,有不同的方式来显示通知:
- 如果设备已解锁,则通知将作为横幅从屏幕顶部向下滚动。
- 如果设备已锁定,则通知将显示在用户的锁屏界面上。
- 如果用户错过了通知,他们可以打开通知中心并在那里查看任何可用的等待通知。
Xamarin.iOS 应用可以发送两种类型的用户通知:
- 本地通知 - 这些由用户设备上本地安装的应用发送。
- 远程通知 - 从远程服务器发送,向用户显示或者触发应用内容的后台更新。
有关详细信息,请参阅我们的增强型用户通知文档。
新的用户通知界面
iOS 10 中的用户通知呈现为新的 UI 设计,提供更多内容,如标题、副标题和可选媒体附件,可在锁屏界面上呈现,作为设备顶部或通知中心的横幅。
无论用户通知在 iOS 10 中显示的位置在哪,它都以相同的外观和相同的特性和功能呈现。
在 iOS 8 中,Apple 引入了可操作通知,开发人员可在其中将自定义操作附加到通知,并允许用户在通知上执行操作,而无需启动应用。 在 iOS 9 中,Apple 为可操作通知增强了快速回复,使用户能够响应带有文本条目的通知。
由于用户通知越来越成为 iOS 10 用户体验的一个不可或缺的部分,因此 Apple 进一步扩展了可操作通知以支持 3D Touch,用户可在其中点按通知和自定义用户界面来提供与通知的丰富交互。
显示自定义用户通知 UI 时,如果用户与附加到通知的任何操作交互,则可以立即更新自定义 UI,以提供对已更改内容的反馈。
iOS 10 的一项新功能是,用户通知 UI API 允许 Xamarin.iOS 应用轻松利用这些新的用户通知 UI 功能。
添加媒体附件
在用户之间共享的较常用项目之一是照片,因此 iOS 10 可以实现直接将媒体项目(如照片)附加到通知,将显示并随时可供用户使用,通知内容的其余部分也一样。
但是,由于发送小图像也要涉及到大小,因此将其附加到远程通知有效负载会变得不切实际。 为了处理这种情况,开发人员可以使用 iOS 10 中新的服务扩展从另一个源(如 CloudKit 数据存储)下载图像,并将其附加到通知内容中,然后再将其显示给用户。
若要使远程通知由服务扩展修改,其有效负载必须标记为可变。 例如:
{
    aps : {
        alert : "New Photo Available",
        mutable-content: 1
    },
    my-attachment : "https://example.com/photo.jpg"
}
查看此过程的以下概述:

将远程通知传送到设备(通过 APN)后,服务扩展就可以通过所需的任何方式(例如 NSURLSession)下载所需的图像,在收到图像后,它可以修改通知的内容并将其显示给用户。
下面是如何在代码中处理此过程的示例:
using System;
using Foundation;
using UIKit;
using UserNotifications;

namespace MonkeyNotification
{
    public class NotificationService : UNNotificationServiceExtension
    {
        #region Constructors
        public NotificationService (IntPtr handle) : base(handle)
        {
        }
        #endregion

        #region Override Methods
        public override void DidReceiveNotificationRequest (UNNotificationRequest request, Action<UNNotificationContent> contentHandler)
        {
            // Get file URL
            var attachementPath = request.Content.UserInfo.ObjectForKey (new NSString ("my-attachment"));
            var url = new NSUrl (attachementPath.ToString ());

            // Download the file
            var localURL = new NSUrl ("PathToLocalCopy");

            // Create attachment
            var attachmentID = "image";
            var options = new UNNotificationAttachmentOptions ();
            NSError err;
            var attachment = UNNotificationAttachment.FromIdentifier (attachmentID, localURL, options , out err);

            // Modify contents
            var content = request.Content.MutableCopy() as UNMutableNotificationContent;
            content.Attachments = new UNNotificationAttachment [] { attachment };

            // Display notification
            contentHandler (content);
        }

        public override void TimeWillExpire ()
        {
            // Handle service timing out
        }
        #endregion
    }
}
从 APN 接收通知时,将从内容中读取图像的自定义地址,并从服务器下载文件。 然后将创建具有唯一的 ID 和图像的本地位置(作为 NSUrl)的 UNNotificationAttachement。 将创建通知内容的可变副本,并添加媒体附件。 最后,通过调用 contentHandler 向用户显示通知。
将附件添加到通知后,系统会接管文件的移动和管理。
除了上面显示的远程通知之外,本地通知也支持媒体附件,其中将创建 UNNotificationAttachement 并将其内容附加到通知。
iOS 10 中的通知支持图像(静态和 GIF)、音频或视频的媒体附件,当向用户显示通知时,系统将自动显示每种此类附件的正确自定义 UI。
注意
应注意优化媒体大小以及从远程服务器下载媒体(或为本地通知组装媒体)所需的时间,因为系统在运行应用的服务扩展时对两者都施加严格的限制。 例如,应考虑发送要在通知中显示的缩小版图像或剪辑后的简短视频。
创建自定义用户界面
若要为其用户通知创建自定义用户界面,开发人员需要将通知内容扩展(iOS 10 的新增功能)添加到应用的解决方案。
通知内容扩展允许开发人员将自己的视图添加到通知 UI 并绘制所需的任何内容。 从 iOS 12 开始,通知内容扩展支持交互式 UI 控件,例如按钮和滑块。 有关详细信息,请参阅 iOS 12 中的交互式通知文档。
为了支持用户与用户通知的交互,应创建自定义操作、向系统注册并将其附加到通知,然后再与系统进行计划。 将调用通知内容扩展来处理这些操作。 有关自定义操作的更多详细信息,请参阅增强型用户通知文档的使用通知操作部分。
向用户显示具有自定义 UI 的用户通知时,它将具有以下元素:

如果用户与自定义操作(显示在通知下方)交互,则可以更新用户界面,以向用户提供有关调用给定操作时发生情况的反馈。
添加通知内容扩展
若要在 Xamarin.iOS 应用中实现自定义用户通知 UI,请执行以下操作:
在 Visual Studio for Mac 中打开应用的解决方案。
右键单击 Solution Pad 中的“解决方案名称”,然后选择“添加”>“添加新项目”。
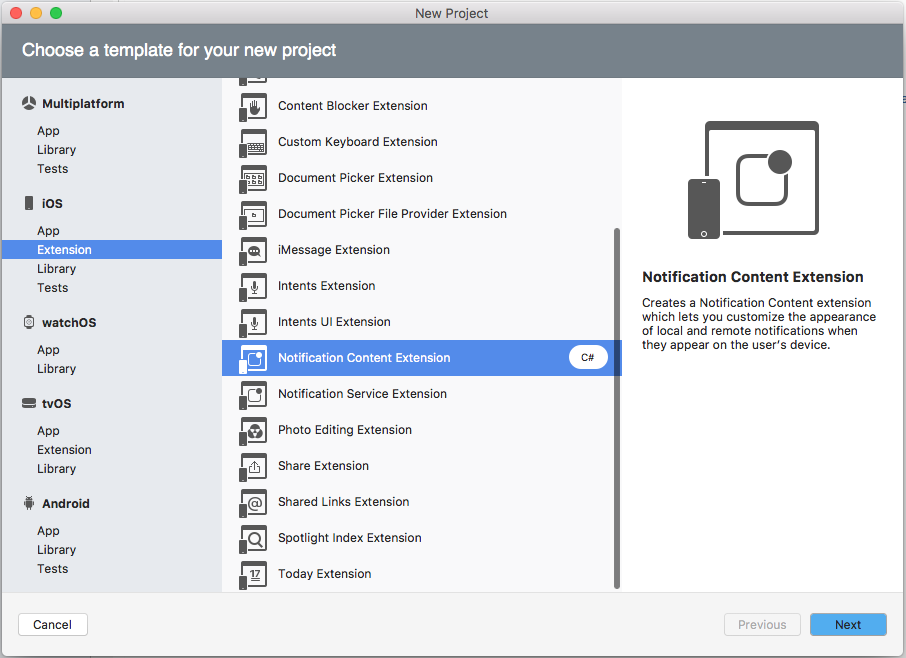
选择“iOS”>“扩展”>“通知内容扩展”,然后单击“下一步”按钮:
输入扩展的名称,然后单击“下一步”按钮:

根据需要调整“项目名称”和/或“解决方案名称”,然后单击“创建”按钮:


将通知内容扩展添加到解决方案后,将在扩展的项目中创建三个文件:
NotificationViewController.cs- 这是通知内容扩展的主视图控制器。MainInterface.storyboard- 借此,开发人员在 iOS 设计器中为通知内容扩展布局可见 UI。Info.plist- 控制通知内容扩展的配置。
默认 NotificationViewController.cs 文件看起来如下所示:
using System;
using Foundation;
using UIKit;
using UserNotifications;
using UserNotificationsUI;

namespace MonkeyChatNotifyExtension
{
    public partial class NotificationViewController : UIViewController, IUNNotificationContentExtension
    {
        #region Constructors
        protected NotificationViewController (IntPtr handle) : base (handle)
        {
            // Note: this .ctor should not contain any initialization logic.
        }
        #endregion

        #region Override Methods
        public override void ViewDidLoad ()
        {
            base.ViewDidLoad ();

            // Do any required interface initialization here.
        }
        #endregion

        #region Public Methods
        [Export ("didReceiveNotification:")]
        public void DidReceiveNotification (UNNotification notification)
        {
            label.Text = notification.Request.Content.Body;

            // Grab content
            var content = notification.Request.Content;

        }
        #endregion
    }
}
DidReceiveNotification 方法在用户展开通知时调用,以便通知内容扩展可以使用 UNNotification 的内容填充自定义 UI。 对于上面的示例,已向视图中添加一个标签,该标签已公开给具有名称 label 的代码,并用于显示通知的正文。
设置通知内容扩展的类别
系统需要根据应用响应的特定类别来了解如何查找应用的通知内容扩展。 请执行以下操作:
在“Solution Pad”中,双击打开扩展的
Info.plist文件进行编辑。切换到“源”视图。
展开
NSExtension键。将
UNNotificationExtensionCategory键添加为字符串类型,值为扩展所属的类别(此示例中为“event-invite”):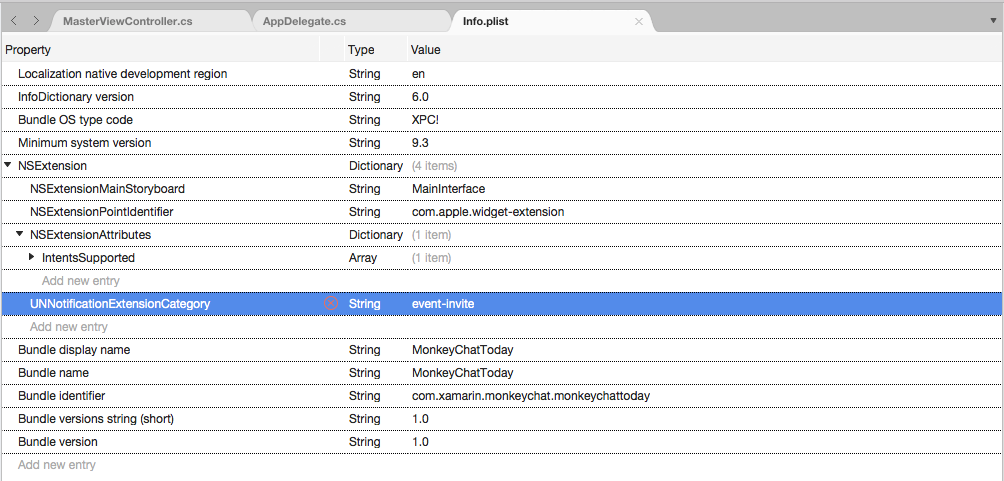
保存所做更改。


通知内容扩展类别 (UNNotificationExtensionCategory) 使用注册通知操作时所用的相同类别值。 如果应用将针对多个类别使用相同的 UI,请将 UNNotificationExtensionCategory 切换到数组类型并提供所需的所有类别。 例如:


隐藏默认通知内容
如果自定义通知 UI 将显示与默认通知相同的内容(通知 UI 底部自动显示的标题、副标题和正文),可以隐藏此默认信息,方法是将 UNNotificationExtensionDefaultContentHidden 键作为布尔类型添加到 NSExtensionAttributes 键,值为扩展的 Info.plist 文件中 YES:


设计自定义 UI
若要设计通知内容扩展的自定义用户界面,请双击 MainInterface.storyboard 文件以在 iOS 设计器中打开它进行编辑,并拖动生成所需界面需要的元素(例如 UILabels 和 UIImageViews)。
注意
从 iOS 12 开始,通知内容扩展可以包括交互式控件,例如按钮和文本字段。 有关详细信息,请参阅 iOS 12 中的交互式通知文档。
在为 UI 布局且向 C# 代码公开了必要控件后,打开 NotificationViewController.cs 进行编辑并修改 DidReceiveNotification 方法,以便在用户展开通知时填充 UI。 例如:
using System;
using Foundation;
using UIKit;
using UserNotifications;
using UserNotificationsUI;

namespace MonkeyChatNotifyExtension
{
    public partial class NotificationViewController : UIViewController, IUNNotificationContentExtension
    {
        #region Constructors
        protected NotificationViewController (IntPtr handle) : base (handle)
        {
            // Note: this .ctor should not contain any initialization logic.
        }
        #endregion

        #region Override Methods
        public override void ViewDidLoad ()
        {
            base.ViewDidLoad ();

            // Do any required interface initialization here.
        }
        #endregion

        #region Public Methods
        [Export ("didReceiveNotification:")]
        public void DidReceiveNotification (UNNotification notification)
        {
            label.Text = notification.Request.Content.Body;

            // Grab content
            var content = notification.Request.Content;

            // Display content in the UILabels
            EventTitle.Text = content.Title;
            EventDate.Text = content.Subtitle;
            EventMessage.Text = content.Body;

            // Get location and display
            var location = content.UserInfo ["location"].ToString ();
            if (location != null) {
                Event.Location.Text = location;
            }

        }
        #endregion
    }
}
设置内容区域大小
若要调整向用户显示的内容区域的大小,下面的代码可以将 ViewDidLoad 方法中的 PreferredContentSize 属性设置为所需的大小。 还可以通过将约束应用于 iOS 设计器中的视图来调整此大小,开发人员可以选择最适合的方法。
由于通知系统已在调用通知内容扩展之前运行,因此内容区域开始是全尺寸,并在向用户显示时将其动画化为请求的大小。
若要消除此效果,请编辑扩展的 Info.plist 文件,并将 NSExtensionAttributes 键的 UNNotificationExtensionInitialContentSizeRatio 键设置为数字类型,值表示所需的比率。 例如:


在自定义 UI 中使用媒体附件
由于媒体附件(如上面的添加媒体附件部分所示)是通知有效负载的一部分,因此可以在通知内容扩展中访问和显示它们,就像在默认通知 UI 中一样。
例如,如果上述自定义 UI 包含向 C# 代码公开的 UIImageView,则以下代码可用于使用媒体附件填充它:
using System;
using Foundation;
using UIKit;
using UserNotifications;
using UserNotificationsUI;

namespace MonkeyChatNotifyExtension
{
    public partial class NotificationViewController : UIViewController, IUNNotificationContentExtension
    {
        #region Constructors
        protected NotificationViewController (IntPtr handle) : base (handle)
        {
            // Note: this .ctor should not contain any initialization logic.
        }
        #endregion

        #region Override Methods
        public override void ViewDidLoad ()
        {
            base.ViewDidLoad ();

            // Do any required interface initialization here.
        }
        #endregion

        #region Public Methods
        [Export ("didReceiveNotification:")]
        public void DidReceiveNotification (UNNotification notification)
        {
            label.Text = notification.Request.Content.Body;

            // Grab content
            var content = notification.Request.Content;

            // Display content in the UILabels
            EventTitle.Text = content.Title;
            EventDate.Text = content.Subtitle;
            EventMessage.Text = content.Body;

            // Get location and display
            var location = content.UserInfo ["location"].ToString ();
            if (location != null) {
                Event.Location.Text = location;
            }

            // Get Media Attachment
            if (content.Attachements.Length > 1) {
                var attachment = content.Attachments [0];
                if (attachment.Url.StartAccessingSecurityScopedResource ()) {
                    EventImage.Image = UIImage.FromFile (attachment.Url.Path);
                    attachment.Url.StopAccessingSecurityScopedResource ();
                }
            }
        }
        #endregion
    }
}
由于媒体附件由系统管理,因此它不在应用的沙盒之外。 扩展需要通过调用 StartAccessingSecurityScopedResource 方法通知系统它想要访问该文件。 当扩展完成该文件后,需要调用 StopAccessingSecurityScopedResource 以释放其连接。
将自定义操作添加到自定义 UI
自定义操作按钮可用于向自定义通知 UI 添加交互性。 有关自定义操作的更多详细信息,请参阅增强型用户通知文档的使用通知操作部分。
除了自定义操作之外,通知内容扩展还可以响应以下内置操作:
- 默认操作 - 这是当用户点击通知以打开应用并显示给定通知的详细信息时。
- 消除操作 - 当用户取消给定的通知时,此操作将发送到应用。
通知内容扩展还可以在用户调用自定义操作之一时更新其 UI,例如当用户点击“接受”自定义操作按钮时显示接受的日期。 此外,通知内容扩展可以告知系统延迟通知 UI 的关闭,以便用户可以在通知关闭之前查看其操作的效果。
这是通过实现包含完成处理程序的另一版 DidReceiveNotification 方法来实现的。 例如:
using System;
using Foundation;
using UIKit;
using UserNotifications;
using UserNotificationsUI;
using CoreGraphics;

namespace myApp {
    public class NotificationViewController : UIViewController, UNNotificationContentExtension {

        public override void ViewDidLoad() {
            base.ViewDidLoad();

            // Adjust the size of the content area
            var size = View.Bounds.Size
            PreferredContentSize = new CGSize(size.Width, size.Width/2);
        }

        public void DidReceiveNotification(UNNotification notification) {

            // Grab content
            var content = notification.Request.Content;

            // Display content in the UILabels
            EventTitle.Text = content.Title;
            EventDate.Text = content.Subtitle;
            EventMessage.Text = content.Body;

            // Get location and display
            var location = Content.UserInfo["location"] as string;
            if (location != null) {
                Event.Location.Text = location;
            }

            // Get Media Attachment
            if (content.Attachements.Length > 1) {
                var attachment = content.Attachments[0];
                if (attachment.Url.StartAccessingSecurityScopedResource()) {
                    EventImage.Image = UIImage.FromFile(attachment.Url.Path);
                    attachment.Url.StopAccessingSecurityScopedResource();
                }
            }
        }

        [Export ("didReceiveNotificationResponse:completionHandler:")]
        public void DidReceiveNotification (UNNotificationResponse response, Action<UNNotificationContentExtensionResponseOption> completionHandler)
        {

            // Update UI when the user interacts with the
            // Notification
            Server.PostEventResponse += (response) {
                // Take action based on the response
                switch(response.ActionIdentifier){
                case "accept":
                    EventResponse.Text = "Going!";
                    EventResponse.TextColor = UIColor.Green;
                    break;
                case "decline":
                    EventResponse.Text = "Not Going.";
                    EventResponse.TextColor = UIColor.Red;
                    break;
                }

                // Close Notification
                completionHandler (UNNotificationContentExtensionResponseOption.Dismiss);
            };
        }
    }
}
通过将 Server.PostEventResponse 处理程序添加到通知内容扩展的 DidReceiveNotification 方法,扩展必须处理所有自定义操作。 扩展还可以通过更改 UNNotificationContentExtensionResponseOption 将自定义操作转发到包含的应用。 例如:
// Close Notification
completionHandler (UNNotificationContentExtensionResponseOption.DismissAndForwardAction);
在自定义 UI 中使用文本输入操作
根据应用和通知的设计,有时可能需要用户将文本输入到通知中(例如回复消息)。 通知内容扩展可以像标准通知一样访问内置文本输入操作。
例如:
using System;
using Foundation;
using UIKit;
using UserNotifications;
using UserNotificationsUI;

namespace MonkeyChatNotifyExtension
{
    public partial class NotificationViewController : UIViewController, IUNNotificationContentExtension
    {
        #region Computed Properties
        // Allow to take input
        public override bool CanBecomeFirstResponder {
            get { return true; }
        }

        // Return the custom created text input view with the
        // required buttons and return here
        public override UIView InputAccessoryView {
            get { return InputView; }
        }
        #endregion

        #region Constructors
        protected NotificationViewController (IntPtr handle) : base (handle)
        {
            // Note: this .ctor should not contain any initialization logic.
        }
        #endregion

        #region Override Methods
        public override void ViewDidLoad ()
        {
            base.ViewDidLoad ();

            // Do any required interface initialization here.
        }
        #endregion

        #region Private Methods
        private UNNotificationCategory MakeExtensionCategory ()
        {

            // Create Accept Action
            ...

            // Create decline Action
            ...

            // Create Text Input Action
            var commentID = "comment";
            var commentTitle = "Comment";
            var textInputButtonTitle = "Send";
            var textInputPlaceholder = "Enter comment here...";
            var commentAction = UNTextInputNotificationAction.FromIdentifier (commentID, commentTitle, UNNotificationActionOptions.None, textInputButtonTitle, textInputPlaceholder);

            // Create category
            var categoryID = "event-invite";
            var actions = new UNNotificationAction [] { acceptAction, declineAction, commentAction };
            var intentIDs = new string [] { };
            var category = UNNotificationCategory.FromIdentifier (categoryID, actions, intentIDs, UNNotificationCategoryOptions.None);

            // Return new category
            return category;

        }
        #endregion

        #region Public Methods
        [Export ("didReceiveNotification:")]
        public void DidReceiveNotification (UNNotification notification)
        {
            label.Text = notification.Request.Content.Body;

            // Grab content
            var content = notification.Request.Content;

            // Display content in the UILabels
            EventTitle.Text = content.Title;
            EventDate.Text = content.Subtitle;
            EventMessage.Text = content.Body;

            // Get location and display
            var location = content.UserInfo ["location"].ToString ();
            if (location != null) {
                Event.Location.Text = location;
            }

            // Get Media Attachment
            if (content.Attachements.Length > 1) {
                var attachment = content.Attachments [0];
                if (attachment.Url.StartAccessingSecurityScopedResource ()) {
                    EventImage.Image = UIImage.FromFile (attachment.Url.Path);
                    attachment.Url.StopAccessingSecurityScopedResource ();
                }
            }
        }

        [Export ("didReceiveNotificationResponse:completionHandler:")]
        public void DidReceiveNotification (UNNotificationResponse response, Action<UNNotificationContentExtensionResponseOption> completionHandler)
        {

            // Is text input?
            if (response is UNTextInputNotificationResponse) {
                var textResponse = response as UNTextInputNotificationResponse;
                Server.Send (textResponse.UserText, () => {
                    // Close Notification
                    completionHandler (UNNotificationContentExtensionResponseOption.Dismiss);
                });
            }

            // Update UI when the user interacts with the
            // Notification
            Server.PostEventResponse += (response) {
                // Take action based on the response
                switch (response.ActionIdentifier) {
                case "accept":
                    EventResponse.Text = "Going!";
                    EventResponse.TextColor = UIColor.Green;
                    break;
                case "decline":
                    EventResponse.Text = "Not Going.";
                    EventResponse.TextColor = UIColor.Red;
                    break;
                }

                // Close Notification
                completionHandler (UNNotificationContentExtensionResponseOption.Dismiss);
            };
        }
        #endregion
    }
}
此代码将创建新的文本输入操作,并将其添加到扩展的类别(MakeExtensionCategory 中)方法中。 在 DidReceive 替代方法中,它会处理用户使用以下代码输入的文本:
// Is text input?
if (response is UNTextInputNotificationResponse) {
    var textResponse = response as UNTextInputNotificationResponse;
    Server.Send (textResponse.UserText, () => {
        // Close Notification
        completionHandler (UNNotificationContentExtensionResponseOption.Dismiss);
    });
}
如果设计要求将自定义按钮添加到文本输入字段,请添加以下代码以包含它们:
// Allow to take input
public override bool CanBecomeFirstResponder {
    get {return true;}
}

// Return the custom created text input view with the
// required buttons and return here
public override UIView InputAccessoryView {
    get {return InputView;}
}
当用户触发注释操作时,需要激活视图控制器和自定义文本输入字段:
// Update UI when the user interacts with the
// Notification
Server.PostEventResponse += (response) {
    // Take action based on the response
    switch(response.ActionIdentifier){
    ...
    case "comment":
        BecomeFirstResponder();
        TextField.BecomeFirstResponder();
        break;
    }

    // Close Notification
    completionHandler (UNNotificationContentExtensionResponseOption.Dismiss);

};
总结
本文已深入探讨如何在 Xamarin.iOS 应用中使用新的用户通知框架。 其中介绍了如何将媒体附件添加到本地通知和远程通知,还介绍了如何使用新的用户通知 UI 创建自定义通知 UI。