Using Wildcards with the Windows Service Template
The Windows Service template in the Operations Console lets you discover and monitor a Windows service by doing little more than typing in the service name. I was just talking with someone who had a situation where the name of the service includes the local computer name meaning that it's different on every computer. It's the same service and should be monitored as such - just a slightly different name on each agent. Unfortunately, the template won't allow us to provide a wildcard in the service name.
For those who are skilled with management pack authoring, you're probably not relying on the template anyway, and this wouldn't be too difficult of a task. As such, I'm going to write this post from the point of view of someone who primarily lives within the Operations Console. We do have to get exposed to a bit of XML in order to pull this off, but it really should be minimal.
First, let's understand what the Windows Service template does. It performs two functions: 1) creates a new class (aka target) for your service and 2) creates a discovery to find instances of that new class. The new class that the template created should be fine as is. We can provide the template with any name we want, and it doesn't have to have anything to do with the name of the service itself. The discovery is what we need to think about.
The discovery that the template uses is a special one specifically designed for finding a service, and it doesn't allow wildcards. We can replace that discovery with a WMI discovery module since we can pretty easily write a WMI query to find all services that match a certain criteria, and that criteria can include a wildcard. There is a module called WmiProviderWithClassSnapshotDataMapper in the Windows Library management pack that will work perfectly.
Let's go through this step by step. I have a virtual machine running under the beta of Hyper-V in Windows Server 2008. That includes a few services that start with the three letters "vmi". I know this is a bit of a difference scenario than I described above, but it will still illustrate the point of discovering services using a wildcard.
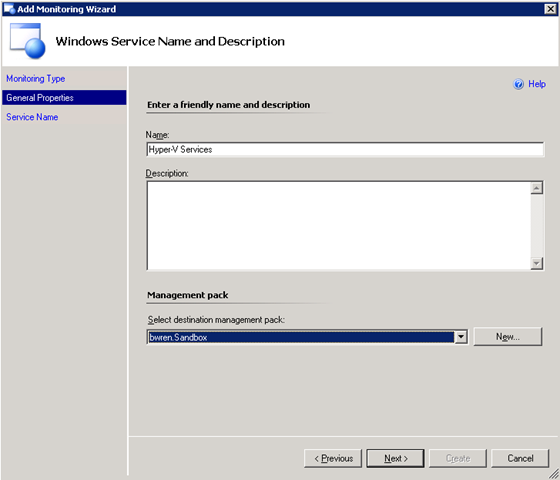
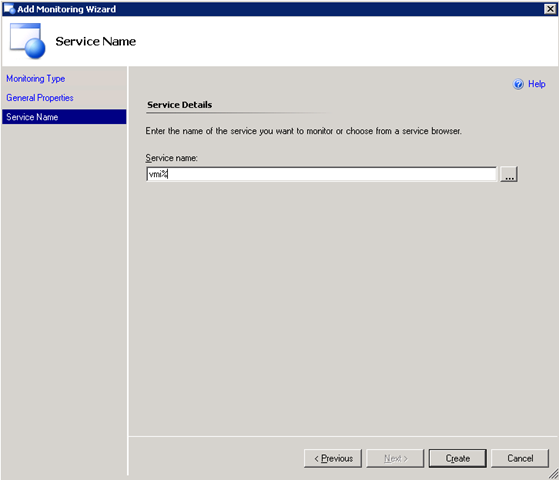
1. Walk through the Windows Template wizard as normal providing your wildcard string. Note that we are going to pass this off to WMI which uses % as a wildcard character, not *.
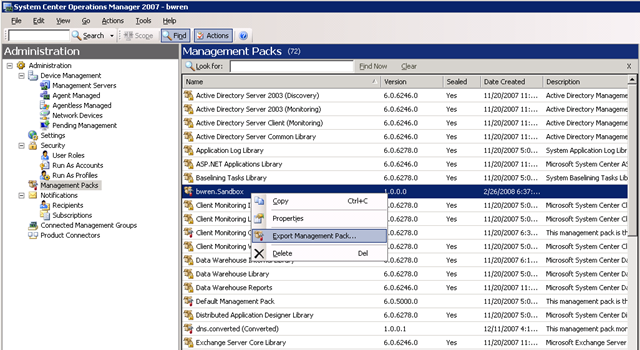
2. Export the management pack you just used for the template.
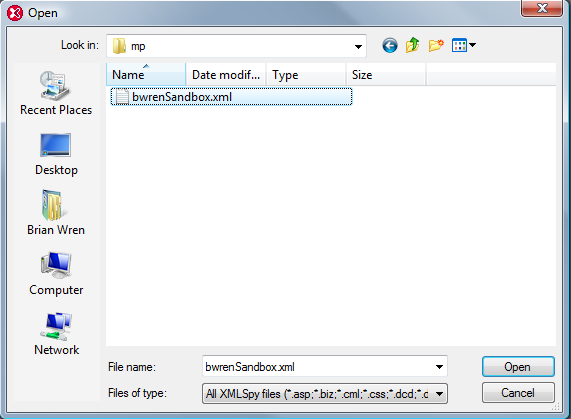
3. Open the XML file you just exported. Use an XML editor if you have one. Otherwise, you could use Notepad.
4. You have to locate the discovery you just created which can be a little tricky since the names generated by the Operations Console are pretty long and ugly. Probably the easiest method would be to search on the wildcard string you typed in.

5. The Discovery will look something like mine which I pasted below. The long ID strings will be different in yours, but the rest should be pretty similar. There's a lot going on here, but we're not going to have to worry about most of it. I highlighted in blue the parts that we're going to need to change, and that shouldn't be too intimidating.
<Discovery ID="ServiceStateProbePage_eaa08473602945a592b2a117b62c634f.DiscoveryRule" Enabled="true" Target="Windows!Microsoft.Windows.Computer" ConfirmDelivery="false" Remotable="true" Priority="Normal">
<Category>Discovery</Category>
<DiscoveryTypes>
<DiscoveryClass TypeID="ServiceStateProbePage_eaa08473602945a592b2a117b62c634f" />
</DiscoveryTypes>
<DataSource ID="DS" TypeID="Windows!Microsoft.Windows.Win32ServiceInformationProviderWithClassSnapshotDataMapper">
<ComputerName>$Target/Property[Type="Windows!Microsoft.Windows.Computer"]/NetworkName$</ComputerName>
<ServiceName>vmi%</ServiceName>
<Frequency>60</Frequency>
<ClassId>$MPElement[Name="ServiceStateProbePage_eaa08473602945a592b2a117b62c634f"]$</ClassId>
<InstanceSettings>
<Settings>
<Setting>
<Name>$MPElement[Name="Windows!Microsoft.Windows.Computer"]/PrincipalName$</Name>
<Value>$Target/Property[Type="Windows!Microsoft.Windows.Computer"]/PrincipalName$</Value>
</Setting>
<Setting>
<Name>$MPElement[Name="MicrosoftSystemCenterNTServiceLibrary!Microsoft.SystemCenter.NTService"]/ServiceName$</Name>
<Value>$Data/Property[@Name='Name']$</Value>
</Setting>
<Setting>
<Name>$MPElement[Name="MicrosoftSystemCenterNTServiceLibrary!Microsoft.SystemCenter.NTService"]/ServiceProcessName$</Name>
<Value>$Data/Property[@Name='BinaryPathName']$</Value>
</Setting>
<Setting>
<Name>$MPElement[Name="MicrosoftSystemCenterNTServiceLibrary!Microsoft.SystemCenter.NTService"]/DisplayName$</Name>
<Value>$Data/Property[@Name='DisplayName']$</Value>
</Setting>
<Setting>
<Name>$MPElement[Name="MicrosoftSystemCenterNTServiceLibrary!Microsoft.SystemCenter.NTService"]/Description$</Name>
<Value>$Data/Property[@Name='Description']$</Value>
</Setting>
<Setting>
<Name>$MPElement[Name="System!System.Entity"]/DisplayName$</Name>
<Value>Hyper-V Services</Value>
</Setting>
</Settings>
</InstanceSettings>
</DataSource>
</Discovery>
6. Modify the discovery to use the WMI discovery module. I highlighted in red the modifications you want to make. You could just copy and paste right from this pots into your management pack. Obviously, in that query, you're going to use your wildcard string as opposed to the vmi% that I used. All we're doing is changing out the module we're using as the data source for the discovery. Then we're replacing the parameters that we were passing to the old module to the parameters expected by the new one.
<Discovery ID="ServiceStateProbePage_eaa08473602945a592b2a117b62c634f.DiscoveryRule" Enabled="true" Target="Windows!Microsoft.Windows.Computer" ConfirmDelivery="false" Remotable="true" Priority="Normal">
<Category>Discovery</Category>
<DiscoveryTypes>
<DiscoveryClass TypeID="ServiceStateProbePage_eaa08473602945a592b2a117b62c634f" />
</DiscoveryTypes>
<DataSource ID="DS" TypeID="Windows!Microsoft.Windows.WmiProviderWithClassSnapshotDataMapper">
<NameSpace>root\cimv2</NameSpace>
<Query>select * from win32_service where name like 'vmi%'</Query>
<Frequency>60</Frequency>
<ClassId>$MPElement[Name="ServiceStateProbePage_eaa08473602945a592b2a117b62c634f"]$</ClassId>
<InstanceSettings>
<Settings>
<Setting>
<Name>$MPElement[Name="Windows!Microsoft.Windows.Computer"]/PrincipalName$</Name>
<Value>$Target/Property[Type="Windows!Microsoft.Windows.Computer"]/PrincipalName$</Value>
</Setting>
<Setting>
<Name>$MPElement[Name="MicrosoftSystemCenterNTServiceLibrary!Microsoft.SystemCenter.NTService"]/ServiceName$</Name>
<Value>$Data/Property[@Name='Name']$</Value>
</Setting>
<Setting>
<Name>$MPElement[Name="MicrosoftSystemCenterNTServiceLibrary!Microsoft.SystemCenter.NTService"]/ServiceProcessName$</Name>
<Value>$Data/Property[@Name='PathName']$</Value>
</Setting>
<Setting>
<Name>$MPElement[Name="MicrosoftSystemCenterNTServiceLibrary!Microsoft.SystemCenter.NTService"]/DisplayName$</Name>
<Value>$Data/Property[@Name='DisplayName']$</Value>
</Setting>
<Setting>
<Name>$MPElement[Name="MicrosoftSystemCenterNTServiceLibrary!Microsoft.SystemCenter.NTService"]/Description$</Name>
<Value>$Data/Property[@Name='Description']$</Value>
</Setting>
<Setting>
<Name>$MPElement[Name="System!System.Entity"]/DisplayName$</Name>
<Value>Hyper-V Services</Value>
</Setting>
</Settings>
</InstanceSettings>
</DataSource>
</Discovery>
7. Import the modified management pack. If you get an error on import, then you made a mistake in the modification. Go back and export the management pack and try again.
8. Go to Discovered Inventory and change the target type to your class. Within a minute or two, you should start to see instances showing up.

Comments
Anonymous
January 01, 2003
I tried modifying your example to monitor all automatic services by changing the service name criteria to "%". It seems to work, but I'm concerned that it may be monitoring things to death. I have 16 managed nodes in my Dev environment and I maxxed out my 15GB OpsMgr DB a couple of weeks after deploying the monitor. I'm not certain it's the cause, but I do suspect it. I have little experience with SCOM management pack authoring, so I was hoping you could comment whether this is a reasonable approach or if I should be trying something else. Thanks, DaveAnonymous
January 01, 2003
The comment has been removedAnonymous
January 01, 2003
Thank you for your post. This is a great post. Is there a way to monitor the service display not the actual service name. I have 15 services with the name display name but different actual service name. Is it possible? Thanks.Anonymous
January 01, 2003
PingBack from http://aceddl.cn/x/using-wildcards-with-the-windows-service-template.jspAnonymous
January 01, 2003
BWren's Management Space : OpsMgr - Using Wildcards with the Windows Service Template http://blogsAnonymous
January 01, 2003
Hi All, I have a problem with web console. with this method I can't watch state health in web console. I have Operator Scom 2007 R2, anyone can help me? Thanks in advanceAnonymous
January 01, 2003
@Mapenzi - Sorry, my web console is fine & displaying no such errors. @Brian - Your query will monitor disabled services as well. This applies to anybody that wants to filter (WHERE) on more than one field. Lookout for the AND and the brackets () SELECT * FROM Win32_Service where (name like 'vmi%') AND (startmode != 'disabled')Anonymous
August 19, 2010
One other issue is that there are problems with this approach in the web console. The web console only shows display name which in this case will be the same for all services (Hyper V services). If you use the webconsole regularly you might want to change: <Setting> <Name>$MPElement[Name="System!System.Entity"]/DisplayName$</Name> <Value>Hyper-V Services</Value> </Setting> To be the actual service name: <Setting> <Name>$MPElement[Name="System!System.Entity"]/DisplayName$</Name> <Value>$Data/Property[@Name='Name']$</Value> </Setting>Anonymous
August 17, 2012
Hi all, When I use this, and I seal the management pack because I want to use the monitoring services in a distributed applications, I'm not able to reimport the sealed management pack (because of the overrides used by scom template ?) Regards,Anonymous
February 13, 2014
With the addition of what Graham Davies said it works like a charm!Anonymous
April 02, 2014
Perfect Post,.. still valid..
My customer is very happy with the created monitors, but he is also interested in the performance counters of those services (CPU and MB), not only the alerting.
Any ideas anyone?Anonymous
September 23, 2014
Worked like a charm!
Only found out I was having issues with editing the Query after it has ran its discovery. That I was unable to perform changes to the Query to filter out object. At this point I had to re-do the steps in order for me to alter the WMI Query. If anyone has a solution please post :-) Since creating a override for all objects it has found is really not an option for the amount of systems that's being monitored through SCOM.
Query at this point:
rootcimv2
select * from win32_service where (NOT name like 'clr_optimization%' AND name != 'ShellHWDetection' AND name != 'sppsvc' AND name != 'RemoteRegistry' AND name != 'gupdate' AND name != 'stisvc' AND name != 'AeLookupSvc' AND name != 'SysmonLog' AND startmode = 'auto')Anonymous
October 06, 2014
This worked like a Charm for me !
I've tried it on SCOM2012 R2. I was able to edit the properties of the Discovery (Authoring>Object Discoveries). This way I don't have to export and import the Management pack every time I need to exclude something.Anonymous
November 10, 2014
@Siva What properties did you edit ? When I went that path I got a Configuration root node with ComputerName as the first node. Not possible to change the TypeID since the DataSource node is not present.Anonymous
November 13, 2014
@Oskar, he is saying that if you go to the Authoring-->Object Discoveries in the console, you can edit the discovery from there instead of exporting the MP to edit it.Anonymous
December 23, 2014
You have to export the MP and edit the XML to switch the discovery to WMI. Once the discovery is altered, import the MP and from then on, you can edit the WMI query directly from the Object Discovery.Anonymous
July 21, 2015
Is anyone else getting duplicated monitors for each service when looking at health explorer of a windows computer > * > windows application health rollup?