DataRepeater Control for Windows Forms
The DataRepeater control is available in the Visual Basic Power Packs.
As Yun Feng introduced in his post, the Visual Basic Power Packs is included in Visual Studio 2008 Service Pack 1 and will also be shipped in Visual Studio 2010.
The DataRepeater control is my favorite component in the Visual Basic Power Packs, which I proudly participated in from start to finish. Recently I monitored the Visual Basic Power Packs forum and I found that customers are saying nice things about the DataRepeater control as well. A lot of good questions have been asked in the forum. For example, how to print all the data in the DataRepeater, how to display unbound data, how to host a data bound ComboBox in the DataRepeater, etc… I feel motivated to write some posts to answer these non-obvious questions.
In this post, I will first present the unique features of the DataRepeater control from my perspective. Then I will show a simple walk through for using a DataRepeater control in a data binding application. At the end, I will list the resources available for reference.
First of all, I would like to point out that the DataRepeater control is a true .Net Windows Forms control. It can be used not only by Visual Basic but also for any other .Net language (e.g. C#). You may be curious why it is under the Visual Basic Power Packs “brand”. The project was initially designed to help VB6 customers migrating to the .Net world with familiar experience and environment. We started the project with the Visual Basic customers in mind as there was already a Data Repeater Control in Visual Basic 6 and unfortunately there was no corresponding control in Visual Studio.Net 2002 to 2008. After we created the control we realized that it would be good for all .NET customers and we decided to make it available to all of Visual Studio.
To differentiate the DataRepeater controls in VB6 and the one now in Visual Studio 2008 SP1, in this article I would call them VB6 DataRepeater and PowerPacks DataRepeater (or simply DataRepeater). The PowerPacks DataRepeater inherits the basic concept of the VB6 DataRepeater control to display repeated data in a scrollable container. Even more, the PowerPacks DataRepeater has significant improvements over the VB6 DataRepeater. The PowerPacks DataRepeater is modern (as I said, it is a .Net control can be used by all languages), more powerful, has more functions, and yet easier to use taking all the advantages of the .Net and Visual Studio Data Access tools and technologies.
For example, in VB6, you need to create an intermediate user control to host the VB6 DataRepeater and set up the data binding there, build it and then include the user control in the host form. With PowerPacks DataRepeater, the intermediate user control is no longer needed! You can now drag and drop the DataRepeater control onto the hosting form directly, and then drag and drop controls on its item template section. You will enjoy a truly WYSIWYG design experience.
Although both DataRepeater controls can host free style controls in the item template section, the PowerPacks DataRepeater allows you to have even more controls on the layout and the appearance of the repeating items. You can use the DrawItem event to customize the color or other appearances as you wish. The LayoutStyle property lets you specify orientation (vertical or horizontal) of the displayed items. The orientation feature is really attractive and I have seen some customers choose the DataRepeater over the DataGridView simply because the DataRepeter can show data in horizontal orientation.
Talking about the DataGridView, the PowerPacks DataRepeater control can be seen as an alternative control to the DataGridView. The PowerPacks DataRepeater follows the design of the DataGridView and you can find many properties (e.g. the Virtual Mode property) in DataRepeater control in parity with the DataGridView. This description from MSDN document best describes the role of the PowerPacks DataRepeater -- “It can be used as an alternative to the DataGridView control when you need more control over the layout of the data.”
The PowerPacks DataRepeater control applies a virtualization technique to display the data in a fashion that scrolling and navigation is fast while rich UI and visual effects are still retained. For example, all displayed controls on the display surface are real controls and you can interact with them without delay. Scrolling is smoothly simulated while VB6 DataRepeater does not have a scroll effect.
You can further improve performance by turning on the Virtual Mode when you want to display large quantities of tabular data in a PowerPacks DataRepeater control. The Virtual Mode allows you explicitly manage the control’s interaction with its data source. Therefore you can load the data rows only when necessary to reduce the initial loading time. You can also reduce the memory consumption by only loading part of the rows into memory at any given time. Notice that if you already have all data rows loaded into memory like a DataSet filled by the TableAdapter.Fill method, you will not have the performance gain with Virtual Mode.
To demonstrate the ease of use of the PowerPacks DataRepeater control, let me give you a walkthrough for building an application with the DataRepeater control.
First I would create a C# Windows Forms Application in Visual Studio 2008 SP1 or 2010 (yes, I purposely choose a C# project here to show that it is not only for VB, the steps in this demo have no difference between C# and VB).
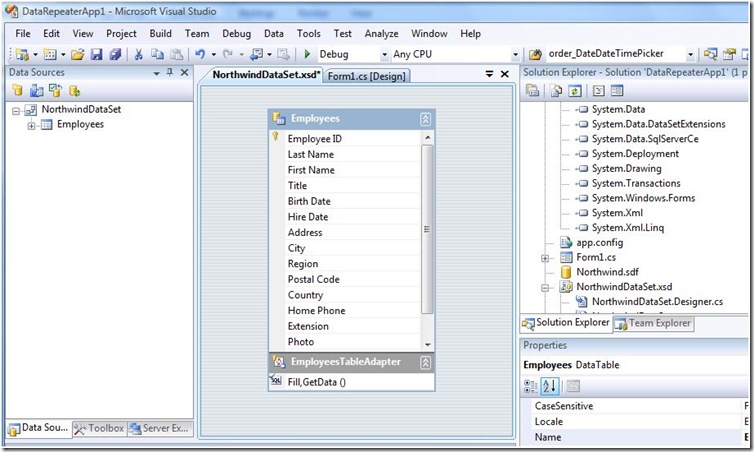
And then I want to create a DataSet data source with the DataSource Configuration Wizard or DataSet Designer. I will assume you are familiar with this part and a DataSet with Employees table connecting to the sample Northwind database is ready to use. You will see that the Data Sources Window on the left hand side is populated with the Employees Datatable (see Picture 1 bellow).
Picture 1 – DataSet designer and Data Sources window.
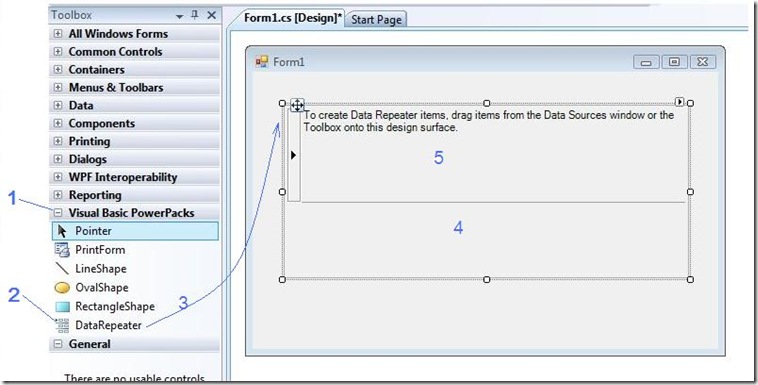
Now, let’s open the Form and show the Toolbox. You can find the Power Packs tab (see picture 2, marker 1, shortened as Pic.2-1), expand it and you will find the DataRepeater toolbox item (Pic.2-2). Drag and drop the DataRepeater toolbox item to the form (Pic. 2-3), you will see two sections in the location of the DataRepeater1 control on the form. The outer section (Pic.2-4) is the total display area of the control and the inner section (Pic.2-5, a.k.s. the Item Template section) holds the repeating items. It also defines the size of the repeating items and the location of the first item. You can fine tune the look and feel of the outer and inner section of the DataRepeater control as you wish.
Picture 2. Drag and Drop DataRepeater to the Form
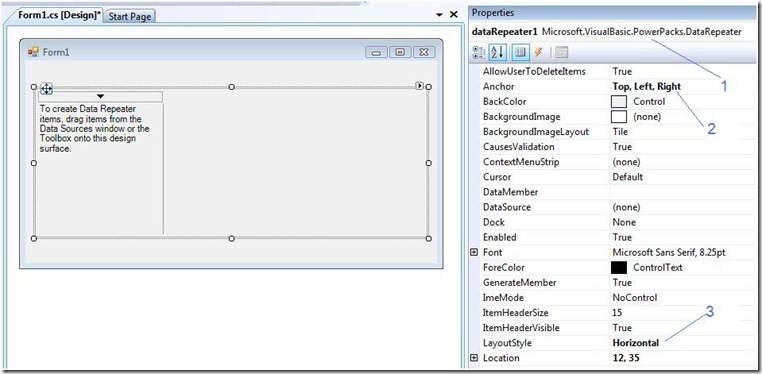
I select my DataRepeater by clicking on the outer section of the DataRepeater, the Property Brower should show as in Pic. 3-1. And I set the anchor as top-left-right (Pic.3-2) and the LayoutStyle as Horizontal (Pic. 3-3).
Picture 3. DataRepeater layout
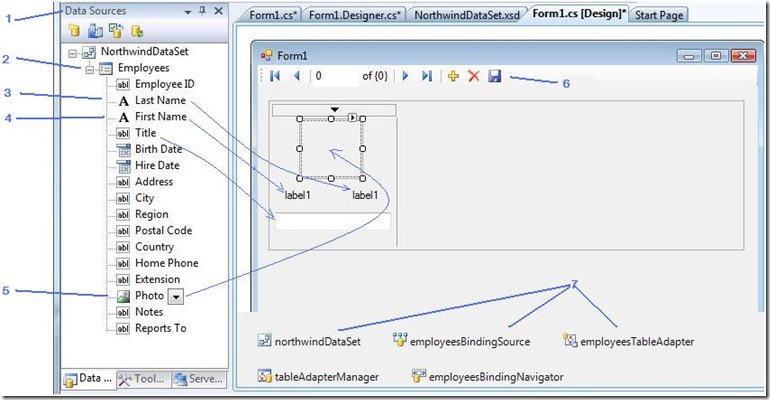
Now, let’s fill the DataRepeater item template section with some data bound controls. I show the Data Sources Window (Pic. 4-1), change the employees table’s view to detail (Pic. 4-2), change the First and Last Name to label (Pic. 4-3), leave the Title as default TextBox (Pic. 4-4), and change the Photo to a PictureBox (Pic. 4-5). I then drag and drop these items to the DataRepeater item template section as indicated in the picture and remove the unnecessary extra labels. Note that it will also cause the auto creation of the navigator bar (Pic. 4-6), Dataset, BindingSource, TableAdapter, etc.(Pic. 4-7). The experience is exactly the same as when you drag and drop detail view items from the Data Sources window to a form or any container control. The difference is now the data bound items in the Item Template section will now be repeated at run time.
Picture 4. Drag and drop detail view items from Data Sources window to the item template section
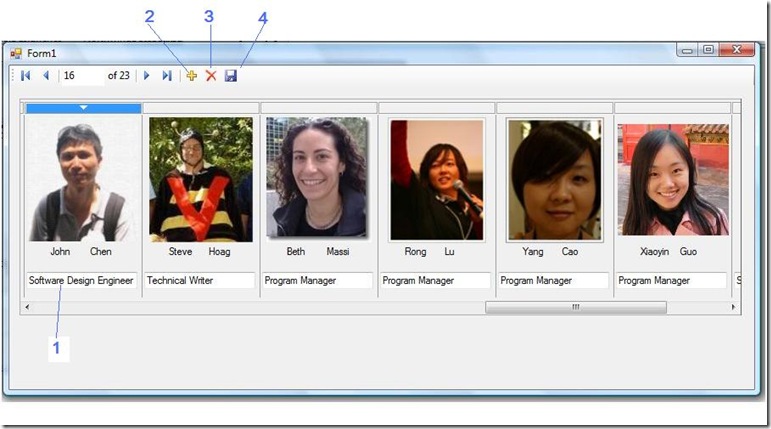
Now I am happy with the setup and eager to see what is out there, I hit F5 to test my app, and I got this result, that is all I need. You can scroll the data by clicking on the scroll bar or the forward and backward button on the navigation bar. You can select an item, and modify the value on any editable control on the item like Title text box (Pic. 5-1). You can add new item (Pic. 5-2), delete an item (Pic. 5-3). And you can save all the changes (Add/Delete/Update) with the save button (Pic. 5-4).
Picture 5. Run time result
To summarize, creating a data binding application can be simply done with these 3 steps: 1) Create the data source; 2) Drag and drop a DataRepeater control to the form and adjust its look and feel; 3) Drag and drop detail view items from Data Sources Window to the item template section of the DataRepeater control.
Lastly, let me wrap up with some more information:
- The sample projects (VB and C# 2008 SP1 version) in this post can be found in MSDN Code Gallery Power Packs Samples
- For a detail instruction of a similar walk through, see MSDN article: How to: Display Bound Data in a DataRepeater Control (Visual Studio)
- For a related video demonstration, see How Do I: Use the DataRepeater Control? presented by Beth Massi.
- For MSDN DataRepeater introduction article: See Introduction to the DataRepeater Control (Visual Studio)
- For DataRepeater class reference: See DataRepeater Class
- For questions and feedback: See Visual Basic Power Packs forum
- For VB6 reference, see Data Repeater Control in Visual Basic 6
- For accessing data technologies in Visual Studio: See VS2010 Beta1 version or VS2008 version
As mentioned above, my colleagues and I will post more articles to answer some advanced or non-obvious How-Tos in the near future. Stay tuned!
----------------------------------------------------------------------------
Follow-up blogs:
- 8/27/09 Gavin Fu: How to Change Appearance of all DataRepeater Items at Run Time
- 9/8/09 John Chen Writing Event Handler for controls in a DataRepeaterItem
Comments
Anonymous
August 12, 2009
John, It's always nice to see posts on WinForms topics, and the data repeater is a really handy control. It would be great if it could be fully built into the framework though. I've been wondering - what is Microsoft's stance on WinForms at the moment? Does the WinForms team still exist? I've heard some rumours that the team is being wound down :-( The way I look at WinForms / WPF at the moment is the same as ASP.NET Forms vs ASP.NET MVC - the newer release isn't replacing the previous one, just complementing it. Is this the same case for WinForms and WPF? -DanAnonymous
August 13, 2009
Hello Dan, Thanks for the comment! WinForms is a great technology for building LOB apps and it interoperates well with complementary technologies like WPF using the ElementHost. There are a number of people from the client and framework teams talking about how to get the most out of both in our technology road map, e.g. BradA in his blog: http://blogs.msdn.com/brada and the WindowsClient site: http://windowsclient.net/getstarted/ -JohnAnonymous
September 08, 2009
Great to see a blog on this fantastic control. Question - any way to change the color the select row?Anonymous
September 08, 2009
Hi Rick, Thanks for the comment! There is a SelectionColor property on DataRepeter allows you to change the color on the row header. If you need to change the background of the row, you can do that in the DataRepeater.DrawItem event handler. Thanks!Anonymous
September 25, 2009
Hi, I tryed to use the DataRepeater in a c# programm. I placed a two radiobuttons on the band and I want to do something win the CheckedChanged-event. But the Checked-state og the button is always false even if it is checked. what can I do. Can someone help me? reagrds from Germany MathiasAnonymous
September 25, 2009
Hi Mathias, Please see my another blog for the answer: http://blogs.msdn.com/vsdata/archive/2009/09/08/writing-event-handler-for-controls-in-a-datarepeateritem.aspx As I have promised to write more about the data repeater, we have already published two follow up posts. I will link them at the end of this blog. Thanks! JohnAnonymous
January 08, 2010
If you whant to highlight the selected row, have a look to the following c# snippet : private void drLignesCommande_DrawItem(object sender, Microsoft.VisualBasic.PowerPacks.DataRepeaterItemEventArgs e) { if (this.drLignesCommande.CurrentItemIndex == e.DataRepeaterItem.ItemIndex) { e.DataRepeaterItem.BackColor = Color.LightBlue; } else { e.DataRepeaterItem.BackColor = Color.LightGray; } }Anonymous
January 08, 2010
The comment has been removedAnonymous
January 08, 2010
Hi Thomas, The drag and drop data experience allows you setup the data binding easily and you can still modify you data query, that return a small set of data. If you want to have the total control of what to display, you can use Virtual Mode, see my new post here: http://blogs.msdn.com/vsdata/archive/2010/01/07/using-the-datarepeater-virtual-mode.aspx Thanks! P.S. you are also welcome to post questions/discussions in our forum http://social.msdn.microsoft.com/Forums/en-US/vbpowerpacks/threadsAnonymous
January 08, 2010
Hi GuinuX, You are right, and I would recommend to use DataRepeater.SelectionColor as below: private void drLignesCommande_DrawItem(object sender, Microsoft.VisualBasic.PowerPacks.DataRepeaterItemEventArgs e) { if (this.drLignesCommande.CurrentItemIndex == e.DataRepeaterItem.ItemIndex) { e.DataRepeaterItem.BackColor = this.drLignesCommande.SelectionColor; } else { e.DataRepeaterItem.BackColor = Color.LightGray; } }Anonymous
June 15, 2010
Have you tried opening this project in VS2010 and letting it convert it? Run it from VS2010 pointing at 10.0.0.0 VB power packs (as automatically handled by the conversion) and the image does not display. There appears to be a problem with data binding to anything more complex than a string/int or whatever. Bug with the 10.0.0.0 version of the VB power pack datarepeater that comes with VS2010?Anonymous
June 20, 2010
Hello Randolph, I've confirmed that what you found was a bug that was introduced in 10.0.0.0 version of the VB power packs. We will fix this bug in the future release of Visual Studio. I apologize for any inconvenience caused.Anonymous
June 22, 2010
The comment has been removedAnonymous
June 24, 2010
Hi, I'm trying to use DataRepeater control in vb.net2008. There is a textbox on the DataRepeater control. A textbox of current row in DataRepeater control has focus, when I press "up key(↑)" or "down key(↓)" on the key board, I want that the focus move to same textbox of previous ( or next ) row in DataRepeater controls. But, when I press these key, the focus leave for a textbox of current row and same textbox of previous/next row doesn't receive focus. To be precise, the focus move to same textbox of previous/next row, but the focus now back to entire current row. Please tell me how to move focus between same controls of DataRepeater control by pressing up/down key. Thanks.Anonymous
July 15, 2010
The comment has been removedAnonymous
December 20, 2010
The comment has been removedAnonymous
January 08, 2011
The comment has been removedAnonymous
January 09, 2011
Hi ibrahim ali, You can't write this: e.DataRepeaterItem.Controls["txtQuestion"].Text = rptrQuestions.DataSource.Columns I bet you will get a compiler erro as DataRepeter.DataSource is of object type. (msdn.microsoft.com/.../microsoft.visualbasic.powerpacks.datarepeater.datasource(VS.90).aspx) It seems you want to show the Question column (probably from a datatable) on the TextBox Why don't you data bind the Question column to the TextBox? On the otherhand, here is some sample code that may work better. (Here I have northwindDataSet.Categories table with Description column) void dataRepeater1_DrawItem(object sender, Microsoft.VisualBasic.PowerPacks.DataRepeaterItemEventArgs e) { int i = e.DataRepeaterItem.ItemIndex; e.DataRepeaterItem.Controls["textBox1"].Text = this.northwindDataSet.Categories.Rows[i]["Description"] as string; } JohnAnonymous
January 09, 2011
The comment has been removedAnonymous
October 13, 2011
hi....i am not able to show image in datarepater control...my image is in database. code of table: create table empInfo ( name varchar(25), address varchar(25), e_image image ) Is it correct way to use datarepeate with database???Anonymous
October 13, 2011
Hi pawan, please refer to my sample: archive.msdn.microsoft.com/.../ProjectReleases.aspxAnonymous
January 08, 2014
Hi, Iam pulling records from a table called person, which has fields like person_picture,person_name,Person_telephone and person_address. Now i want to display all these records using datarepeteater in a way like where in datarepeater it should show only first 4 rows from table person at top and then goes 4 rows down and so on. I mean row= picture,name telephone,address So it should show like this below . row1 row2 row3 row4 row5 rows6 rows7 row8 row9 row10 row11 row12 row13 rows14 rows15 row16 Please suggest urgently how can i achieve this. Iam doing it on windows application. If its not possible by datarepeater, Please suggest some other way. Please help at the earliest
