快速入門:使用 Azure CLI 部署適用於 AKS 的 Azure Linux 容器主機叢集
使用 Azure CLI 為 AKS 叢集部署 Azure Linux 容器主機,以開始使用 Azure Linux 容器主機。 安裝必要條件之後,請建立資源群組、建立 AKS 叢集、連線至叢集,然後在叢集中執行範例多容器應用程式。
必要條件
-
如果您沒有 Azure 訂用帳戶,請在開始之前先建立 Azure 免費帳戶。
在 Azure Cloud Shell 中使用 Bash 環境。 如需詳細資訊,請參閱 Azure Cloud Shell 快速入門 - Bash。

若要在本地執行 CLI 參考命令,請安裝 Azure CLI。 若您在 Windows 或 macOS 上執行,請考慮在 Docker 容器中執行 Azure CLI。 如需詳細資訊,請參閱〈如何在 Docker 容器中執行 Azure CLI〉。
如果您使用的是本機安裝,請使用 az login 命令,透過 Azure CLI 來登入。 請遵循您終端機上顯示的步驟,完成驗證程序。 如需其他登入選項,請參閱使用 Azure CLI 登入。
出現提示時,請在第一次使用時安裝 Azure CLI 延伸模組。 如需擴充功能詳細資訊,請參閱使用 Azure CLI 擴充功能。
執行 az version 以尋找已安裝的版本和相依程式庫。 若要升級至最新版本,請執行 az upgrade。
建立資源群組
Azure 資源群組是部署及管理 Azure 資源所在的邏輯群組。 建立資源群組時,必須指定位置。 此位置為:
- 資源群組中繼資料的儲存位置。
- 如果您未在資源建立時指定另一個區域,則是您會在 Azure 中執行資源的位置。
若要在 eastus 區域中建立名為 testAzureLinuxResourceGroup 的資源群組,請遵循此步驟:
使用 az group create 命令建立資源群組。
az group create --name testAzureLinuxResourceGroup --location eastus
下列輸出類似於已成功建立您的資源群組:
{
  "id": "/subscriptions/<guid>/resourceGroups/testAzureLinuxResourceGroup",
  "location": "eastus",
  "managedBy": null,
  "name": "testAzureLinuxResourceGroup",
  "properties": {
    "provisioningState": "Succeeded"
  },
  "tags": null
}
注意
上述範例使用 eastus,但 Azure Linux 容器主機叢集在所有區域中均可使用。
建立 Azure Linux 容器主機叢集
使用 az aks create 命令搭配 --os-sku 參數建立 AKS 叢集,以使用 Azure Linux 映像佈建 AKS 叢集。 下列範例會建立名為 testAzureLinuxCluster、且包含一個節點的 Azure Linux 叢集:
az aks create --name testAzureLinuxCluster --resource-group testAzureLinuxResourceGroup --os-sku AzureLinux
幾分鐘後,命令會完成並傳回關於叢集的 JSON 格式資訊。
連線至叢集
若要管理 Kubernetes 叢集,請使用 Kubernetes 命令列用戶端 kubectl。
- 使用
az aks get-credentials命令,設定kubectl連線到 Kubernetes 叢集。
az aks get-credentials --resource-group testAzureLinuxResourceGroup --name testAzureLinuxCluster
- 使用 kubectl get nodes 命令來確認與叢集的連線。 命令會傳回 Pod 的清單。
kubectl get pods --all-namespaces
部署應用程式
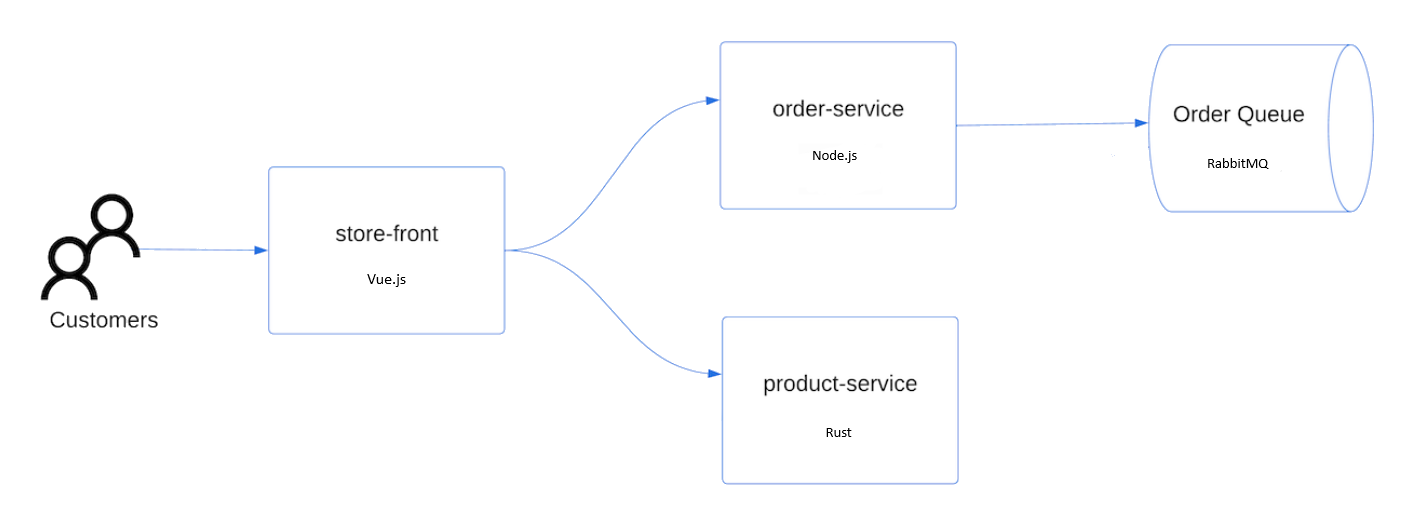
若要部署應用程式,您可以使用資訊清單檔來建立執行 AKS 市集應用程式所需的所有物件。 Kubernetes 資訊清單檔會定義叢集所需的狀態,例如要執行哪些容器映像。 資訊清單包含下列 Kubernetes 部署和服務:
- 市集前端:供客戶檢視產品和下單的 Web 應用程式。
- 產品服務:顯示產品資訊。
- 訂單服務:下單。
- Rabbit MQ:訂單佇列的訊息佇列。
注意
除非是針對生產環境的永續性儲存,否則不建議執行具狀態容器,例如 Rabbit MQ。 這裡使用具狀態容器是為了簡單起見,但我們建議使用受管理的服務,例如 Azure Cosmos DB 或 Azure 服務匯流排。
建立名為
aks-store-quickstart.yaml的檔案,然後將下列資訊清單複製進來:apiVersion: apps/v1 kind: Deployment metadata: name: rabbitmq spec: replicas: 1 selector: matchLabels: app: rabbitmq template: metadata: labels: app: rabbitmq spec: nodeSelector: "kubernetes.io/os": linux containers: - name: rabbitmq image: mcr.microsoft.com/mirror/docker/library/rabbitmq:3.10-management-alpine ports: - containerPort: 5672 name: rabbitmq-amqp - containerPort: 15672 name: rabbitmq-http env: - name: RABBITMQ_DEFAULT_USER value: "username" - name: RABBITMQ_DEFAULT_PASS value: "password" resources: requests: cpu: 10m memory: 128Mi limits: cpu: 250m memory: 256Mi volumeMounts: - name: rabbitmq-enabled-plugins mountPath: /etc/rabbitmq/enabled_plugins subPath: enabled_plugins volumes: - name: rabbitmq-enabled-plugins configMap: name: rabbitmq-enabled-plugins items: - key: rabbitmq_enabled_plugins path: enabled_plugins --- apiVersion: v1 data: rabbitmq_enabled_plugins: | [rabbitmq_management,rabbitmq_prometheus,rabbitmq_amqp1_0]. kind: ConfigMap metadata: name: rabbitmq-enabled-plugins --- apiVersion: v1 kind: Service metadata: name: rabbitmq spec: selector: app: rabbitmq ports: - name: rabbitmq-amqp port: 5672 targetPort: 5672 - name: rabbitmq-http port: 15672 targetPort: 15672 type: ClusterIP --- apiVersion: apps/v1 kind: Deployment metadata: name: order-service spec: replicas: 1 selector: matchLabels: app: order-service template: metadata: labels: app: order-service spec: nodeSelector: "kubernetes.io/os": linux containers: - name: order-service image: ghcr.io/azure-samples/aks-store-demo/order-service:latest ports: - containerPort: 3000 env: - name: ORDER_QUEUE_HOSTNAME value: "rabbitmq" - name: ORDER_QUEUE_PORT value: "5672" - name: ORDER_QUEUE_USERNAME value: "username" - name: ORDER_QUEUE_PASSWORD value: "password" - name: ORDER_QUEUE_NAME value: "orders" - name: FASTIFY_ADDRESS value: "0.0.0.0" resources: requests: cpu: 1m memory: 50Mi limits: cpu: 75m memory: 128Mi initContainers: - name: wait-for-rabbitmq image: busybox command: ['sh', '-c', 'until nc -zv rabbitmq 5672; do echo waiting for rabbitmq; sleep 2; done;'] resources: requests: cpu: 1m memory: 50Mi limits: cpu: 75m memory: 128Mi --- apiVersion: v1 kind: Service metadata: name: order-service spec: type: ClusterIP ports: - name: http port: 3000 targetPort: 3000 selector: app: order-service --- apiVersion: apps/v1 kind: Deployment metadata: name: product-service spec: replicas: 1 selector: matchLabels: app: product-service template: metadata: labels: app: product-service spec: nodeSelector: "kubernetes.io/os": linux containers: - name: product-service image: ghcr.io/azure-samples/aks-store-demo/product-service:latest ports: - containerPort: 3002 resources: requests: cpu: 1m memory: 1Mi limits: cpu: 1m memory: 7Mi --- apiVersion: v1 kind: Service metadata: name: product-service spec: type: ClusterIP ports: - name: http port: 3002 targetPort: 3002 selector: app: product-service --- apiVersion: apps/v1 kind: Deployment metadata: name: store-front spec: replicas: 1 selector: matchLabels: app: store-front template: metadata: labels: app: store-front spec: nodeSelector: "kubernetes.io/os": linux containers: - name: store-front image: ghcr.io/azure-samples/aks-store-demo/store-front:latest ports: - containerPort: 8080 name: store-front env: - name: VUE_APP_ORDER_SERVICE_URL value: "http://order-service:3000/" - name: VUE_APP_PRODUCT_SERVICE_URL value: "http://product-service:3002/" resources: requests: cpu: 1m memory: 200Mi limits: cpu: 1000m memory: 512Mi --- apiVersion: v1 kind: Service metadata: name: store-front spec: ports: - port: 80 targetPort: 8080 selector: app: store-front type: LoadBalancer如果您在本地建立並儲存 YAML 檔案,則可以選取 [上傳/下載檔案] 按鈕,然後從本地文件系統選取檔案,將資訊清單檔上傳至 CloudShell 裡的預設目錄。
使用
kubectl apply命令來部署應用程式,並指定 YAML 資訊清單的名稱。kubectl apply -f aks-store-quickstart.yaml
測試應用程式
您可以造訪公用 IP 位址或應用程式 URL 來驗證應用程式是否正在執行。
使用下列命令取得應用程式 URL:
runtime="5 minutes"
endtime=$(date -ud "$runtime" +%s)
while [[ $(date -u +%s) -le $endtime ]]
do
   STATUS=$(kubectl get pods -l app=store-front -o 'jsonpath={..status.conditions[?(@.type=="Ready")].status}')
   echo $STATUS
   if [ "$STATUS" == 'True' ]
   then
      export IP_ADDRESS=$(kubectl get service store-front --output 'jsonpath={..status.loadBalancer.ingress[0].ip}')
      echo "Service IP Address: $IP_ADDRESS"
      break
   else
      sleep 10
   fi
done
curl $IP_ADDRESS
結果:
<!doctype html>
<html lang="">
   <head>
      <meta charset="utf-8">
      <meta http-equiv="X-UA-Compatible" content="IE=edge">
      <meta name="viewport" content="width=device-width,initial-scale=1">
      <link rel="icon" href="/favicon.ico">
      <title>store-front</title>
      <script defer="defer" src="/js/chunk-vendors.df69ae47.js"></script>
      <script defer="defer" src="/js/app.7e8cfbb2.js"></script>
      <link href="/css/app.a5dc49f6.css" rel="stylesheet">
   </head>
   <body>
      <div id="app"></div>
   </body>
</html>
echo "You can now visit your web server at $IP_ADDRESS"
選取叢集
如果您不打算繼續執行下列教學課程,為避免 Azure 費用,請清除任何不必要的資源。 使用 az group delete 命令,以移除資源群組和所有相關資源。
az group delete --name testAzureLinuxCluster --yes --no-wait
下一步
在本快速入門中,您已部署 Azure Linux 容器主機叢集。 若要深入了解 Azure Linux 容器主機,並逐步了解完整的叢集部署和管理範例,請繼續進行 Azure Linux 容器主機教學課程。
