快速入門:將您的通話應用程式加入 Teams 通話佇列
在本快速入門中,您將瞭解如何從 Azure 通訊服務 使用者到 Teams 通話佇列開始通話。 您將使用下列步驟來達成此目的:
- 使用 Teams 租用戶啟用 Azure 通訊服務資源的同盟。
- 透過 Teams 系統管理中心選取或建立 Teams 通話佇列。
- 透過 Teams 系統管理中心取得通話佇列的電子郵件地址。
- 透過圖形 API 取得通話佇列的物件識別碼。
- 使用 Azure 通訊服務通話 SDK 啟動通話。
如果您想要直接跳到結尾,您可以在 GitHub 上下載本快速入門作為範例。
在您的 Teams 租用戶中啟用互通性
具有 Teams 系統管理員角色 的 Microsoft Entra 使用者可以使用 MicrosoftTeams 模組執行 PowerShell Cmdlet,以啟用租用戶中的通訊服務資源。
1.準備 Microsoft Teams 模組
首先,開啟 PowerShell,並使用下列命令驗證 Teams 模組是否存在:
Get-module *teams*
如果您沒有看到 MicrosoftTeams 模組,請先加以安裝。 若要安裝模組,您必須以系統管理員身分執行 PowerShell。 然後執行下列命令:
Install-Module -Name MicrosoftTeams
系統會通知您將要安裝的模組,您可以用 Y 或 A 答案進行確認。 如果模組已安裝但已過期,您可以執行下列命令來更新模組:
Update-Module MicrosoftTeams
2.連線至 Microsoft Teams 模組
安裝模組並就緒時,您可以使用下列命令連線到 MicrosftTeams 模組。 系統將透過一個互動式視窗提示您登入。 您將使用的使用者帳戶必須具有 Teams 系統管理員權限。 否則,您可能會在下一個步驟中取得 access denied 回應。
Connect-MicrosoftTeams
3.刪除租用戶設定
與通訊服務資源的互通性是透過租用戶設定和指派的原則來控制。 Teams 租用戶具有單一租用戶設定,且 Teams 使用者已指派全域原則或自訂原則。 如需詳細資訊,請參閱 在 Teams 中指派原則。
成功登入之後,您可以執行 Cmdlet Set-CsTeamsAcsFederationConfiguration 以在您的租用戶中啟用通訊服務資源。 以通訊資源中的不可變資源識別碼取代文字 IMMUTABLE_RESOURCE_ID。 您可以在 這裡 找到如何取得此資訊的詳細資訊。
$allowlist = @('IMMUTABLE_RESOURCE_ID')
Set-CsTeamsAcsFederationConfiguration -EnableAcsUsers $True -AllowedAcsResources $allowlist
4.啟用租用戶原則
每個 Teams 使用者已指派 External Access Policy,以判斷通訊服務使用者是否可以呼叫此 Teams 使用者。 使用 Cmdlet Set-CsExternalAccessPolicy 以確保指派給 Teams 使用者的原則已將 EnableAcsFederationAccess 設定為 $true
Set-CsExternalAccessPolicy -Identity Global -EnableAcsFederationAccess $true
建立或選取 Teams 通話佇列
Teams 通話佇列是 Microsoft Teams 中的一項功能,可有效地在指定的使用者或客服人員群組之間分配來電。 這對於客戶支援或客服中心案例很有用。 通話會放在佇列中,並根據預先決定的路由方法指派給下一個可用的客服人員。 客服人員會收到通知,而且可使用 Teams 的通話控制來處理通話。 此功能提供效能追蹤的報告和分析。 其可簡化通話處理、確保一致的客戶體驗,並將客服人員生產力最佳化。 您可以透過 Teams 系統管理中心選取現有或建立新的通話佇列。
在這裡深入了解如何使用 Teams 系統管理中心建立通話佇列。
尋找通話佇列的物件識別碼
建立通話佇列之後,我們需要尋找相互關聯的物件識別碼,以供稍後呼叫使用。 物件識別碼會連線到連結至通話佇列的資源帳戶 - 在 Teams 管理員中開啟 [資源帳戶] 索引標籤並尋找電子郵件。
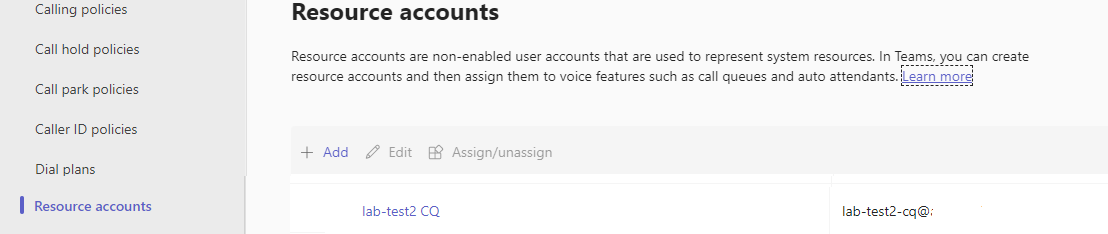 在搜尋中使用此電子郵件 Microsoft Graph 總管中找到資源帳戶的所有必要資訊。
https://graph.microsoft.com/v1.0/users/lab-test2-cq-@contoso.com
在結果中,我們可以找到 [識別碼] 欄位
    "userPrincipalName": "lab-test2-cq@contoso.com",
    "id": "31a011c2-2672-4dd0-b6f9-9334ef4999db"
必要條件
設定
建立新的 Node.js 應用程式
開啟您的終端機或命令視窗,為您的應用程式建立新的目錄,並瀏覽至該目錄。
mkdir calling-quickstart && cd calling-quickstart
Install the package
使用 npm install 命令,以安裝適用於 JavaScript 的 Azure 通訊服務通話 SDK。
重要
本快速入門會使用 Azure 通訊服務通話 SDK 版本 next。
npm install @azure/communication-common@next --save
npm install @azure/communication-calling@next --save
設定應用程式架構
本快速入門會使用 webpack 來組合應用程式資產。 執行下列命令以安裝 webpack、webpack-cli 和 webpack-dev-server npm 套件,並將其列為 package.json 中的開發相依性:
npm install copy-webpack-plugin@^11.0.0 webpack@^5.88.2 webpack-cli@^5.1.4 webpack-dev-server@^4.15.1 --save-dev
在專案的根目錄中建立 index.html 檔案。 我們將使用此檔案來設定基本配置,讓使用者能夠撥打 1 對 1 視訊通話。
程式碼如下:
<!-- index.html -->
<!DOCTYPE html>
<html>
    <head>
        <title>Azure Communication Services - Calling Web SDK</title>
    </head>
    <body>
        <h4>Azure Communication Services - Calling Web SDK</h4>
        <input id="user-access-token"
            type="text"
            placeholder="User access token"
            style="margin-bottom:1em; width: 500px;"/>
        <button id="initialize-teams-call-agent" type="button">Initialize Call Agent</button>
        <br>
        <br>
        <input id="application-object-id"
            type="text"
            placeholder="Enter callee's Teams user identity in format: 'APP_GUID'"
            style="margin-bottom:1em; width: 500px; display: block;"/>
        <button id="start-call-button" type="button" disabled="true">Start Call</button>
        <button id="hangup-call-button" type="button" disabled="true">Hang up Call</button>
        <button id="accept-call-button" type="button" disabled="true">Accept Call</button>
        <button id="start-video-button" type="button" disabled="true">Start Video</button>
        <button id="stop-video-button" type="button" disabled="true">Stop Video</button>
        <br>
        <br>
        <div id="connectedLabel" style="color: #13bb13;" hidden>Call is connected!</div>
        <br>
        <div id="remoteVideoContainer" style="width: 40%;" hidden>Remote participants' video streams:</div>
        <br>
        <div id="localVideoContainer" style="width: 30%;" hidden>Local video stream:</div>
        <!-- points to the bundle generated from client.js -->
        <script src="./main.js"></script>
    </body>
</html>
Azure 通訊服務呼叫 Web SDK 物件模型
下列類別和介面會處理 Azure 通訊服務通話 SDK 的一些主要功能:
| 名稱 | 描述 |
|---|---|
CallClient |
通話 SDK 的主要進入點。 |
CallAgent |
用來啟動和管理通話。 |
DeviceManager |
用來管理媒體裝置。 |
Call |
用於表示通話。 |
LocalVideoStream |
用於在本機系統上建立相機裝置的本機視訊串流。 |
RemoteParticipant |
用於代表通話中的遠程參與者。 |
RemoteVideoStream |
用於表示來自遠端參與者的遠端視訊串流。 |
在專案的根目錄中建立名為 client.js 的檔案,以包含本快速入門的應用程式邏輯。 將下列程式碼新增至 client.js:
// Make sure to install the necessary dependencies
const { CallClient, VideoStreamRenderer, LocalVideoStream } = require('@azure/communication-calling');
const { AzureCommunicationTokenCredential } = require('@azure/communication-common');
const { AzureLogger, setLogLevel } = require("@azure/logger");
// Set the log level and output
setLogLevel('verbose');
AzureLogger.log = (...args) => {
    console.log(...args);
};
// Calling web sdk objects
let callAgent;
let deviceManager;
let call;
let incomingCall;
let localVideoStream;
let localVideoStreamRenderer;
// UI widgets
let userAccessToken = document.getElementById('user-access-token');
let callQueueId = document.getElementById('application-object-id');
let initializeCallAgentButton = document.getElementById('initialize-teams-call-agent');
let startCallButton = document.getElementById('start-call-button');
let hangUpCallButton = document.getElementById('hangup-call-button');
let acceptCallButton = document.getElementById('accept-call-button');
let startVideoButton = document.getElementById('start-video-button');
let stopVideoButton = document.getElementById('stop-video-button');
let connectedLabel = document.getElementById('connectedLabel');
let remoteVideoContainer = document.getElementById('remoteVideoContainer');
let localVideoContainer = document.getElementById('localVideoContainer');
/**
 * Create an instance of CallClient. Initialize a CallAgent instance with a AzureCommunicationTokenCredential via created CallClient. CallAgent enables us to make outgoing calls and receive incoming calls.
 * You can then use the CallClient.getDeviceManager() API instance to get the DeviceManager.
 */
initializeCallAgentButton.onclick = async () => {
    try {
        const callClient = new CallClient();
        tokenCredential = new AzureCommunicationTokenCredential(userAccessToken.value.trim());
        callAgent = await callClient.createCallAgent(tokenCredential)
        // Set up a camera device to use.
        deviceManager = await callClient.getDeviceManager();
        await deviceManager.askDevicePermission({ video: true });
        await deviceManager.askDevicePermission({ audio: true });
        // Listen for an incoming call to accept.
        callAgent.on('incomingCall', async (args) => {
            try {
                incomingCall = args.incomingCall;
                acceptCallButton.disabled = false;
                startCallButton.disabled = true;
            } catch (error) {
                console.error(error);
            }
        });
        startCallButton.disabled = false;
        initializeCallAgentButton.disabled = true;
    } catch(error) {
        console.error(error);
    }
}
/**
 * Place a 1:1 outgoing video call to a Teams Call Queue
 * Add an event listener to initiate a call when the `startCallButton` is selected.
 * Enumerate local cameras using the deviceManager `getCameraList` API.
 * In this quickstart, we're using the first camera in the collection. Once the desired camera is selected, a
 * LocalVideoStream instance will be constructed and passed within `videoOptions` as an item within the
 * localVideoStream array to the call method. When the call connects, your application will be sending a video stream to the other participant.
 */
startCallButton.onclick = async () => {
    try {
        const localVideoStream = await createLocalVideoStream();
        const videoOptions = localVideoStream ? { localVideoStreams: [localVideoStream] } : undefined;
        call = callAgent.startCall([{ teamsAppId: callQueueId.value.trim(), cloud:"public" }], { videoOptions: videoOptions });
        // Subscribe to the call's properties and events.
        subscribeToCall(call);
    } catch (error) {
        console.error(error);
    }
}
/**
 * Accepting an incoming call with a video
 * Add an event listener to accept a call when the `acceptCallButton` is selected.
 * You can accept incoming calls after subscribing to the `CallAgent.on('incomingCall')` event.
 * You can pass the local video stream to accept the call with the following code.
 */
acceptCallButton.onclick = async () => {
    try {
        const localVideoStream = await createLocalVideoStream();
        const videoOptions = localVideoStream ? { localVideoStreams: [localVideoStream] } : undefined;
        call = await incomingCall.accept({ videoOptions });
        // Subscribe to the call's properties and events.
        subscribeToCall(call);
    } catch (error) {
        console.error(error);
    }
}
// Subscribe to a call obj.
// Listen for property changes and collection udpates.
subscribeToCall = (call) => {
    try {
        // Inspect the initial call.id value.
        console.log(`Call Id: ${call.id}`);
        //Subsribe to call's 'idChanged' event for value changes.
        call.on('idChanged', () => {
            console.log(`Call ID changed: ${call.id}`);
        });
        // Inspect the initial call.state value.
        console.log(`Call state: ${call.state}`);
        // Subscribe to call's 'stateChanged' event for value changes.
        call.on('stateChanged', async () => {
            console.log(`Call state changed: ${call.state}`);
            if(call.state === 'Connected') {
                connectedLabel.hidden = false;
                acceptCallButton.disabled = true;
                startCallButton.disabled = true;
                hangUpCallButton.disabled = false;
                startVideoButton.disabled = false;
                stopVideoButton.disabled = false;
            } else if (call.state === 'Disconnected') {
                connectedLabel.hidden = true;
                startCallButton.disabled = false;
                hangUpCallButton.disabled = true;
                startVideoButton.disabled = true;
                stopVideoButton.disabled = true;
                console.log(`Call ended, call end reason={code=${call.callEndReason.code}, subCode=${call.callEndReason.subCode}}`);
            }
        });
        call.localVideoStreams.forEach(async (lvs) => {
            localVideoStream = lvs;
            await displayLocalVideoStream();
        });
        call.on('localVideoStreamsUpdated', e => {
            e.added.forEach(async (lvs) => {
                localVideoStream = lvs;
                await displayLocalVideoStream();
            });
            e.removed.forEach(lvs => {
               removeLocalVideoStream();
            });
        });

        call.on('isLocalVideoStartedChanged', () => {
            console.log(`isLocalVideoStarted changed: ${call.isLocalVideoStarted}`);
        });
        console.log(`isLocalVideoStarted: ${call.isLocalVideoStarted}`);
        // Inspect the call's current remote participants and subscribe to them.
        call.remoteParticipants.forEach(remoteParticipant => {
            subscribeToRemoteParticipant(remoteParticipant);
        });
        // Subscribe to the call's 'remoteParticipantsUpdated' event to be
        // notified when new participants are added to the call or removed from the call.
        call.on('remoteParticipantsUpdated', e => {
            // Subscribe to new remote participants that are added to the call.
            e.added.forEach(remoteParticipant => {
                subscribeToRemoteParticipant(remoteParticipant)
            });
            // Unsubscribe from participants that are removed from the call
            e.removed.forEach(remoteParticipant => {
                console.log('Remote participant removed from the call.');
            });
        });
    } catch (error) {
        console.error(error);
    }
}
// Subscribe to a remote participant obj.
// Listen for property changes and collection udpates.
subscribeToRemoteParticipant = (remoteParticipant) => {
    try {
        // Inspect the initial remoteParticipant.state value.
        console.log(`Remote participant state: ${remoteParticipant.state}`);
        // Subscribe to remoteParticipant's 'stateChanged' event for value changes.
        remoteParticipant.on('stateChanged', () => {
            console.log(`Remote participant state changed: ${remoteParticipant.state}`);
        });
        // Inspect the remoteParticipants's current videoStreams and subscribe to them.
        remoteParticipant.videoStreams.forEach(remoteVideoStream => {
            subscribeToRemoteVideoStream(remoteVideoStream)
        });
        // Subscribe to the remoteParticipant's 'videoStreamsUpdated' event to be
        // notified when the remoteParticiapant adds new videoStreams and removes video streams.
        remoteParticipant.on('videoStreamsUpdated', e => {
            // Subscribe to newly added remote participant's video streams.
            e.added.forEach(remoteVideoStream => {
                subscribeToRemoteVideoStream(remoteVideoStream)
            });
            // Unsubscribe from newly removed remote participants' video streams.
            e.removed.forEach(remoteVideoStream => {
                console.log('Remote participant video stream was removed.');
            })
        });
    } catch (error) {
        console.error(error);
    }
}
/**
 * Subscribe to a remote participant's remote video stream obj.
 * You have to subscribe to the 'isAvailableChanged' event to render the remoteVideoStream. If the 'isAvailable' property
 * changes to 'true' a remote participant is sending a stream. Whenever the availability of a remote stream changes
 * you can choose to destroy the whole 'Renderer' a specific 'RendererView' or keep them. Displaying RendererView without a video stream will result in a blank video frame.
 */
subscribeToRemoteVideoStream = async (remoteVideoStream) => {
    // Create a video stream renderer for the remote video stream.
    let videoStreamRenderer = new VideoStreamRenderer(remoteVideoStream);
    let view;
    const renderVideo = async () => {
        try {
            // Create a renderer view for the remote video stream.
            view = await videoStreamRenderer.createView();
            // Attach the renderer view to the UI.
            remoteVideoContainer.hidden = false;
            remoteVideoContainer.appendChild(view.target);
        } catch (e) {
            console.warn(`Failed to createView, reason=${e.message}, code=${e.code}`);
        }
    }

    remoteVideoStream.on('isAvailableChanged', async () => {
        // Participant has switched video on.
        if (remoteVideoStream.isAvailable) {
            await renderVideo();
        // Participant has switched video off.
        } else {
            if (view) {
                view.dispose();
                view = undefined;
            }
        }
    });
    // Participant has video on initially.
    if (remoteVideoStream.isAvailable) {
        await renderVideo();
    }
}
// Start your local video stream.
// This will send your local video stream to remote participants so they can view it.
startVideoButton.onclick = async () => {
    try {
        const localVideoStream = await createLocalVideoStream();
        await call.startVideo(localVideoStream);
    } catch (error) {
        console.error(error);
    }
}
// Stop your local video stream.
// This will stop your local video stream from being sent to remote participants.
stopVideoButton.onclick = async () => {
    try {
        await call.stopVideo(localVideoStream);
    } catch (error) {
        console.error(error);
    }
}
/**
 * To render a LocalVideoStream, you need to create a new instance of VideoStreamRenderer, and then
 * create a new VideoStreamRendererView instance using the asynchronous createView() method.
 * You may then attach view.target to any UI element.
 */
// Create a local video stream for your camera device
createLocalVideoStream = async () => {
    const camera = (await deviceManager.getCameras())[0];
    if (camera) {
        return new LocalVideoStream(camera);
    } else {
        console.error(`No camera device found on the system`);
    }
}
// Display your local video stream preview in your UI
displayLocalVideoStream = async () => {
    try {
        localVideoStreamRenderer = new VideoStreamRenderer(localVideoStream);
        const view = await localVideoStreamRenderer.createView();
        localVideoContainer.hidden = false;
        localVideoContainer.appendChild(view.target);
    } catch (error) {
        console.error(error);
    }
}
// Remove your local video stream preview from your UI
removeLocalVideoStream = async() => {
    try {
        localVideoStreamRenderer.dispose();
        localVideoContainer.hidden = true;
    } catch (error) {
        console.error(error);
    }
}
// End the current call
hangUpCallButton.addEventListener("click", async () => {
    // end the current call
    await call.hangUp();
});
新增 Webpack 本地伺服器程式代碼
在 webpack.config.js 專案的根目錄中建立檔案,以包含此快速入門的本機伺服器邏輯。 將下列程式碼新增至 webpack.config.js:
const path = require('path');
const CopyPlugin = require("copy-webpack-plugin");

module.exports = {
    mode: 'development',
    entry: './client.js',
    output: {
        filename: 'main.js',
        path: path.resolve(__dirname, 'dist'),
    },
    devServer: {
        static: {
            directory: path.join(__dirname, './')
        },
    },
    plugins: [
        new CopyPlugin({
            patterns: [
                './index.html'
            ]
        }),
    ]
};
執行程式碼
使用 webpack-dev-server 來建置並執行您的應用程式。 執行下列命令,在本機 Web 伺服器上組合應用程式主機:
npx webpack serve --config webpack.config.js
設定呼叫的手動步驟:
- 開啟瀏覽器並巡覽至 http://localhost:8080/.
- 輸入有效的使用者存取權杖。 如果您還沒有可使用的權杖,請參閱使用者存取權杖文件。
- 按一下 [初始化呼叫代理程式] 按鈕。
- 輸入 Teams 通話佇列物件識別碼,然後選取 [開始通話] 按鈕。 應用程式會啟動具指定物件識別碼之通話佇列的撥出電話。
- 通話已連線到通話佇列。
- 通訊服務用戶會根據其組態透過通話佇列路由傳送。
重要
此 Azure 通訊服務功能目前處於預覽狀態。
提供的預覽 API 和 SDK 並無服務等級協定。 建議您不要將其用於生產工作負載。 部分功能可能不受支援,或是在功能上有所限制。
如需詳細資訊,請參閱 Microsoft Azure 預覽版增補使用規定。
在本快速入門中,您將了解如何從 Azure 通訊服務使用者對 Teams 通話佇列開始通話。 您將使用下列步驟來達成此目的:
- 使用 Teams 租用戶啟用 Azure 通訊服務資源的同盟。
- 透過 Teams 系統管理中心選取或建立 Teams 通話佇列。
- 透過 Teams 系統管理中心取得通話佇列的電子郵件地址。
- 透過圖形 API 取得通話佇列的物件識別碼。
- 使用 Azure 通訊服務通話 SDK 啟動通話。
如果您想要直接跳到結尾,您可以在 GitHub 上下載本快速入門作為範例。
在您的 Teams 租用戶中啟用互通性
具有 Teams 系統管理員角色 的 Microsoft Entra 使用者可以使用 MicrosoftTeams 模組執行 PowerShell Cmdlet,以啟用租用戶中的通訊服務資源。
1.準備 Microsoft Teams 模組
首先,開啟 PowerShell,並使用下列命令驗證 Teams 模組是否存在:
Get-module *teams*
如果您沒有看到 MicrosoftTeams 模組,請先加以安裝。 若要安裝模組,您必須以系統管理員身分執行 PowerShell。 然後執行下列命令:
Install-Module -Name MicrosoftTeams
系統會通知您將要安裝的模組,您可以用 Y 或 A 答案進行確認。 如果模組已安裝但已過期,您可以執行下列命令來更新模組:
Update-Module MicrosoftTeams
2.連線至 Microsoft Teams 模組
安裝模組並就緒時,您可以使用下列命令連線到 MicrosftTeams 模組。 系統將透過一個互動式視窗提示您登入。 您將使用的使用者帳戶必須具有 Teams 系統管理員權限。 否則,您可能會在下一個步驟中取得 access denied 回應。
Connect-MicrosoftTeams
3.刪除租用戶設定
與通訊服務資源的互通性是透過租用戶設定和指派的原則來控制。 Teams 租用戶具有單一租用戶設定,且 Teams 使用者已指派全域原則或自訂原則。 如需詳細資訊,請參閱 在 Teams 中指派原則。
成功登入之後,您可以執行 Cmdlet Set-CsTeamsAcsFederationConfiguration 以在您的租用戶中啟用通訊服務資源。 以通訊資源中的不可變資源識別碼取代文字 IMMUTABLE_RESOURCE_ID。 您可以在 這裡 找到如何取得此資訊的詳細資訊。
$allowlist = @('IMMUTABLE_RESOURCE_ID')
Set-CsTeamsAcsFederationConfiguration -EnableAcsUsers $True -AllowedAcsResources $allowlist
4.啟用租用戶原則
每個 Teams 使用者已指派 External Access Policy,以判斷通訊服務使用者是否可以呼叫此 Teams 使用者。 使用 Cmdlet Set-CsExternalAccessPolicy 以確保指派給 Teams 使用者的原則已將 EnableAcsFederationAccess 設定為 $true
Set-CsExternalAccessPolicy -Identity Global -EnableAcsFederationAccess $true
建立或選取 Teams 通話佇列
Teams 通話佇列是 Microsoft Teams 中的一項功能,可有效地在指定的使用者或客服人員群組之間分配來電。 這對於客戶支援或客服中心案例很有用。 通話會放在佇列中,並根據預先決定的路由方法指派給下一個可用的客服人員。 客服人員會收到通知,而且可使用 Teams 的通話控制來處理通話。 此功能提供效能追蹤的報告和分析。 其可簡化通話處理、確保一致的客戶體驗,並將客服人員生產力最佳化。 您可以透過 Teams 系統管理中心選取現有或建立新的通話佇列。
在這裡深入了解如何使用 Teams 系統管理中心建立通話佇列。
尋找通話佇列的物件識別碼
建立通話佇列之後,我們需要尋找相互關聯的物件識別碼,以供稍後呼叫使用。 對象標識符會連線到連結至通話佇列的資源帳戶 - 在 Teams 管理員中開啟 [資源帳戶] 索引卷標 ,並尋找電子郵件。
在搜尋中使用此電子郵件 Microsoft Graph 總管中找到資源帳戶的所有必要資訊。
https://graph.microsoft.com/v1.0/users/lab-test2-cq-@contoso.com
在結果中,我們可以找到 [識別碼] 欄位
    "userPrincipalName": "lab-test2-cq@contoso.com",
    "id": "31a011c2-2672-4dd0-b6f9-9334ef4999db"
若要在呼叫應用程式中使用,我們需要將前置詞新增至此標識符。 目前支援下列專案:
- 公用雲端通話佇列:
28:orgid:<id> - 政府雲端通話佇列:
28:gcch:<id>
必要條件
具有有效訂用帳戶的 Azure 帳戶。 免費建立帳戶。
Android Studio,用於建立 Android 應用程式。
已部署通訊服務資源。 建立通訊服務資源。
針對您的 Azure 通訊服務的使用者存取權杖。 您也可以使用 Azure CLI,並搭配您的連接字串執行命令,以建立使用者和存取權杖。
az communication identity token issue --scope voip --connection-string "yourConnectionString"如需詳細資訊,請參閱使用 Azure CLI 建立和管理存取權杖。
Teams 通話應用程式的最低支援:2.12.0-beta.1
設定
建立具有空白活動的 Android 應用程式
從 Android Studio 中,選取 [啟動新的 Android Studio 專案]。
![顯示在 Android Studio 中選取 [啟動新的 Android Studio 專案] 按鈕的螢幕擷取畫面。](media/android/studio-new-project.png)
選取 [手機和平板電腦] 底下的 [空白檢視活動] 專案範本。
![顯示在 [專案範本] 畫面中選取 [空白活動] 選項的螢幕擷取畫面。](media/android/studio-blank-activity.png)
針對最低 SDK 選取 [API 26:Android 8.0(Oreo)] 或更新版本。
![顯示在 [專案範本] 畫面 2 中選取 [空白活動] 選項的螢幕擷取畫面。](media/android/studio-calling-min-api.png)
Install the package
找出您的專案 settings.gradle.kts,並務必在 pluginManagement 和 dependencyResolutionManagement 下的存放庫清單看到 mavenCentral()
pluginManagement {
    repositories {
    ...
        mavenCentral()
    ...
    }
}

dependencyResolutionManagement {
    repositoriesMode.set(RepositoriesMode.FAIL_ON_PROJECT_REPOS)
    repositories {
    ...
        mavenCentral()
    }
}
然後,在您的模組層級 build.gradle 中,將以下幾行新增至相依性和 android 區段
android {
    ...

    compileOptions {
        sourceCompatibility JavaVersion.VERSION_1_8
        targetCompatibility JavaVersion.VERSION_1_8
    }
}

dependencies {
    ...
    implementation ("com.azure.android:azure-communication-calling:2.6.0")
    ...
}
將權限新增至應用程式資訊清單
為了要求進行通話所需的權限,必須在應用程式資訊清單 (app/src/main/AndroidManifest.xml) 中宣告。 使用下列程式碼取代檔案的內容:
    <?xml version="1.0" encoding="utf-8"?>
<manifest xmlns:android="http://schemas.android.com/apk/res/android"
    package="com.contoso.acsquickstart">

    <uses-permission android:name="android.permission.INTERNET" />
    <uses-permission android:name="android.permission.ACCESS_NETWORK_STATE" />
    <uses-permission android:name="android.permission.ACCESS_WIFI_STATE" />
    <uses-permission android:name="android.permission.RECORD_AUDIO" />
    <uses-permission android:name="android.permission.CAMERA" />
    <uses-permission android:name="android.permission.WRITE_EXTERNAL_STORAGE" />
    <uses-permission android:name="android.permission.READ_PHONE_STATE" />

    <application
        android:allowBackup="true"
        android:icon="@mipmap/ic_launcher"
        android:label="@string/app_name"
        android:roundIcon="@mipmap/ic_launcher_round"
        android:supportsRtl="true"
        android:theme="@style/AppTheme">
        <!--Our Calling SDK depends on the Apache HTTP SDK.
When targeting Android SDK 28+, this library needs to be explicitly referenced.
See https://developer.android.com/about/versions/pie/android-9.0-changes-28#apache-p-->
        <uses-library android:name="org.apache.http.legacy" android:required="false"/>
        <activity android:name=".MainActivity">
            <intent-filter>
                <action android:name="android.intent.action.MAIN" />

                <category android:name="android.intent.category.LAUNCHER" />
            </intent-filter>
        </activity>
    </application>

</manifest>
設定應用程式的配置
需要兩個輸入:被呼叫者識別碼的文字輸入,以及用來進行呼叫的按鈕。 這些輸入可以透過設計工具或藉由編輯版面配置 xml 來新增。 建立識別碼為 call_button、文字輸入為 callee_id 的按鈕。 瀏覽至 app/src/main/res/layout/activity_main.xml 並且以下列程式碼取代檔案的內容:
<?xml version="1.0" encoding="utf-8"?>
<androidx.constraintlayout.widget.ConstraintLayout xmlns:android="http://schemas.android.com/apk/res/android"
    xmlns:app="http://schemas.android.com/apk/res-auto"
    xmlns:tools="http://schemas.android.com/tools"
    android:layout_width="match_parent"
    android:layout_height="match_parent"
    tools:context="${launchApp}">

    <EditText
        android:id="@+id/callee_id"
        android:layout_width="match_parent"
        android:layout_height="wrap_content"
        android:ems="10"
        android:hint="Callee Id"
        android:inputType="textPersonName"
        android:layout_marginTop="100dp"
        android:layout_marginHorizontal="20dp"
        app:layout_constraintEnd_toEndOf="parent"
        app:layout_constraintStart_toStartOf="parent"
        app:layout_constraintTop_toTopOf="parent" />

    <LinearLayout
        android:layout_width="match_parent"
        android:layout_height="wrap_content"
        android:layout_marginBottom="46dp"
        android:gravity="center"
        app:layout_constraintBottom_toBottomOf="parent"
        app:layout_constraintEnd_toEndOf="parent"
        app:layout_constraintStart_toStartOf="parent">

        <Button
            android:id="@+id/call_button"
            android:layout_width="wrap_content"
            android:layout_height="wrap_content"
            android:text="Call" />

        <Button
            android:id="@+id/hangup_button"
            android:layout_width="wrap_content"
            android:layout_height="wrap_content"
            android:text="Hangup" />

    </LinearLayout>

    <TextView
        android:id="@+id/status_bar"
        android:layout_width="wrap_content"
        android:layout_height="wrap_content"
        android:layout_marginBottom="16dp"
        app:layout_constraintBottom_toBottomOf="parent"
        app:layout_constraintEnd_toEndOf="parent"
        app:layout_constraintStart_toStartOf="parent" />
</androidx.constraintlayout.widget.ConstraintLayout>
建立主要活動 Scaffolding 和繫結
建立版面配置之後,即可新增繫結,以及活動的基本 Scaffolding。 活動會處理要求執行階段權限、建立通話代理程式,並在按下按鈕時進行通話。 系統會覆寫 onCreate 方法以叫用 getAllPermissions 和 createAgent,並新增呼叫按鈕的繫結。 此事件只會在建立活動時發生一次。 如需 onCreate 的詳細資訊,請參閱了解活動生命週期指南。
瀏覽至 MainActivity.java,然後以下列程式碼取代內容:
package com.contoso.acsquickstart;

import androidx.annotation.NonNull;
import androidx.appcompat.app.AppCompatActivity;
import androidx.core.app.ActivityCompat;

import android.Manifest;
import android.content.pm.PackageManager;
import android.media.AudioManager;
import android.os.Bundle;
import android.widget.Button;
import android.widget.EditText;
import android.widget.TextView;
import android.widget.Toast;

import java.util.ArrayList;
import java.util.concurrent.ExecutionException;

import com.azure.android.communication.common.CommunicationIdentifier;
import com.azure.android.communication.common.CommunicationUserIdentifier;
import com.azure.android.communication.calling.Call;
import com.azure.android.communication.calling.CallAgent;
import com.azure.android.communication.calling.CallClient;
import com.azure.android.communication.calling.HangUpOptions;
import com.azure.android.communication.common.CommunicationTokenCredential;
import com.azure.android.communication.calling.StartCallOptions;

public class MainActivity extends AppCompatActivity {
    private static final String[] allPermissions = new String[] { Manifest.permission.RECORD_AUDIO, Manifest.permission.CAMERA, Manifest.permission.WRITE_EXTERNAL_STORAGE, Manifest.permission.READ_PHONE_STATE };
    private static final String UserToken = "<User_Access_Token>";

    TextView statusBar;

    private CallAgent agent;
    private Call call;
    private Button callButton;

    @Override
    protected void onCreate(Bundle savedInstanceState) {
        super.onCreate(savedInstanceState);
        setContentView(R.layout.activity_main);

        callButton = findViewById(R.id.call_button);

        getAllPermissions();
        createAgent();
        callButton.setOnClickListener(l -> startCall());

        Button hangupButton = findViewById(R.id.hangup_button);
        hangupButton.setOnClickListener(l -> endCall());

        statusBar = findViewById(R.id.status_bar);

        setVolumeControlStream(AudioManager.STREAM_VOICE_CALL);
    }

    /**
     * Start a call
     */
    private void startCall() {
        if (UserToken.startsWith("<")) {
            Toast.makeText(this, "Please enter token in source code", Toast.LENGTH_SHORT).show();
            return;
        }

        EditText calleeIdView = findViewById(R.id.callee_id);
        String calleeId = calleeIdView.getText().toString();
        if (calleeId.isEmpty()) {
            Toast.makeText(this, "Please enter callee", Toast.LENGTH_SHORT).show();
            return;
        }
        ArrayList<CommunicationIdentifier> participants = new ArrayList<>();
        participants.add(new MicrosoftTeamsAppIdentifier(calleeId));
        StartCallOptions options = new StartCallOptions();
        call = agent.startCall(
                getApplicationContext(),
                participants,
                options);
        call.addOnStateChangedListener(p -> setStatus(call.getState().toString()));
    }

    /**
     * Ends the call previously started
     */
    private void endCall() {
        try {
            call.hangUp(new HangUpOptions()).get();
        } catch (ExecutionException | InterruptedException e) {
            Toast.makeText(this, "Unable to hang up call", Toast.LENGTH_SHORT).show();
        }
    }

    /**
     * Create the call agent
     */
    private void createAgent() {
        try {
            CommunicationTokenCredential credential = new CommunicationTokenCredential(UserToken);
            agent = new CallClient().createCallAgent(getApplicationContext(), credential).get();
        } catch (Exception ex) {
            Toast.makeText(getApplicationContext(), "Failed to create call agent.", Toast.LENGTH_SHORT).show();
        }
    }

    /**
     * Ensure all permissions were granted, otherwise inform the user permissions are missing.
     */
    @Override
    public void onRequestPermissionsResult(int requestCode, @NonNull String[] permissions, int[] grantResults) {
        boolean allPermissionsGranted = true;
        for (int result : grantResults) {
            allPermissionsGranted &= (result == PackageManager.PERMISSION_GRANTED);
        }
        if (!allPermissionsGranted) {
            Toast.makeText(this, "All permissions are needed to make the call.", Toast.LENGTH_LONG).show();
            finish();
        }
    }

    /**
     * Shows message in the status bar
     */
    private void setStatus(String status) {
        runOnUiThread(() -> statusBar.setText(status));
    }
}
要求執行階段時的權限
針對 Android 6.0 和更新版本 (API 層級 23) 和 targetSdkVersion 23 或更新版本,權限會在執行階段授與,而不是在安裝應用程式時。 為了提供支援,可實作 getAllPermissions 來呼叫 ActivityCompat.checkSelfPermission 和 ActivityCompat.requestPermissions,以取得每個必要的權限。
/**
 * Request each required permission if the app doesn't already have it.
 */
private void getAllPermissions() {
    ArrayList<String> permissionsToAskFor = new ArrayList<>();
    for (String permission : allPermissions) {
        if (ActivityCompat.checkSelfPermission(this, permission) != PackageManager.PERMISSION_GRANTED) {
            permissionsToAskFor.add(permission);
        }
    }
    if (!permissionsToAskFor.isEmpty()) {
        ActivityCompat.requestPermissions(this, permissionsToAskFor.toArray(new String[0]), 1);
    }
}
注意
在設計您的應用程式時,請考量何時應要求這些權限。 您應該視需要要求權限,而不是提前要求。 如需詳細資訊,請參閱 Android 權限指南 \(機器翻譯\)。
物件模型
下列類別和介面會處理 Azure 通訊服務通話 SDK 的一些重大功能:
| 名稱 | 描述 |
|---|---|
CallClient |
CallClient 是通話 SDK 的主要進入點。 |
CallAgent |
CallAgent 可用來開始和管理通話。 |
CommunicationTokenCredential |
CommunicationTokenCredential 可作為權杖認證用來將 CallAgent 具現化。 |
CommunicationIdentifier |
CommunicationIdentifier 會當成可參與通話的不同參與者類型。 |
從使用者存取權杖建立代理程式
透過使用者權杖,可以將已驗證的呼叫代理程式具現化。 一般來說,此權杖會從具有應用程式特定驗證的服務產生。 如需使用者存取權杖的詳細資訊,請參閱使用者存取權杖指南。
在快速入門中,將 <User_Access_Token> 取代為針對您的 Azure 通訊服務資源所產生的使用者存取權杖。
/**
 * Create the call agent for placing calls
 */
private void createAgent() {
    String userToken = "<User_Access_Token>";

    try {
            CommunicationTokenCredential credential = new CommunicationTokenCredential(userToken);
            callAgent = new CallClient().createCallAgent(getApplicationContext(), credential).get();
    } catch (Exception ex) {
        Toast.makeText(getApplicationContext(), "Failed to create call agent.", Toast.LENGTH_SHORT).show();
    }
}
執行程式碼
現在可以使用工具列上的 [執行應用程式] 按鈕來啟動應用程式。
設定呼叫的手動步驟:
- 使用 Android Studio 啟動應用程式。
- 輸入通話佇列物件標識碼 (前置詞),然後選取 [開始通話] 按鈕。 應用程式會啟動具有指定物件標識碼之通話佇列的傳出呼叫。
- 通話已連線到通話佇列。
- 通訊服務用戶會根據其組態透過通話佇列路由傳送。
重要
此 Azure 通訊服務功能目前處於預覽狀態。
提供的預覽 API 和 SDK 並無服務等級協定。 建議您不要將其用於生產工作負載。 部分功能可能不受支援,或是在功能上有所限制。
如需詳細資訊,請參閱 Microsoft Azure 預覽版增補使用規定。
在本快速入門中,您將了解如何從 Azure 通訊服務使用者對 Teams 通話佇列開始通話。 您將使用下列步驟來達成此目的:
- 使用 Teams 租用戶啟用 Azure 通訊服務資源的同盟。
- 透過 Teams 系統管理中心選取或建立 Teams 通話佇列。
- 透過 Teams 系統管理中心取得通話佇列的電子郵件地址。
- 透過圖形 API 取得通話佇列的物件識別碼。
- 使用 Azure 通訊服務通話 SDK 啟動通話。
如果您想要直接跳到結尾,您可以在 GitHub 上下載本快速入門作為範例。
在您的 Teams 租用戶中啟用互通性
具有 Teams 系統管理員角色 的 Microsoft Entra 使用者可以使用 MicrosoftTeams 模組執行 PowerShell Cmdlet,以啟用租用戶中的通訊服務資源。
1.準備 Microsoft Teams 模組
首先,開啟 PowerShell,並使用下列命令驗證 Teams 模組是否存在:
Get-module *teams*
如果您沒有看到 MicrosoftTeams 模組,請先加以安裝。 若要安裝模組,您必須以系統管理員身分執行 PowerShell。 然後執行下列命令:
Install-Module -Name MicrosoftTeams
系統會通知您將要安裝的模組,您可以用 Y 或 A 答案進行確認。 如果模組已安裝但已過期,您可以執行下列命令來更新模組:
Update-Module MicrosoftTeams
2.連線至 Microsoft Teams 模組
安裝模組並就緒時,您可以使用下列命令連線到 MicrosftTeams 模組。 系統將透過一個互動式視窗提示您登入。 您將使用的使用者帳戶必須具有 Teams 系統管理員權限。 否則,您可能會在下一個步驟中取得 access denied 回應。
Connect-MicrosoftTeams
3.刪除租用戶設定
與通訊服務資源的互通性是透過租用戶設定和指派的原則來控制。 Teams 租用戶具有單一租用戶設定,且 Teams 使用者已指派全域原則或自訂原則。 如需詳細資訊,請參閱 在 Teams 中指派原則。
成功登入之後,您可以執行 Cmdlet Set-CsTeamsAcsFederationConfiguration 以在您的租用戶中啟用通訊服務資源。 以通訊資源中的不可變資源識別碼取代文字 IMMUTABLE_RESOURCE_ID。 您可以在 這裡 找到如何取得此資訊的詳細資訊。
$allowlist = @('IMMUTABLE_RESOURCE_ID')
Set-CsTeamsAcsFederationConfiguration -EnableAcsUsers $True -AllowedAcsResources $allowlist
4.啟用租用戶原則
每個 Teams 使用者已指派 External Access Policy,以判斷通訊服務使用者是否可以呼叫此 Teams 使用者。 使用 Cmdlet Set-CsExternalAccessPolicy 以確保指派給 Teams 使用者的原則已將 EnableAcsFederationAccess 設定為 $true
Set-CsExternalAccessPolicy -Identity Global -EnableAcsFederationAccess $true
建立或選取 Teams 通話佇列
Teams 通話佇列是 Microsoft Teams 中的一項功能,可有效地在指定的使用者或客服人員群組之間分配來電。 這對於客戶支援或客服中心案例很有用。 通話會放在佇列中,並根據預先決定的路由方法指派給下一個可用的客服人員。 客服人員會收到通知,而且可使用 Teams 的通話控制來處理通話。 此功能提供效能追蹤的報告和分析。 其可簡化通話處理、確保一致的客戶體驗,並將客服人員生產力最佳化。 您可以透過 Teams 系統管理中心選取現有或建立新的通話佇列。
在這裡深入了解如何使用 Teams 系統管理中心建立通話佇列。
尋找通話佇列的物件識別碼
建立通話佇列之後,我們需要尋找相互關聯的物件識別碼,以供稍後呼叫使用。 對象標識符會連線到連結至通話佇列的資源帳戶 - 在 Teams 管理員中開啟 [資源帳戶] 索引卷標 ,並尋找電子郵件。
在搜尋中使用此電子郵件 Microsoft Graph 總管中找到資源帳戶的所有必要資訊。
https://graph.microsoft.com/v1.0/users/lab-test2-cq-@contoso.com
在結果中,我們可以找到 [識別碼] 欄位
    "userPrincipalName": "lab-test2-cq@contoso.com",
    "id": "31a011c2-2672-4dd0-b6f9-9334ef4999db"
若要在呼叫應用程式中使用,我們需要將前置詞新增至此標識符。 目前支援下列專案:
- 公用雲端通話佇列:
28:orgid:<id> - 政府雲端通話佇列:
28:gcch:<id>
必要條件
取得具備有效訂用帳戶的 Azure 帳戶。 免費建立帳戶。
執行 Xcode 的 Mac,以及安裝在您 Keychain 中的有效開發人員憑證。
已部署通訊服務資源。 建立通訊服務資源。 您必須針對此快速入門記錄您的連接字串。
針對您的 Azure 通訊服務的使用者存取權杖。 您也可以使用 Azure CLI,並搭配您的連接字串執行命令,以建立使用者和存取權杖。
az communication identity token issue --scope voip --connection-string "yourConnectionString"如需詳細資訊,請參閱使用 Azure CLI 建立和管理存取權杖。
Teams 通話應用程式的最低支援:2.14.0-beta.1
設定
建立 XCode 專案
在 Xcode 中建立新的 iOS 專案,並選取 [應用程式] 範本。 本教學課程使用 SwiftUI 架構,因此您應將 [語言] 設定為 [Swift],並將 [使用者介面] 設定為 [SwiftUI]。 進行本快速入門期間,您不會建立測試。 您可以取消核取 [包含測試]。
![顯示 Xcode 內 [新專案] 視窗的螢幕擷取畫面。](media/ios/xcode-new-ios-project.png)
使用 CocoaPods 安裝套件和相依性
若要為應用程式建立 Podfile,請開啟終端,然後瀏覽至專案資料夾並執行:
pod init將下列程式碼新增至 Podfile 並儲存 (請確定 "target" 與您專案的名稱相符):
platform :ios, '13.0'
use_frameworks!

target 'AzureCommunicationCallingSample' do
  pod 'AzureCommunicationCalling', '~> 2.14.0-beta.1'
end
執行
pod install。使用 Xcode 開啟
.xcworkspace。
要求存取麥克風
您必須以 NSMicrophoneUsageDescription 更新應用程式的資訊屬性清單,才能存取裝置的麥克風。 您可以將相關聯的值設定為 string,此值會包含在系統用來向使用者要求存取權的對話中。
以滑鼠右鍵按一下專案樹狀結構的 Info.plist 項目,然後選取 [開啟形式] > [原始程式碼]。 將以下幾行新增至最上層 <dict> 區段中,然後儲存檔案。
<key>NSMicrophoneUsageDescription</key>
<string>Need microphone access for VOIP calling.</string>
設定應用程式架構
開啟專案的 ContentView.swift 檔案,並且將 import 宣告新增至檔案頂端,以匯入 AzureCommunicationCalling library。 此外,匯入 AVFoundation,我們需要此程式碼以便在程式碼中進行音訊權限要求。
import AzureCommunicationCalling
import AVFoundation
使用一些簡單的 UI 控制項來取代 ContentView 結構的實作,讓使用者可以起始和結束通話。 在本快速入門中,我們會將商務邏輯附加至這些控制項。
struct ContentView: View {
    @State var callee: String = ""
    @State var callClient: CallClient?
    @State var callAgent: CallAgent?
    @State var call: Call?

    var body: some View {
        NavigationView {
            Form {
                Section {
                    TextField("Who would you like to call?", text: $callee)
                    Button(action: startCall) {
                        Text("Start Call")
                    }.disabled(callAgent == nil)
                    Button(action: endCall) {
                        Text("End Call")
                    }.disabled(call == nil)
                }
            }
            .navigationBarTitle("Calling Quickstart")
        }.onAppear {
            // Initialize call agent
        }
    }

    func startCall() {
        // Ask permissions
        AVAudioSession.sharedInstance().requestRecordPermission { (granted) in
            if granted {
                // Add start call logic
            }
        }
    }

    func endCall() {
        // Add end call logic
    }
}
物件模型
下列類別和介面會處理 Azure 通訊服務通話 SDK 的一些重大功能:
| 名稱 | 描述 |
|---|---|
CallClient |
CallClient 是通話 SDK 的主要進入點。 |
CallAgent |
CallAgent 可用來開始和管理通話。 |
CommunicationTokenCredential |
CommunicationTokenCredential 可作為權杖認證用來將 CallAgent 具現化。 |
CommunicationUserIdentifier |
CommunicationUserIdentifier 可用來代表使用者的身分識別,其可以是下列其中一個選項:CommunicationUserIdentifier、PhoneNumberIdentifier 或 CallingApplication. |
驗證用戶端
使用使用者存取權杖來初始化 CallAgent 執行個體,讓我們能夠進行和接收通話。
在下列程式碼中,您必須將 <USER ACCESS TOKEN> 取代為資源的有效使用者存取權杖。 如果您還沒有可用的權杖,請參閱使用者存取權杖文件。
將下列程式碼新增至 ContentView.swift 中的 onAppear 回撥:
var userCredential: CommunicationTokenCredential?
do {
    userCredential = try CommunicationTokenCredential(token: "<USER ACCESS TOKEN>")
} catch {
    print("ERROR: It was not possible to create user credential.")
    return
}

self.callClient = CallClient()

// Creates the call agent
self.callClient?.createCallAgent(userCredential: userCredential!) { (agent, error) in
    if error != nil {
        print("ERROR: It was not possible to create a call agent.")
        return
    }
    else {
        self.callAgent = agent
        print("Call agent successfully created.")
    }
}
開始通話
startCall 方法會設定為點選 [開始通話] 按鈕時要執行的動作。 更新此實作,以使用 ASACallAgent 開始通話:
func startCall()
{
    // Ask permissions
    AVAudioSession.sharedInstance().requestRecordPermission { (granted) in
        if granted {
            // start call logic
            let callees:[CommunicationIdentifier] = [MicrosoftTeamsAppIdentifier(self.callee)]
            self.callAgent?.startCall(participants: callees, options: StartCallOptions()) { (call, error) in
                if (error == nil) {
                    self.call = call
                } else {
                    print("Failed to get call object")
                }
            }
        }
    }
}
您也可以使用 StartCallOptions 中的屬性來設定通話的初始選項 (也就是允許在麥克風靜音的情況下開始通話)。
結束通話
當點選 [結束通話] 按鈕時,請實作 endCall 方法來結束目前的通話。
func endCall()
{
    self.call!.hangUp(options: HangUpOptions()) { (error) in
        if (error != nil) {
            print("ERROR: It was not possible to hangup the call.")
        }
    }
}
執行程式碼
您可以藉由選取 [產品] > [執行] 或使用 (⌘-R) 鍵盤快速鍵,在 iOS 模擬器上建置並執行應用程式。
注意
第一次進行通話時,系統會提示您需要麥克風的存取權。 在實際執行環境應用程式中,您應該使用 AVAudioSession API 檢查權限狀態,並在未授與權限時,正常地更新應用程式的行為。
設定呼叫的手動步驟:
- 使用 Xcode 啟動應用程式
- 輸入通話佇列物件標識碼 (前置詞),然後選取 [開始通話] 按鈕。 應用程式會啟動具有指定物件標識碼之通話佇列的傳出呼叫。
- 通話已連線到通話佇列。
- 通訊服務用戶會根據其組態透過通話佇列路由傳送。
重要
此 Azure 通訊服務功能目前處於預覽狀態。
提供的預覽 API 和 SDK 並無服務等級協定。 建議您不要將其用於生產工作負載。 部分功能可能不受支援,或是在功能上有所限制。
如需詳細資訊,請參閱 Microsoft Azure 預覽版增補使用規定。
在本快速入門中,您將了解如何從 Azure 通訊服務使用者對 Teams 通話佇列開始通話。 您將使用下列步驟來達成此目的:
- 使用 Teams 租用戶啟用 Azure 通訊服務資源的同盟。
- 透過 Teams 系統管理中心選取或建立 Teams 通話佇列。
- 透過 Teams 系統管理中心取得通話佇列的電子郵件地址。
- 透過圖形 API 取得通話佇列的物件識別碼。
- 使用 Azure 通訊服務通話 SDK 啟動通話。
如果您想要直接跳到結尾,您可以在 GitHub 上下載本快速入門作為範例。
在您的 Teams 租用戶中啟用互通性
具有 Teams 系統管理員角色 的 Microsoft Entra 使用者可以使用 MicrosoftTeams 模組執行 PowerShell Cmdlet,以啟用租用戶中的通訊服務資源。
1.準備 Microsoft Teams 模組
首先,開啟 PowerShell,並使用下列命令驗證 Teams 模組是否存在:
Get-module *teams*
如果您沒有看到 MicrosoftTeams 模組,請先加以安裝。 若要安裝模組,您必須以系統管理員身分執行 PowerShell。 然後執行下列命令:
Install-Module -Name MicrosoftTeams
系統會通知您將要安裝的模組,您可以用 Y 或 A 答案進行確認。 如果模組已安裝但已過期,您可以執行下列命令來更新模組:
Update-Module MicrosoftTeams
2.連線至 Microsoft Teams 模組
安裝模組並就緒時,您可以使用下列命令連線到 MicrosftTeams 模組。 系統將透過一個互動式視窗提示您登入。 您將使用的使用者帳戶必須具有 Teams 系統管理員權限。 否則,您可能會在下一個步驟中取得 access denied 回應。
Connect-MicrosoftTeams
3.刪除租用戶設定
與通訊服務資源的互通性是透過租用戶設定和指派的原則來控制。 Teams 租用戶具有單一租用戶設定,且 Teams 使用者已指派全域原則或自訂原則。 如需詳細資訊,請參閱 在 Teams 中指派原則。
成功登入之後,您可以執行 Cmdlet Set-CsTeamsAcsFederationConfiguration 以在您的租用戶中啟用通訊服務資源。 以通訊資源中的不可變資源識別碼取代文字 IMMUTABLE_RESOURCE_ID。 您可以在 這裡 找到如何取得此資訊的詳細資訊。
$allowlist = @('IMMUTABLE_RESOURCE_ID')
Set-CsTeamsAcsFederationConfiguration -EnableAcsUsers $True -AllowedAcsResources $allowlist
4.啟用租用戶原則
每個 Teams 使用者已指派 External Access Policy,以判斷通訊服務使用者是否可以呼叫此 Teams 使用者。 使用 Cmdlet Set-CsExternalAccessPolicy 以確保指派給 Teams 使用者的原則已將 EnableAcsFederationAccess 設定為 $true
Set-CsExternalAccessPolicy -Identity Global -EnableAcsFederationAccess $true
建立或選取 Teams 通話佇列
Teams 通話佇列是 Microsoft Teams 中的一項功能,可有效地在指定的使用者或客服人員群組之間分配來電。 這對於客戶支援或客服中心案例很有用。 通話會放在佇列中,並根據預先決定的路由方法指派給下一個可用的客服人員。 客服人員會收到通知,而且可使用 Teams 的通話控制來處理通話。 此功能提供效能追蹤的報告和分析。 其可簡化通話處理、確保一致的客戶體驗,並將客服人員生產力最佳化。 您可以透過 Teams 系統管理中心選取現有或建立新的通話佇列。
在這裡深入了解如何使用 Teams 系統管理中心建立通話佇列。
尋找通話佇列的物件識別碼
建立通話佇列之後,我們需要尋找相互關聯的物件識別碼,以供稍後呼叫使用。 對象標識符會連線到連結至通話佇列的資源帳戶 - 在 Teams 管理員中開啟 [資源帳戶] 索引卷標 ,並尋找電子郵件。
在搜尋中使用此電子郵件 Microsoft Graph 總管中找到資源帳戶的所有必要資訊。
https://graph.microsoft.com/v1.0/users/lab-test2-cq-@contoso.com
在結果中,我們可以找到 [識別碼] 欄位
    "userPrincipalName": "lab-test2-cq@contoso.com",
    "id": "31a011c2-2672-4dd0-b6f9-9334ef4999db"
若要在呼叫應用程式中使用,我們需要將前置詞新增至此標識符。 目前支援下列專案:
- 公用雲端通話佇列:
28:orgid:<id> - 政府雲端通話佇列:
28:gcch:<id>
必要條件
若要完成本教學課程,您需要下列必要條件:
具有有效訂用帳戶的 Azure 帳戶。 免費建立帳戶。
安裝包含通用 Windows 平台開發工作負載的 Visual Studio 2022。
已部署通訊服務資源。 建立通訊服務資源。 您必須針對此快速入門記錄您的連接字串。
針對您的 Azure 通訊服務的使用者存取權杖。 您也可以使用 Azure CLI,並搭配您的連接字串執行命令,以建立使用者和存取權杖。
az communication identity token issue --scope voip --connection-string "yourConnectionString"如需詳細資訊,請參閱使用 Azure CLI 建立和管理存取權杖。
Teams 通話應用程式的最低支援:1.10.0-beta.1
設定
建立專案
在 Visual Studio 中,使用 [空白應用程式 (通用 Windows)] 範本建立新專案,以設定單頁通用 Windows 平台 (UWP) 應用程式。
![螢幕擷取畫面:顯示 Visual Studio 內的 [新 UWP 專案] 視窗。](media/windows/create-a-new-project.png)
Install the package
以滑鼠右鍵選取您的專案,然後移至 Manage Nuget Packages 以安裝 Azure.Communication.Calling.WindowsClient 1.4.0 或更高版本。 如果您想要查看公開預覽的版本,請確定已核取 Include Prerelease。
要求存取
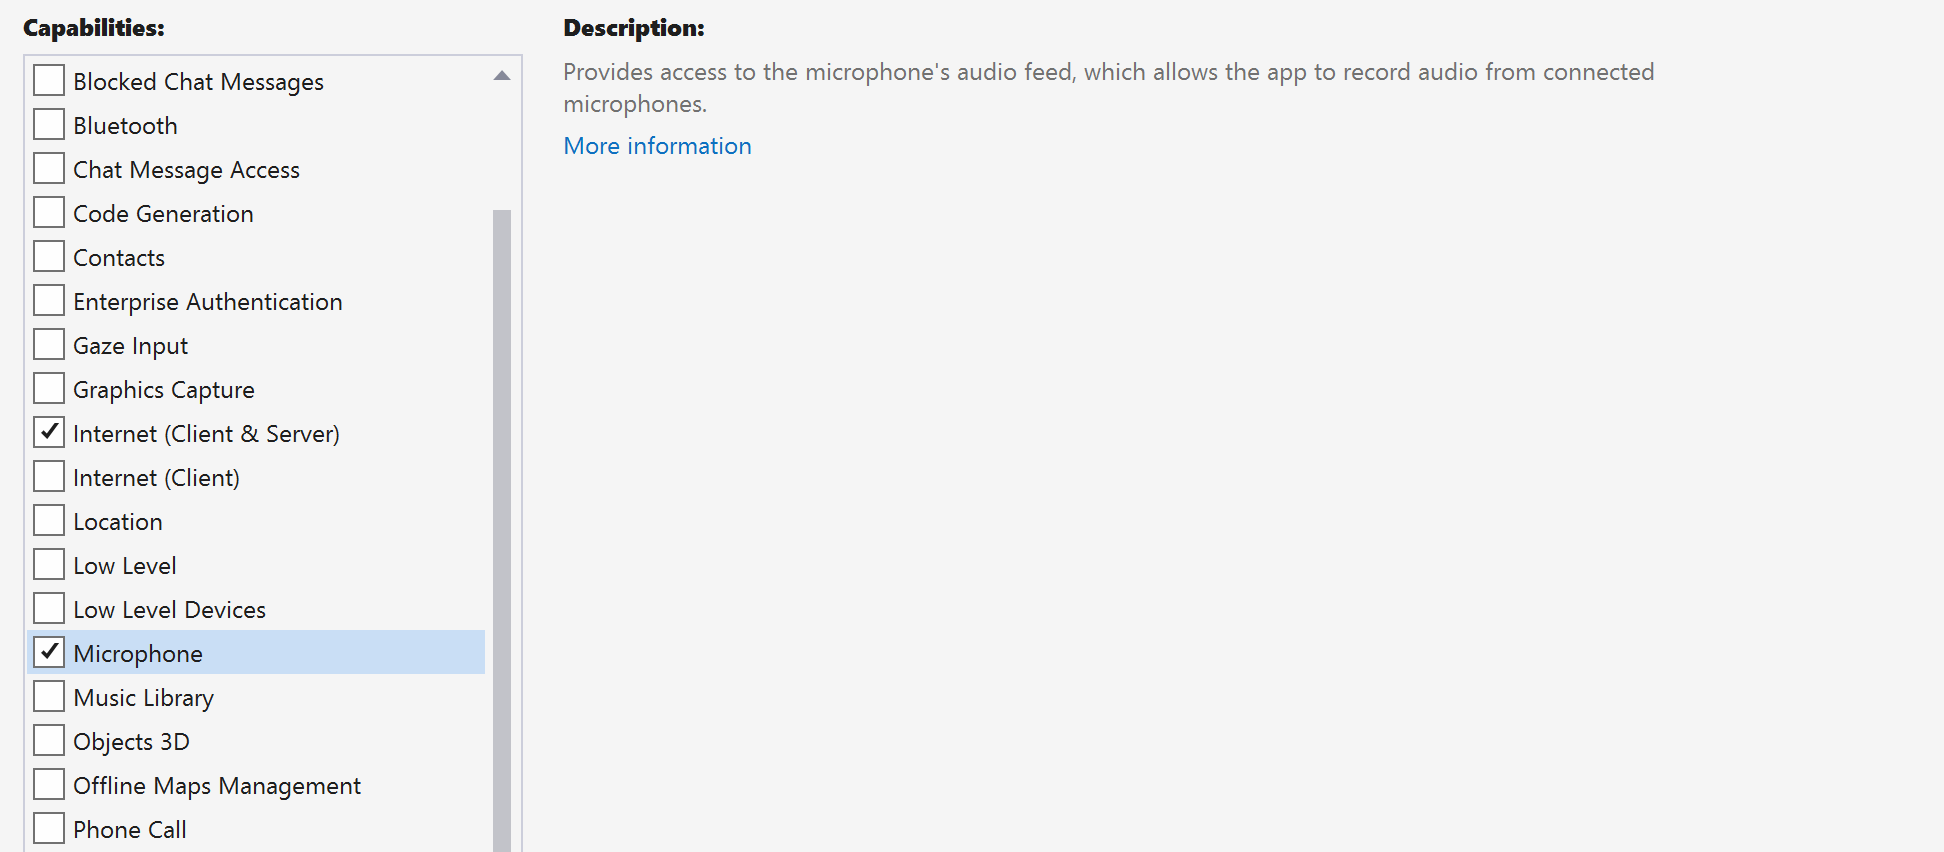
移至 Package.appxmanifest 並選取 Capabilities。
勾選 Internet (Client) 和 Internet (Client & Server) 以取得網際網路的輸入和輸出存取權。 勾選 Microphone 以存取麥克風的音訊來源,並勾選 Webcam 以存取相機的視訊來源。
設定應用程式架構
我們必須設定基本配置來附加邏輯。 為了撥打外撥電話,我們需要 TextBox 來提供被通話者的使用者識別碼。 我們也需要 [Start/Join call] 按鈕和 [Hang up] 按鈕。 此範例中也包含 Mute 和 BackgroundBlur 核取方塊,用於示範切換音訊狀態和視訊效果的功能。
開啟專案的 MainPage.xaml,並將 Grid 節點新增至 Page:
<Page
    x:Class="CallingQuickstart.MainPage"
    xmlns="http://schemas.microsoft.com/winfx/2006/xaml/presentation"
    xmlns:x="http://schemas.microsoft.com/winfx/2006/xaml"
    xmlns:local="using:CallingQuickstart"
    xmlns:d="http://schemas.microsoft.com/expression/blend/2008"
    xmlns:mc="http://schemas.openxmlformats.org/markup-compatibility/2006"
    mc:Ignorable="d"
    Background="{ThemeResource ApplicationPageBackgroundThemeBrush}" Width="800" Height="600">

        <!-- Don't forget to replace ‘CallingQuickstart’ with your project’s name -->


    <Grid>
        <Grid.RowDefinitions>
            <RowDefinition Height="16*"/>
            <RowDefinition Height="30*"/>
            <RowDefinition Height="200*"/>
            <RowDefinition Height="60*"/>
            <RowDefinition Height="16*"/>
        </Grid.RowDefinitions>
        <TextBox Grid.Row="1" x:Name="CalleeTextBox" PlaceholderText="Who would you like to call?" TextWrapping="Wrap" VerticalAlignment="Center" Height="30" Margin="10,10,10,10" />

        <Grid x:Name="AppTitleBar" Background="LightSeaGreen">
            <TextBlock x:Name="QuickstartTitle" Text="Calling Quickstart sample title bar" Style="{StaticResource CaptionTextBlockStyle}" Padding="7,7,0,0"/>
        </Grid>

        <Grid Grid.Row="2">
            <Grid.RowDefinitions>
                <RowDefinition/>
            </Grid.RowDefinitions>
            <Grid.ColumnDefinitions>
                <ColumnDefinition Width="*"/>
                <ColumnDefinition Width="*"/>
            </Grid.ColumnDefinitions>
            <MediaPlayerElement x:Name="LocalVideo" HorizontalAlignment="Center" Stretch="UniformToFill" Grid.Column="0" VerticalAlignment="Center" AutoPlay="True" />
            <MediaPlayerElement x:Name="RemoteVideo" HorizontalAlignment="Center" Stretch="UniformToFill" Grid.Column="1" VerticalAlignment="Center" AutoPlay="True" />
        </Grid>
        <StackPanel Grid.Row="3" Orientation="Vertical" Grid.RowSpan="2">
            <StackPanel Orientation="Horizontal">
                <Button x:Name="CallButton" Content="Start/Join call" Click="CallButton_Click" VerticalAlignment="Center" Margin="10,0,0,0" Height="40" Width="123"/>
                <Button x:Name="HangupButton" Content="Hang up" Click="HangupButton_Click" VerticalAlignment="Center" Margin="10,0,0,0" Height="40" Width="123"/>
                <CheckBox x:Name="MuteLocal" Content="Mute" Margin="10,0,0,0" Click="MuteLocal_Click" Width="74"/>
            </StackPanel>
        </StackPanel>
        <TextBox Grid.Row="5" x:Name="Stats" Text="" TextWrapping="Wrap" VerticalAlignment="Center" Height="30" Margin="0,2,0,0" BorderThickness="2" IsReadOnly="True" Foreground="LightSlateGray" />
    </Grid>
</Page>
開啟 MainPage.xaml.cs 並將內容取代為下列實作:
using Azure.Communication.Calling.WindowsClient;
using System;
using System.Collections.Generic;
using System.ComponentModel;
using System.Linq;
using System.Threading.Tasks;
using Windows.ApplicationModel;
using Windows.ApplicationModel.Core;
using Windows.Media.Core;
using Windows.Networking.PushNotifications;
using Windows.UI;
using Windows.UI.ViewManagement;
using Windows.UI.Xaml;
using Windows.UI.Xaml.Controls;
using Windows.UI.Xaml.Media;
using Windows.UI.Xaml.Navigation;

namespace CallingQuickstart
{
    public sealed partial class MainPage : Page
    {
        private const string authToken = "<AUTHENTICATION_TOKEN>";

        private CallClient callClient;
        private CallTokenRefreshOptions callTokenRefreshOptions = new CallTokenRefreshOptions(false);
        private CallAgent callAgent;
        private CommunicationCall call;

        private LocalOutgoingAudioStream micStream;

        #region Page initialization
        public MainPage()
        {
            this.InitializeComponent();
            // Additional UI customization code goes here
        }

        protected override async void OnNavigatedTo(NavigationEventArgs e)
        {
            await InitCallAgentAndDeviceManagerAsync();

            base.OnNavigatedTo(e);
        }
        #endregion

        #region UI event handlers
        private async void CallButton_Click(object sender, RoutedEventArgs e)
        {
            // Start a call
        }

        private async void HangupButton_Click(object sender, RoutedEventArgs e)
        {
            // Hang up a call
        }

        private async void MuteLocal_Click(object sender, RoutedEventArgs e)
        {
            // Toggle mute/unmute audio state of a call
        }
        #endregion

        #region API event handlers
        private async void OnIncomingCallAsync(object sender, IncomingCallReceivedEventArgs args)
        {
            // Handle incoming call event
        }

        private async void OnStateChangedAsync(object sender, PropertyChangedEventArgs args)
        {
            // Handle connected and disconnected state change of a call
        }
        #endregion

        #region Helper methods

        private async Task InitCallAgentAndDeviceManagerAsync()
        {
            //Initialize the call agent and search for devices
        }


        private async Task<CommunicationCall> StartCallAsync(string acsCallee)
        {
            // Start a call to an Azure Communication Services user using the CallAgent and the callee id
        }

        #endregion
    }
}
物件模型
下方列出類別和介面的表格會處理 Azure 通訊服務通話 SDK 的一些主要功能:
| 名稱 | 描述 |
|---|---|
CallClient |
CallClient 是通話 SDK 的主要進入點。 |
CallAgent |
CallAgent 可用來開始和管理通話。 |
CommunicationCall |
CommunicationCall 可用來管理進行中的通話。 |
CallTokenCredential |
CallTokenCredential 可用來作為權杖認證以將 CallAgent 具現化。 |
CallIdentifier |
CallIdentifier 可用來代表使用者的身分識別,其可以是下列其中一個選項:UserCallIdentifier、PhoneNumberCallIdentifier 等。 |
驗證用戶端
透過使用者存取權杖來將 CallAgent 執行個體初始化,此存取權杖可讓我們撥打和接聽通話,並選擇性地取得 DeviceManager 執行個體來查詢用戶端裝置設定。
在程式碼中,將 <AUTHENTICATION_TOKEN> 取代為使用者存取權杖。 如果您還沒有可用的權杖,請參閱使用者存取權杖文件。
新增 InitCallAgentAndDeviceManagerAsync 函式,以啟動 SDK。 您可以自訂此協助程式,以符合應用程式的需求。
        private async Task InitCallAgentAndDeviceManagerAsync()
        {
            this.callClient = new CallClient(new CallClientOptions() {
                Diagnostics = new CallDiagnosticsOptions() {

                    // make sure to put your project AppName
                    AppName = "CallingQuickstart",

                    AppVersion="1.0",

                    Tags = new[] { "Calling", "ACS", "Windows" }
                    }

                });

            // Set up local audio stream using the first mic enumerated
            var deviceManager = await this.callClient.GetDeviceManagerAsync();
            var mic = deviceManager?.Microphones?.FirstOrDefault();

            micStream = new LocalOutgoingAudioStream();

            var tokenCredential = new CallTokenCredential(authToken, callTokenRefreshOptions);

            var callAgentOptions = new CallAgentOptions()
            {
                DisplayName = $"{Environment.MachineName}/{Environment.UserName}",
            };

            this.callAgent = await this.callClient.CreateCallAgentAsync(tokenCredential, callAgentOptions);

            this.callAgent.IncomingCallReceived += OnIncomingCallAsync;
        }
啟動呼叫
取得 StartCallOptions 物件之後,即可使用 CallAgent 來起始 Azure 通訊服務通話:
        private async Task<CommunicationCall> StartCallAsync(string acsCallee)
        {
            var options = new StartCallOptions();
            var call = await this.callAgent.StartCallAsync( new [] { new MicrosoftTeamsAppCallIdentifier(acsCallee) }, options);
            return call;
        }
結束通話
按兩下 [Hang up] 按鈕時,結束目前的通話。 將實作新增至 HangupButton_Click 以結束通話,並停止預覽和視訊串流。
        private async void HangupButton_Click(object sender, RoutedEventArgs e)
        {
            var call = this.callAgent?.Calls?.FirstOrDefault();
            if (call != null)
            {
                await call.HangUpAsync(new HangUpOptions() { ForEveryone = false });
            }
        }
在音訊上切換靜音/取消靜音
按兩下 [Mute] 按鈕時,可將傳出音訊設為靜音。 將實作新增至 MuteLocal_Click 以將通話設為靜音。
        private async void MuteLocal_Click(object sender, RoutedEventArgs e)
        {
            var muteCheckbox = sender as CheckBox;

            if (muteCheckbox != null)
            {
                var call = this.callAgent?.Calls?.FirstOrDefault();

                if (call != null)
                {
                    if ((bool)muteCheckbox.IsChecked)
                    {
                        await call.MuteOutgoingAudioAsync();
                    }
                    else
                    {
                        await call.UnmuteOutgoingAudioAsync();
                    }
                }

                // Update the UI to reflect the state
            }
        }
接聽來電
IncomingCallReceived 事件接收設定於 SDK 啟動程序協助程式 InitCallAgentAndDeviceManagerAsync 中。
this.callAgent.IncomingCallReceived += OnIncomingCallAsync;
應用程式有機會設定應如何接受來電,例如,視訊和音訊串流類型。
        private async void OnIncomingCallAsync(object sender, IncomingCallReceivedEventArgs args)
        {
            var incomingCall = args.IncomingCall;

            var acceptCallOptions = new AcceptCallOptions() { };

            call = await incomingCall.AcceptAsync(acceptCallOptions);
            call.StateChanged += OnStateChangedAsync;
        }
監視和回應通話狀態變更事件
當進行中的通話從一種狀態異動為另一種狀態時,就會引發 CommunicationCall 物件上的 StateChanged 事件。 應用程式有機會反映 UI 上的狀態變更,或插入商務邏輯。
        private async void OnStateChangedAsync(object sender, PropertyChangedEventArgs args)
        {
            var call = sender as CommunicationCall;

            if (call != null)
            {
                var state = call.State;

                // Update the UI

                switch (state)
                {
                    case CallState.Connected:
                        {
                            await call.StartAudioAsync(micStream);

                            break;
                        }
                    case CallState.Disconnected:
                        {
                            call.StateChanged -= OnStateChangedAsync;

                            call.Dispose();

                            break;
                        }
                    default: break;
                }
            }
        }
讓通話按鈕正常運作
一旦 Callee ID 不是 Null 或空白,您就可以開始通話。
通話狀態必須使用 OnStateChangedAsync 動作來變更。
    private async void CallButton_Click(object sender, RoutedEventArgs e)
    {
        var callString = CalleeTextBox.Text.Trim();

        if (!string.IsNullOrEmpty(callString))
        {
            call = await StartCallAsync(callString);

            call.StateChanged += OnStateChangedAsync;
        }


    }
執行程式碼
在 Visual Studio 中,您可以建置並執行程式碼。 針對解決方案平台,我們支援 ARM64、x64 和 x86。
設定呼叫的手動步驟:
- 使用 Visual Studio 啟動應用程式。
- 輸入通話佇列物件標識碼 (前置詞),然後選取 [開始通話] 按鈕。 應用程式會啟動具有指定物件標識碼之通話佇列的傳出呼叫。
- 通話已連線到通話佇列。
- 通訊服務用戶會根據其組態透過通話佇列路由傳送。
清除資源
如果您想要清除並移除通訊服務訂用帳戶,您可以刪除資源或資源群組。 刪除資源群組也會刪除與其相關聯的任何其他資源。 深入了解如何清除資源。
下一步
如需詳細資訊,請參閱下列文章:
- 開始使用對 Teams 語音應用程式的 UI 通話
- 了解通話 SDK 功能
- 深入了解通話的運作方式