使用 GitHub Actions 和 Azure 建置自定義虛擬機映像
藉由建立工作流程來建置虛擬機映射,以開始使用 GitHub Actions 。
透過 GitHub Actions,您可以使用工作流程中的成品建立自定義虛擬機映像,以加快 CI/CD 程式的速度。 您可以建置映像,並將其散發至 共用映像庫。
建置虛擬機映像動作會使用 Azure Image Builder 服務。
必要條件
- 具有有效訂用帳戶的 Azure 帳戶。 免費建立帳戶。
- 具有使用中存放庫的 GitHub 帳戶。 如果您沒有 Microsoft 帳戶,請免費註冊。
- 此範例使用 Java Spring PetClinic 範例應用程式。
- 具有映像的 Azure 計算資源庫。
工作流程檔案概觀
工作流程是由存放庫中路徑中的 /.github/workflows/ YAML (.yml) 檔案所定義。 此定義包含組成工作流程的各種步驟與參數。
檔案有三個區段:
| 區段 | 工作 |
|---|---|
| 驗證 | 1.新增使用者受控識別。 2.設定服務主體或開啟標識碼 連線。 3.建立 GitHub 秘密。 |
| 建立 | 1.設定環境。 2.建置應用程式。 |
| 映像 | 1.建立 VM 映射。 2.建立虛擬機。 |
建立使用者受控識別
您需要 Azure Image Builder(AIB) 的使用者受控識別,才能散發映像。 映射建置期間會使用 Azure 使用者指派的受控識別,將映像讀取和寫入至 共用映像庫。
自定義此 JSON 程式代碼。 將和
{rgName}的{subscriptionID}佔位元取代為您的訂用帳戶標識碼和資源組名。{ "properties": { "roleName": "Image Creation Role", "IsCustom": true, "description": "Azure Image Builder access to create resources for the image build", "assignableScopes": [ "/subscriptions/{subscriptionID}/resourceGroups/{rgName}" ], "permissions": [ { "actions": [ "Microsoft.Compute/galleries/read", "Microsoft.Compute/galleries/images/read", "Microsoft.Compute/galleries/images/versions/read", "Microsoft.Compute/galleries/images/versions/write", "Microsoft.Compute/images/write", "Microsoft.Compute/images/read", "Microsoft.Compute/images/delete" ], "notActions": [], "dataActions": [], "notDataActions": [] } ] } }使用此 JSON 程式代碼以 JSON 建立 新的自定義角色 。
在 Azure 入口網站 中,開啟您的 Azure 計算資源庫,然後移至存取控制 (IAM) 。
選取 [新增角色指派 ],並將映射建立角色指派給您的使用者受控識別。
產生部署認證
使用 Azure CLI 中的 az ad sp create-for-rbac 命令來建立服務主體。 請使用 Azure 入口網站中的 Azure Cloud Shell,或選取 [試試看] 按鈕來執行此命令。
az ad sp create-for-rbac --name "myML" --role contributor \
                            --scopes /subscriptions/<subscription-id>/resourceGroups/<group-name> \
                            --json-auth
參數 --json-auth 可在 Azure CLI 版本 >= 2.51.0 中使用。 此 --sdk-auth 版本之前的版本會搭配取代警告使用。
在上述範例中,將預留位置換成為您的訂用帳戶識別碼、資源群組名稱和應用程式名稱。 輸出是一個 JSON 物件,內有角色指派認證可讓您存取 App Service 應用程式,如下所示。 複製此 JSON 物件以供後續使用。
  {
    "clientId": "<GUID>",
    "clientSecret": "<GUID>",
    "subscriptionId": "<GUID>",
    "tenantId": "<GUID>",
    (...)
  }
建立 GitHub 祕密
在 GitHub (英文) 中,前往您的存放庫。
移至導覽功能表中 設定。
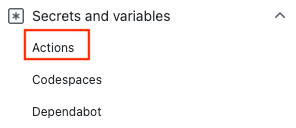
選取 [安全性] > [祕密和變數] > [動作]。
選取 [新增存放庫祕密]。
將得自 Azure CLI 命令的整個 JSON 輸出貼到祕密的 [值] 欄位中。 將祕密命名為
AZURE_CREDENTIALS。選取 [新增祕密]。
使用 Azure 登入動作
使用 GitHub 秘密搭配 Azure 登入動作 向 Azure 進行驗證。
在此工作流程中,您會使用 Azure 登入動作與儲存在 中的 secrets.AZURE_CREDENTIALS服務主體詳細數據進行驗證。 然後,您會執行 Azure CLI 動作。 如需在工作流程檔案中參考 GitHub 秘密的詳細資訊,請參閱 在 GitHub Docs 中使用工作流程 中的加密密碼。
on: [push]

name: Create Custom VM Image

jobs:
  build-image:
    runs-on: ubuntu-latest
    steps:
      - name: Log in with Azure
        uses: azure/login@v1
        with:
          creds: '${{ secrets.AZURE_CREDENTIALS }}'
設定Java
使用 Java 設定 SDK 動作來設定 Java 環境。 在此範例中,您將設定環境、使用 Maven 建置,然後輸出成品。
GitHub 成品 是一種在作業之間共用工作流程中的檔案的方法。 您將建立成品來保存 JAR 檔案,然後將它新增至虛擬機映射。
on: [push]

name: Create Custom VM Image

jobs:
  build-image:
    runs-on: ubuntu-latest
    strategy:
      matrix:
        java: [ '17' ]

    steps:
    - name: Checkout
      uses: actions/checkout@v3

    - name: Login via Az module
      uses: azure/login@v1
      with:
        creds: ${{secrets.AZURE_CREDENTIALS}}

    - name: Set up JDK ${{matrix.java}}
      uses: actions/setup-java@v2
      with:
        java-version: ${{matrix.java}}
        distribution: 'adopt'
        cache: maven
    - name: Build with Maven Wrapper
      run: ./mvnw -B package

    - name: Build Java
      run: mvn --batch-mode --update-snapshots verify

    - run: mkdir staging && cp target/*.jar staging
    - uses: actions/upload-artifact@v2
      with:
        name: Package
        path: staging
建置您的映像
使用建置 Azure 虛擬機映射動作 來建立自定義虛擬機映像。
將和 {rgName}{Identity} 的佔位元{subscriptionID}取代為您的訂用帳戶標識碼、資源組名和受控識別名稱。 將和 {imageName} 的值{galleryName}取代為您的映像庫名稱和映像名稱。
注意
如果建立應用程式烘焙映射動作失敗,並出現許可權錯誤,請確認您已將映像建立角色指派給使用者管理的身分識別。
    - name: Create App Baked Image
      id: imageBuilder
      uses: azure/build-vm-image@v0
      with:
        location: 'eastus2'
        resource-group-name: '{rgName}'
        managed-identity: '{Identity}' # Managed identity
        source-os-type: 'windows'
        source-image-type: 'platformImage'
        source-image: MicrosoftWindowsServer:WindowsServer:2019-Datacenter:latest #unique identifier of source image
        dist-type: 'SharedImageGallery'
        dist-resource-id: '/subscriptions/{subscriptionID}/resourceGroups/{rgName}/providers/Microsoft.Compute/galleries/{galleryName}/images/{imageName}/versions/0.1.${{ GITHUB.RUN_ID }}' #Replace with the resource id of your shared image  gallery's image definition
        dist-location: 'eastus2'
虛擬機動作自變數
| 輸入 | 必要 | 描述: |
|---|---|---|
resource-group-name |
Yes | 建置程式期間用於儲存和儲存成品的資源群組。 |
image-builder-template-name |
No | 所使用的映像產生器範本資源名稱。 |
location |
Yes | Azure Image Builder 將執行的位置。 請參閱 支援的位置。 |
build-timeout-in-minutes |
No | 建置取消的時間。 預設值為 240。 |
vm-size |
選擇性 | 根據預設, Standard_D1_v2 將會使用 。 請參閱 虛擬機大小。 |
managed-identity |
Yes | 您稍早建立的使用者受控識別。 如果您的身分識別位於不同的資源群組中,請使用完整標識符。 如果名稱位於相同的資源群組中,請使用名稱。 |
source-os |
Yes | 基底映像的 OS 類型 (Linux 或 Windows) |
source-image-type |
Yes | 將用於建立自定義映像的基底映像類型。 |
source-image |
Yes | 基底映像的資源標識碼。 來源映像應該出現在位置輸入值中設定的相同 Azure 區域中。 |
customizer-source |
No | 您可以保留需要新增至基底映射以自訂之所有成品的目錄。 根據預設,此值為 ${{ GITHUB.WORKSPACE }}/workflow-artifacts. |
customizer-destination |
No | 這是自定義映像中的目錄,其中會複製成品。 |
customizer-windows-update |
No | 僅適用於 Windows。 布林值。 如果 true為 ,映像產生器會在自定義項目結束時執行 Windows Update。 |
dist-location |
No | 針對 SharedImageGallery,這是 dist-type。 |
dist-image-tags |
No | 這些是新增至所建立自定義映像的使用者定義標籤(例如: version:beta)。 |
建立虛擬機
最後一個步驟是從映像建立虛擬機。
將的佔位元
{rgName}取代為您的資源組名。使用虛擬機密碼新增 GitHub 秘密 (
VM_PWD)。 請務必記下密碼,因為您將無法再次看到密碼。 使用者名稱稱為myuser。
    - name: CREATE VM
      uses: azure/CLI@v1
      with:
        azcliversion: 2.0.72
        inlineScript: |
        az vm create --resource-group ghactions-vMimage  --name "app-vm-${{ GITHUB.RUN_NUMBER }}"  --admin-username myuser --admin-password "${{ secrets.VM_PWD }}" --location  eastus2 \
            --image "${{ steps.imageBuilder.outputs.custom-image-uri }}"
完成 YAML
  on: [push]

  name: Create Custom VM Image

  jobs:
    build-image:
      runs-on: ubuntu-latest
      steps:
      - name: Checkout
        uses: actions/checkout@v2

      - name: Login via Az module
        uses: azure/login@v1
        with:
          creds: ${{secrets.AZURE_CREDENTIALS}}

      - name: Setup Java 1.8.x
        uses: actions/setup-java@v1
        with:
          java-version: '1.8.x'

      - name: Build Java
        run: mvn --batch-mode --update-snapshots verify

      - run: mkdir staging && cp target/*.jar staging
      - uses: actions/upload-artifact@v2
        with:
          name: Package
          path: staging

      - name: Create App Baked Image
        id: imageBuilder
        uses: azure/build-vm-image@v0
        with:
          location: 'eastus2'
          resource-group-name: '{rgName}'
          managed-identity: '{Identity}' # Managed identity
          source-os-type: 'windows'
          source-image-type: 'platformImage'
          source-image: MicrosoftWindowsServer:WindowsServer:2019-Datacenter:latest #unique identifier of source image
          dist-type: 'SharedImageGallery'
          dist-resource-id: '/subscriptions/{subscriptionID}/resourceGroups/{rgName}/providers/Microsoft.Compute/galleries/{galleryName}/images/{imageName}/versions/0.1.${{ GITHUB.RUN_ID }}' #Replace with the resource id of your shared image  gallery's image definition
          dist-location: 'eastus2'

      - name: CREATE VM
        uses: azure/CLI@v1
        with:
          azcliversion: 2.0.72
          inlineScript: |
          az vm create --resource-group ghactions-vMimage  --name "app-vm-${{ GITHUB.RUN_NUMBER }}"  --admin-username myuser --admin-password "${{ secrets.VM_PWD }}" --location  eastus2 \
              --image "${{ steps.imageBuilder.outputs.custom-image-uri }}"
下一步
- 瞭解如何 部署至 Azure。