使用 Azure Artifacts 摘要作為私人 PowerShell 存放庫
Azure DevOps Services
Azure Artifacts 提供共用 PowerShell 腳本的便利解決方案。 藉由使用 Azure Artifacts 摘要,您可以從命令行順暢地發佈 PowerShell 模組,並透過摘要設定控制其存取權。 本文會引導您將 Azure Artifacts 摘要設定為私人 PowerShell 存放庫,以儲存和共用 PowerShell 模組。
在本文中,您將學會如何:
- 建立個人存取令牌
- 建立 PowerShell 模組
- 建立 SecretStore 保存庫並註冊存放庫
- 從摘要發佈和取用套件
必要條件
如果您還沒有摘要,請建立 新的摘要 。
安裝 PSResourceGet。
注意
PSResourceGet 不支援 Azure Artifacts 認證提供者。
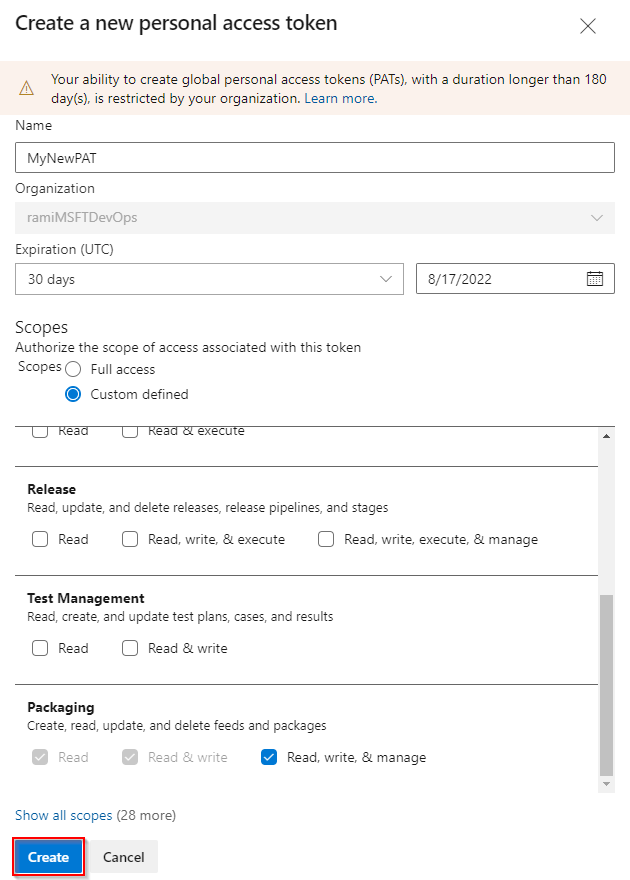
建立個人存取權杖
個人存取令牌可作為您的數位身分識別,並做為使用 Azure DevOps 進行驗證的替代密碼。
流覽至您的 Azure DevOps 組織
https://dev.azure.com/<ORGANIZATION_NAME>/選取使用者設定圖示,選取 [ 個人存取令牌],然後選取 [ 新增令牌]。
輸入 PAT 的名稱、設定到期日、選取 [自定義定義],然後選取 [封裝>讀取、寫入及管理]。
完成 時選取 [建立 ],並確定您將 PAT 複製並儲存在安全的位置。
建立 PowerShell 模組
如果您沒有自己的模組,請遵循本節中的指示來建立範例 PowerShell 模組。 否則,請跳到下一個步驟:
建立新的資料夾 PowerShell-Demo。 流覽至您的資料夾,並建立新的檔案 PowerShell-Demo.psm1。
將下列腳本貼到 PowerShell-Demo.psm1 檔案中:
Function PowerShell-Demo{
    Write-Host "Hello World!"
}
在 PowerShell-Demo 目錄中執行下列命令,以產生模組指令清單:
New-ModuleManifest -Path .\PowerShell-Demo.psd1開啟 PowerShell-Demo.psd1 檔案並找出
RootModule變數。 此設定會指定 PowerShell 在匯入模組時載入的主要腳本檔案。 將空字串取代為 PowerShell-Demo.psm1 檔案的路徑:RootModule = 'PowerShell-Demo.psm1'區
FunctionsToExport段會指定用戶匯入模組時可存取哪些函式。 包含您的 PowerShell-Demo 函式:FunctionsToExport = @('PowerShell-Demo')找出 區
FileList段,其中列出封裝模組時所包含的檔案。 新增您想要與模組一起封裝的檔案:FileList = @('./PowerShell-Demo.psm1')
註冊存放庫
執行下列命令來建立認證物件。 以正確的資訊取代佔位元。
$username = "<USER_NAME>"
$patToken = "<PERSONAL_ACCESS_TOKEN>" | ConvertTo-SecureString -AsPlainText -Force

$credentials = New-Object System.Management.Automation.PSCredential($username, $patToken)
請確定 已安裝 SecretManagement 和 SecretStore ,然後執行下列命令來建立保存庫並新增秘密:
Register-SecretVault -Name "MySecretVault" -ModuleName Microsoft.PowerShell.SecretStore -DefaultVault

Set-Secret -Name "MyCredential" -Secret $credentials -Vault "MySecretVault"

$CredentialInfo = [Microsoft.PowerShell.PSResourceGet.UtilClasses.PSCredentialInfo]::new('MySecretVault', 'MyCredential')
若要確認保存庫和秘密是否已成功建立,請執行下列命令以列出您的所有秘密:
PS > Get-SecretInfo

Name            Type         VaultName
----            ----         ---------
MyCredential    PSCredential MySecretVault
執行下列命令來註冊 PowerShell 存放庫。 您可以瀏覽至 [項目設定] 區段>來源 URL 底下的 [成品>連線至摘要>] NuGet.exe來尋找
SourceLocation連結。專案範圍的摘要:
Register-PSResourceRepository -Name "PowershellPSResourceRepository" `
    -Uri "https://pkgs.dev.azure.com/<ORGANIZATION_NAME>/<PROJECT_NAME>/_packaging/<FEED_NAME>/nuget/v3/index.json" `
    -Trusted `
    -CredentialInfo $CredentialInfo
組織範圍的摘要:
Register-PSResourceRepository -Name "PowershellPSResourceRepository" `
    -Uri "https://pkgs.dev.azure.com/<ORGANIZATION_NAME>/_packaging/<FEED_NAME>/nuget/v3/index.json" `
    -Trusted `
    -CredentialInfo $CredentialInfo
提示
某些版本的 PowerShell 可能需要在執行 Cmdlet 之後
Register-PSResourceRepository啟動新的工作階段,以避免遇到 無法解析套件來源 警告。若要確認存放庫是否已成功註冊,請執行下列命令來擷取目前使用者的所有已註冊存放庫:
Get-PSResourceRepository
注意
如果您遇到錯誤:回應狀態代碼未指出成功: 404(找不到)。請確定您的來源 URL 指向 nuget/v3/index.json ,而不是 nuget/v2。
發佈套件
執行下列命令,將套件發佈至您的摘要:
Publish-PSResource -Path <PACKAGE_PATH> -Repository <REPOSITORY_NAME> -ApiKey (Get-Secret <SECRET_NAME>)
範例:
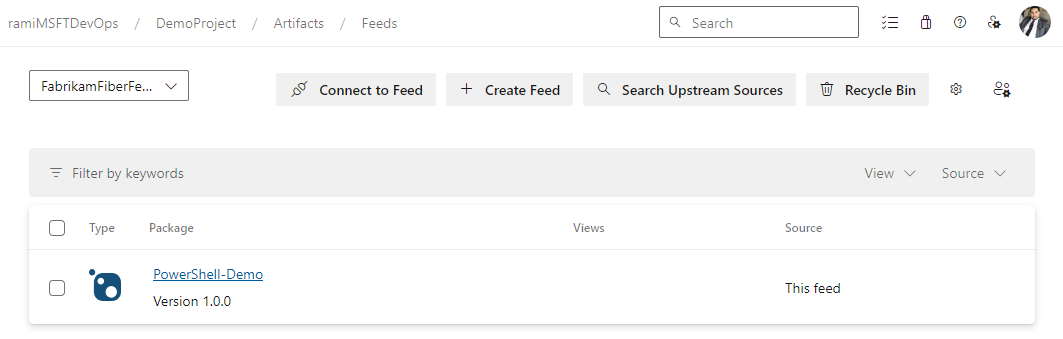
PS C:\AzureDevOps\Demos\PowerShellDemo> Publish-PSResource -Path .\scripts\ -Repository FabrikamFiberFeed -ApiKey (Get-Secret MyNewCredential) -verbose
VERBOSE: Performing the operation "Publish-PSResource" on target "Publish resource
'C:\AzureDevOps\Demos\PowerShellDemo\scripts\' from the machine".
VERBOSE: The newly created nuspec is:
C:\Users\xxxx\AppData\Local\Temp\xxxxxxxxx\PowerShell-Demo.nuspec
VERBOSE: credential successfully read from vault and set for repository: FabrikamFiberFeed
VERBOSE: Successfully packed the resource into a .nupkg
VERBOSE: Successfully published the resource to
'https://pkgs.dev.azure.com/ramiMSFTDevOps/DemoProject/_packaging/FabrikamFiberFeed/nuget/v3/index.json'
VERBOSE: Deleting temporary directory 'C:\Users\xxxx\AppData\Local\Temp\xxxxxxx'
安裝套件
若要確認模組是否可在您的存放庫中使用,請使用下列命令來搜尋它:
Find-PSResource -Name <RESOURCE_NAME> -Repository <REPOSITORY_NAME> -verbose執行下列命令以安裝模組的最新穩定版本:
Install-PSResource <MODULE_NAME>
提示
如果您遇到錯誤: 呼叫 「WriteObject」 的例外狀況,請啟動新的 PowerShell 視窗並執行 Get-SecretInfo。 在執行 Find-PSResource 和 Install-PSResource 之前,請輸入保存庫密碼,因為 SecretStore 逾時期限可能會過期。 默認 PasswordTimeout 為 900 秒,但您可以視需要修改此值。 如需詳細資訊,請參閱 在自動化 中使用 SecretStore。
在本文中,您將學會如何:
- 建立個人存取令牌
- 建立、封裝及發佈PowerShell模組
- 以 PowerShell 存放庫的形式連線到摘要
- 使用 Azure Pipelines 註冊並安裝 PowerShell 模組
必要條件
建立個人存取權杖
個人存取令牌可作為您的數位身分識別,並做為使用 Azure DevOps 進行驗證的替代密碼。
流覽至您的 Azure DevOps 組織
https://dev.azure.com/<ORGANIZATION_NAME>/選取使用者設定圖示,選取 [ 個人存取令牌],然後選取 [ 新增令牌]。
輸入 PAT 的名稱、設定到期日、選取 [自定義定義],然後選取 [封裝>讀取、寫入及管理]。
完成 時選取 [建立 ],並確定您將 PAT 複製並儲存在安全的位置。
建立 PowerShell 模組
如果您沒有自己的模組,請遵循本節中的指示來建立範例 PowerShell 模組。 否則,請跳到下一個步驟:
建立新的資料夾 Get-Hello。 流覽至您的資料夾,並建立新的 檔案 Get-Hello.psm1。
將下列腳本貼到 Get-Hello.psm1 檔案中:
Function Get-Hello{
    Write-Host "Hello Azure DevOps!"
}
在 Get-Hello 目錄中執行下列命令,以產生模組指令清單:
New-ModuleManifest -Path .\Get-Hello.psd1開啟 Get-Hello.psd1 檔案並找出
RootModule變數。 此設定會指定 PowerShell 在匯入模組時載入的主要腳本檔案。 將空字串取代為 Get-Hello.psm1 檔案的路徑:RootModule = 'Get-Hello.psm1'區
FunctionsToExport段會指定用戶匯入模組時可存取哪些函式。 包含您的 Get-Hello 函 式:FunctionsToExport = @('Get-Hello')尋找 區
FileList段,指定封裝模組時所包含的檔案。 新增您想要與模組一起封裝的檔案:FileList = @('./Get-Hello.psm1')
封裝和發佈模組
為您的模組產生 nuspec 檔案。 此命令會 建立 Get-Hello.nuspec 檔案,其中包含封裝模組所需的元數據:
nuget spec Get-Hello執行下列命令來封裝您的模組:
nuget pack Get-Hello.nuspec執行下列命令以新增您的摘要來源 URL。 請確定您在摘要來源 URL 中使用 V2,因為不支援 NuGet V3。
組織範圍的摘要:
nuget sources Add -Name "<FEED_NAME>" -Source "https://pkgs.dev.azure.com/<ORGANIZATION_NAME>/_packaging/<FEED_NAME>/nuget/v2" -username "<USER_NAME>" -password "<PERSONAL_ACCESS_TOKEN>"專案範圍的摘要:
nuget sources Add -Name "<FEED_NAME>" -Source "https://pkgs.dev.azure.com/<ORGANIZATION_NAME>/<PROJECT_NAME>/_packaging/<FEED_NAME>/nuget/v2" -username "<USER_NAME>" -password "<PERSONAL_ACCESS_TOKEN>"
將套件發佈至您的摘要:
nuget push -Source "<FEED_NAME>" -ApiKey "<ANY_STRING>" "<PACKAGE_PATH>"
重要
模組指令清單中的版本號碼 (.psd1) 必須與 .nuspec 檔案中的版本號碼相同。
以 PowerShell 存放庫的形式連線到摘要
本節會引導您使用摘要作為 PowerShell 存放庫進行驗證,並取用裝載於摘要中的模組:
在 PowerShell 提示字元視窗中,執行下列命令來設定您的認證。 將佔位元取代為適當的資訊。
$patToken = "<PERSONAL_ACCESS_TOKEN>" | ConvertTo-SecureString -AsPlainText -Force

$credsAzureDevopsServices = New-Object System.Management.Automation.PSCredential("<USER_NAME>", $patToken)
註冊 PowerShell 存放庫。 您可以瀏覽至 [項目設定] 區段>來源 URL 底下的 [成品>連線至摘要>] NuGet.exe來尋找
SourceLocation連結。專案範圍的摘要:
Register-PSRepository -Name <REPOSITORY_NAME> -SourceLocation "https://pkgs.dev.azure.com/<ORGANIZATION_NAME>/<PROJECT_NAME>/_packaging/<FEED_NAME>/nuget/v2" -PublishLocation "https://pkgs.dev.azure.com/<ORGANIZATION_NAME>/<PROJECT_NAME>/_packaging/<FEED_NAME>/nuget/v2" -InstallationPolicy Trusted -Credential $credsAzureDevopsServices組織範圍的摘要:
Register-PSRepository -Name <REPOSITORY_NAME> -SourceLocation "https://pkgs.dev.azure.com/<ORGANIZATION_NAME>/_packaging/<FEED_NAME>/nuget/v2" -PublishLocation "https://pkgs.dev.azure.com/<ORGANIZATION_NAME>/_packaging/<FEED_NAME>/nuget/v2" -InstallationPolicy Trusted -Credential $credsAzureDevopsServices
提示
某些版本的 PowerShell 可能需要在執行 Cmdlet 之後
Register-PSRepository啟動新的工作階段,以避免遇到 無法解析套件來源 警告。註冊您的套件來源:
專案範圍的摘要:
Register-PackageSource -Name <REPOSITORY_NAME> -Location "https://pkgs.dev.azure.com/<ORGANIZATION_NAME>/<PROJECT_NAME>/_packaging/<FEED_NAME>/nuget/v2" -ProviderName NuGet -Trusted -SkipValidate -Credential $credsAzureDevopsServices組織範圍的摘要:
Register-PackageSource -Name <REPOSITORY_NAME> -Location "https://pkgs.dev.azure.com/<ORGANIZATION_NAME>/_packaging/<FEED_NAME>/nuget/v2" -ProviderName NuGet -Trusted -SkipValidate -Credential $credsAzureDevopsServices
注意
- Register-PSRepository:用於註冊 PowerShell 存放庫來尋找及安裝模組。
- Register-PackageSource:用來註冊套件來源來尋找和發佈套件。
若要確認存放庫是否已成功註冊,請執行下列命令來擷取目前使用者的所有已註冊存放庫:
Get-PSRepository執行下列命令以安裝 Get-Hello 模組。
Install-Module -Name <PACKAGE_NAME> -Repository <REPOSITORY_NAME>
注意
如果您的組織使用防火牆或 Proxy 伺服器,請確定您允許存取 Azure Artifacts 網域 URL 和 IP 位址。
從管線安裝套件
此範例會逐步引導您使用 Azure Artifacts 摘要進行驗證,並從管線安裝 PowerShell 模組。 若要使用您的個人存取令牌,請將它新增為管線變數,如下所示:
登入您的 Azure DevOps 組織,然後瀏覽至您的專案。
選取 [管線],選取您的管線定義,然後選取 [ 編輯 ] 以修改管線。
選取 右上角的 [變數 ],然後選取 [ 新增變數]。
輸入變數的 [ 名稱 ],然後將您的個人存取令牌貼到 [值 ] 文字框中。
請確定您選取 [ 保留此值秘密 ] 複選框。 完成時選取 [ 確定 ]。
為您的userName新增第二個變數。 輸入變數的 [名稱],然後在 [值] 文本框中輸入您的 userName。
當完成時,選擇儲存。
trigger:
- main

pool:
  vmImage: 'Windows-latest'

variables:
  PackageFeedEndpoint: 'https://pkgs.dev.azure.com/<ORGANIZATION_NAME>/<PROJECT_NAME>/_packaging/<FEED_NAME>/nuget/v2' ## For organization scoped feeds use'https://pkgs.dev.azure.com/<ORGANIZATION_NAME>/_packaging/<FEED_NAME>/nuget/v2'

steps:
- powershell: |
    $pat = ConvertTo-SecureString ${env:pat_token} -AsPlainText -Force
    $credential = New-Object System.Management.Automation.PSCredential("${env:userName}", $pat)
    Register-PSRepository -Name <REPOSITORY_NAME> -SourceLocation "$(PackageFeedEndpoint)" -InstallationPolicy Trusted -Credential $credential
  displayName: 'Register PSRepository'
  env:
    pat_token: $patToken
    userName: $userName

- powershell: |
    nuget install <PACKAGE_NAME> -Source "https://pkgs.dev.azure.com/<ORGANIZATION_NAME>/<PROJECT_NAME>/_packaging/<FEED_NAME>/nuget/v3/index.json"
  displayName: 'Install module'