快速入門:使用 ARM 範本部署 Azure IoT 中樞和儲存體帳戶
在本快速入門中,您會使用 Azure Resource Manager 範本 (ARM 範本) 來建立 IoT 中樞、Azure 儲存體帳戶,以及將訊息從 IoT 中樞傳送至儲存體的路由。 設定中樞之後,在符合路由條件時,傳送至中樞的訊息就會自動路由至儲存體帳戶。 在本快速入門結束時,您可以開啟儲存體帳戶並查看已傳送的訊息。
Azure Resource Manager 範本是一個 JavaScript 物件標記法 (JSON) 檔案,會定義專案的基礎結構和設定。 範本使用宣告式語法。 您可以描述預期的部署,而不需要撰寫程式設計命令順序來建立部署。
如果您的環境符合必要條件,而且您很熟悉 ARM 範本,請選取 [部署至 Azure] 按鈕。 範本會在 Azure 入口網站中開啟。

必要條件
- 如果您沒有 Azure 訂用帳戶,請在開始前建立免費 Azure 帳戶。
檢閱範本
本快速入門中使用的範本名為 101-iothub-auto-route-messages,來自 Azure 快速入門範本。
範本中定義了兩個 Azure 資源:
- Microsoft.Storage/storageAccounts:具有容器的儲存體帳戶。
- Microsoft.Devices/IotHubs:具有指向儲存體容器之端點的 IoT 中樞,以及傳送篩選訊息至該端點的路由。
{
  "$schema": "https://schema.management.azure.com/schemas/2019-04-01/deploymentTemplate.json#",
  "contentVersion": "1.0.0.0",
  "metadata": {
    "_generator": {
      "name": "bicep",
      "version": "0.26.54.24096",
      "templateHash": "1111741482289134864"
    }
  },
  "parameters": {
    "projectName": {
      "type": "string",
      "defaultValue": "contoso",
      "minLength": 1,
      "maxLength": 11,
      "metadata": {
        "description": "Define the project name or prefix for all objects."
      }
    },
    "location": {
      "type": "string",
      "defaultValue": "[resourceGroup().location]",
      "metadata": {
        "description": "The datacenter to use for the deployment."
      }
    },
    "skuName": {
      "type": "string",
      "defaultValue": "S1",
      "metadata": {
        "description": "The SKU to use for the IoT Hub."
      }
    },
    "skuUnits": {
      "type": "int",
      "defaultValue": 1,
      "metadata": {
        "description": "The number of IoT Hub units."
      }
    },
    "d2cPartitions": {
      "type": "int",
      "defaultValue": 4,
      "metadata": {
        "description": "Partitions used for the event stream."
      }
    }
  },
  "variables": {
    "iotHubName": "[format('{0}Hub{1}', parameters('projectName'), uniqueString(resourceGroup().id))]",
    "storageAccountName": "[format('{0}{1}', toLower(parameters('projectName')), uniqueString(resourceGroup().id))]",
    "storageEndpoint": "[format('{0}StorageEndpont', parameters('projectName'))]",
    "storageContainerName": "[format('{0}results', toLower(parameters('projectName')))]"
  },
  "resources": [
    {
      "type": "Microsoft.Storage/storageAccounts",
      "apiVersion": "2023-01-01",
      "name": "[variables('storageAccountName')]",
      "location": "[parameters('location')]",
      "sku": {
        "name": "Standard_LRS"
      },
      "kind": "Storage",
      "properties": {
        "allowBlobPublicAccess": false,
        "minimumTlsVersion": "TLS1_2",
        "supportsHttpsTrafficOnly": true
      }
    },
    {
      "type": "Microsoft.Storage/storageAccounts/blobServices/containers",
      "apiVersion": "2023-01-01",
      "name": "[format('{0}/default/{1}', variables('storageAccountName'), variables('storageContainerName'))]",
      "properties": {
        "publicAccess": "None"
      },
      "dependsOn": [
        "[resourceId('Microsoft.Storage/storageAccounts', variables('storageAccountName'))]"
      ]
    },
    {
      "type": "Microsoft.Devices/IotHubs",
      "apiVersion": "2023-06-30",
      "name": "[variables('iotHubName')]",
      "location": "[parameters('location')]",
      "sku": {
        "name": "[parameters('skuName')]",
        "capacity": "[parameters('skuUnits')]"
      },
      "properties": {
        "eventHubEndpoints": {
          "events": {
            "retentionTimeInDays": 1,
            "partitionCount": "[parameters('d2cPartitions')]"
          }
        },
        "routing": {
          "endpoints": {
            "storageContainers": [
              {
                "connectionString": "[format('DefaultEndpointsProtocol=https;AccountName={0};EndpointSuffix={1};AccountKey={2}', variables('storageAccountName'), environment().suffixes.storage, listKeys(resourceId('Microsoft.Storage/storageAccounts', variables('storageAccountName')), '2023-01-01').keys[0].value)]",
                "containerName": "[variables('storageContainerName')]",
                "fileNameFormat": "{iothub}/{partition}/{YYYY}/{MM}/{DD}/{HH}/{mm}",
                "batchFrequencyInSeconds": 100,
                "maxChunkSizeInBytes": 104857600,
                "encoding": "JSON",
                "name": "[variables('storageEndpoint')]"
              }
            ]
          },
          "routes": [
            {
              "name": "ContosoStorageRoute",
              "source": "DeviceMessages",
              "condition": "level=\"storage\"",
              "endpointNames": [
                "[variables('storageEndpoint')]"
              ],
              "isEnabled": true
            }
          ],
          "fallbackRoute": {
            "name": "$fallback",
            "source": "DeviceMessages",
            "condition": "true",
            "endpointNames": [
              "events"
            ],
            "isEnabled": true
          }
        },
        "messagingEndpoints": {
          "fileNotifications": {
            "lockDurationAsIso8601": "PT1M",
            "ttlAsIso8601": "PT1H",
            "maxDeliveryCount": 10
          }
        },
        "enableFileUploadNotifications": false,
        "cloudToDevice": {
          "maxDeliveryCount": 10,
          "defaultTtlAsIso8601": "PT1H",
          "feedback": {
            "lockDurationAsIso8601": "PT1M",
            "ttlAsIso8601": "PT1H",
            "maxDeliveryCount": 10
          }
        }
      },
      "dependsOn": [
        "[resourceId('Microsoft.Storage/storageAccounts', variables('storageAccountName'))]"
      ]
    }
  ],
  "outputs": {
    "name": {
      "type": "string",
      "value": "[variables('iotHubName')]"
    },
    "resourceId": {
      "type": "string",
      "value": "[resourceId('Microsoft.Devices/IotHubs', variables('iotHubName'))]"
    },
    "resourceGroupName": {
      "type": "string",
      "value": "[resourceGroup().name]"
    },
    "location": {
      "type": "string",
      "value": "[parameters('location')]"
    }
  }
}
部署範本
本節提供部署 ARM 範本的步驟。
藉由部署 ARM 範本來建立資源。
傳送裝置到雲端的訊息
在本節中,您會在新的 IoT 中樞註冊裝置,然後將訊息從該裝置傳送至 IoT 中樞。 在 IoT 中樞中設定範本的路由只會在包含訊息屬性 level=storage 時傳送訊息至儲存體。 為了測試此路由條件如預期般運作,我們會傳送一些具有該屬性 (有些則沒有) 的訊息。
提示
為方便起見,本快速入門會使用 Azure CLI 模擬裝置。 如需針對路由傳送使用訊息屬性傳送裝置到雲端訊息的程式碼範例,請參閱適用於 .NET 的 Azure IoT SDK 中的 HubRoutingSample (英文)。
擷取範本為您建立的 IoT 中樞名稱。
如果您在上一節中使用預設命令,您的資源是在 ContosoResourceGrp 資源群組中建立的。 如果您使用不同的資源群組,請更新下列命令,使其符合。
az iot hub list --resource-group ContosoResourceGrp --output table從輸出複製 IoT 中樞的名稱。 其格式應該像這樣:
contosoHub{randomidentifier}將裝置新增至中樞。
az iot hub device-identity create --device-id contosoDevice --hub-name {YourIoTHubName}模擬裝置並傳送裝置到雲端的訊息。
--data參數可讓我們設定訊息本文。az iot device simulate \ --device-id contosoDevice \ --hub-name {YourIoTHubName} \ --data "This message won't be routed."模擬器會傳送 100 則訊息,然後中斷連線。 基於本快速入門的目的,您不需要等候全部 100 則訊息。
提示
Azure CLI 不會在傳送訊息時列印訊息。 如果您想要在訊息到達中樞時觀看訊息,則可以安裝適用於 Visual Studio Code 的 Azure IoT 中樞延伸模組 (部分機器翻譯),並用它來監視內建端點。
傳送要路由傳送至儲存體之裝置到雲端的訊息。
--properties參數可讓我們將訊息、應用程式或系統屬性新增至預設訊息。 在本快速入門中,IoT 中樞的路由會尋找包含訊息屬性level=storage的訊息。az iot device simulate \ --device-id contosoDevice \ --hub-name {YourIoTHubName} \ --properties level=storage \ --data "This message will be routed to storage."
檢閱已部署的資源
登入 Azure 入口網站並選取 [資源群組],然後選取儲存體帳戶。
向下切入至儲存體帳戶,直到您找到檔案為止。
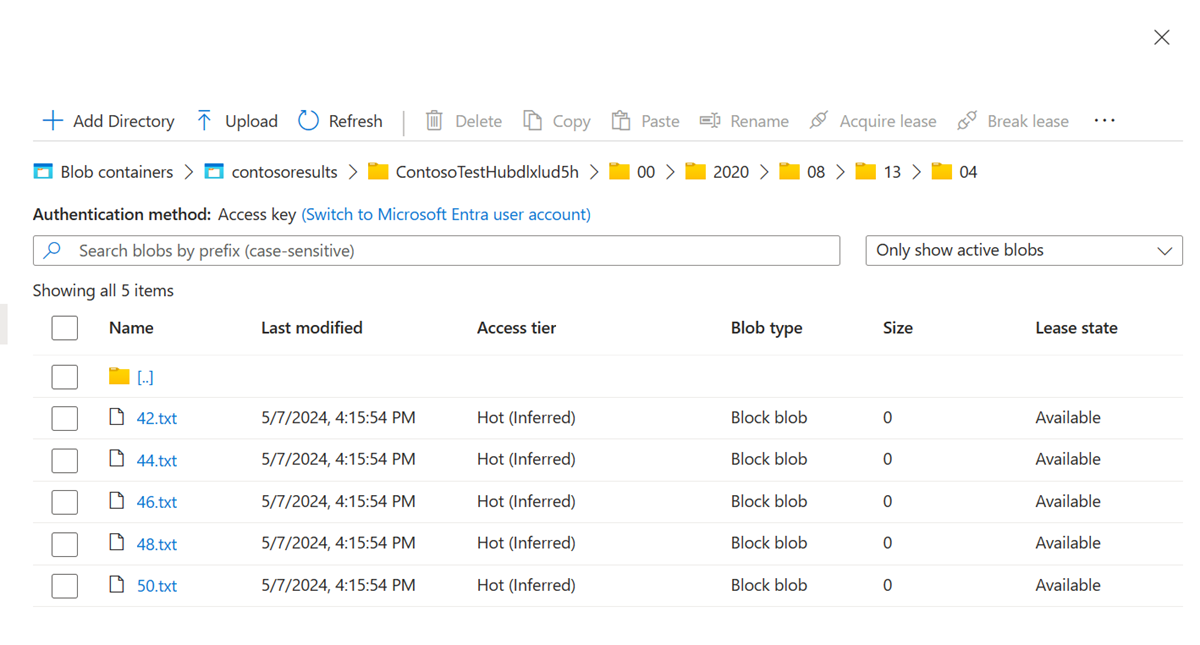
選取其中一個檔案,然後選取 [下載],並將檔案下載到您稍後可以找到的位置。 其名稱為數值,例如 47。 在結尾加上 .txt,然後在檔案上按兩下來開啟檔案。
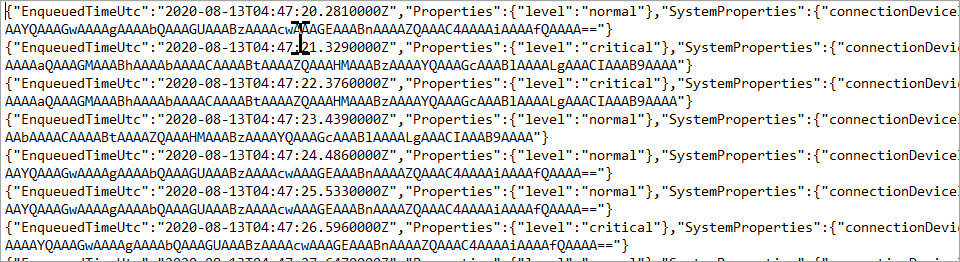
當您開啟檔案時,每個資料列都是不同的訊息;每則訊息的本文也會經過加密。 其必須按照順序,才能讓您對訊息本文執行查詢。
注意
這些訊息會以 UTF-32 和 base64 編碼。 如果您回讀訊息,則必須將其從 base64 和 UTF-32 中解碼,才能以 ASCII 的形式讀取。 如果您有興趣,可以使用路由教學課程中的 ReadOneRowFromFile 方法,從這些訊息檔案中讀取其中一個檔案,並將其解碼成 ASCII。 ReadOneRowFromFile 位於您針對此快速入門進行解壓縮的 IoT C# SDK 存放庫中。 以下是該資料夾頂端的路徑:./iothub/device/samples/gettinged/RoutingTutorial/SimulatedDevice/Program.cs。將布林值
readTheFile設定為 true,並對磁碟上的檔案路徑進行硬式編碼,這會開啟並轉譯檔案中的第一個資料列。
在本快速入門中,您已部署 ARM 範本來建立 IoT 中樞和儲存體帳戶,並執行程式以將訊息傳送至中樞。 訊息會根據其訊息屬性路由傳送,並儲存在可供檢視的儲存體帳戶中。
清除資源
若要移除在本快速入門期間新增的資源,請登入 Azure 入口網站。 選取 [資源群組],然後尋找您在本快速入門中使用的資源群組。 選取資源群組,然後選取 [刪除]。 刪除群組時,也會刪除群組中的所有資源。