排程及廣播作業 (Python)
使用 Azure IoT 中樞排程和追蹤會更新數百萬部裝置的作業。 使用作業以:
- 更新所需屬性
- 更新標籤
- 叫用直接方法
就概念而言,作業會包裝上述其中一個動作,然後針對由裝置對應項 (twin) 查詢所定義的一組裝置,追蹤執行進度。 例如,後端應用程式可以在 10,000 個裝置上使用作業叫用重新啟動方法,此方法由裝置對應項查詢指定並排定在未來執行。 接著,該應用程式可以追蹤每個這些裝置接收和執行重新啟動方法的進度。
從下列文章深入了解這當中的每一項功能:
裝置對應項和屬性:開始使用裝置對應項和了解並使用 IoT 中樞中的裝置對應項屬性
直接方法:IoT 中樞開發人員指南 - 直接方法 (部分機器翻譯)
注意
本文中所述的功能僅適用於 IoT 中樞的標準層。 如需基本和標準/免費 IoT 中樞層的詳細資訊,請參閱選擇適合您解決方案的 IoT 中樞層。
本文說明如何建立兩個 Python 應用程式:
Python 模擬裝置應用程式 simDevice.py,其實作 lockDoor 直接方法,後端應用程式可呼叫此方法。
Python 主控台應用程式 scheduleJobService.py,其會建立兩個作業。 一個作業會呼叫 lockDoor 直接方法,而另一個作業會將所需的屬性更新傳送至多個裝置。
注意
如需可用來建置裝置和後端應用程式的 SDK 工具詳細資訊,請參閱 Azure IoT SDK。
必要條件
使用中的 Azure 帳戶。 (如果您沒有帳戶,只需要幾分鐘的時間就可以建立免費帳戶。)
Azure 訂用帳戶中的 IoT 中樞。 如果您還沒有中樞,可遵循建立 IoT 中樞中的步驟。
在 IoT 中樞內註冊的裝置。 如果 IoT 中樞中沒有裝置,請遵循註冊裝置中的步驟。
建議使用 Python 3.7 版或更新版本。 請務必使用安裝程式所需的 32 位元或 64 位元安裝。 在安裝期間出現系統提示時,務必將 Python 新增至平台特有的環境變數。
建立模擬裝置應用程式
在本節中,您建立 Python 主控台應用程式,回應雲端所呼叫的直接方法,可觸發模擬的 lockDoor 方法。
重要
本文包含使用共用存取簽章 (也稱為對稱金鑰驗證) 連線裝置的步驟。 此驗證方法方便進行測試和評估,但使用 X.509 憑證來驗證裝置是更安全的方法。 若要深入了解,請參閱安全性最佳做法>連線安全性。
在命令提示字元中,執行下列命令以安裝 azure-iot-device 套件:
pip install azure-iot-device使用文字編輯器,在工作目錄中建立新的 simDevice.py 檔案。
在 simDevice.py 檔案開頭新增下列
import陳述式和變數。 將deviceConnectionString取代為您上方所建立裝置的連接字串:import time from azure.iot.device import IoTHubDeviceClient, MethodResponse CONNECTION_STRING = "{deviceConnectionString}"定義下列函式,如此一來便會將用戶端具現化,並將其設為回應 lockDoor 方法以及接收裝置對應項更新:
def create_client():
    # Instantiate the client
    client = IoTHubDeviceClient.create_from_connection_string(CONNECTION_STRING)

    # Define behavior for responding to the lockDoor direct method
    def method_request_handler(method_request):
        if method_request.name == "lockDoor":
            print("Locking Door!")

            resp_status = 200
            resp_payload = {"Response": "lockDoor called successfully"}
            method_response = MethodResponse.create_from_method_request(
                method_request=method_request,
                status=resp_status,
                payload=resp_payload
            )
            client.send_method_response(method_response)

    # Define behavior for receiving a twin patch
    def twin_patch_handler(twin_patch):
        print("")
        print("Twin desired properties patch received:")
        print(twin_patch)

    # Set the handlers on the client
    try:
        print("Beginning to listen for 'lockDoor' direct method invocations...")
        client.on_method_request_received = method_request_handler
        print("Beginning to listen for updates to the Twin desired properties...")
        client.on_twin_desired_properties_patch_received = twin_patch_handler
    except:
        # If something goes wrong while setting the handlers, clean up the client
        client.shutdown()
        raise
新增下列程式碼以執行範例:
def main():
    print ("Starting the IoT Hub Python jobs sample...")
    client = create_client()

    print ("IoTHubDeviceClient waiting for commands, press Ctrl-C to exit")
    try:
        while True:
            time.sleep(100)
    except KeyboardInterrupt:
        print("IoTHubDeviceClient sample stopped!")
    finally:
        # Graceful exit
        print("Shutting down IoT Hub Client")
        client.shutdown()


if __name__ == '__main__':
    main()
儲存並關閉 simDevice.py 檔案。
注意
為了簡單起見,本文章不會實作重試原則。 在生產環境程式碼中,您應該如暫時性錯誤處理一文中所建議,實作重試原則 (例如指數型輪詢)。
取得 IoT 中樞連接字串
在本文中,您會建立後端服務,在裝置上叫用直接方法及更新裝置對應項。 服務需要有服務連線權限才能在裝置上呼叫直接方法。 服務也需要登錄讀取和登錄寫入權限,才能讀取和寫入身分識別登錄。 沒有任何預設的共用存取原則只包含這些權限,所以必須自己建立一個。
若要建立共用存取原則,其會授與服務連線、登錄讀取及登錄寫入權限,並取得此原則的連接字串,請遵循下列步驟:
在 Azure 入口網站中開啟 IoT 中樞。 取得 IoT 中樞最簡單的方式是選取 [資源群組]、選取 IoT 中樞所在的資源群組,以及從資源清單中選取您的 IoT 中樞。
在 IoT 中樞的左側窗格中,選取 [共用存取原則]。
從原則清單上方的功能表中,選取 [新增共用存取原則]。
在 [新增共用存取原則] 窗格中,輸入原則的描述性名稱,例如:serviceAndRegistryReadWrite。 在 [權限] 下,選取 [登錄寫入] 和 [服務連線] (當選取 [登錄寫入] 時,便會自動選取 [登錄讀取]),然後選取 [新增]。

返回 [共用存取原則] 頁面,從原則清單選取新原則。
在顯示的新窗格中,選取 [主要連接字串] 的複製圖示並儲存值。


如需 IoT 中樞共用存取原則和權限的詳細資訊,請參閱存取控制及權限。
重要
本文包含使用共用存取簽章連線至服務的步驟。 此驗證方法方便進行測試和評估,但使用 Microsoft Entra ID 或受控識別向服務進行驗證是更安全的方法。 若要深入了解,請參閱安全性最佳做法 > 雲端安全性。
排定用於呼叫直接方法及更新裝置對應項 (twin) 屬性的作業
在本節中,您會建立一個 Python 主控台應用程式,其會使用直接方法在裝置上初始化遠端 lockDoor,並更新裝置對應項的所需屬性。
在命令提示字元中,執行下列命令以安裝 azure-iot-hub 套件:
pip install azure-iot-hub使用文字編輯器,在工作目錄中建立新的 scheduleJobService.py 檔案。
在 scheduleJobService.py 檔案開頭新增下列
import陳述式和變數。 將{IoTHubConnectionString}預留位置取代為先前在取得 IoT 中樞連接字串內複製的 IoT 中樞連接字串。 將{deviceId}預留位置取代為裝置識別碼 (已註冊裝置的名稱):import os import sys import datetime import time import threading import uuid import msrest from azure.iot.hub import IoTHubJobManager, IoTHubRegistryManager from azure.iot.hub.models import JobProperties, JobRequest, Twin, TwinProperties, CloudToDeviceMethod CONNECTION_STRING = "{IoTHubConnectionString}" DEVICE_ID = "{deviceId}" METHOD_NAME = "lockDoor" METHOD_PAYLOAD = "{\"lockTime\":\"10m\"}" UPDATE_PATCH = {"building":43,"floor":3} TIMEOUT = 60 WAIT_COUNT = 5 # Create IoTHubJobManager iothub_job_manager = IoTHubJobManager.from_connection_string(CONNECTION_STRING)新增下列方法來執行呼叫直接方法和裝置對應項的兩個作業:
def device_method_job(job_id, device_id, execution_time):
    print ( "" )
    print ( "Scheduling job: " + str(job_id) )

    job_request = JobRequest()
    job_request.job_id = job_id
    job_request.type = "scheduleDeviceMethod"
    job_request.start_time = datetime.datetime.utcnow().isoformat()
    job_request.cloud_to_device_method = CloudToDeviceMethod(method_name=METHOD_NAME, payload=METHOD_PAYLOAD)
    job_request.max_execution_time_in_seconds = execution_time
    job_request.query_condition = "DeviceId in ['{}']".format(device_id)

    new_job_response = iothub_job_manager.create_scheduled_job(job_id, job_request)

def device_twin_job(job_id, device_id, execution_time):
    print ( "" )
    print ( "Scheduling job " + str(job_id) )

    job_request = JobRequest()
    job_request.job_id = job_id
    job_request.type = "scheduleUpdateTwin"
    job_request.start_time = datetime.datetime.utcnow().isoformat()
    job_request.update_twin = Twin(etag="*", properties=TwinProperties(desired=UPDATE_PATCH))
    job_request.max_execution_time_in_seconds = execution_time
    job_request.query_condition = "DeviceId in ['{}']".format(device_id)

    new_job_response = iothub_job_manager.create_scheduled_job(job_id, job_request)
新增下列程式碼來排程作業及更新作業狀態。 另包含
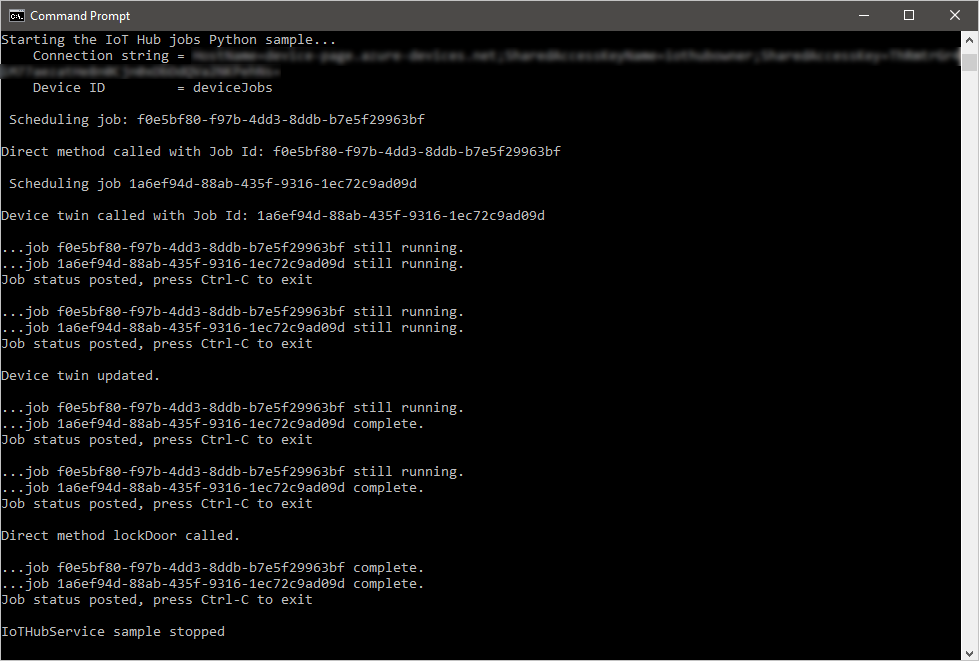
main常式:def iothub_jobs_sample_run(): try: method_job_id = uuid.uuid4() device_method_job(method_job_id, DEVICE_ID, TIMEOUT) print ( "" ) print ( "Direct method called with Job Id: " + str(method_job_id) ) twin_job_id = uuid.uuid4() device_twin_job(twin_job_id, DEVICE_ID, TIMEOUT) print ( "" ) print ( "Device twin called with Job Id: " + str(twin_job_id) ) while True: print ( "" ) method_job_status = iothub_job_manager.get_scheduled_job(method_job_id) print ( "...job " + str(method_job_id) + " " + method_job_status.status ) twin_job_status = iothub_job_manager.get_scheduled_job(twin_job_id) print ( "...job " + str(twin_job_id) + " " + twin_job_status.status ) print ( "Job status posted, press Ctrl-C to exit" ) time.sleep(WAIT_COUNT) except msrest.exceptions.HttpOperationError as ex: print ( "" ) print ( "Http error {}".format(ex.response.text) ) return except Exception as ex: print ( "" ) print ( "Unexpected error {}".format(ex) ) return except KeyboardInterrupt: print ( "" ) print ( "IoTHubService sample stopped" ) if __name__ == '__main__': print ( "Starting the IoT Hub jobs Python sample..." ) print ( " Connection string = {0}".format(CONNECTION_STRING) ) print ( " Device ID = {0}".format(DEVICE_ID) ) iothub_jobs_sample_run()儲存並關閉 scheduleJobService.py 檔案。
執行應用程式
現在您已經準備好執行應用程式。
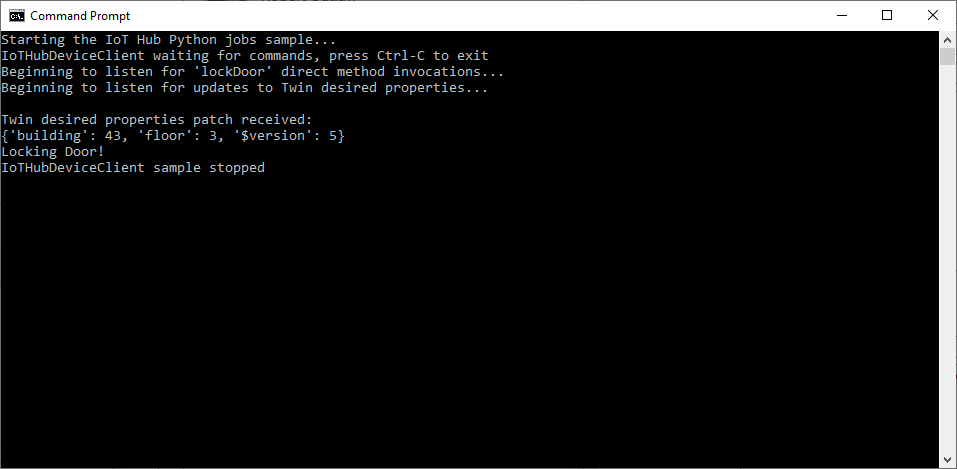
在工作目錄的命令提示字元中,執行下列命令以開始接聽重新啟動直接方法:
python simDevice.py在工作目錄的另一個命令提示字元中,執行下列命令以觸發鎖門作業並更新對應項:
python scheduleJobService.py您會在主控台中看到直接方法和裝置對應項更新的裝置回應。
下一步
在本文中,您已排程工作來執行直接方法,並更新裝置對應項的屬性。
若要繼續探索 IoT 中樞和裝置管理模式,請更新使用 Raspberry Pi 3 B+ 參考映像的 Azure IoT 中樞裝置更新教學課程中的映像。