教學課程:使用 Azure 入口網站和主題/訂用帳戶來更新庫存
Azure 服務匯流排是多租用戶雲端傳訊服務,可在應用程式和服務之間傳送資訊。 非同步作業可讓您進行靈活的代理傳訊,搭配結構化的先進先出 (FIFO) 傳訊及發佈/訂閱功能。 如需 Azure 服務匯流排的詳細概觀,請參閱什麼是服務匯流排?。
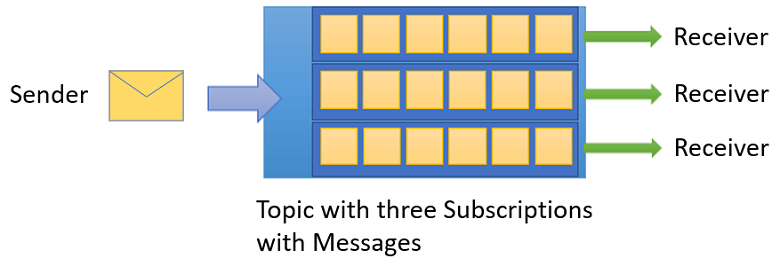
本教學課程說明如何透過使用 Azure 入口網站和 .NET 的發佈/訂閱通道,在零售庫存案例中使用服務匯流排主題和訂用帳戶。 此案例的範例是多個零售商店的庫存商品更新。 在此案例中,每個 (或每組) 商店都會收到預定要傳送給他們的訊息,用以更新其商品。 本教學課程將說明如何使用訂用帳戶和篩選實作此案例。 首先,您會以三個訂用帳戶建立主題、新增的某些規則和篩選條件,然後從主題和訂用帳戶來傳送和接收訊息。
在本教學課程中,您會了解如何:
- 使用 Azure 入口網站建立服務匯流排主題,並建立該主題的三個訂用帳戶
- 使用 .NET 程式碼新增訂用帳戶篩選條件
- 建立具有不同內容的訊息
- 傳送訊息並確認這些訊息送達預期的訂用帳戶
- 從訂用帳戶接收訊息
必要條件
若要完成本教學課程,請確定您具有下列項目︰
- Azure 訂用帳戶。 若要使用 Azure 服務 (包括 Azure 服務匯流排),您需要訂用帳戶。 如果您沒有 Azure 訂用帳戶,您可以在開始前建立免費帳戶。
- Visual Studio 2019 或更新版本。
服務匯流排主題和訂用帳戶
主題的每個訂用帳戶都會接收到每則訊息的複本。 主題在通訊協定和語意上都與服務匯流排佇列完全相容。 服務匯流排主題支援具有篩選條件、並且可透過選用動作來設定或修改訊息屬性的多種選取規則。 每當有規則符合時,就會產生一則訊息。 若要深入了解規則、篩選條件和動作,請進入此連結。
在 Azure 入口網站中建立命名空間
若要開始在 Azure 中使用服務匯流排傳訊實體,您必須先使用 Azure 中的唯一名稱建立命名空間。 命名空間為應用程式內的服務匯流排資源 (佇列、主題等) 提供範圍容器。
若要建立命名空間:
登入 Azure 入口網站。
瀏覽至 [所有服務] 頁面。
在左側導覽列上,從類別清單中選取 [整合],將滑鼠停留在 [服務匯流排] 上方,然後選取 [服務匯流排] 圖格上的 + 按鈕。
![此圖顯示在功能表中依序選取 [建立資源]、[整合] 及 [服務匯流排]。](includes/media/service-bus-create-namespace-portal/create-resource-service-bus-menu.png)
在 [建立命名空間] 頁面的 [基本] 標籤中,遵循下列步驟:
針對 [訂用帳戶],選擇要在其中建立命名空間的 Azure 訂用帳戶。
針對 [資源群組],選擇將存留命名空間的現有資源群組,或是建立新的資源群組。
輸入命名空間的名稱。 命名空間名稱應遵循下列命名慣例:
- 名稱在整個 Azure 中必須是唯一的。 系統會立即檢查此名稱是否可用。
- 名稱長度至少 6 個字元,最多 50 個字元。
- 名稱僅可包含字母、數字和連字號 "-"。
- 名稱開頭必須為字母,且結尾必須為字母或數字。
- 名稱結尾不得為「-sb」或「-mgmt」。
針對 [位置],選擇應裝載命名空間的區域。
針對定價層,選取命名空間的定價層 (基本、標準或進階)。 針對本快速入門,選取 [標準]。
重要
如果您想要使用主題和訂用帳戶,請選擇 [標準] 或 [進階]。 基本定價層不支援主題/訂用帳戶。
若已選取 [進階] 定價層,請指定傳訊單位數目。 進階層可讓您的資源在 CPU 和記憶體層級上獲得隔離,讓每個工作負載能夠獨立執行。 此資源容器稱為傳訊單位。 進階命名空間都至少有一個傳訊單位。 您可以為每個服務匯流排的進階命名空間選取 1、2、4、8 或 16 個傳訊單位。 如需詳細資訊,請參閱服務匯流排進階傳訊。
選取頁面底部的 [檢閱 + 建立] 。
![此圖顯示 [建立命名空間] 頁面](includes/media/service-bus-create-namespace-portal/create-namespace.png)
在 [檢閱 + 建立] 頁面上檢閱設定,然後選取 [建立]。
一旦部署資源成功,請在部署頁面上選取 [移至資源]。
![此圖顯示部署成功頁面及 [前往資源] 連結。](includes/media/service-bus-create-namespace-portal/deployment-alert.png)
您會看到服務匯流排命名空間的首頁。

![此圖顯示在功能表中依序選取 [建立資源]、[整合] 及 [服務匯流排]。](includes/media/service-bus-create-namespace-portal/create-resource-service-bus-menu.png#lightbox)

取得命名空間的連接字串 (Azure 入口網站)
建立新命名空間時會自動產生初始共用存取簽章 (SAS) 原則與主要和次要金鑰,以及主要和次要連接字串,其會授與命名空間所有層面的完整控制權。 請參閱服務匯流排驗證與授權,以了解如何建立進一步的規則,對一般傳送者和接收者的權限施加更多限制。
用戶端可以使用連接字串來連線到服務匯流排命名空間。 若要複製命名空間的主要連接字串,請遵循下列步驟:
在 [服務匯流排命名空間] 頁面上,選取左側功能表的 [共用存取原則]。
在 [共用存取原則] 頁面上,選取 [RootManageSharedAccessKey]。
在 [原則:RootManageSharedAccessKey] 視窗中,選取在 [主要連接字串] 旁邊的複製按鈕,將連接字串複製到您的剪貼簿以供後續使用。 將此值貼到記事本或一些其他暫存位置。

您可使用此頁面來複製主要金鑰、次要金鑰、主要連接字串和次要連接字串。

使用 Azure 入口網站建立主題
在 [服務匯流排命名空間] 頁面上,選取左側功能表上的 [主題]。
選取工具列上的 [+ 主題]。
輸入主題的名稱。 保留其他選項的預設值。
選取 建立。
![螢幕擷取畫面:[建立主題] 頁面。](includes/media/service-bus-create-topics-subscriptions-portal/create-topic.png)
![螢幕擷取畫面:[建立主題] 頁面。](includes/media/service-bus-create-topics-subscriptions-portal/create-topic.png#lightbox)
針對主題建立訂用帳戶
選取您在上一節中建立的主題。
![螢幕擷取畫面:[主題] 頁面,其中已選取您的主題。](includes/media/service-bus-create-topics-subscriptions-portal/select-topic.png)
在 [服務匯流排主題] 頁面上,從左側功能表中選取 [訂用帳戶],然後選取工具列上的 [+ 訂用帳戶]。
![螢幕擷取畫面:[訂用帳戶] 頁面,其中已選取 [新增訂用帳戶] 按鈕。](includes/media/service-bus-create-topics-subscriptions-portal/add-subscription-button.png)
在 [建立訂用帳戶] 頁面上,遵循下列步驟:
輸入 S1 作為訂用帳戶的 [名稱]。
然後,選取 [建立] 以建立訂用帳戶。
![螢幕擷取畫面:[建立訂用帳戶] 頁面。](includes/media/service-bus-create-topics-subscriptions-portal/create-subscription-page.png)
重複執行前一個步驟兩次,以建立名為 S2 和 S3 的訂用帳戶。
![螢幕擷取畫面:[主題] 頁面,其中已選取您的主題。](includes/media/service-bus-create-topics-subscriptions-portal/select-topic.png#lightbox)
在訂用帳戶上建立篩選規則
佈建命名空間和主題/訂用帳戶,且您已擁有命名空間的連接字串之後,您即可在訂用帳戶上建立篩選規則,然後傳送和接收訊息。 您可以在此 GitHub 範例資料夾中查看程式碼。
傳送和接收訊息
若要執行程式碼,請遵循下列步驟:
在命令提示字元或 PowerShell 提示字元中發出下列命令,以複製服務匯流排 GitHub 存放庫︰
git clone https://github.com/Azure/azure-service-bus.git瀏覽至範例資料夾
azure-service-bus\samples\DotNet\Azure.Messaging.ServiceBus\BasicSendReceiveTutorialWithFilters。取得您稍早在本教學課程中複製到記事本的連接字串。 您也需要在上一節中建立的主題名稱。
在命令提示字元中,輸入下列命令:
dotnet build瀏覽至
BasicSendReceiveTutorialWithFilters\bin\Debug\netcoreapp3.1資料夾。輸入下列命令以執行程式。 請務必將
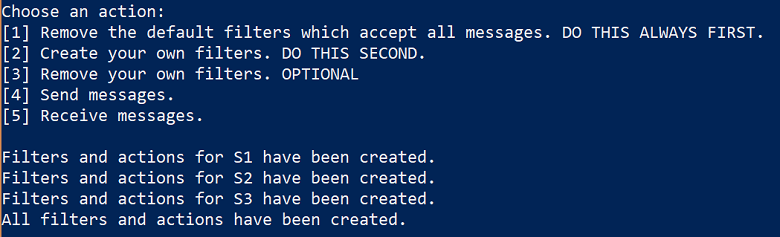
myConnectionString取代為您先前取得的值,並將myTopicName取代為您已建立的主題名稱:dotnet --roll-forward Major BasicSendReceiveTutorialWithFilters.dll -ConnectionString "myConnectionString" -TopicName "myTopicName"首先,依照主控台中的指示選取篩選建立。 移除預設篩選是建立篩選的一部分。 使用 PowerShell 或 CLI 時,您不需要移除預設篩選,但如果您在程式碼中執行此作業,則必須將其移除。 主控台命令 1 和 3 可協助您對先前建立的訂用帳戶進行篩選管理:
執行 1:移除預設篩選。
執行 2:新增您自己的篩選。
執行 3:若是教學課程,則略過此步驟。 此選項可選擇性地移除您自己的篩選。 這並不會重新建立預設篩選。
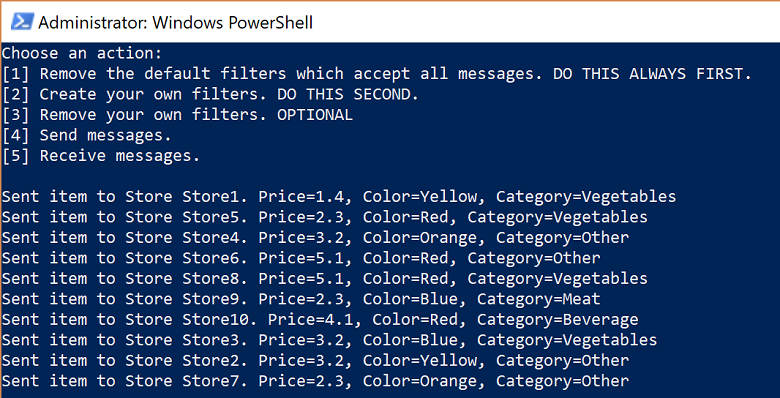
篩選建立後,您可以傳送訊息。 按 4 並觀察 10 個傳送至主題的訊息:
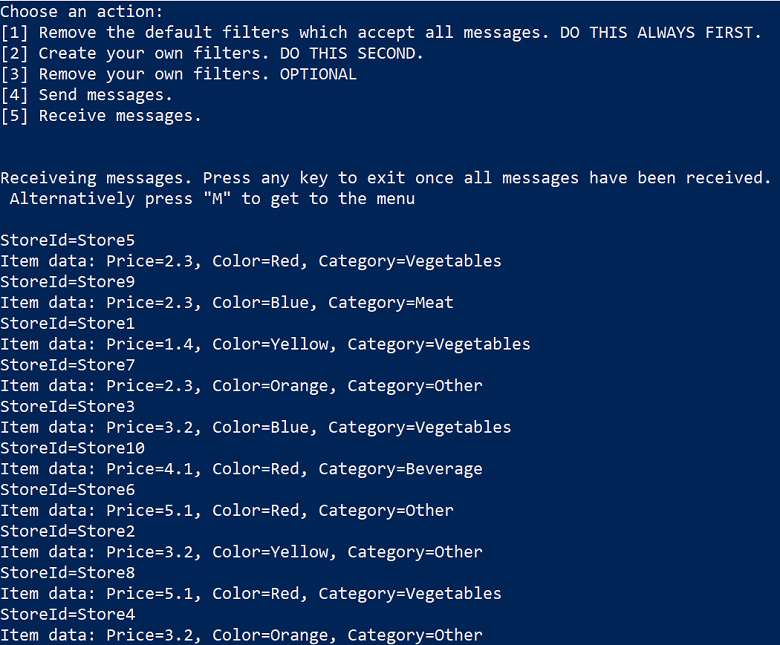
按 5 並觀察接收的訊息。 若未傳回 10 個訊息,請按 "m" 以顯示功能表,然後再按一次 5。
清除資源
遵循下列步驟,清除不再需要的資源。
- 在 Azure 入口網站中,瀏覽到您的命名空間。
- 在 [服務匯流排命名空間] 頁面上,從命令列選取 [刪除],以刪除命名空間和其中的資源 (佇列、主題和訂用帳戶)。
了解範例程式碼
本節將詳細說明範例程式碼的功能。
取得連接字串和主題
首先,程式碼會宣告一組變數,使程式完成其餘的執行。
string ServiceBusConnectionString;
string TopicName;

static string[] Subscriptions = { "S1", "S2", "S3" };
static IDictionary<string, string[]> SubscriptionFilters = new Dictionary<string, string[]> {
    { "S1", new[] { "StoreId IN('Store1', 'Store2', 'Store3')", "StoreId = 'Store4'"} },
    { "S2", new[] { "sys.To IN ('Store5','Store6','Store7') OR StoreId = 'Store8'" } },
    { "S3", new[] { "sys.To NOT IN ('Store1','Store2','Store3','Store4','Store5','Store6','Store7','Store8') OR StoreId NOT IN ('Store1','Store2','Store3','Store4','Store5','Store6','Store7','Store8')" } }
};
// You can have only have one action per rule and this sample code supports only one action for the first filter, which is used to create the first rule.
static IDictionary<string, string> SubscriptionAction = new Dictionary<string, string> {
    { "S1", "" },
    { "S2", "" },
    { "S3", "SET sys.Label = 'SalesEvent'"  }
};
static string[] Store = { "Store1", "Store2", "Store3", "Store4", "Store5", "Store6", "Store7", "Store8", "Store9", "Store10" };
static string SysField = "sys.To";
static string CustomField = "StoreId";
static int NrOfMessagesPerStore = 1; // Send at least 1.
連接字串和主題名稱會透過命令列參數傳入 (如下所示),然後以 Main() 方法讀取:
static void Main(string[] args)
{
    string ServiceBusConnectionString = "";
    string TopicName = "";

    for (int i = 0; i < args.Length; i++)
    {
        if (args[i] == "-ConnectionString")
        {
            Console.WriteLine($"ConnectionString: {args[i + 1]}");
            ServiceBusConnectionString = args[i + 1]; // Alternatively enter your connection string here.
        }
        else if (args[i] == "-TopicName")
        {
            Console.WriteLine($"TopicName: {args[i + 1]}");
            TopicName = args[i + 1]; // Alternatively enter your queue name here.
        }
    }

    if (ServiceBusConnectionString != "" && TopicName != "")
    {
        Program P = StartProgram(ServiceBusConnectionString, TopicName);
        P.PresentMenu().GetAwaiter().GetResult();
    }
    else
    {
        Console.WriteLine("Specify -Connectionstring and -TopicName to execute the example.");
        Console.ReadKey();
    }
}
移除預設篩選
當您建立訂用帳戶時,服務匯流排會為每個訂用帳戶建立一個預設篩選。 此篩選可用來接收傳送至主題的每個訊息。 如果您想要使用自訂篩選,您可以移除預設篩選,如下列程式碼所示:
private async Task RemoveDefaultFilters()
{
    Console.WriteLine($"Starting to remove default filters.");

    try
    {
        var client = new ServiceBusAdministrationClient(ServiceBusConnectionString);
        foreach (var subscription in Subscriptions)
        {
            await client.DeleteRuleAsync(TopicName, subscription, CreateRuleOptions.DefaultRuleName);
            Console.WriteLine($"Default filter for {subscription} has been removed.");
        }

        Console.WriteLine("All default Rules have been removed.\n");
    }
    catch (Exception ex)
    {
        Console.WriteLine(ex.ToString());
    }

    await PresentMenu();
}
建立篩選器
下列程式碼會新增在本教學課程中定義的自訂篩選:
private async Task CreateCustomFilters()
{
    try
    {
        for (int i = 0; i < Subscriptions.Length; i++)
        {
            var client = new ServiceBusAdministrationClient(ServiceBusConnectionString);
            string[] filters = SubscriptionFilters[Subscriptions[i]];
            if (filters[0] != "")
            {
                int count = 0;
                foreach (var myFilter in filters)
                {
                    count++;

                    string action = SubscriptionAction[Subscriptions[i]];
                    if (action != "")
                    {
                        await client.CreateRuleAsync(TopicName, Subscriptions[i], new CreateRuleOptions
                        {
                            Filter = new SqlRuleFilter(myFilter),
                            Action = new SqlRuleAction(action),
                            Name = $"MyRule{count}"
                        });
                    }
                    else
                    {
                        await client.CreateRuleAsync(TopicName, Subscriptions[i], new CreateRuleOptions
                        {
                            Filter = new SqlRuleFilter(myFilter),
                            Name = $"MyRule{count}"
                        });
                    }
                }
            }

            Console.WriteLine($"Filters and actions for {Subscriptions[i]} have been created.");
        }

        Console.WriteLine("All filters and actions have been created.\n");
    }
    catch (Exception ex)
    {
        Console.WriteLine(ex.ToString());
    }

    await PresentMenu();
}
移除您已建立的自訂篩選
如果您想要移除訂用帳戶上的所有篩選,請參考下列程式碼所說明的操作方式:
private async Task CleanUpCustomFilters()
{
    foreach (var subscription in Subscriptions)
    {
        try
        {
            var client = new ServiceBusAdministrationClient(ServiceBusConnectionString);
            IAsyncEnumerator<RuleProperties> rules = client.GetRulesAsync(TopicName, subscription).GetAsyncEnumerator();
            while (await rules.MoveNextAsync())
            {
                await client.DeleteRuleAsync(TopicName, subscription, rules.Current.Name);
                Console.WriteLine($"Rule {rules.Current.Name} has been removed.");
            }
        }
        catch (Exception ex)
        {
            Console.WriteLine(ex.ToString());
        }
    }
    Console.WriteLine("All default filters have been removed.\n");

    await PresentMenu();
}
傳送訊息
將訊息傳送至主題的程序,與傳送訊息至佇列類似。 此範例說明如何使用工作清單和非同步處理來傳送訊息:
public async Task SendMessages()
{
    try
    {
        await using var client = new ServiceBusClient(ServiceBusConnectionString);
        var taskList = new List<Task>();
        for (int i = 0; i < Store.Length; i++)
        {
            taskList.Add(SendItems(client, Store[i]));
        }

        await Task.WhenAll(taskList);
    }
    catch (Exception ex)
    {
        Console.WriteLine(ex.ToString());
    }
    Console.WriteLine("\nAll messages sent.\n");
}

private async Task SendItems(ServiceBusClient client, string store)
{
    // create the sender
    ServiceBusSender tc = client.CreateSender(TopicName);

    for (int i = 0; i < NrOfMessagesPerStore; i++)
    {
        Random r = new Random();
        Item item = new Item(r.Next(5), r.Next(5), r.Next(5));

        // Note the extension class which is serializing an deserializing messages
        ServiceBusMessage message = item.AsMessage();
        message.To = store;
        message.ApplicationProperties.Add("StoreId", store);
        message.ApplicationProperties.Add("Price", item.GetPrice().ToString());
        message.ApplicationProperties.Add("Color", item.GetColor());
        message.ApplicationProperties.Add("Category", item.GetItemCategory());

        await tc.SendMessageAsync(message);
        Console.WriteLine($"Sent item to Store {store}. Price={item.GetPrice()}, Color={item.GetColor()}, Category={item.GetItemCategory()}"); ;
    }
}
接收訊息
訊息同樣會透過工作清單來接收,而程式碼會使用批次。 您可以使用批次進行傳送和接收,但此範例僅說明如何進行批次接收。 在實務上,您不會中斷迴圈,而是會保留迴圈並設定較高的時間範圍,例如一分鐘。 對訊息代理程式的接收呼叫在這段時間內會保持開啟,且訊息在送達時將會立即傳回,並發出新的接收呼叫。 這個概念稱為長輪詢。 使用您可以在快速入門中和存放庫內的數個其他範例中看到的接收幫浦,是較為常見的選項。
public async Task Receive()
{
    var taskList = new List<Task>();
    for (var i = 0; i < Subscriptions.Length; i++)
    {
        taskList.Add(this.ReceiveMessages(Subscriptions[i]));
    }

    await Task.WhenAll(taskList);
}

private async Task ReceiveMessages(string subscription)
{
    await using var client = new ServiceBusClient(ServiceBusConnectionString);
    ServiceBusReceiver receiver = client.CreateReceiver(TopicName, subscription);

    // In reality you would not break out of the loop like in this example but would keep looping. The receiver keeps the connection open
    // to the broker for the specified amount of seconds and the broker returns messages as soon as they arrive. The client then initiates
    // a new connection. So in reality you would not want to break out of the loop.
    // Also note that the code shows how to batch receive, which you would do for performance reasons. For convenience you can also always
    // use the regular receive pump which we show in our Quick Start and in other GitHub samples.
    while (true)
    {
        try
        {
            //IList<Message> messages = await receiver.ReceiveAsync(10, TimeSpan.FromSeconds(2));
            // Note the extension class which is serializing an deserializing messages and testing messages is null or 0.
            // If you think you did not receive all messages, just press M and receive again via the menu.
            IReadOnlyList<ServiceBusReceivedMessage> messages = await receiver.ReceiveMessagesAsync(maxMessages: 100);

            if (messages.Any())
            {
                foreach (ServiceBusReceivedMessage message in messages)
                {
                    lock (Console.Out)
                    {
                        Item item = message.As<Item>();
                        IReadOnlyDictionary<string, object> myApplicationProperties = message.ApplicationProperties;
                        Console.WriteLine($"StoreId={myApplicationProperties["StoreId"]}");
                        if (message.Subject != null)
                        {
                            Console.WriteLine($"Subject={message.Subject}");
                        }
                        Console.WriteLine(
                            $"Item data: Price={item.GetPrice()}, Color={item.GetColor()}, Category={item.GetItemCategory()}");
                    }

                    await receiver.CompleteMessageAsync(message);
                }
            }
            else
            {
                break;
            }
        }
        catch (Exception ex)
        {
            Console.WriteLine(ex.ToString());
        }
    }
}
注意
您可以使用服務匯流排總管來管理服務匯流排資源。 服務匯流排總管可讓使用者連線到服務匯流排命名空間,並以簡便的方式管理傳訊實體。 此工具提供進階的功能 (例如匯入/匯出功能) 或測試主題、佇列、訂用帳戶、轉送服務、通知中樞和事件中樞的能力。
下一步
在本教學課程中,您已使用 Azure 入口網站佈建資源,然後從服務匯流排主題及其訂用帳戶傳送和接收訊息。 您已了解如何︰
- 使用 Azure 入口網站建立服務匯流排主題,並建立該主題的一或多個訂用帳戶
- 使用 .NET 程式碼新增主題篩選
- 建立含有不同內容的兩個訊息
- 傳送訊息,並確認它們送達預期的訂用帳戶中
- 從訂用帳戶接收訊息
如需傳送和接收訊息的範例,請開始使用 GitHub 上的服務匯流排範例。
繼續進行下一個教學課程,以深入了解如何使用服務匯流排的發佈/訂閱功能。