如何建立資料繫結 (WPF .NET)
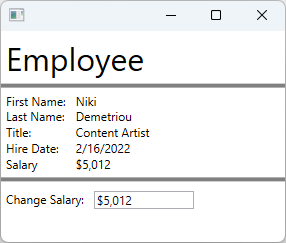
本文說明如何建立繫結 XAML。 此範例所使用的資料物件代表公司的員工。 此資料物件繫結至 XAML 視窗,該視窗使用 TextBlock 控制項來列出員工的詳細資料。 您將建立看起來如下圖的 UI:
若要深入了解資料繫結,請參閱 WPF 中的資料繫結概觀。
建立資料物件
在此範例中,員工作為 UI 所繫結的資料物件。
將新類別加入您的專案中,並且命名為
Employee。使用下列片段取代程式碼:
using System;
using System.ComponentModel;

namespace ArticleSample
{
    public class Employee : INotifyPropertyChanged
    {
        private decimal _salary;
        public event PropertyChangedEventHandler? PropertyChanged;

        public required string FirstName { get; set; }
        public required string LastName { get; set; }
        public required string Title { get; set; }
        public required DateTime HireDate { get; set; }

        public required decimal Salary
        {
            get => _salary;
            set
            {
                _salary = value;

                // Support TwoWay binding
                PropertyChanged?.Invoke(this, new PropertyChangedEventArgs(nameof(Salary)));
            }
        }
    }
}
Imports System.ComponentModel Public Class Employee Implements INotifyPropertyChanged Private _salary As Decimal Public Event PropertyChanged As PropertyChangedEventHandler Implements INotifyPropertyChanged.PropertyChanged Public Property FirstName As String Public Property LastName As String Public Property Title As String Public Property HireDate As DateTime Public Property Salary As Decimal Get Return _salary End Get Set(value As Decimal) _salary = value RaiseEvent PropertyChanged(Me, New PropertyChangedEventArgs(NameOf(Salary))) End Set End Property End Class
員工資料物件是描述員工的簡單類別:
- 員工的姓名。
- 員工的雇用日期。
- 員工的公司職稱。
- 員工的收入。
繫結至資料物件
下列 XAML 示範如何使用 Employee 類別作為資料物件。 根項目的 DataContext 屬性會繫結至 XAML 中宣告的靜態資源。 個別控制項會繫結至 Employee 的屬性。
將新的 Window 新增至專案,並將其命名為
EmployeeView使用下列片段取代 XAML:
重要
下列片段取自 C# 專案。 如果您使用 Visual Basic,應該宣告
x:Class而不使用ArticleSample命名空間。 您可以在這裡查看 Visual Basic 版本的外觀。<Window x:Class="ArticleSample.EmployeeView" xmlns="http://schemas.microsoft.com/winfx/2006/xaml/presentation" xmlns:x="http://schemas.microsoft.com/winfx/2006/xaml" xmlns:local="clr-namespace:ArticleSample" Title="" Height="250" Width="300"> <Window.Resources> <local:Employee x:Key="EmployeeExample" FirstName="Niki" LastName="Demetriou" HireDate="2022-02-16" Salary="5012.00" Title="Content Artist" /> </Window.Resources> <StackPanel DataContext="{StaticResource EmployeeExample}"> <Label FontSize="32">Employee</Label> <Border BorderBrush="Gray" BorderThickness="2" /> <Grid Grid.Row="1" Margin="5"> <Grid.RowDefinitions> <RowDefinition Height="Auto"/> <RowDefinition Height="Auto"/> <RowDefinition Height="Auto"/> <RowDefinition Height="Auto"/> <RowDefinition Height="Auto"/> </Grid.RowDefinitions> <Grid.ColumnDefinitions> <ColumnDefinition Width="Auto"/> <ColumnDefinition Width="*"/> </Grid.ColumnDefinitions> <TextBlock Text="First Name:" Grid.Row="0" Margin="0,0,10,0" /> <TextBlock Text="Last Name:" Grid.Row="1" /> <TextBlock Text="Title:" Grid.Row="2" /> <TextBlock Text="Hire Date:" Grid.Row="3" /> <TextBlock Text="Salary" Grid.Row="4" /> <TextBlock Text="{Binding FirstName}" Grid.Row="0" Grid.Column="1" /> <TextBlock Text="{Binding LastName}" Grid.Row="1" Grid.Column="1" /> <TextBlock Text="{Binding Title}" Grid.Row="2" Grid.Column="1" /> <TextBlock Text="{Binding HireDate, StringFormat=d}" Grid.Row="3" Grid.Column="1" /> <TextBlock Text="{Binding Salary, StringFormat=C0}" Grid.Row="4" Grid.Column="1" /> </Grid> <Border BorderBrush="Gray" BorderThickness="2" /> <StackPanel Margin="5,10" Orientation="Horizontal"> <TextBlock Text="Change Salary:" Margin="0,0,10,0" /> <TextBox Text="{Binding Salary, Mode=TwoWay, UpdateSourceTrigger=PropertyChanged, StringFormat=C0}" Width="100" /> </StackPanel> </StackPanel> </Window>
程式碼的命名空間不符合專案的命名空間,除非您建立名為 ArticleSample 的專案。 如果您建立新專案,您可以將 Window.Resources 和根項目 (StackPanel) 複製並貼到 MainWindow 中。
若要進一步了解上一個 XAML 如何使用資料繫結,請考慮下列幾點:
XAML 資源用來建立
Employee類別的實例。一般而言,資料物件會傳遞至 Window 或與其關聯。 此範例硬式編碼員工以供示範之用。
<Window.Resources>
    <local:Employee x:Key="EmployeeExample" FirstName="Niki" LastName="Demetriou"
                                            HireDate="2022-02-16" Salary="5012.00"
                                            Title="Content Artist" />
</Window.Resources>
根項目 (
StackPanel) 已將其資料內容設定為硬式編碼Employee實例。除非明確設定,否則子元素會從父元素繼承其
DataContext。<StackPanel DataContext="{StaticResource EmployeeExample}">Employee實例的屬性會繫結至TextBlock控制項。Binding未指定BindingSource,因此DataContext會作為來源使用。<TextBlock Text="{Binding FirstName}" Grid.Row="0" Grid.Column="1" /> <TextBlock Text="{Binding LastName}" Grid.Row="1" Grid.Column="1" /> <TextBlock Text="{Binding Title}" Grid.Row="2" Grid.Column="1" /> <TextBlock Text="{Binding HireDate, StringFormat=d}" Grid.Row="3" Grid.Column="1" /> <TextBlock Text="{Binding Salary, StringFormat=C0}" Grid.Row="4" Grid.Column="1" />TextBox控制項會與TwoWay模式繫結,允許TextBox變更Employee.Salary屬性。<TextBox Text="{Binding Salary, Mode=TwoWay, UpdateSourceTrigger=PropertyChanged, StringFormat=C0}" Width="100" />