開始使用語意核心
只要幾個步驟,您就可以在 Python、.NET 或 Java 中使用語意核心建置您的第一個 AI 代理程式。 本指南將示範如何...
- 安裝必要的套件
- 使用 AI 建立來回交談
- 讓 AI 代理程式能夠執行您的程式代碼
- 即時觀看 AI 建立計畫
安裝 SDK
語意核心有數個可用的 NuGet 套件。 不過,在大部分情況下,您通常只需要 Microsoft.SemanticKernel。
您可以使用下列命令安裝:
dotnet add package Microsoft.SemanticKernel
如需 Nuget 套件的完整清單,請參閱 支援的語言一文。
如需存取 Python 套件的 SemanticKernel 指示,請參閱 這裡。 它就像這樣簡單:
pip install semantic-kernel
快速開始使用筆記本
如果您是 Python 或 C# 開發人員,您可以快速開始使用我們的筆記本。 這些筆記本提供如何使用語意核心來建置 AI 代理程式的逐步指南。
遵循下列步驟以開始使用:
- 複製語意核心存放 庫
- 在 Visual Studio Code 中開啟存放庫
- 流覽至 _/python/samples/getting_started
- 開啟 00-getting-started.ipynb 以開始設定您的環境,並建立您的第一個 AI 代理程式!
遵循下列步驟以開始使用:
- 複製語意核心存放 庫
- 在 Visual Studio Code 中開啟存放庫
- 流覽至 _/dotnet/notebooks
- 開啟 00-getting-started.ipynb 以開始設定您的環境,並建立您的第一個 AI 代理程式!
撰寫您的第一個主控台應用程式
// Import packages
using Microsoft.SemanticKernel;
using Microsoft.SemanticKernel.ChatCompletion;
using Microsoft.SemanticKernel.Connectors.OpenAI;

// Create a kernel with Azure OpenAI chat completion
var builder = Kernel.CreateBuilder().AddAzureOpenAIChatCompletion(modelId, endpoint, apiKey);

// Add enterprise components
builder.Services.AddLogging(services => services.AddConsole().SetMinimumLevel(LogLevel.Trace));

// Build the kernel
Kernel kernel = builder.Build();
var chatCompletionService = kernel.GetRequiredService<IChatCompletionService>();

// Add a plugin (the LightsPlugin class is defined below)
kernel.Plugins.AddFromType<LightsPlugin>("Lights");

// Enable planning
OpenAIPromptExecutionSettings openAIPromptExecutionSettings = new()
{
    ToolCallBehavior = ToolCallBehavior.AutoInvokeKernelFunctions
};

// Create a history store the conversation
var history = new ChatHistory();

// Initiate a back-and-forth chat
string? userInput;
do {
    // Collect user input
    Console.Write("User > ");
    userInput = Console.ReadLine();

    // Add user input
    history.AddUserMessage(userInput);

    // Get the response from the AI
    var result = await chatCompletionService.GetChatMessageContentAsync(
        history,
        executionSettings: openAIPromptExecutionSettings,
        kernel: kernel);

    // Print the results
    Console.WriteLine("Assistant > " + result);

    // Add the message from the agent to the chat history
    history.AddMessage(result.Role, result.Content ?? string.Empty);
} while (userInput is not null)
import asyncio

from semantic_kernel import Kernel
from semantic_kernel.functions import kernel_function
from semantic_kernel.connectors.ai.open_ai import AzureChatCompletion
from semantic_kernel.connectors.ai.function_call_behavior import FunctionCallBehavior
from semantic_kernel.connectors.ai.chat_completion_client_base import ChatCompletionClientBase
from semantic_kernel.contents.chat_history import ChatHistory
from semantic_kernel.functions.kernel_arguments import KernelArguments

from semantic_kernel.connectors.ai.open_ai.prompt_execution_settings.azure_chat_prompt_execution_settings import (
    AzureChatPromptExecutionSettings,
)

async def main():
    # Initialize the kernel
    kernel = Kernel()

    # Add Azure OpenAI chat completion
    kernel.add_service(AzureChatCompletion(
        deployment_name="your_models_deployment_name",
        api_key="your_api_key",
        base_url="your_base_url",
    ))

    # Set the logging level for  semantic_kernel.kernel to DEBUG.
    logging.basicConfig(
        format="[%(asctime)s - %(name)s:%(lineno)d - %(levelname)s] %(message)s",
        datefmt="%Y-%m-%d %H:%M:%S",
    )
    logging.getLogger("kernel").setLevel(logging.DEBUG)

    # Add a plugin (the LightsPlugin class is defined below)
    kernel.add_plugin(
        LightsPlugin(),
        plugin_name="Lights",
    )

    chat_completion : AzureChatCompletion = kernel.get_service(type=ChatCompletionClientBase)

    # Enable planning
    execution_settings = AzureChatPromptExecutionSettings(tool_choice="auto")
    execution_settings.function_call_behavior = FunctionCallBehavior.EnableFunctions(auto_invoke=True, filters={})

    # Create a history of the conversation
    history = ChatHistory()

    # Initiate a back-and-forth chat
    userInput = None
    while True:
        # Collect user input
        userInput = input("User > ")

        # Terminate the loop if the user says "exit"
        if userInput == "exit":
            break

        # Add user input to the history
        history.add_user_message(userInput)

        # Get the response from the AI
        result = (await chat_completion.get_chat_message_contents(
            chat_history=history,
            settings=execution_settings,
            kernel=kernel,
            arguments=KernelArguments(),
        ))[0]

        # Print the results
        print("Assistant > " + str(result))

        # Add the message from the agent to the chat history
        history.add_message(result)

# Run the main function
if __name__ == "__main__":
    asyncio.run(main())
下列來回聊天應該類似於您在控制台中看到的內容。 以下已新增函式呼叫,以示範 AI 如何運用幕後外掛程式。
| 角色 | 訊息 |
|---|---|
| 🔵使用者 | 請切換燈 |
| 🔴小幫手(函數調用) | LightsPlugin.GetState() |
| 🟢工具 | off |
| 🔴小幫手(函數調用) | LightsPlugin.ChangeState(true) |
| 🟢工具 | on |
| 🔴小幫手 | 燈現在開啟 |
如果您有興趣深入瞭解上述程式代碼,我們將在下一節中加以細分。
了解程式碼
為了讓您更輕鬆地開始使用語意核心建置企業應用程式,我們已建立逐步引導您完成建立核心並使用它與 AI 服務互動的程式。
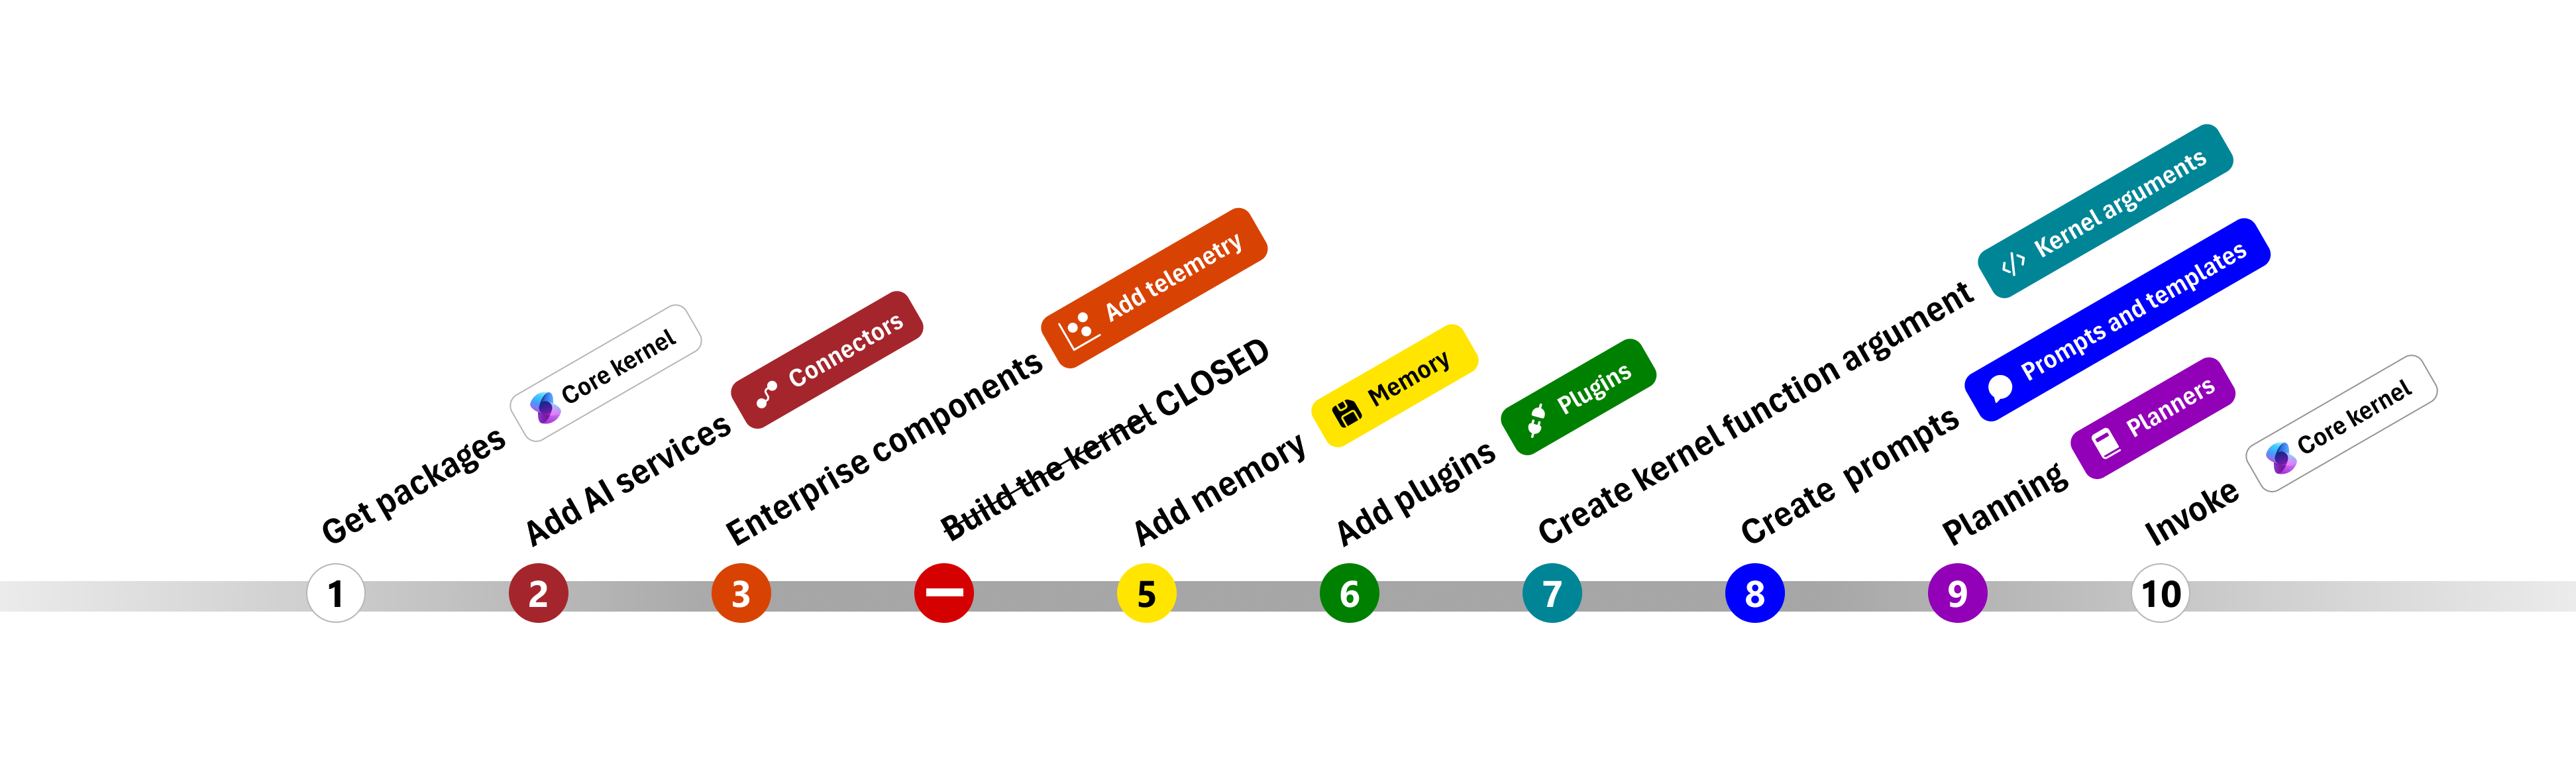
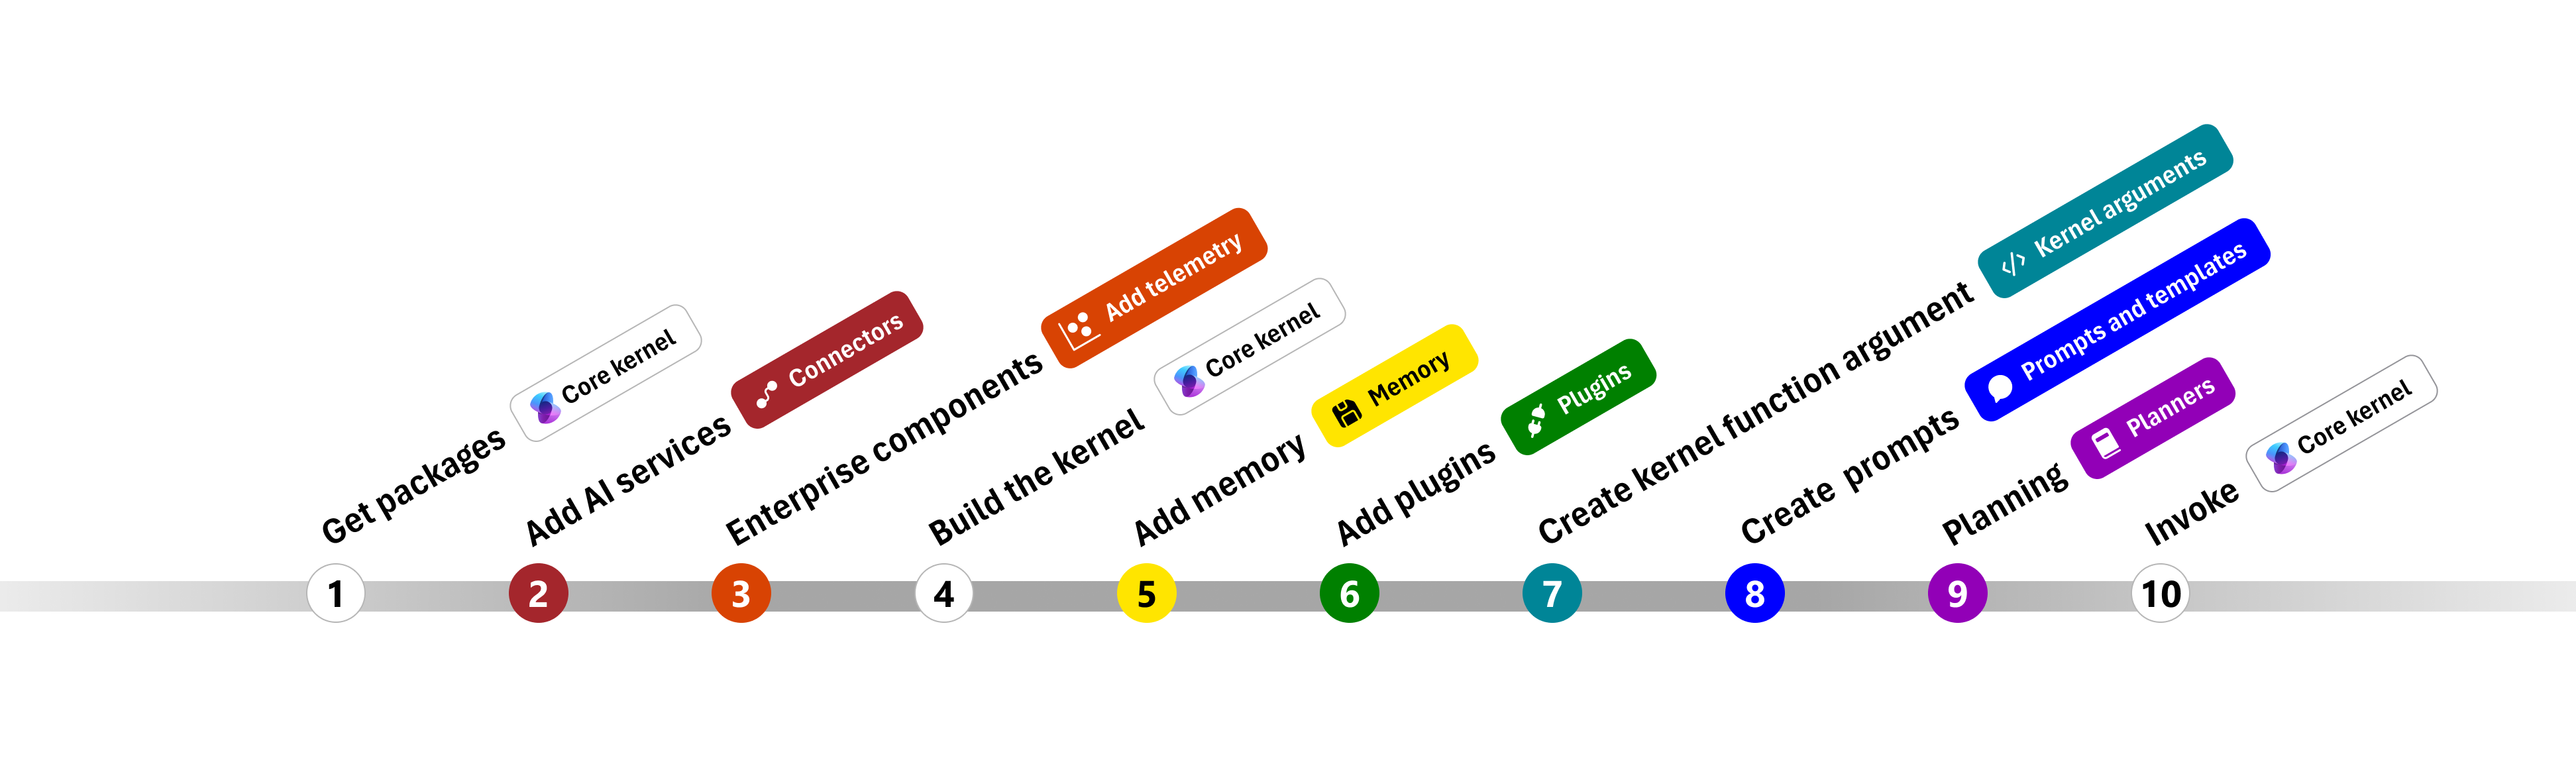
在下列各節中,我們將逐步解開上述範例的步驟 1、2、3、4、6、9 和 10。 建置由 AI 服務提供且可執行程式碼的簡單代理程式所需的一切。
1) 匯入套件
在此範例中,我們先從匯入下列套件開始:
using Microsoft.SemanticKernel;
using Microsoft.SemanticKernel.ChatCompletion;
using Microsoft.SemanticKernel.Connectors.OpenAI;
import asyncio

from semantic_kernel import Kernel
from semantic_kernel.connectors.ai.open_ai import AzureChatCompletion
from semantic_kernel.connectors.ai.function_call_behavior import FunctionCallBehavior
from semantic_kernel.connectors.ai.chat_completion_client_base import ChatCompletionClientBase
from semantic_kernel.contents.chat_history import ChatHistory
from semantic_kernel.functions.kernel_arguments import KernelArguments

from semantic_kernel.connectors.ai.open_ai.prompt_execution_settings.azure_chat_prompt_execution_settings import (
    AzureChatPromptExecutionSettings,
)
2) 新增 AI 服務
之後,我們會新增核心最重要的部分:您想要使用的 AI 服務。 在此範例中,我們已將 Azure OpenAI 聊天完成服務新增至核心產生器。
注意
在此範例中,我們使用 Azure OpenAI,但您可以使用任何其他聊天完成服務。 若要查看支援服務的完整清單,請參閱 支援的語言一文。 如果您需要建立不同服務的協助,請參閱 AI 服務一文。 您可以在該處找到如何使用 OpenAI 或 Azure OpenAI 模型作為服務的指引。
// Create kernel
var builder = Kernel.CreateBuilder()
builder.AddAzureOpenAIChatCompletion(modelId, endpoint, apiKey);
# Initialize the kernel
kernel = Kernel()

# Add Azure OpenAI chat completion
kernel.add_service(AzureChatCompletion(
    deployment_name="your_models_deployment_name",
    api_key="your_api_key",
    base_url="your_base_url",
))
3) 新增企業服務
使用 Semantic Kernel 的主要優點之一是它支援企業級服務。 在此範例中,我們已將記錄服務新增至核心,以協助偵錯 AI 代理程式。
builder.Services.AddLogging(services => services.AddConsole().SetMinimumLevel(LogLevel.Trace));
import logging

# Set the logging level for  semantic_kernel.kernel to DEBUG.
logging.basicConfig(
    format="[%(asctime)s - %(name)s:%(lineno)d - %(levelname)s] %(message)s",
    datefmt="%Y-%m-%d %H:%M:%S",
)
logging.getLogger("kernel").setLevel(logging.DEBUG)
4) 建置核心並擷取服務
新增服務之後,我們會建置核心並擷取聊天完成服務以供稍後使用。
Kernel kernel = builder.Build();

// Retrieve the chat completion service
var chatCompletionService = kernel.Services.GetRequiredService<IChatCompletionService>();
設定核心之後,我們會擷取聊天完成服務以供稍後使用。
注意
在 Python 中,您不需要明確建置核心。 相反地,您可以直接從核心物件存取服務。
chat_completion : AzureChatCompletion = kernel.get_service(type=ChatCompletionClientBase)
6) 新增外掛程式
使用外掛程式,可讓您的 AI 代理程式執行程式代碼,以從外部來源擷取資訊或執行動作。 在上述範例中,我們新增了一個外掛程式,可讓 AI 代理程式與燈泡互動。 下面,我們將示範如何建立此外掛程式。
建立原生外掛程式
下面,您可以看到建立原生外掛程式就像建立新類別一樣簡單。
在此範例中,我們已建立可以操作燈泡的外掛程式。 雖然這是簡單的範例,但此外掛程式會快速示範如何支援這兩者...
- 藉由提供 AI 代理程式燈泡的狀態來擷取增強世代 (RAG)
- 而 工作自動化 是允許 AI 代理程式開啟或關閉燈泡。
在您自己的程式代碼中,您可以建立與任何外部服務或 API 互動的外掛程式,以達到類似的結果。
using System.ComponentModel;
using Microsoft.SemanticKernel;

public class LightsPlugin
{
   // Mock data for the lights
   private readonly List<LightModel> lights = new()
   {
      new LightModel { Id = 1, Name = "Table Lamp", IsOn = false },
      new LightModel { Id = 2, Name = "Porch light", IsOn = false },
      new LightModel { Id = 3, Name = "Chandelier", IsOn = true }
   };

   [KernelFunction("get_lights")]
   [Description("Gets a list of lights and their current state")]
   [return: Description("An array of lights")]
   public async Task<List<LightModel>> GetLightsAsync()
   {
      return lights
   }

   [KernelFunction("change_state")]
   [Description("Changes the state of the light")]
   [return: Description("The updated state of the light; will return null if the light does not exist")]
   public async Task<LightModel?> ChangeStateAsync(int id, bool isOn)
   {
      var light = lights.FirstOrDefault(light => light.Id == id);

      if (light == null)
      {
         return null;
      }

      // Update the light with the new state
      light.IsOn = isOn;

      return light;
   }
}

public class LightModel
{
   [JsonPropertyName("id")]
   public int Id { get; set; }

   [JsonPropertyName("name")]
   public string Name { get; set; }

   [JsonPropertyName("is_on")]
   public bool? IsOn { get; set; }
}
from typing import Annotated
from semantic_kernel.functions import kernel_function

class LightsPlugin:
    lights = [
        {"id": 1, "name": "Table Lamp", "is_on": False},
        {"id": 2, "name": "Porch light", "is_on": False},
        {"id": 3, "name": "Chandelier", "is_on": True},
    ]

    @kernel_function(
        name="get_lights",
        description="Gets a list of lights and their current state",
    )
    def get_state(
        self,
    ) -> Annotated[str, "the output is a string"]:
        """Gets a list of lights and their current state."""
        return self.lights

    @kernel_function(
        name="change_state",
        description="Changes the state of the light",
    )
    def change_state(
        self,
        id: int,
        is_on: bool,
    ) -> Annotated[str, "the output is a string"]:
        """Changes the state of the light."""
        for light in self.lights:
            if light["id"] == id:
                light["is_on"] = is_on
                return light
        return None
將外掛程式新增至核心
建立外掛程式之後,您可以將它新增至核心,讓 AI 代理程式可以存取它。 在範例中,我們已將 LightsPlugin 類別新增至核心。
// Add the plugin to the kernel
kernel.Plugins.AddFromType<LightsPlugin>("Lights");
# Add the plugin to the kernel
kernel.add_plugin(
    LightsPlugin(),
    plugin_name="Lights",
)
9) 規劃
語意核心會 利用函式呼叫 –大部分 LLM 的原生功能,以提供 規劃。 使用函式呼叫,LLM 可以要求(或呼叫)特定函式以滿足使用者的要求。 語意核心接著會將要求封送處理至程式代碼基底中適當的函式,並將結果傳回 LLM,讓 AI 代理程式可以產生最終回應。
若要啟用自動函數呼叫,我們必須先建立適當的執行設定,讓 Semantic Kernel 知道在 AI 代理程式要求函式時自動叫用核心中的函式。
OpenAIPromptExecutionSettings openAIPromptExecutionSettings = new()
{
    ToolCallBehavior = ToolCallBehavior.AutoInvokeKernelFunctions
};
execution_settings = AzureChatPromptExecutionSettings(tool_choice="auto")
execution_settings.function_call_behavior = FunctionCallBehavior.EnableFunctions(auto_invoke=True, filters={})
10) 叫用
最後,我們會使用外掛程式叫用 AI 代理程式。 範例程式代碼示範如何產生非串流回應,但您也可以使用 GetStreamingChatMessageContentAsync 方法來產生串流回應。
// Create chat history
var history = new ChatHistory();

// Get the response from the AI
var result = await chatCompletionService.GetChatMessageContentAsync(
    history,
    executionSettings: openAIPromptExecutionSettings,
    kernel: kernel
);
# Create a history of the conversation
history = ChatHistory()

# Get the response from the AI
result = (await chat_completion.get_chat_message_contents(
    chat_history=history,
    settings=execution_settings,
    kernel=kernel,
    arguments=KernelArguments(),
))[0]
下一步
在本指南中,您已瞭解如何建置可與 AI 服務互動並執行程式碼的簡單 AI 代理程式,以快速開始使用語意核心。 若要查看更多範例,並瞭解如何建置更複雜的 AI 代理程式,請參閱我們的 深入範例。