使用 WinUI 3 和 Win32 Interop 建置 C# .NET 應用程式
在本文中,我們會逐步解說如何使用平台叫用服務 (PInvoke),透過 WinUI 3 和 Win32 interop 功能建置基本 C# .NET 應用程式。
必要條件
基本受控 C#/.NET 應用程式
針對此範例,我們會指定應用程式視窗的位置和大小、針對適當的 DPI 轉換和調整、停用視窗最小化和最大化按鈕,最後查詢目前的程序以顯示目前程序中載入的模組清單。
我們會從初始範本應用程式建置範例應用程式 (請參閱必要條件)。 另請參閱 Visual Studio 中的 WinUI 3 範本。
MainWindow.xaml 檔案
使用 WinUI 3,您可以在 XAML 標記中建立 Window 類別的執行個體。
XAML Window 類別已擴充為支援桌面視窗,並將其轉換成 UWP 和傳統型應用程式模型所使用的每個低階視窗實作抽象概念。 具體而言,適用於 UWP 的 CoreWindow 和適用於 Win32 的視窗控制代碼 (或 HWND)。
下列程式碼顯示來自初始範本應用程式的 MainWindow.xaml 檔案,該檔案會使用 Window 類別作為應用程式的根元素。
<Window
    x:Class="WinUI_3_basic_win32_interop.MainWindow"
    xmlns="http://schemas.microsoft.com/winfx/2006/xaml/presentation"
    xmlns:x="http://schemas.microsoft.com/winfx/2006/xaml"
    xmlns:local="using:WinUI_3_basic_win32_interop"
    xmlns:d="http://schemas.microsoft.com/expression/blend/2008"
    xmlns:mc="http://schemas.openxmlformats.org/markup-compatibility/2006"
    mc:Ignorable="d">

    <StackPanel Orientation="Horizontal" HorizontalAlignment="Center" VerticalAlignment="Center">
        <Button x:Name="myButton" Click="myButton_Click">Click Me</Button>
    </StackPanel>
</Window>
組態
若要呼叫在 User32.dll 中公開的 WIN32 API,請將開放原始碼 PInvoke.User32 NuGet 套件新增至 VS 專案 (從 Visual Studio 功能表中,選取 [工具 -> NuGet 套件管理員 -> 管理解決方案的 NuGet 套件...],並搜尋 "Pinvoke.User32")。 如需詳細資訊,請參閱從受控程式碼呼叫原生函式。
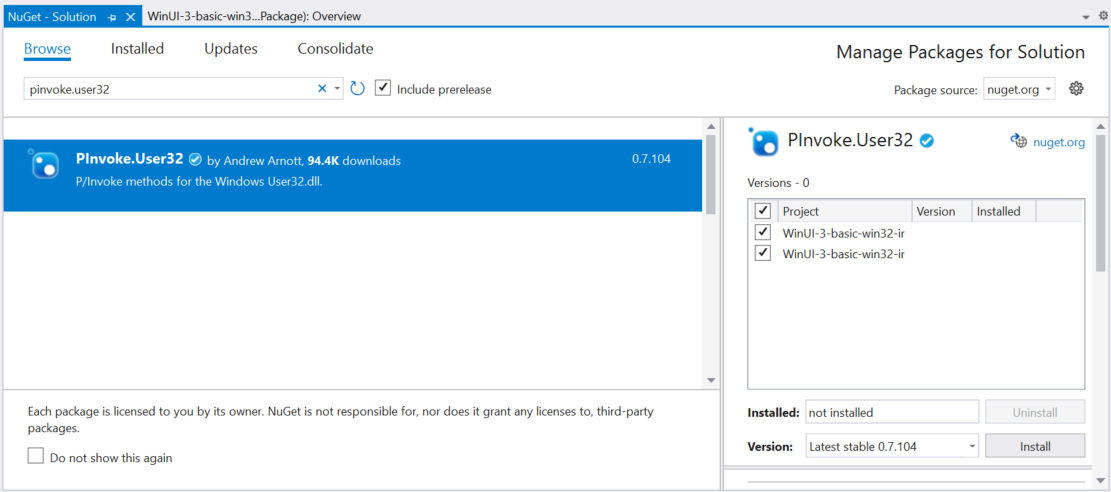
已選取 PInvoke.User32 的 NuGet 套件管理員。檢查 VS 專案中的 Packages 資料夾,確認安裝成功。
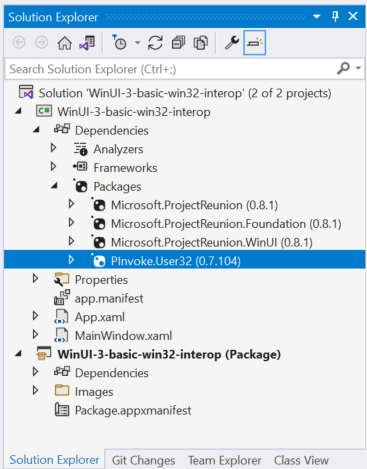
具有 PInvoke.User32 的方案總管套件。接下來,按兩下應用程式專案檔 (或以滑鼠右鍵按一下並選取 [編輯專案檔]),在文字編輯器中開啟檔案,並確認專案檔現在包含 "PInvoke.User32" 的 NuGet
PackageReference。<Project Sdk="Microsoft.NET.Sdk"> <PropertyGroup> <OutputType>WinExe</OutputType> <TargetFramework>net6.0-windows10.0.19041.0</TargetFramework> <TargetPlatformMinVersion>10.0.17763.0</TargetPlatformMinVersion> <RootNamespace>WinUI_3_basic_win32_interop</RootNamespace> <ApplicationManifest>app.manifest</ApplicationManifest> <Platforms>x86;x64;arm64</Platforms> <RuntimeIdentifiers>win10-x86;win10-x64;win10-arm64</RuntimeIdentifiers> <UseWinUI>true</UseWinUI> </PropertyGroup> <ItemGroup> <PackageReference Include="Microsoft.ProjectReunion" Version="0.8.1" /> <PackageReference Include="Microsoft.ProjectReunion.Foundation" Version="0.8.1" /> <PackageReference Include="Microsoft.ProjectReunion.WinUI" Version="0.8.1" /> <PackageReference Include="PInvoke.User32" Version="0.7.104" /> <Manifest Include="$(ApplicationManifest)" /> </ItemGroup> </Project>
代碼
在
App.xaml.cs程式碼後置檔案中,我們會使用 WindowNative.GetWindowHandle WinRT COM interop 方法取得 Window 的控制代碼 (請參閱擷取視窗控制代碼 (HWND))。從應用程式的 OnLaunched 處理常式呼叫這個方法,如下所示:
/// <summary>
/// Invoked when the application is launched normally by the end user.  Other entry points
/// will be used such as when the application is launched to open a specific file.
/// </summary>
/// <param name="args">Details about the launch request and process.</param>
protected override void OnLaunched(Microsoft.UI.Xaml.LaunchActivatedEventArgs args)
{
    m_window = new MainWindow();

    var hwnd = WinRT.Interop.WindowNative.GetWindowHandle(m_window);

    SetWindowDetails(hwnd, 800, 600);

    m_window.Activate();
}
然後,我們會呼叫
SetWindowDetails方法,傳遞視窗控制代碼和慣用的維度。 請記得新增using static PInvoke.User32;指示詞。在這個方法中:
- 我們會呼叫 GetDpiForWindow 以取得視窗的每吋點數 (dpi) 值 (Win32 會使用實際像素,而 WinUI 3 會使用有效像素)。 這個 DPI 值是用來計算縮放比例,並將其套用至為視窗指定的寬度和高度。
- 然後,我們會呼叫 SetWindowPos 來指定視窗所需的位置。
- 最後,我們會呼叫 SetWindowLong 以停用最小化和最大化按鈕。
private static void SetWindowDetails(IntPtr hwnd, int width, int height)
{
    var dpi = GetDpiForWindow(hwnd);
    float scalingFactor = (float)dpi / 96;
    width = (int)(width * scalingFactor);
    height = (int)(height * scalingFactor);

    _ = SetWindowPos(hwnd, SpecialWindowHandles.HWND_TOP,
                                0, 0, width, height,
                                SetWindowPosFlags.SWP_NOMOVE);
    _ = SetWindowLong(hwnd,
           WindowLongIndexFlags.GWL_STYLE,
           (SetWindowLongFlags)(GetWindowLong(hwnd,
              WindowLongIndexFlags.GWL_STYLE) &
              ~(int)SetWindowLongFlags.WS_MINIMIZEBOX &
              ~(int)SetWindowLongFlags.WS_MAXIMIZEBOX));
}
在 MainWindow.xaml 檔案中,我們會使用 ContentDialog 搭配 ScrollViewer,以顯示目前程序載入的所有模組清單。
<StackPanel Orientation="Horizontal" HorizontalAlignment="Center" VerticalAlignment="Center">
    <Button x:Name="myButton" Click="myButton_Click">Display loaded modules</Button>

    <ContentDialog x:Name="contentDialog" CloseButtonText="Close">
        <ScrollViewer>
            <TextBlock x:Name="cdTextBlock" TextWrapping="Wrap" />
        </ScrollViewer>
    </ContentDialog>

</StackPanel>
然後,我們會將
MyButton_Click事件處理常式取代為下列程式碼。在這裡,我們會呼叫 GetCurrentProcess,以取得目前程序的參考。 接著,我們會逐一查看 Modules 的集合,並將每個 ProcessModule 的檔案名稱附加至我們的顯示字串。
private async void myButton_Click(object sender, RoutedEventArgs e)
{
    myButton.Content = "Clicked";

    var description = new System.Text.StringBuilder();
    var process = System.Diagnostics.Process.GetCurrentProcess();
    foreach (System.Diagnostics.ProcessModule module in process.Modules)
    {
        description.AppendLine(module.FileName);
    }

    cdTextBlock.Text = description.ToString();
    await contentDialog.ShowAsync();
}
編譯和執行應用程式。
視窗出現之後,選取 [顯示載入的模組] 按鈕。
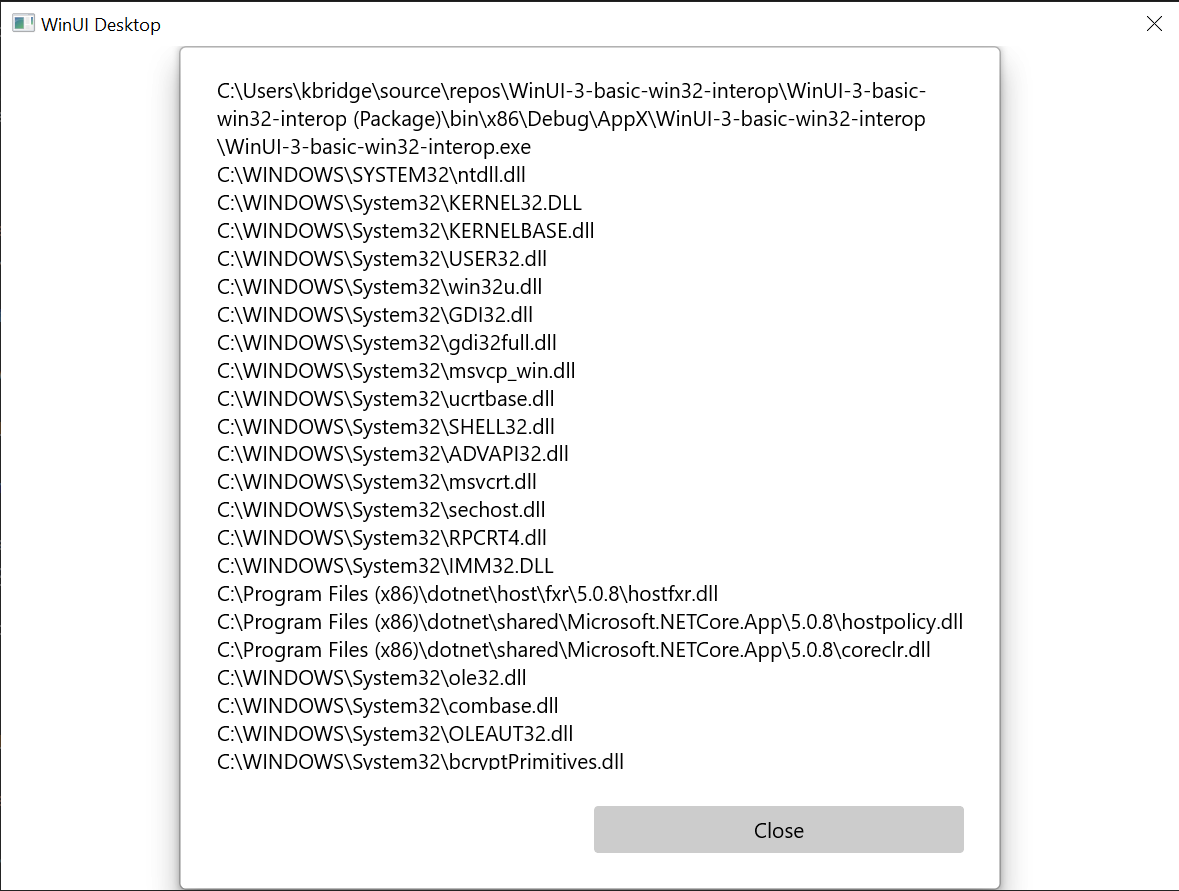
本主題所述的基本 Win32 Interop 應用程式。
摘要
在本主題中,我們討論如何存取基礎視窗實作 (在此案例中為 Win32 和 HWND),以及使用 WIN32 API 與 WinRT API。 這示範如何在建立新的 WinUI 3 傳統型應用程式時,使用現有的傳統型應用程式程式碼。
如需更廣泛的範例,請參閱 Windows 應用程式 SDK 範例 GitHub 存放庫中的 AppWindow 資源庫範例。
