如何使用 Direct2D 裝置內容來轉譯
在本主題中,您將瞭解如何在 Windows 8 中建立 Direct2D 裝置內容。 如果您要使用 Direct2D 開發 Windows 市集應用程式或傳統型應用程式,這項資訊適用於您。 本主題描述 Direct2D 裝置內容物件的用途、如何建立該物件,以及轉譯和顯示 Direct2D 基本類型和影像的逐步指南。 您也將瞭解如何切換轉譯目標,並將效果新增至您的應用程式。
- 什麼是 Direct2D 裝置?
- 什麼是 Direct2D 裝置內容?
- 在 Windows 8 上使用 Direct2D 轉譯
- 為什麼要使用裝置內容來轉譯?
- 如何建立 Direct2D 裝置內容以進行轉譯
- 選取目標
- 如何轉譯和顯示
什麼是 Direct2D 裝置?
您需要 Direct2D 裝置和 Direct3D 裝置,才能建立 Direct2D 裝置內容。 Direct2D 裝置(公開 ID2D1Device 介面指標)代表顯示配接器。 Direct3D 裝置(公開 ID3D11Device 介面指標)與 Direct2D 裝置相關聯。 每個應用程式都必須有一個 Direct2D 裝置,但可以有多個 裝置。
什麼是 Direct2D 裝置內容?
Direct2D 裝置內容 (公開 ID2D1DeviceContext 介面指標)代表一組狀態和命令緩衝區,用來轉譯至目標。 您可以在裝置內容上呼叫方法來設定管線狀態,並使用裝置所擁有的資源產生轉譯命令。
在 Windows 8 上使用 Direct2D 轉譯
在 Windows 7 和更早版本上,您可以使用 ID2D1HwndRenderTarget 或其他轉譯目標介面來轉譯至視窗或表面。 從 Windows 8 開始,我們不建議使用依賴 ID2D1HwndRenderTarget 等介面的方法進行轉譯,因為它們不適用於 Windows 市集應用程式。 如果您想要製作傳統型應用程式,但仍利用裝置內容的其他功能,您可以使用裝置內容轉譯至 Hwnd。 不過, 需要裝置內容 ,才能使用 Direct2D 在 Windows 市集應用程式中轉譯內容。
為什麼要使用裝置內容來轉譯?
- 您可以轉譯 Windows 市集應用程式。
- 您可以在轉譯之前、期間和轉譯之後隨時變更轉譯目標。 裝置內容可確保呼叫繪圖方法的順序執行,並在您切換轉譯目標時套用它們。
- 您可以搭配裝置內容使用一種以上的視窗類型。 您可以使用裝置內容和 DXGI 交換鏈結直接轉譯至 Windows::UI::Core::CoreWindow 或 Windows::UI::XAML::SwapChainBackgroundPanel。
- 您可以使用 Direct2D 裝置內容來建立 Direct2D 效果,並將影像效果或效果圖形的輸出轉譯成轉譯目標。
- 您可以有多個 裝置內容,這有助於改善線程應用程式中的效能。 如需詳細資訊,請參閱 多線程 Direct2D 應用程式 。
- 裝置 內容 與 Direct3D 緊密互通,讓您能夠存取 Direct3D 選項。
如何建立 Direct2D 裝置內容以進行轉譯
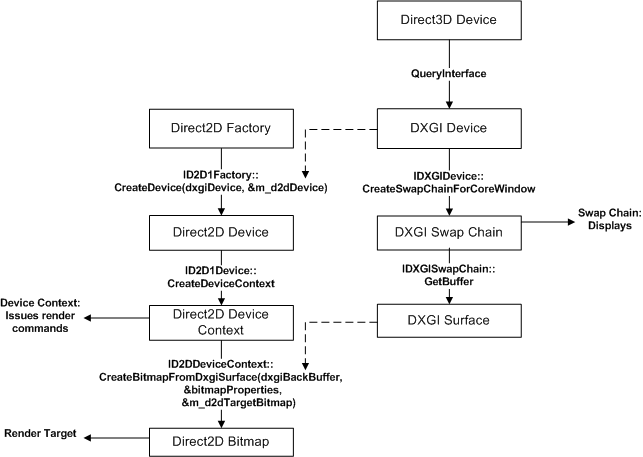
這裡的程式代碼示範如何建立 Direct3D11 裝置、取得相關聯的 DXGI 裝置、建立 Direct2D 裝置,最後建立 Direct2D 裝置內容以進行轉譯。
以下是方法呼叫的圖表,以及此程式代碼所使用的介面。
注意
此程式代碼假設您已經有ID2D1Factory1物件,如需詳細資訊,請參閱ID2D1Factory參考頁面。
    // This flag adds support for surfaces with a different color channel ordering than the API default.
    // You need it for compatibility with Direct2D.
    UINT creationFlags = D3D11_CREATE_DEVICE_BGRA_SUPPORT;

    // This array defines the set of DirectX hardware feature levels this app  supports.
    // The ordering is important and you should  preserve it.
    // Don't forget to declare your app's minimum required feature level in its
    // description.  All apps are assumed to support 9.1 unless otherwise stated.
    D3D_FEATURE_LEVEL featureLevels[] =
    {
        D3D_FEATURE_LEVEL_11_1,
        D3D_FEATURE_LEVEL_11_0,
        D3D_FEATURE_LEVEL_10_1,
        D3D_FEATURE_LEVEL_10_0,
        D3D_FEATURE_LEVEL_9_3,
        D3D_FEATURE_LEVEL_9_2,
        D3D_FEATURE_LEVEL_9_1
    };

    // Create the DX11 API device object, and get a corresponding context.
    ComPtr<ID3D11Device> device;
    ComPtr<ID3D11DeviceContext> context;

    DX::ThrowIfFailed(
        D3D11CreateDevice(
            nullptr,                    // specify null to use the default adapter
            D3D_DRIVER_TYPE_HARDWARE,
            0,
            creationFlags,              // optionally set debug and Direct2D compatibility flags
            featureLevels,              // list of feature levels this app can support
            ARRAYSIZE(featureLevels),   // number of possible feature levels
            D3D11_SDK_VERSION,
            &device,                    // returns the Direct3D device created
            &m_featureLevel,            // returns feature level of device created
            &context                    // returns the device immediate context
            )
        );

    ComPtr<IDXGIDevice> dxgiDevice;
    // Obtain the underlying DXGI device of the Direct3D11 device.
    DX::ThrowIfFailed(
        device.As(&dxgiDevice)
        );

    // Obtain the Direct2D device for 2-D rendering.
    DX::ThrowIfFailed(
        m_d2dFactory->CreateDevice(dxgiDevice.Get(), &m_d2dDevice)
        );

    // Get Direct2D device's corresponding device context object.
    DX::ThrowIfFailed(
        m_d2dDevice->CreateDeviceContext(
            D2D1_DEVICE_CONTEXT_OPTIONS_NONE,
            &m_d2dContext
            )
        );
讓我們逐步解說上述程式代碼範例中的步驟。
取得ID3D11Device介面指標,您將需要此指標才能建立裝置內容。
宣告建立旗標,以設定 BGRA 支援的 Direct3D 裝置。 Direct2D 需要 BGRA 色彩順序。
宣告D3D_FEATURE_LEVEL項目的陣列,代表應用程式將支援的功能層級集合。
注意
Direct3D 會搜尋您的清單,直到找到主機系統支援的功能層級為止。
使用 D3D11CreateDevice 函式來建立 ID3D11Device 物件,此函式也會傳回 ID3D11DeviceContext 物件,但此範例不需要該物件。
查詢 Direct3D 11 裝置是否有其 DXGI 裝置介面。
呼叫 ID2D1Factory::CreateDevice 方法並傳入 IDXGIDevice 物件,以建立 ID2D1Device 物件。
使用 ID2D1Device::CreateDeviceContext 方法建立 ID2D1DeviceContext 指標。
選取目標
這裡的程式代碼會示範如何取得視窗後台緩衝區的 2D Direct3D 紋理,並建立位圖目標,以連結到 Direct2D 裝置內容所轉譯的這個紋理。
        // Allocate a descriptor.
        DXGI_SWAP_CHAIN_DESC1 swapChainDesc = {0};
        swapChainDesc.Width = 0;                           // use automatic sizing
        swapChainDesc.Height = 0;
        swapChainDesc.Format = DXGI_FORMAT_B8G8R8A8_UNORM; // this is the most common swapchain format
        swapChainDesc.Stereo = false;
        swapChainDesc.SampleDesc.Count = 1;                // don't use multi-sampling
        swapChainDesc.SampleDesc.Quality = 0;
        swapChainDesc.BufferUsage = DXGI_USAGE_RENDER_TARGET_OUTPUT;
        swapChainDesc.BufferCount = 2;                     // use double buffering to enable flip
        swapChainDesc.Scaling = DXGI_SCALING_NONE;
        swapChainDesc.SwapEffect = DXGI_SWAP_EFFECT_FLIP_SEQUENTIAL; // all apps must use this SwapEffect
        swapChainDesc.Flags = 0;

        // Identify the physical adapter (GPU or card) this device is runs on.
        ComPtr<IDXGIAdapter> dxgiAdapter;
        DX::ThrowIfFailed(
            dxgiDevice->GetAdapter(&dxgiAdapter)
            );

        // Get the factory object that created the DXGI device.
        ComPtr<IDXGIFactory2> dxgiFactory;
        DX::ThrowIfFailed(
            dxgiAdapter->GetParent(IID_PPV_ARGS(&dxgiFactory))
            );

        // Get the final swap chain for this window from the DXGI factory.
        DX::ThrowIfFailed(
            dxgiFactory->CreateSwapChainForCoreWindow(
                device.Get(),
                reinterpret_cast<IUnknown*>(m_window),
                &swapChainDesc,
                nullptr,    // allow on all displays
                &m_swapChain
                )
            );

        // Ensure that DXGI doesn't queue more than one frame at a time.
        DX::ThrowIfFailed(
            dxgiDevice->SetMaximumFrameLatency(1)
            );

    // Get the backbuffer for this window which is be the final 3D render target.
    ComPtr<ID3D11Texture2D> backBuffer;
    DX::ThrowIfFailed(
        m_swapChain->GetBuffer(0, IID_PPV_ARGS(&backBuffer))
        );

    // Now we set up the Direct2D render target bitmap linked to the swapchain.
    // Whenever we render to this bitmap, it is directly rendered to the
    // swap chain associated with the window.
    D2D1_BITMAP_PROPERTIES1 bitmapProperties =
        BitmapProperties1(
            D2D1_BITMAP_OPTIONS_TARGET | D2D1_BITMAP_OPTIONS_CANNOT_DRAW,
            PixelFormat(DXGI_FORMAT_B8G8R8A8_UNORM, D2D1_ALPHA_MODE_IGNORE),
            m_dpi,
            m_dpi
            );

    // Direct2D needs the dxgi version of the backbuffer surface pointer.
    ComPtr<IDXGISurface> dxgiBackBuffer;
    DX::ThrowIfFailed(
        m_swapChain->GetBuffer(0, IID_PPV_ARGS(&dxgiBackBuffer))
        );

    // Get a D2D surface from the DXGI back buffer to use as the D2D render target.
    DX::ThrowIfFailed(
        m_d2dContext->CreateBitmapFromDxgiSurface(
            dxgiBackBuffer.Get(),
            &bitmapProperties,
            &m_d2dTargetBitmap
            )
        );

    // Now we can set the Direct2D render target.
    m_d2dContext->SetTarget(m_d2dTargetBitmap.Get());
讓我們逐步解說上述程式代碼範例中的步驟。
配置DXGI_SWAP_CHAIN_DESC1結構,並定義交換鏈結的設定。
這些設定示範如何建立 Windows 市集應用程式可以使用的交換鏈結。
取得 Direct3D 裝置和 DXGI 裝置正在執行的適配卡,並取得與其相關聯的 IDXGIFactory 物件。 您必須使用此 DXGI 處理站 ,以確保 交換鏈結 是在相同的配接器上建立。
呼叫IDXGIFactory2::CreateSwapChainForCoreWindow 方法來建立交換鏈結。 使用 Windows 市集應用程式主視窗的 Windows::UI::CoreWindow 類別。
請務必將最大畫面格延遲設定為 1,以將耗電量降至最低。
如果您想要在 Windows 市集應用程式中轉譯 Direct2D 內容,請參閱 CreateSwapChainForComposition 方法。
從 交換鏈結取得返回緩衝區。 後端緩衝區會公開交換鏈結所配置的ID3D11Texture2D介面
宣告D2D1_BITMAP_PROPERTIES1結構並設定屬性值。 將圖元格式設定為 BGRA,因為這是 Direct3D 裝置和 DXGI 裝置所使用的格式。
以IDXGISurface的形式取得返回緩衝區,以傳遞至 Direct2D。 Direct2D 不接受直接 ID3D11Texture2D。
使用 ID2D1DeviceContext::CreateBitmapFromDxgiSurface 方法,從後端緩衝區建立 ID2D1Bitmap 物件。
現在 Direct2D 位陣圖會連結至後台緩衝區。 將 Direct2D 裝置內容上的目標設定為點陣圖。
如何轉譯和顯示
既然您有目標位圖,您可以使用 Direct2D 裝置內容來繪製基本類型、影像、影像效果和文字。 這裡的程式代碼會示範如何繪製矩形。
ComPtr<ID2D1SolidColorBrush> pBlackBrush;
DX::ThrowIfFailed(
m_d2dContext->CreateSolidColorBrush(
D2D1::ColorF(D2D1::ColorF::Black),
&pBlackBrush
)
);
m_d2dContext->BeginDraw();
m_d2dContext->DrawRectangle(
D2D1::RectF(
rc.left + 100.0f,
rc.top + 100.0f,
rc.right - 100.0f,
rc.bottom - 100.0f),
pBlackBrush);
DX::ThrowIfFailed(
m_d2dContext->EndDraw()
);
DX::ThrowIfFailed(
m_swapChain->Present1(1, 0, ¶meters);
);
讓我們逐步解說上述程式代碼範例中的步驟。
- 呼叫 CreateSolidColorBrush 來建立筆刷來繪製矩形。
- 發出任何繪圖命令之前, 請先呼叫 BeginDraw 方法。
- 呼叫 DrawRectangle 方法,以繪製矩形和筆刷。
- 完成發出繪圖命令之後,呼叫 EndDraw 方法。
- 呼叫 IDXGISwapChain::P resent 方法來顯示結果。
現在,您可以使用 Direct2D 裝置內容 將基本類型、影像、影像效果和文字繪製到畫面。