Configure MQTT broker authentication
Important
Azure IoT Operations Preview – enabled by Azure Arc is currently in preview. You shouldn't use this preview software in production environments.
You'll need to deploy a new Azure IoT Operations installation when a generally available release is made available. You won't be able to upgrade a preview installation.
See the Supplemental Terms of Use for Microsoft Azure Previews for legal terms that apply to Azure features that are in beta, preview, or otherwise not yet released into general availability.
MQTT broker supports multiple authentication methods for clients, and you can configure each listener to have its own authentication system with BrokerAuthentication resources. For a list of the available settings, see the Broker Authentication API reference.
Link BrokerListener and BrokerAuthentication
The following rules apply to the relationship between BrokerListener and BrokerAuthentication:
- Each BrokerListener can have multiple ports. Each port can be linked to a BrokerAuthentication resource.
- Each BrokerAuthentication can support multiple authentication methods at once.
To link a BrokerListener to a BrokerAuthentication resource, specify the authenticationRef field in the ports setting of the BrokerListener resource. To learn more, see BrokerListener resource.
Default BrokerAuthentication resource
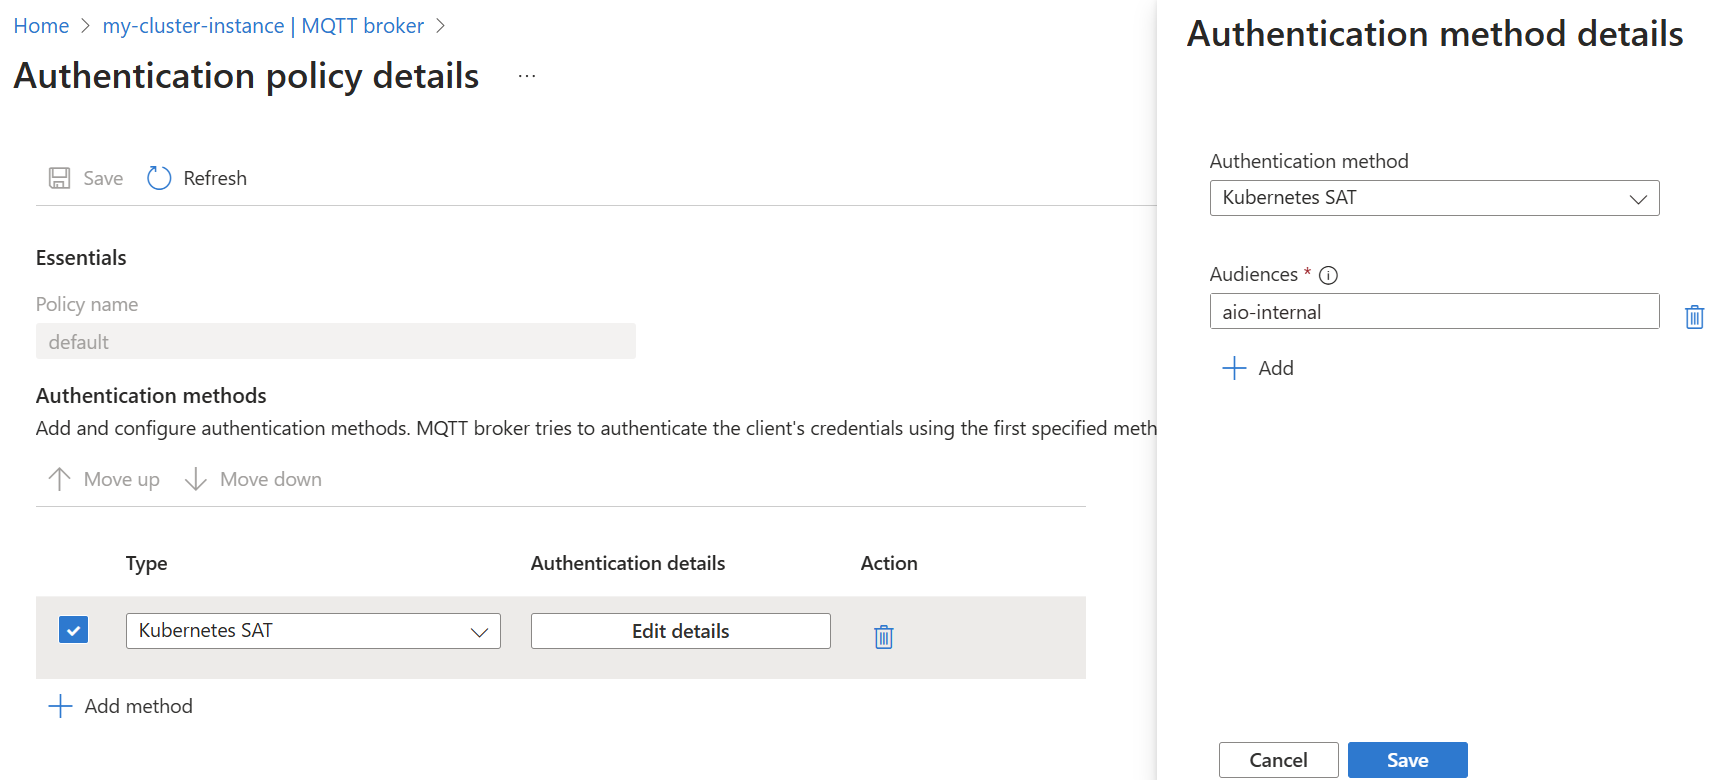
Azure IoT Operations Preview deploys a default BrokerAuthentication resource named default linked with the default listener in the azure-iot-operations namespace. It's configured to only use Kubernetes Service Account Tokens (SATs) for authentication.
Important
The service account token (SAT) authentication method in the default BrokerAuthentication resource is required for components in the Azure IoT Operations to function correctly. Avoid updating or deleting the default BrokerAuthentication resource.
In the Azure portal, navigate to your IoT Operations instance.
Under Azure IoT Operations resources, select MQTT Broker.
Select the Authentication tab.
From authentication policy list, select the default policy name.

To add new authentication methods, select Add method.
Authentication flow
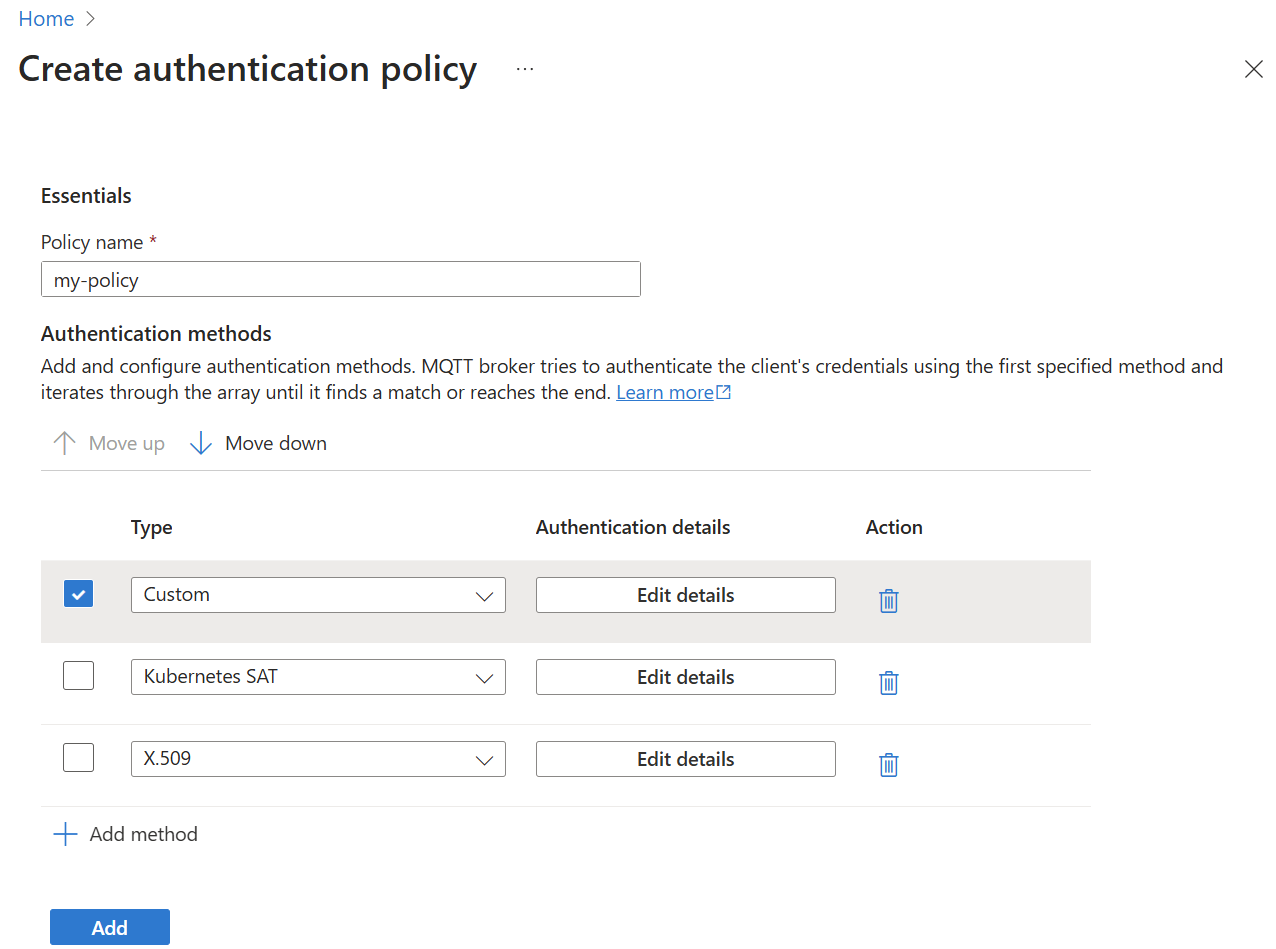
The order of authentication methods in the array determines how MQTT broker authenticates clients. MQTT broker tries to authenticate the client's credentials using the first specified method and iterates through the array until it finds a match or reaches the end.
For each method, MQTT broker first checks if the client's credentials are relevant for that method. For example, SAT authentication requires a username starting with K8S-SAT, and X.509 authentication requires a client certificate. If the client's credentials are relevant, MQTT broker then verifies if they're valid. For more information, see the Configure authentication method section.
For custom authentication, MQTT broker treats failure to communicate with the custom authentication server as credentials not relevant. This behavior lets MQTT broker fall back to other methods if the custom server is unreachable.
The authentication flow ends when:
- One of these conditions is true:
- The client's credentials are relevant and valid for one of the methods.
- The client's credentials aren't relevant for any of the methods.
- The client's credentials are relevant but invalid for any of the methods.
- MQTT broker either grants or denies access to the client based on the outcome of the authentication flow.
With multiple authentication methods, MQTT broker has a fallback mechanism. For example:
apiVersion: mqttbroker.iotoperations.azure.com/v1beta1
kind: BrokerAuthentication
metadata:
  name: default
  namespace: azure-iot-operations
spec:
  authenticationMethods:
    - method: Custom
      customSettings:
        # ...
    - method: ServiceAccountToken
      serviceAccountTokenSettings:
        # ...
    - method: X509
      x509Settings:
        # ...
The earlier example specifies custom and SAT. When a client connects, MQTT broker attempts to authenticate the client using the specified methods in the given order custom then SAT.
- MQTT broker checks if the client's credentials are valid for custom authentication. Since custom authentication relies on an external server to determine validity of credentials, the broker considers all credentials relevant to custom auth and forwards them to the custom authentication server.
- If the custom authentication server responds with
PassorFailresult, the authentication flow ends. However, if the custom authentication server isn't available, then MQTT broker falls back to the remaining specified methods, with SAT being next. - MQTT broker tries to authenticate the credentials as SAT credentials. If the MQTT username starts with
K8S-SAT, MQTT broker evaluates the MQTT password as a SAT.
If the custom authentication server is unavailable and all subsequent methods determined that the provided credentials aren't relevant, then the broker denies the client connection.
Configure authentication method
You can add authentication methods such as X.509, SAT, or custom to authentication policies.
To add an authentication method to a policy:
In the Azure portal, navigate to your IoT Operations instance.
Under Azure IoT Operations resources, select MQTT Broker.
Select the Authentication tab.
Choose an existing authentication policy or create a new one.
Add a new method by selecting Add method.
Choose the method type from the dropdown list then select Add details to configure the method.

To learn more about each of the authentication options, see the next sections for each method.
For more information about enabling secure settings by configuring an Azure Key Vault and enabling workload identities, see Enable secure settings in Azure IoT Operations Preview deployment.
X.509
A trusted root CA certificate is required to validate the client certificate. Client certificates must be rooted in this CA for MQTT broker to authenticate them. Both EC and RSA keys are supported, but all certificates in the chain must use the same key algorithm. If you're importing your own CA certificates, ensure that the client certificate uses the same key algorithm as the CAs. To import a root certificate that can be used to validate client certificates, import the certificate PEM as ConfigMap under the key client_ca.pem. For example:
kubectl create configmap client-ca --from-file=client_ca.pem -n azure-iot-operations
To check the root CA certificate is properly imported, run kubectl describe configmap. The result shows the same base64 encoding of the PEM certificate file.
kubectl describe configmap client-ca -n azure-iot-operations
Name:         client-ca
Namespace:    azure-iot-operations

Data
====
client_ca.pem:
----
-----BEGIN CERTIFICATE-----
<Certificate>
-----END CERTIFICATE-----


BinaryData
====
Once the trusted client root CA certificate and the certificate-to-attribute mapping are imported, enable X.509 client authentication by adding it as one of the authentication methods as part of a BrokerAuthentication resource linked to a TLS-enabled listener.
Certificate attributes for authorization
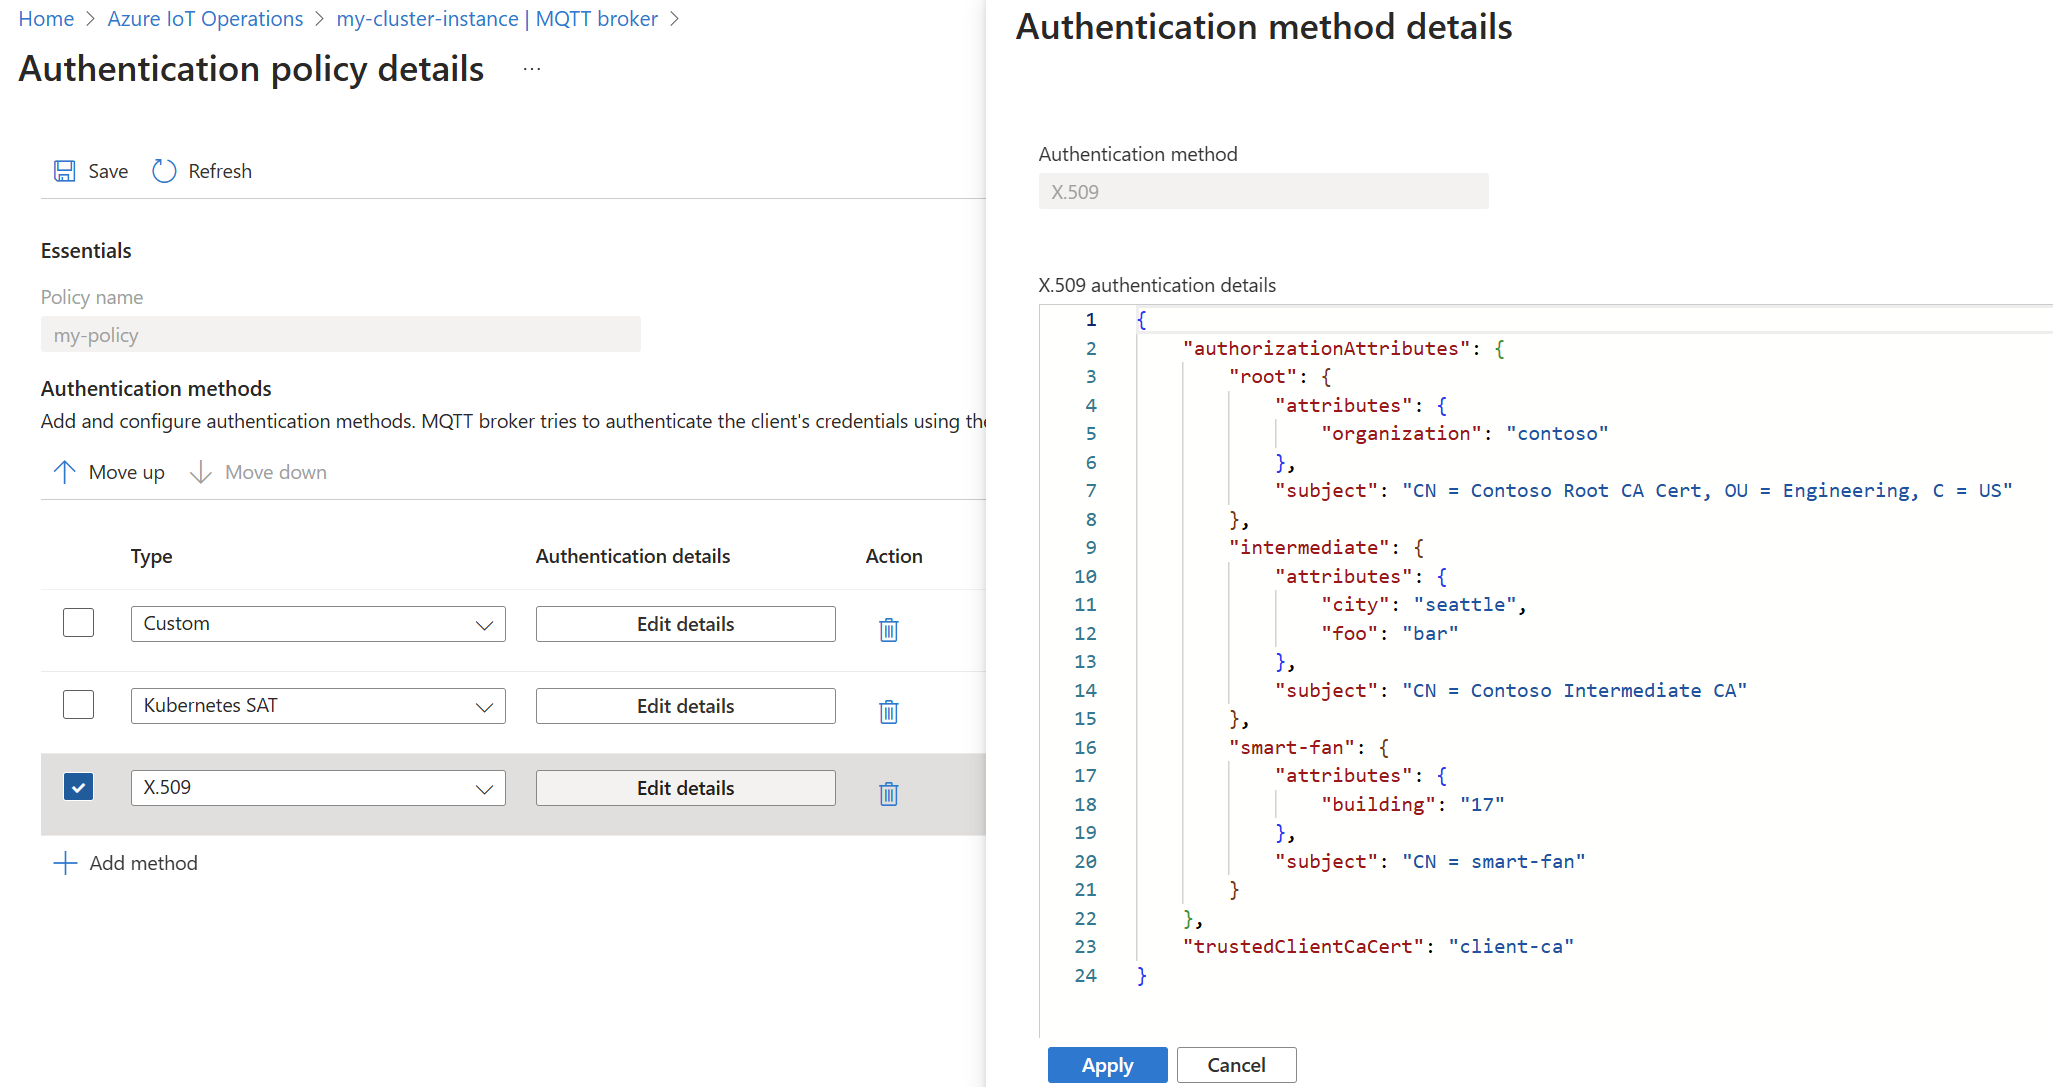
X.509 attributes can be specified in the BrokerAuthentication resource, and they're used to authorize clients based on their certificate properties. The attributes are defined in the authorizationAttributes field.
In the Azure portal, navigate to your IoT Operations instance.
Under Azure IoT Operations resources, select MQTT Broker.
Select the Authentication tab.
Choose an existing authentication policy or create a new one.
Add a new method by selecting Add method.
Choose the method type X.509 from the dropdown list then select Add details to configure the method.

In this example, every client that has a certificate issued by the root CA CN = Contoso Root CA Cert, OU = Engineering, C = US or an intermediate CA CN = Contoso Intermediate CA receives the attributes listed. In addition, the smart fan receives attributes specific to it.
The matching for attributes always starts from the leaf client certificate and then goes along the chain. The attribute assignment stops after the first match. In previous example, even if smart-fan has the intermediate certificate CN = Contoso Intermediate CA, it doesn't get the associated attributes.
Authorization rules can be applied to clients using X.509 certificates with these attributes. To learn more, see Authorize clients that use X.509 authentication.
Connect mosquitto client to MQTT broker with X.509 client certificate
A client like mosquitto needs three files to be able to connect to MQTT broker with TLS and X.509 client authentication. For example:
mosquitto_pub -q 1 -t hello -d -V mqttv5 -m world -i thermostat \
-h "<IOT_MQ_EXTERNAL_IP>" \
--cert thermostat_cert.pem \
--key thermostat_key.pem \
--cafile chain.pem
In the example:
- The
--certparameter specifies the client certificate PEM file. - The
--keyparameter specifies the client private key PEM file. - The third parameter
--cafileis the most complex: the trusted certificate database, used for two purposes:- When mosquitto client connects to MQTT broker over TLS, it validates the server certificate. It searches for root certificates in the database to create a trusted chain to the server certificate. Because of this, the server root certificate needs to be copied into this file.
- When the MQTT broker requests a client certificate from mosquitto client, it also requires a valid certificate chain to send to the server. The
--certparameter tells mosquitto which certificate to send, but it's not enough. MQTT broker can't verify this certificate alone because it also needs the intermediate certificate. Mosquitto uses the database file to build the necessary certificate chain. To support this, thecafilemust contain both the intermediate and root certificates.
Understand MQTT broker X.509 client authentication flow
The following are the steps for client authentication flow:
- When X.509 client authentication is turned on, connecting clients must present its client certificate and any intermediate certificates to let MQTT broker build a certificate chain rooted to one of its configured trusted certificates.
- The load balancer directs the communication to one of the frontend brokers.
- Once the frontend broker received the client certificate, it tries to build a certificate chain that's rooted to one of the configured certificates. The certificate is required for a TLS handshake. If the frontend broker successfully built a chain and the presented chain is verified, it finishes the TLS handshake. The connecting client is able to send MQTT packets to the frontend through the built TLS channel.
- The TLS channel is open, but the client authentication or authorization isn't finished yet.
- The client then sends a CONNECT packet to MQTT broker.
- The CONNECT packet is routed to a frontend again.
- The frontend collects all credentials the client presented so far, like username and password fields, authentication data from the CONNECT packet, and the client certificate chain presented during the TLS handshake.
- The frontend sends these credentials to the authentication service. The authentication service checks the certificate chain once again and collects the subject names of all the certificates in the chain.
- The authentication service uses its configured authorization rules to determine what attributes the connecting clients has. These attributes determine what operations the client can execute, including the CONNECT packet itself.
- Authentication service returns decision to frontend broker.
- The frontend broker knows the client attributes and if it's allowed to connect. If so, then the MQTT connection is completed and the client can continue to send and receive MQTT packets determined by its authorization rules.
Kubernetes Service Account Tokens
Kubernetes Service Account Tokens (SATs) are JSON Web Tokens associated with Kubernetes Service Accounts. Clients present SATs to the MQTT broker to authenticate themselves.
MQTT broker uses bound service account tokens that are detailed in the What GKE users need to know about Kubernetes' new service account tokens post. Here are the salient features from the post:
Launched in Kubernetes 1.13, and becoming the default format in 1.21, bound tokens address all of the limited functionality of legacy tokens, and more:
- The tokens themselves are harder to steal and misuse; they're time-bound, audience-bound, and object-bound.
- They adopt a standardized format: OpenID Connect (OIDC), with full OIDC Discovery, making it easier for service providers to accept them.
- They're distributed to pods more securely, using a new Kubelet projected volume type.
The broker verifies tokens using the Kubernetes Token Review API. Enable Kubernetes TokenRequestProjection feature to specify audiences (default since 1.21). If this feature isn't enabled, SATs can't be used.
Create a service account
To create SATs, first create a service account. The following command creates a service account called mqtt-client.
kubectl create serviceaccount mqtt-client -n azure-iot-operations
Add attributes for authorization
Clients authentication via SAT can optionally have their SATs annotated with attributes to be used with custom authorization policies. To learn more, see Authorize clients that use Kubernetes Service Account Tokens.
Enable Service Account Token (SAT) authentication
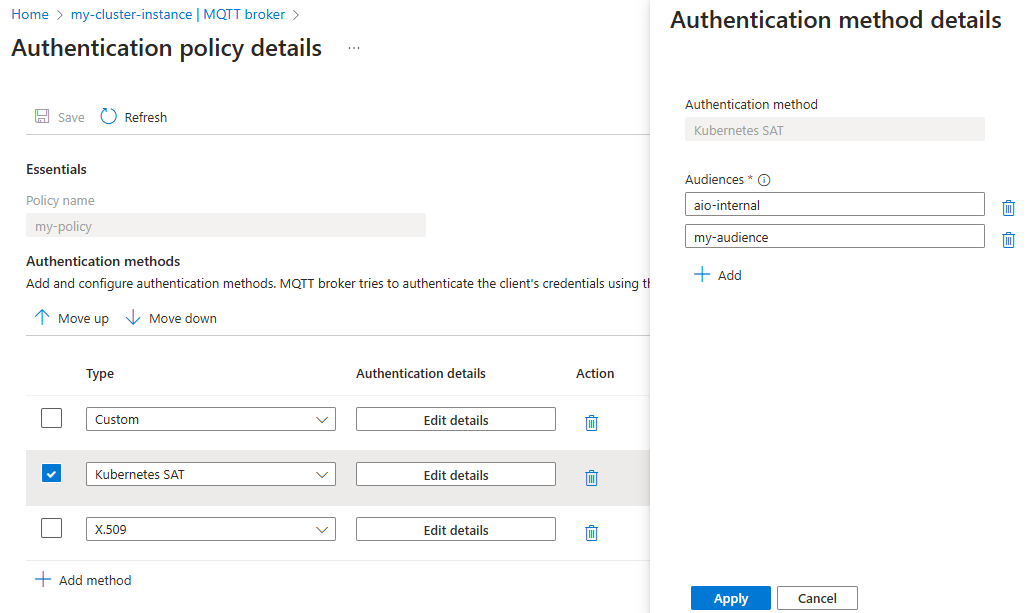
Modify the authenticationMethods setting in a BrokerAuthentication resource to specify ServiceAccountToken as a valid authentication method. The audiences specifies the list of valid audiences for tokens. Choose unique values that identify the MQTT broker service. You must specify at least one audience, and all SATs must match one of the specified audiences.
- In the Azure portal, navigate to your IoT Operations instance.
- Under Azure IoT Operations resources, select MQTT Broker.
- Select the Authentication tab.
- Choose an existing authentication policy or create a new one.
- Add a new method by selecting Add method.
- Choose the method type Kubernetes SAT from the dropdown list then select Add details to configure the method.

Test SAT authentication
SAT authentication must be used from a client in the same cluster as MQTT broker. Only enhanced authentication fields are permitted. Set authentication method to K8S-SAT and authentication data to the token.
The following command specifies a pod that has the mosquitto client and mounts the SAT created in the previous steps into the pod.
apiVersion: v1
kind: Pod
metadata:
  name: mqtt-client
  namespace: azure-iot-operations
spec:
  serviceAccountName: mqtt-client
  containers:
  - image: efrecon/mqtt-client
    name: mqtt-client
    command: ["sleep", "infinity"]
    volumeMounts:
    - name: mqtt-client-token
      mountPath: /var/run/secrets/tokens
  volumes:
  - name: mqtt-client-token
    projected:
      sources:
      - serviceAccountToken:
          path: mqtt-client-token
          audience: my-audience
          expirationSeconds: 86400
Here, the serviceAccountName field in the pod configuration must match the service account associated with the token being used. Also, The serviceAccountToken.audience field in the pod configuration must be one of the audiences configured in the BrokerAuthentication resource.
Once the pod is created, start a shell in the pod:
kubectl exec --stdin --tty mqtt-client -n azure-iot-operations -- sh
Inside the pod's shell, run the following command to publish a message to the broker:
mosquitto_pub --host aio-broker --port 18883 --message "hello" --topic "world" --debug --cafile /var/run/certs/ca.crt -D CONNECT authentication-method 'K8S-SAT' -D CONNECT authentication-data $(cat /var/run/secrets/tokens/broker-sat)
The output should look similar to the following:
Client (null) sending CONNECT
Client (null) received CONNACK (0)
Client (null) sending PUBLISH (d0, q0, r0, m1, 'world', ... (5 bytes))
Client (null) sending DISCONNECT
The mosquitto client uses the service account token mounted at /var/run/secrets/tokens/broker-sat to authenticate with the broker. The token is valid for 24 hours. The client also uses the default root CA cert mounted at /var/run/certs/ca.crt to verify the broker's TLS certificate chain.
Refresh service account tokens
Service account tokens are valid for a limited time and configured with expirationSeconds. However, Kubernetes automatically refreshes the token before it expires. The token is refreshed in the background, and the client doesn't need to do anything other than to fetch it again.
For example, if the client is a pod that uses the token mounted as a volume, like in the test SAT authentication example, then the latest token is available at the same path /var/run/secrets/tokens/mqtt-client-token. When making a new connection, the client can fetch the latest token and use it to authenticate. The client should also have a mechanism to handle MQTT unauthorized errors by fetching the latest token and retrying the connection.
Custom authentication
Extend client authentication beyond the provided authentication methods with custom authentication. It's pluggable since the service can be anything as long as it adheres to the API.
When a client connects to MQTT broker and custom authentication is enabled, MQTT broker delegates the verification of client credentials to a custom authentication server with an HTTP request along with all credentials the client presents. The custom authentication server responds with approval or denial for the client with the client's attributes for authorization.
Create custom authentication service
The custom authentication server is implemented and deployed separately from MQTT broker.
A sample custom authentication server and instructions are available on GitHub. Use this sample as a template can and starting point for implementing your own custom authentication logic.
API
The API between MQTT broker and the custom authentication server follow the API specification for custom authentication. The OpenAPI specification is available on GitHub.
HTTPS with TLS encryption is required
MQTT broker sends requests containing sensitive client credentials to the custom authentication server. To protect these credentials, communication between MQTT broker and custom authentication server must be encrypted with TLS.
The custom authentication server must present a server certificate, and MQTT broker must have a trusted root CA certificate for validating the server certificate. Optionally, the custom authentication server might require MQTT broker to present a client certificate to authenticate itself.
Enable custom authentication for a listener
Modify the authenticationMethods setting in a BrokerAuthentication resource to specify Custom as a valid authentication method. Then, specify the parameters required to communicate with a custom authentication server.
This example shows all possible parameters. The exact parameters required depend on each custom server's requirements.
spec:
  authenticationMethods:
    - method: Custom
      customSettings:
        # Endpoint for custom authentication requests. Required.
        endpoint: https://auth-server-template
        # Optional CA certificate for validating the custom authentication server's certificate.
        caCertConfigMap: custom-auth-ca
        # Authentication between MQTT broker with the custom authentication server.
        # The broker may present X.509 credentials or no credentials to the server.
        auth:
          x509:
            secretRef: custom-auth-client-cert
            namespace: azure-iot-operations
        # Optional additional HTTP headers that the broker will send to the
        # custom authentication server.
        headers:
          header_key: header_value
Disable authentication
For testing, you can disable authentication for a broker listener port. Disabling authentication isn't recommended for production environments.
- In the Azure portal, navigate to your IoT Operations instance.
- Under Azure IoT Operations resources, select MQTT Broker.
- Select the broker listener you want to edit from the list.
- On the port you want to disable authentication, select None in the authentication dropdown.
Client disconnect after credentials expire
MQTT broker disconnects clients when their credentials expire. Disconnect after credential expiration applies to all clients that connect to the MQTT broker frontends including:
- Clients authenticated with SATs disconnect when their SAT expires
- Clients authenticated with X.509 disconnect when their client certificate expires
- Clients authenticated with custom authentication disconnect based on the expiry time returned from the custom authentication server.
On disconnect, the client's network connection is closed. The client won't receive an MQTT DISCONNECT packet, but the broker logs a message that it disconnected the client.
MQTT v5 clients authenticated with SATs and custom authentication can reauthenticate with a new credential before their initial credential expires. X.509 clients can't reauthenticate and must re-establish the connection since authentication is done at the TLS layer.
Clients can reauthenticate by sending an MQTT v5 AUTH packet.
SAT clients send an AUTH client with the fields method: K8S-SAT, data: <token>.
Custom authentication clients set the method and data field as required by the custom authentication server.
Successful reauthentication updates the client's credential expiry with the expiry time of its new credential, and the broker responds with a Success AUTH packet. Failed authentication due to transient issues cause the broker to respond with a ContinueAuthentication AUTH packet. For example, the custom authentication server being unavailable. The client can try again later. Other authentication failures cause the broker to send a DISCONNECT packet and close the client's network connection.